Trying Out SIP From Twilio Using FreeSWITCH
Time to read:
March 19, 2013
Written by
This post is part of Twilio’s archive and may contain outdated information. We’re always building something new, so be sure to check out our latest posts for the most up-to-date insights.

Twilio recently introduced the new noun which lets you directly dial a SIP server from your Twilio app. But what if you don’t have a SIP server? In this post I’ll show you how you can set up and use FreeSWITCH, a free, cross platform and open source communication server that includes SIP capabilities, to try out the noun.
A Quick Intro to SIP
Before you get started setting up the FreeSWITCH server, it’s useful to have at least a cursory understanding of what SIP is. SIP, or session initiation protocol, is a common protocol used by IP Telephony equipment and software to create and manage communication sessions between two parties. It’s similar to HTTP in that it uses a request/response transaction model and borrows elements from HTTP like headers and response codes. SIP also draws from the SMTP protocol as well using the familiar user:pass@host:port format to identify individual clients.
Many different platforms from unified communication vendors like Cisco and Avaya to platforms like Asterisk and FreeSWITCH use the SIP protocol to connect with other systems.
Installing FreeSWITCH
FreeSWITCH is available in both a Windows and Mac version and the FreeSWITCH wiki contains lots of installation information for both platforms. If you want to run Linux, you can of course download and compile from source or there are binary distributions or a number of different distributions including SuSe and Ubuntu.
For my tests I create a new Ubuntu 120.4 LTE micro instance on Amazon EC2 and installed FreeSWITCH from source using the instructions on the FreeSWITCH wiki.
If you choose to install FreeSWITCH on Windows, you can either build the binaries from the C++ source using Visual Studio, or you can download an MSI installer which is built weekly. Again for my tests, I created a new Windows Server 2012 micro instance on Amazon EC2 and installed FreeSWITCH using the MSI and enabled the FreeSWITCH windows service to start automatically:

Note: After I ran the MSI, I had to move the sound files from the location that they were installed up one folder in order for FreeSWITCH to locate them.
Finally, if you choose to install FreeSWITCH into an EC2 instance, you will need to make sure you open the correct ports and make the appropriate changes to the FreeSWITCH config files. All of this is well documented in the wiki.
For my installation, I also assigned each EC2 instance an elastic IP.
Of course of you run into any problems installing FreeSWITCH you can always go post a question to the FreeSWITCH mailing list (or search the list archive), or hop into the FreeSWITCH IRC channel: #freeswitch.
Testing Your FreeSWITCH Install
Once you’ve got FreeSWITCH installed, you can test to make sure it’s working properly by using a SIP client such as XLite, which is a free and cross platform SIP softphone. Install it onto a client machine and set the account settings to connect to the FreeSWITCH server and to answer to a specific extension.

Now you can try to connect to your FreeSWITCH server by dialing some of FreeSWITCH’s interesting extensions to try out. Additionally, if you install XLite on a second system and configure it to answer to a different extension, you can test a client to client connection.
SIP clients are available for iPhone and Android as well so you can test making SIP calls to and from those platforms.
Connecting with Twilio
So now that you have a SIP server running, you can try out the new noun. To get started, head over to http://twimlbin.com which is a free static TwiML hosting service and create a new Twimlbin. You’ll use the Twimlbin to host the short snippets of TwiML used to test out Twilios new capabilities. Of course if you have your own host or some other way you want to serve up TwiML you’re welcome to use those instead of Twimlbin.
Lets start by looking first at an example that lets someone call a Twilio number and get forwarded to extension 1004 on the FreeSWITCH server. To do this you would use this TwiML:
You can see that you use the SIP noun within the verb, much like you use any other verb, including the noun to tell Twilio what you want to dial. Additionally, in this case because the FreeSWITCH server requires inbound communication to be authenticated, you also need to use the SIP nouns username and password attributes. Now you can go configure a Twilio number with your Twimlbin URL and give it a call.
Note: If you don’t have a Twilio account, when you sign up we’ll give you a phone number you can configure.
Dial your Twilio phone number from a normal phone, and it should begin to ring the XLite softphone, assuming you have configured it as extension 1004. That’s it. Pretty simple, huh?
FreeSWITCH Dialplans
When a SIP client initiates a connection with my FreeSWITCH server, how does the server know what to do with that connection? Or more concretely, how exactly did FreeSWITCH know that it should route the connection 1004@XXX.XXX.XXX.XXX to your softphone as opposed to some other kind of endpoint. That’s where dialplans come in. Dialplans are used to route a dialed call to its appropriate endpoint, which can be a traditional extension, voicemail, interactive voice response (IVR) menu or other compatible application. They are extremely flexible.
When you dial your FreeSWITCH server, it looks for a dialplan to execute. Thankfully, FreeSWITCH comes configured with a default dialplan which when found gets passed information about the incoming call. The variables that are avilable to a dialplan are called channel variables. You can use channel variables to create conditions that determine the flow of a call, or pass the variables into the applications defined in the Actions of an extension. FreeSWITCH makes it really easy to see all of the channel variables available to you in a call. From XLite simply dial 9192 and FreeSWITCH will execute the Info application. The Info app dumps a list of the channel variables to the server console.
Note: If you are running FreeSWITCH as a Windows Service you can start the fs_cli.exe application which allows you to connect a console to the running FreeSWITCH service. On Linux run the ./fs_li command.
The image below shows part of the list of variables that are output to the console when you dial 9192.

You can see that there are lots of variables that provide you information about who is connecting and who they are trying to reach, all of which you can use in your dialplan to create very complex call flows.
Passing data using SIP Headers and URI Parameters
One of the more powerful aspects of dialing a SIP server from Twilio is the ability to pass data from your Twilio application to your SIP server. Doing this allows you to create application experiences that appear to be seamless to callers, despite the fact that they in fact are provided by very different systems.
One way to send data from Twilio to your SIP server is by inserting headers into the SIP request. The SIP specification includes a set of well-defined headers, but like in HTTP, it also allows custom headers to be included, and like in HTTP custom headers not defined by the spec (aka “X headers”) are prefixed with the X- prefix.
A second way to send data is by appending parameters to the SIP URI. Like headers, SIP also defines a set of well-defined parameters that can be included in the SIP URI, as well as allowing custom parameters to be included.
Lets start by taking a look at how Twilio uses SIP headers to include call metadata in the SIP request, how you can include your own custom headers and also how you can use the header data in a FreeSWITCH dialplan. By default Twilio includes three custom headers when we send the SIP request:
- X-Twilio-ApiVersion – Includes the version of the Twilio API
- X-Twilio-AccountSid – The unique ID of the account responsible for creating this call
- X-Twilio-CallSid – A 34 character string that uniquely identifies this leg of the call
FreeSWITCH makes it easy to use these headers in our dialplan because by default it looks for any header prefixed with X- and creates a variable out of that. We can see this if call the FreeSWITCH server from Twilio and have it connect to the same extension we used earlier to print the available variables.

You can see highlighted in image the variables prefixed with variable_sip_h_X-Twilio. These are the names of the variables the FreeSWITCH created based on the Twilio headers.
Using these variables, you can create conditions in the dialplan that check the header values and perform some action of the condition evaluates to True. For example, below is a dialplan extension that checks to see if the Account SID passed in by Twilio matches a value hard coded in the dialplan. If it does match, FreeSWITCH plays a tone:
In cases where the Account SID does not match, FreeSWITCH will continue to the next extension defined in the dialplan, or hang up if there are not more extensions defined.
In addition to the headers added autmatically by Twilio, its easy to add your own custom SIP headers to the request. To do this you use the familiar query string syntax with the SIP URI you defined to specify header key/value pairs . When you specify the address in the noun, you are actually specifying a URI (Uniform Resource Locator). And like HTTP, where you can include query string data at the end of a URL, SIP allows you to include key/value pairs of data at the end of the Uri. For example, if you wanted to change the extension that FreeSWITCH rang based on the source of the customer, you could simply append a query string key/value pair to the SIP URI:
Twilio will take the query string parameters and change each key/value pair into a custom header and include it in its SIP request. Since Twilio automatically adds the X- prefix to each key, FreeSWITCH will see the headers and create a new channel variable for each, letting you use them in a dialplan:
Here I’ve created two new extensions in my dialplan to match the possible values for my custom header. FreeSWITCH will evaluate each extension until it finds one that matches.
Another way to pass data to a SIP server from Twilio is by using URI Parameters. Let’s look at an example that shows how to specify one of SIPs well-defined URI parameters, the transport parameter. By default Twilio is going to use UDP to transmit SIP requests, but SIP also supports transmitting them using TCP. To tell Twilio to use TCP, you simply set the transport parameter in the SIP URI:
This can be useful if you need to connect to a system like Microsoft Lync server, which only supports SIP traffic using TCP.
You can also specify you own custom URI parameters by including a semi-colon delimited list of key/value pairs as part of the URI:
These parameters are parsed by FreeSWITCH and included in a variable named sip_request_params as shown in the image below:

And like the other variables shown in this post, you can use the parameters in your dialplan to create different conditions or pass them into an Actions application.
The power to include headers opens up significant capabilities for you. And while so far in the post the TwiML has been static, it’s entirely possible to generate the TwiML, including headers, dynamically.
Receiving Headers
Finally, while in this post we’ve looked at a number of ways that Twilio can pass metadata to your SIP server, it’s also possible to have your SIP server include custom headers in the responses it sends to Twilio, and like FreeSWITCH, Twilio will automatically read headers that are prefixed with X- and pass those to the URL specified in the verbs action attribute or the nouns call screening attribute.
To create response headers in FreeSWITCH, you set channel variables inside of your dialplan. FreeSWITCH offers a few different types of channel variables which allow you control which responses include your headers. For example, to include a header in the OK response, you can use the sip_rh_ prefix:
To capture this header in your application, set the Url parameter in the noun:
When Twilio receives the OK response from FreeSWITCH, it will look for any X- headers and pass those to your application by including them in its request to to the Uri specified in the Url parameter, appending the prefix SipHeader_ to the header name.
In this case I have set the url parameter to a url from the website http://requestb.in. This site will capture the request Twilio makes to it and allow you to see all of the headers and content included in the request.
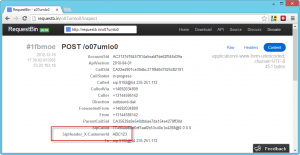
The image above shows a custom response header named X-CustomerId returned from FreeSWITCH and captured by requestb.in when Twilio requests the Url:
Conclusion
The new noun adds the powerful ability for your applications integrate with other SIP infrastructure like FreeSWITCH in an easy and straight forward manner. Use it to perform simple call bridging, or get fancy by passing metadata between your apps.
Hit up the FreeSWITCH site today to set up your own server and start playing with.
And as always, I’d love your comments or questions on this post. Feel free to email me at devin@twilio.com or tweet me at @devinrader.

Related Resources
Twilio Docs
From APIs to SDKs to sample apps
API reference documentation, SDKs, helper libraries, quickstarts, and tutorials for your language and platform.
Resource Center
The latest ebooks, industry reports, and webinars
Learn from customer engagement experts to improve your own communication.
Ahoy
Twilio's developer community hub
Best practices, code samples, and inspiration to build communications and digital engagement experiences.