Browser Messaging with WebRTC and the Twilio Data Track API
Time to read:
January 29, 2021
Written by

Twilio Programmable Video is a robust service based on the WebRTC open standard, which enables real-time communications for web browsers and mobile devices. One of the lesser known features of WebRTC is the ability to stream data in addition to video and audio. The data track is often used to send information that annotates or complements the media streams, but it is also possible to build applications that do not use video and audio and just use the WebRTC data tracks to communicate.
In this tutorial you are going to learn how to use the Twilio Data Track API while building a small browser-to-browser messaging application. The application is going to have a small Flask back end dedicated to the generation of Access Tokens, and a vanilla JavaScript front end that will be able to send real-time notifications to other running instances of the application.

Requirements
To build this project you will need:
- Python 3.6 or newer. If your operating system does not provide a Python interpreter, you can go to python.org to download an installer.
- A free or paid Twilio account. If you are new to Twilio get your free account now!
- A web browser that is compatible with the Twilio Programmable Video service (see below for a list of them).
Supported web browsers
Even though the application that you are going to build in this tutorial does not make use of any video or audio features, the data track functionality is part of WebRTC and is supported by Twilio through the Programmable Video APIs and the twilio-video.js library. Here is the current list of supported browsers:
- Android: Chrome, Firefox, UC Browser, and Android Browser
- iOS: Safari
- Linux: Chrome and Firefox
- macOS: Chrome, Firefox, Safari and Edge
- Windows: Chrome, Firefox and Edge
Check the Programmable Video documentation for the latest supported web browser list.
Project structure
Let’s begin by creating the directory where you will store your project files. Open a terminal window, find a suitable parent directory, and then enter the following commands:
Following a basic Flask application structure, create two sub-directories, static and templates, to store the files that will be served to the client.
Setting up your Twilio account
Before you begin the coding portion of this tutorial you are going to configure your Twilio account.
The Twilio Account SID
Log in to your Twilio account to access the Console. In this page you can see the "Account SID" assigned to your account. This is important, as it identifies your account and is used for authenticating requests to the Twilio API.
Because you are going to need the Account SID later, click the “Copy to Clipboard” button on the right side. Then, create a new file named .env in your text editor (note the leading dot) and write the following contents to it, carefully pasting the Account SID where indicated:
The Twilio API Key
The Programmable Video service also requires a Twilio API Key for authentication, so in this step you will add one to your Twilio account. To begin, navigate to the API Keys & Tokens section of the Twilio Console. There, click the Create API key button.
Enter data-track as the name of the key (or any name you like), leave Region set to its default value and Key type set as "Standard", and then click the "Create" button.
Now you will be presented with the details of your newly created API Key. The “SID” and “SECRET” values are used for authentication along with the Account SID value that you saved earlier.
Open the .env file again in your text editor, and add two more lines to it to record the details of your API key:
Once you have your API key safely written to the .env file you can leave the API Keys page. Note that if you ever lose your API Key Secret you will need to generate a new key.
The information contained in your .env file is private. Make sure you don’t share this file with anyone. If you plan on storing your project under source control it would be a good idea to configure this file so that it is ignored, because you do not want to ever commit this file by mistake.
Creating a Python virtual environment
Following best practices, you are going to create a virtual environment where you will install your Python dependencies.
If you are using a UNIX or macOS system, open a terminal and enter the following commands to do the tasks described above:
For those of you following the tutorial on Windows, enter the following commands in a command prompt window:
The last command uses pip, the Python package installer, to install the three Python packages that you are going to use in this project, which are:
- The Twilio Python Helper library, to work generate access tokens for the front end
- The Flask framework, to create the web application
- Python-dotenv, to import the contents of your .env file as environment variables
For your reference, at the time this tutorial was released these were the versions of the above packages and their dependencies:
Generating access tokens
The Twilio Programmable Video service uses a token based authentication system that is designed to make access from the web browser secure. The role of the back end is to generate short-lived access tokens that the front end can use to authenticate and gain access to Twilio services.
Without further ado, below you can see the complete back end, written in Python and using the Flask framework. Copy the code below to a file named app.py and store it in your project directory:
The / endpoint returns an HTML template called index.html. This is going to be the top-level component of the front end. For now the index.html file does not exist, you’ll create it later.
The /token endpoint returns a token in a JSON response. In a real application the front end would send authentication information so that the server can decide if it wants to grant access or not by checking the user’s credentials against a user database. In this example there are no users, so the back end generates a random username to use in the token.
The generated tokens are valid for one hour from the time they are generated. This can be changed with the ttl=3600 argument, which gives the validity time of the token in seconds. The longest allowed duration for a token is 24 hours.
The instances of the application are all going to join a single room, called ping-room. For this example this is sufficient, but a more complex application could use many different rooms and assign clients to different rooms to receive different notifications.
If you are interested in learning more about token generation for Twilio APIs, check out the Generating Twilio Access Tokens in Python tutorial or the official documentation.
Starting the web server
Even though it is still early in the life of the project, you are ready to start the web server. If you are using a Linux or macOS computer, use the following command:
If you use a Windows computer, use the following commands instead:
You should see something like the following output once the server starts:
If you are unable to start the web server, make sure that you are in the webrtc-data-track directory, which is the top-level folder of your project. Make sure that your virtual environment is also activated and that you have installed all the Python dependencies as shown above.
At this point you have the web server running and ready to receive requests. Flask’s debug mode is enabled, which will trigger the web server to restart itself whenever changes are made to the application, so you can now leave this terminal window alone while you code the front end portion of the project.
Page layout
The project is going to use a very simple design. Copy the following HTML page and store it in a file named index.html in the templates sub-directory, where Flask will look for it when the render_template() function is called.
The page design includes a title, a status message, a name entry field and a button. There is also an empty <ul> element at the end, where pings from other instances of the application will be dynamically added.
The page also includes the twilio-video.js library and a ping.js script that you will add later in this tutorial.
You can see how the page looks below:
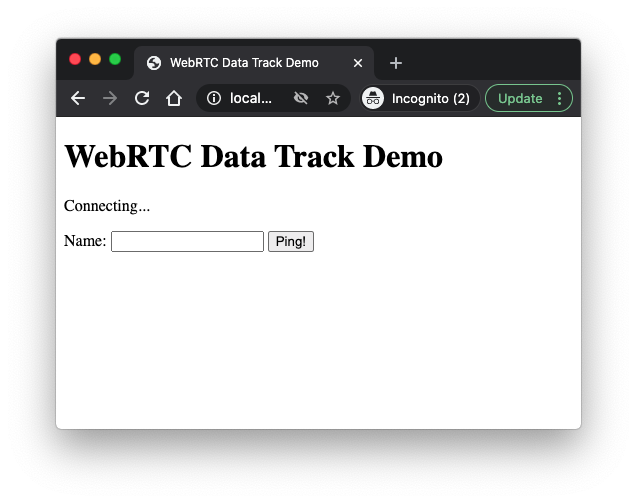
If you’ve been following along, after you save the index.html in the templates directory you can open your web browser and type http://localhost:5000 in the address bar and you should see this page.
Connecting to the Programmable Video service
Now the fun part of building the front end begins! Create a new file named ping.js in the static sub-directory.
You will begin by writing a connect() function that connects the client to the Twilio Programmable Video service. This involves a few steps:
- Obtaining an Access Token from the Flask back end
- Connecting to Programmable Video
- Setting up event handlers to be notified when other instances of the application connect
Below you can see the definition of connect(), along with an auxiliary function setMessage(). Copy the code below to your ping.js file:
The dataTrack constant is initialized with a local data track object, from the twilio-video.js library. This is the object that represents the data track that sends data to other participants in the room.
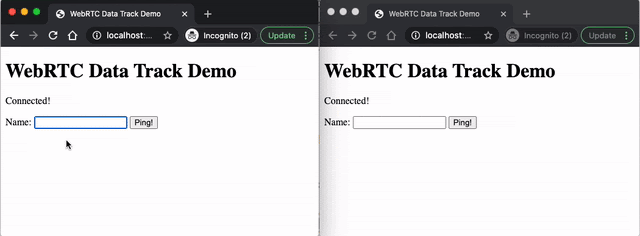
The setMessage() function is a short auxiliary function that modifies the text in the <p id="message">. As you have seen, this <p> element is initialized with the text Connecting…. With this function, the text can be changed to either Connected! or Connection Error depending on the results of the connection attempt.
The connect() function starts by sending a POST request to the /token endpoint in the Flask backend. The response is a JSON payload with the format {"token": "access-token-here"}.
Once the payload is decoded, the contents are stored in the data local variable.
Next, an attempt is made to connect to the Twilio Programmable Video room. The room name is part of the token and was added as part of a VideoGrant object defined by the Python back end.
By default, the Twilio.Video.connect() function is designed to start local video and audio tracks, so for this application the tracks option is added to override the default and just connect the local data track created at the beginning. The message in the page is updated with the success or failure of this connection.
If the connection is successful, the next step is for the application to be aware of other participants that could be sending notifications. There are two scenarios here that need to be handled. First, the application needs to hook up with other participants that are already connected. Second, it needs to set up a handler to be notified when new participants join.
The handling of a remote participant is done by a function called participantJoined() that you will write in the next section.
Handling remote participants
Each remote participant will have one or more published tracks. A participant can add and remove tracks dynamically during a connection. Here, there is a similar situation to that of participants, where the application needs to look at existing tracks and also set up a handler to be notified of new tracks that are published at a later time.
The participantConnected() function that you see below calls the trackSubscribed() handler for each existing track. It also sets this function up as a handler in case a track is published later on. The trackSubscribed() function checks if the track is a data track. If it is, the function adds a handler for the message event on the track, which will trigger on incoming data sent by the remote participant.
Copy this code at the end of the ping.js file:
Sending and receiving data
The final part of this application involves sending and receiving data through the data tracks.
Add a sendPing() function to ping.js that sends the contents of the text input box over the local data track:
Then add a receivePing() function that appends the received text to the <ul id="pings"> element as an additional <li> element:
Finally, to tie everything together, configure the sendPing() function as a handler for the click event on the button, and call the connect() function to initiate a connection:
Testing the application
With the Flask server still running, open two or more browser windows or tabs and navigate to http://localhost:5000 on all of them. Go to any of the instances, type a name in the text entry field, and click the Ping button. Immediately you will see the notifications on all the other instances!
Conclusion
The complete code for the application feature in this tutorial is available on this GitHub repository.
I hope that after you complete this tutorial you’ll have a lot of cool ideas to put the WebRTC data track to good use. If you need some inspiration, you can find ways in which you can extend the tutorial application below.
A simple extension is to implement a real-time chat service. All the elements that you need to do this are covered in this tutorial, you just need to change the layout of the page a little bit.
Another interesting option is to implement the concept of publishers and subscribers (pub/sub) using the techniques shown above. In this tutorial every application instance acts as a publisher (when the ping button is clicked) and as a subscriber (when the message event is received).
It isn’t really necessary that the application performs both functions, depending on the case an instance of the application can be just a publisher, or just a subscriber, and when it is a subscriber it can choose which room(s) to subscribe to. This can make for a very powerful pub/sub system with multiple channels.
I can’t wait to see what you build!
Miguel Grinberg is a Python Developer for Technical Content at Twilio. Reach out to him at mgrinberg [at] twilio [dot] com if you have a cool Python project you’d like to share on the Twilio blog!

Related Resources
Twilio Docs
From APIs to SDKs to sample apps
API reference documentation, SDKs, helper libraries, quickstarts, and tutorials for your language and platform.
Resource Center
The latest ebooks, industry reports, and webinars
Learn from customer engagement experts to improve your own communication.
Ahoy
Twilio's developer community hub
Best practices, code samples, and inspiration to build communications and digital engagement experiences.