Building Conversational AI for Owl Car with Twilio, Segment, and Google Cloud CCAI
Time to read:
November 03, 2022
Written by
Reviewed by
At Twilio SIGNAL 2022, we shared a 45 minute CX Spotlight Session on the Virtuous Cycle of Customer Engagement, where we showcased an example technology-forward auto manufacturer, Owl Car, that built a Conversational AI strategy with Twilio and Google. Owl Car used Twilio’s native 1-click voice integration with Google Dialogflow CX (CCAI) to power a Conversational AI experience with Twilio Voice, Twilio Segment, and Flex.
In this blog post, Google’s Hussain Chinoy and I will demonstrate how the 1-click integration works, help you understand the power of the integration, show you how to best utilize the powerful features Twilio provides for communications, and show you the best practices for building a robust, secure, and scalable Virtual Agent on Dialogflow CX. In the process, we’ll embellish on the Owl Car example to share more details about the use case and the design paradigms Owl Car used for their implementation, which you can then use as a reference point for building your own solutions that expand on the example we’re providing here.
Prerequisites
To get the most out of this blog post, we recommend you follow our 1-click onboarding guide for the minimum required setup (approximately 5-10 minutes). Follow this guide through the section where you set up a phone number to connect to the Virtual Agent, then come back to this blog post to continue on from there.
Once you’re finished with the guide, you should have a base configuration where you can place calls with Twilio to your Virtual Agent. Of course this is just a basic setup, but it's the appropriate jump off point to continue on with a deep dive on Owl Car, and perhaps create scaffolding for you to build on with your own use cases!
How the Twilio Voice integration is configured
The Twilio differentiation - simplicity and extensibility
So you may be asking yourself: what is it that separates Twilio from the competition in this example? Can’t I integrate any telephony partner with Google CCAI?
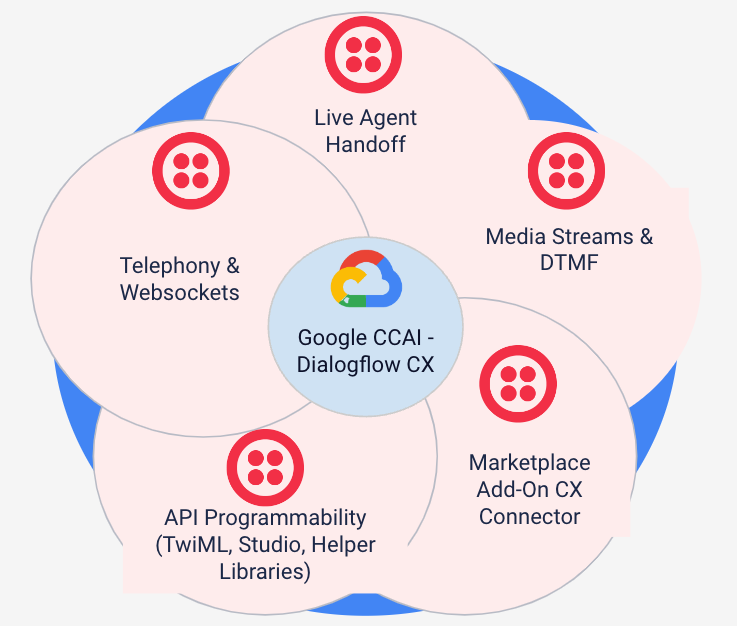
Twilio has dedicated the past few years towards building a robust integration that includes what we believe to be the deepest and most powerful feature set on the market. When you choose Twilio and Google, you’re not just settling for a standard IVR experience – you are getting best-in-class integration features that you can tweak and tune to each individual customer’s experience, and you can use the power of programmability to drive deep personalization woven into your Conversational AI design.
Let’s go through the features of Twilio’s native integration at a high level:
- 1-click integration experience - In just a few steps as part of a guided workflow, we take you from a Dialogflow CX Virtual Agent to being fully connected over the voice channel with Twilio. Behind the scenes, Twilio is provisioning a Dialogflow CX Marketplace Add-On Connector and a Studio Flow, abstracting the complex steps required to make this happen on both the Twilio and Google side. Once the 1-click setup is complete, you can go back and make changes to the CX Connector to tailor the experience specific to your requirements [we will talk about this later].
- Hosted Telephony and Websockets - We’ve built (and we host) this complex infrastructure so that you don’t have to. All the infrastructure overhead is transparent, so you can focus entirely on designing and building great customer engagement.
- DTMF and Barge-In Support - We’ve updated our services to allow for DTMF (dual tone multi-frequency) capture and Barge-In support out of the box. You can control these features directly from your Dialogflow CX Console.
- Marketplace Add-On Connector - We built this Connector natively in the Twilio Console so our customers have a simple UX to manage their connections to Dialogflow CX Virtual Agents. The Connector keeps it simple, giving you the basics to configure your Virtual Agent. You can change any settings directly in the Connector after installing via the 1-click integration experience.
- Dedicated Studio Widget - We built this widget for use cases where customers want to leverage Twilio’s Serverless platform to manage their integration and call flow logic. The Studio Widget is the core of a solution built on Serverless, as you can connect both incoming and outgoing calls directly in a no-code way for simpler Conversational AI experiences, and a low-code way if you want to build more robust solutions. The low-code tooling we provide within the widget itself is extensive, as you can modify the statusCallback URL, define session parameters that can be sent to Dialogflow, override the default configuration options from the Connector, and even provide custom configuration overrides to dictate things like which Speech-to-Text (STT) model is used, or configure Custom Voices. We’ve also built in native transitions, including the ability to use Live Agent Handoff to an agent on Twilio Flex.
- TwiML and Helper Library Support - Rather than using the Twilio Studio Widget, if you want your own application to handle the logic of connecting to the Virtual Agent, we’ve built support for this within TwiML and our Helper Libraries. This option is useful for more sophisticated developer teams that want to control application logic, drive custom events, integrate with backend systems directly, and so on. Our docs page shows you how to get started with different examples across TwiML and Helper Library supported programming languages.
As you can see, we’ve created a native experience that is quick and efficient to set up for basic use cases, and yet very powerful to configure at your own pace as you start to build and iterate on your Conversational AI implementation.
The Dialogflow CX Add-On Connector
After completing the 1-click integration, you will be able to navigate in the Twilio Console to Add-ons -> Installed -> [BETA] Dialogflow CX Connector to view the configuration. The settings shown represent configuration that was specified during the 1-click process (i.e., Unique Name, Voice Name, Language, Welcome Intent, and Sentiment Analysis). However, there are also configurations that are performed behind the scenes as part of the 1-click process (i.e., Conversation Profile ID, Project ID, and Agent Location).
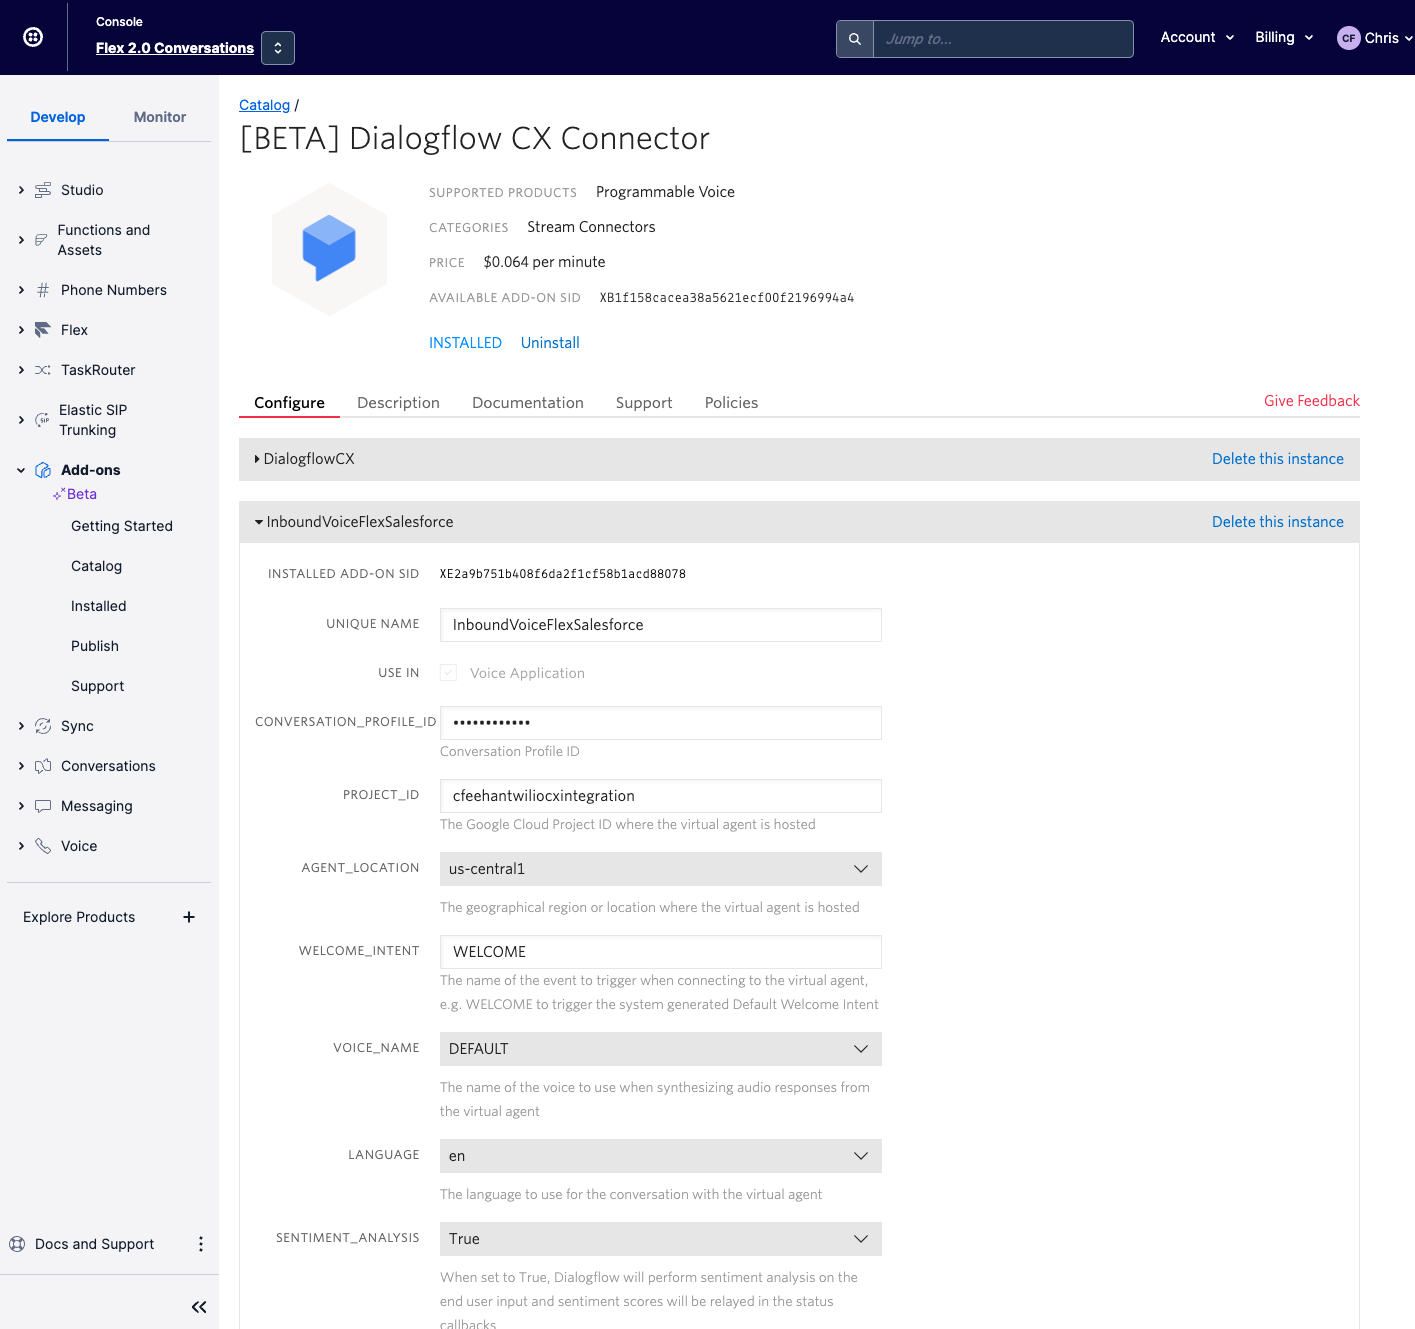
Depending on what you configured during the 1-click process, your default settings here will vary. If you configure multiple Dialogflow CX Virtual Agents with the 1-click integration, you will see each of those instances reflected. We will show how we override these settings with our Studio Flow in a moment.
The native Studio Flow widget
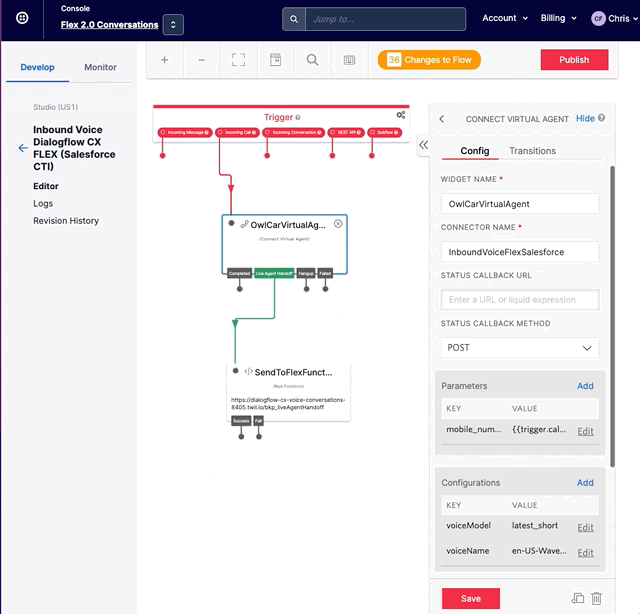
After completing the 1-click integration, you will also be able to navigate in the Twilio Console to Studio -> Flows, and click on the name of the flow you provided in the 1-click setup to view the configuration.
You’ll notice that the 1-click process already connected an incoming call to our Connect Virtual Agent widget. From our 1-click onboarding guide, you should have already set up a phone number and tested your ability to place calls that utilize this setup. This is the starting point for creating a tailored implementation like we’ve done for Owl Car.
In the screenshot below, notice that for Owl Car, we’re utilizing Twilio’s ability to pass in Custom Parameters into the Dialogflow CX Virtual Agent using the widget’s native capabilities. Specifically, we provide a key/value pair for the inbound caller’s mobile number, which allows us to perform a lookup on the customer’s Segment Profile downstream using a Dialogflow CX Webhook.
We’re also doing a few simple configuration overrides that enhance and personalize the experience. Because our Studio Flow is specific to Owl Care customer care, we want to use a specific Google voice and speech model that meets specific requirements for that experience. In this case, we use Google’s “latest_short” speech model, and we override the default voice that was configured during the 1-click to use an English (US) female wavenet voice.
We’re also utilizing Twilio’s native Live Agent Handoff transition. Connecting that transition to a Twilio Function call gathers the call details with the VirtualAgent, sets up the proper routing configuration, and then enqueues the call to Twilio Flex to be handled by the appropriate Owl Car Customer Care Specialist.
Building with Google Dialogflow CX
Intro to Dialogflow CX design
The beauty of Conversational AI is that it has the potential to be a massive improvement in automated engagement with your customers. The key word there is “potential”, as it requires a thoughtful design and a robust implementation to leverage the benefits of its powerful features.
For Owl Car, we looked at how typical vehicle call centers or customer care IVRs are organized. We documented the menu system navigation paths a caller could take, and then we deconstructed those IVRs by breaking them down into the universe of topics an end-customer may be calling in about. Focusing on metrics that benefit both the customer care teams and Owl Car’s customers, such as addressing the most common questions asked and those that allow the customer to get the information needed as quickly as possible, help design a conversational experience that can be trusted as it improves.
Thankfully, you are not alone figuring out how to design and build your Virtual Agent experience. Twilio and Google have expertise in this area, and we can lend a hand to jump start your design and development through experienced thought leadership as stewards of our joint native solution. In the next few sections, we’ll take you through the most important building blocks of Dialogflow CX and use Owl Car as a reference.
The building blocks of Dialogflow CX - Flows, Pages, and Intents
Dialogflow CX’s visual conversational design surface is structured around an AI-driven navigation graph. The core feature of the graph is a concept called Flows.
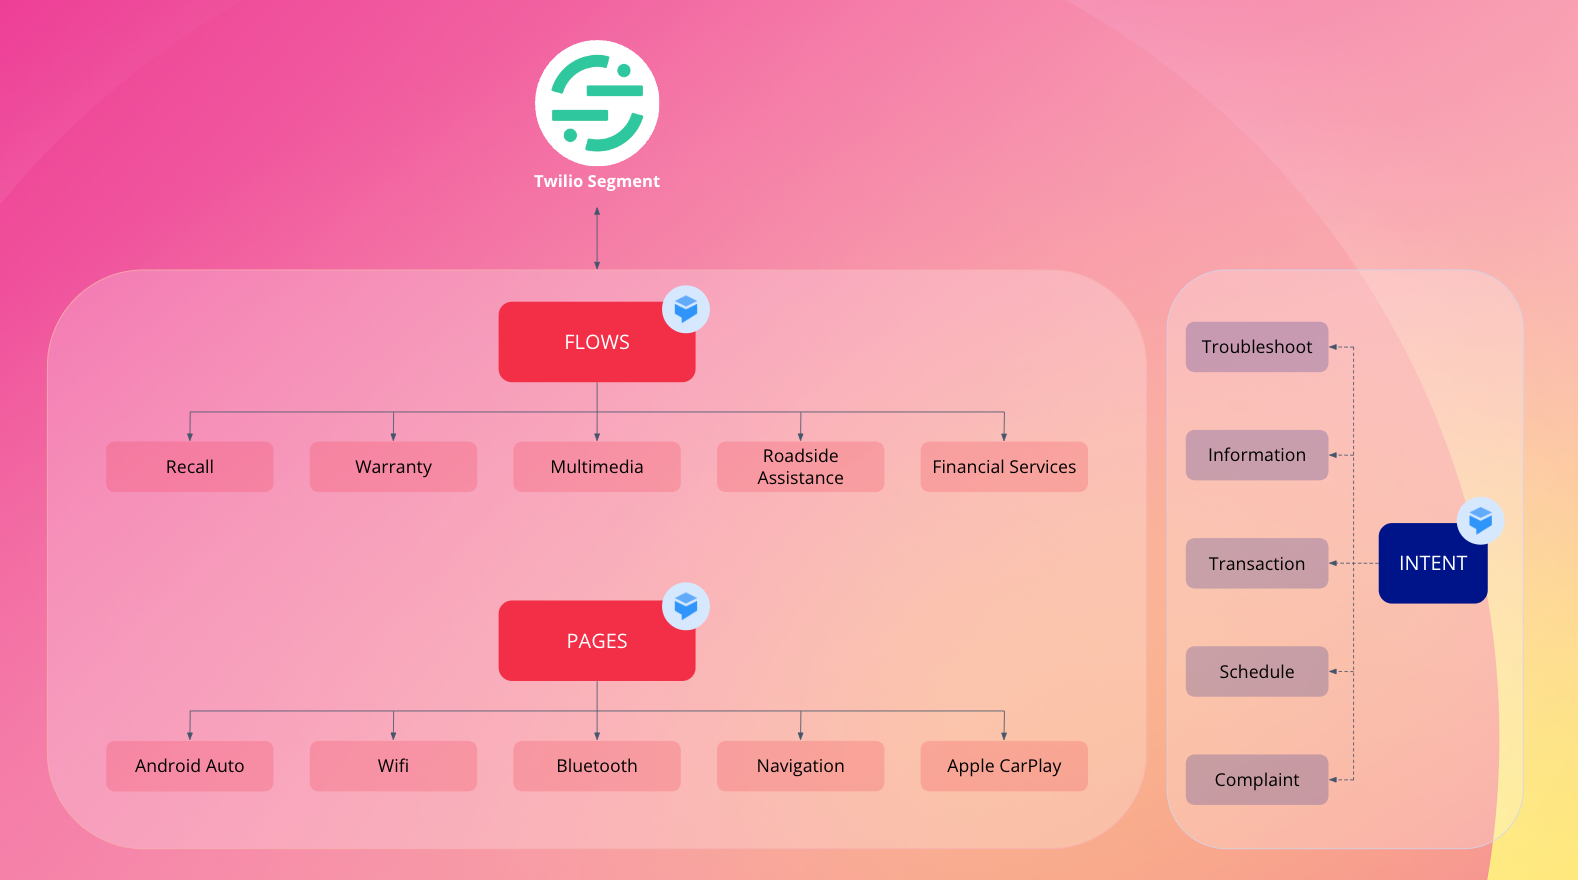
Flows represent similar use cases that a user might ask about and the various states that might elicit a response or an action from the bot. Dialogflow CX’s AI determines the intent of a user’s interaction and routes between Pages within a Flow or even to another Flow. Pages represent a response to a user or an opportunity to ask for more information.
In the Owl Car demo in the CX Spotlight Session on the Virtuous Cycle of Customer Engagement, we see a few aspects of Flows and Pages in action. When the user dials in to the help line, the Start Page on the Default Start Flow quickly checks an external datasource to identify the customer via phone number and personalizes the greeting with the user’s name. When the user asks about their bluetooth problem, the CX virtual agent determines the Intent and routes the user to the Multimedia Flow to assist.
Leveraging Entities and form filling
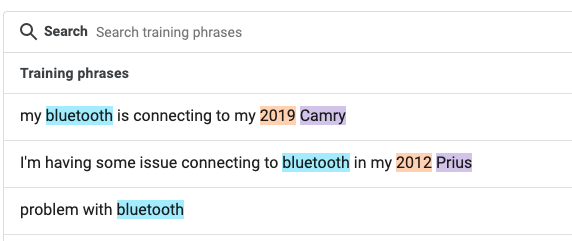
Bot designers can specify both Intents and Entities to direct the Dialogflow CX AI to better assist in fulfilling users desires: Intents are phrases that resolve to a general categorization of topic and Entities are synonyms for distinct items that Owl Car’s support team needs. For example, if someone says something like “I’d like some help with steps to connect bluetooth to my 2010 Camry” the items “bluetooth” “camry” and “2010” are extracted as the Entities Topic, Vehicle, and VehicleYear, respectively, which can then be used in Pages for decision making. The phrase, overall, is categorized as a Troubleshoot-Multimedia intent and directed to not only the Multimedia Flow, but because the Entity for Topic (“bluetooth”) was captured, the specific Page within the Flow for Bluetooth. The capacity for Dialogflow to not only determine user Intent but also extract details streamlines the user’s experience - they’re not repeating information they’ve already given.
Combining the Segment provided data about the user and the Entity detection in the Intent routed the virtual agent to the Multimedia Flow and the Bluetooth page directly, instead of making the user repeat information that would be inferred in a great customer experience. If some of the information wasn’t provided, the bot could also enhance the form filling experience by providing custom questions for each required entity.
The Dialogflow CX UI Designer Experience
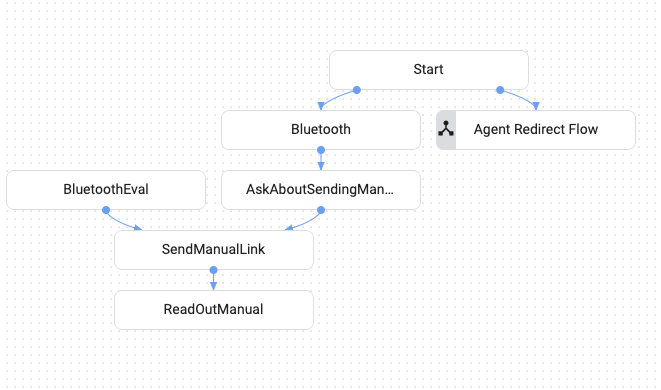
Shown below is part of Multimedia Flow in the Dialogflow CX designer surface. This Flow goes through a few steps to ask the user if they’d like a reference to the user manual and is able to send that information via SMS by calling a webhook to Twilio Programmable SMS service or, if the user asks to be escalated to an agent, it can escalate as well.
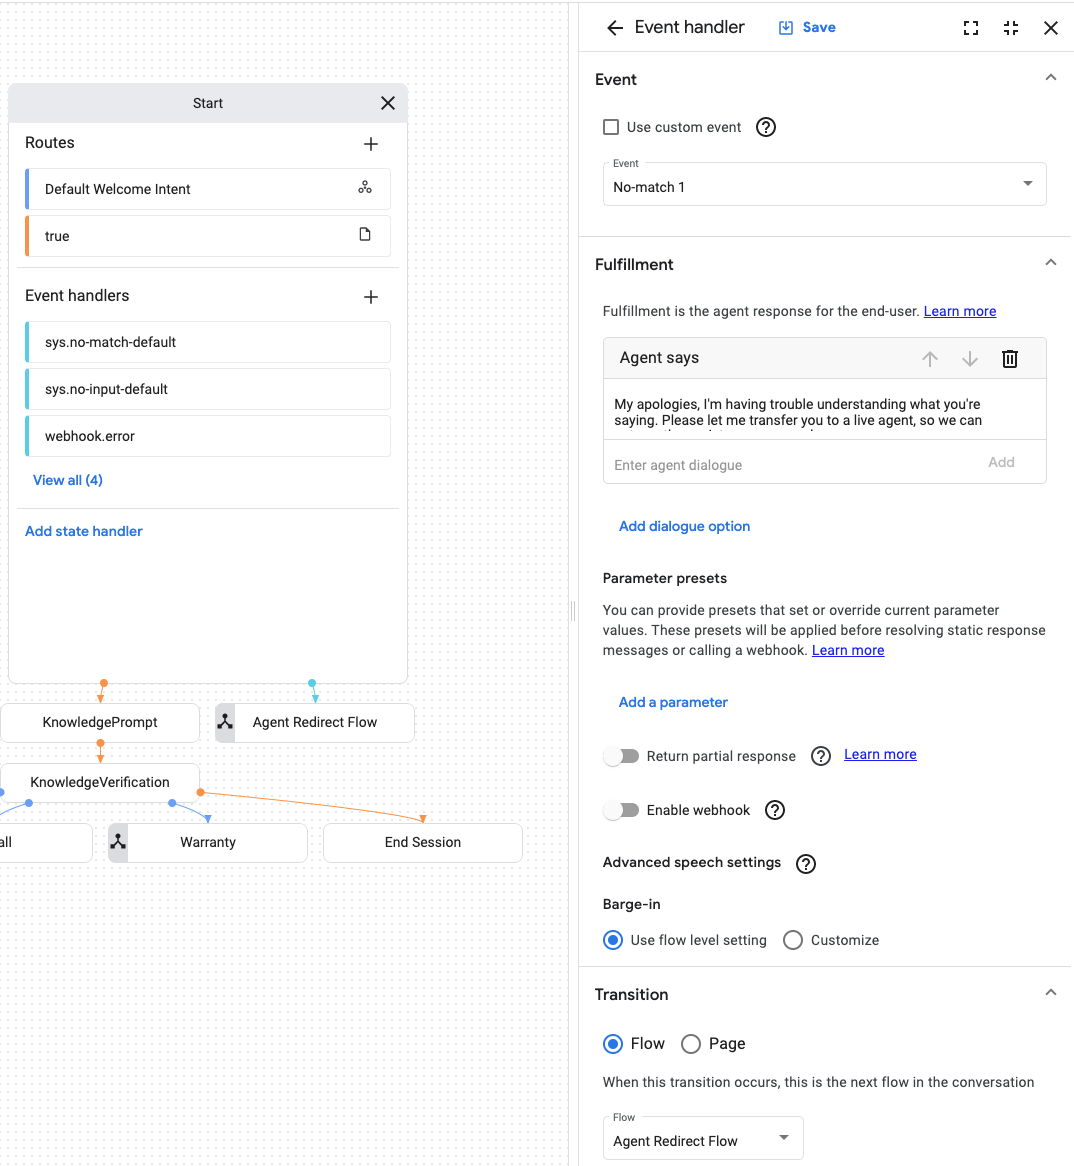
In the case of a misunderstanding, the last thing that users want is to have an endless loop of “can you say that again?”. With Dialogflow CX’s built-in system events, you can design the proper conversational repair. For example, using NO MATCH events, which fire when the virtual agent can’t determine the intent of the user’s statement, the conversational designer can customize the Event handler to escalate to a live agent after 2 tries (up to 6 are possible).
Using Dialogflow CX webhooks with Segment
When introducing external function calls or data dips into secure resources, we understand most customers will expect a thoughtful design paradigm and robust tooling to ensure communications are properly secured. Given the sensitivity inherent in pulling customer data into any cloud processing, we’ll address how Owl Car was built. We recommend you also follow some of the best practices listed here to ensure your own solutions are hardened for enterprise grade security.

Dialogflow CX’s ability to create a smooth conversational design is enhanced by the ability to access external data via webhooks and use those results as parameters for decision making. Security is an important consideration when communicating between different systems, and Twilio and Dialogflow both give you great starting points and additional options here. First, all traffic is required to be HTTPS, so if you’re connecting from Dialogflow to Twilio Functions or even Google Cloud Functions, it’ll have to be HTTPS. Next, you have the option to add on either – or both – a Bearer token for standard OAuth2/JWT based security or use Mutual TLS with opencustom certificates.
There are also some best practices for security when designing and creating a serverless function to provide rich data to your conversational application. When a user calls into Owl Car virtual agent, before responding to the user, Dialogflow CX calls a Cloud Function webhook that contacts Segment over HTTPS for the relevant customer data. This Cloud Function uses Segment’s best practice of using an Access Token in the call to the Segment API. Since an Access Token is an asset that should be secured, we also added it to Cloud Secret Manager so that the Cloud Function won’t have the secret embedded in the function or an environment variable. Instead, it’s looked up in real time via the IAM restricted Service Account principal for the Cloud Function. Managing the security asset outside the Cloud Functions allows for a security friendly lifecycle – it can now be rotated, altered, and audited outside of the Cloud Function deployment lifecycle.
Additionally, in the design of the virtual agent, there are other options for authenticating the user versus the current example of immediately identifying the user via the incoming phone number. Understanding the conversational experience that you want to achieve – aligned with your brand goals such as transparency – will dictate which options you’d want to choose for security-sensitive interactions.
There are a couple other examples of authentication you can employ with your own solutions:
- You can use the SMS channel as either a first or second factor of authentication via Twilio SMS, similar to how SMS was used to send the user manual via text during the SIGNAL Spotlight session.
- Twilio Verify, a SMS authentication with one-time code verification, was shown in The Virtuous Cycle of Customer Engagement when the user was transferred to the Owl Car agent.
- Voice biometrics such as Google Cloud Speaker ID can be used with Dialogflow CX’s in-built enrollment Flow to inform and have the user opt-in. A validation Flow could then subsequently perform active (via passphrase) or passive (via voice print) verification or identification that can be used to make an authentication decision.
We hope this gives you some perspective on how you can securely connect to the Segment Customer Engagement Platform from your Dialogflow CX Agent to pull in dynamic customer data. We think bringing in real-time customer data from Segment in your Conversational AI has massive potential to help serve your customers with context and empathy by utilizing that data in your CX design.
Building your own Conversational AI with Twilio and Google
The things we’ve shared in this blog post only scratch the surface of what you can build with Twilio and Google Dialogflow CX. With Twilio and Google, you can create amazing Conversational AI experiences for your customers.
Throughout this blog we’ve linked to resources that will help make you successful, but our Twilio and Google sales teams are equipped to help you build these experiences tailored to your specific needs. Please reach out to your Twilio sales team directly or via our contact sales page, and we will talk through how you can build on this amazing integration!
Chris Feehan is a Contact Center Solutions Architect at Twilio. Chris supports some of Twilio’s largest Enterprise customers building innovative solutions across multiple Twilio products. Chris has also been heavily involved in partnerships with R&D building concept architectures and solution blueprints for strategic partner integrations, including most recently helping support the productization of Twilio’s native voice integration to Google Dialogflow CX CCAI.
Hussain Chinoy is a Customer Engineer at Google Cloud with a focus on Application Modernization (APIs, Integrations, and Serverless, oh my!) and Conversational AI applications, including CCAI, Dialogflow CX, and natural language models.


Related Resources
Twilio Docs
From APIs to SDKs to sample apps
API reference documentation, SDKs, helper libraries, quickstarts, and tutorials for your language and platform.
Resource Center
The latest ebooks, industry reports, and webinars
Learn from customer engagement experts to improve your own communication.
Ahoy
Twilio's developer community hub
Best practices, code samples, and inspiration to build communications and digital engagement experiences.