Building A Tamagotchi With Twilio SMS
Time to read:
June 10, 2015
Written by
This post is part of Twilio’s archive and may contain outdated information. We’re always building something new, so be sure to check out our latest posts for the most up-to-date insights.

Growing up in an apartment can be hard, but when you live in a big city like Sao Paulo it becomes even harder. Space is always limited and your parents are never really keen on adding anyone else unless strictly necessary. My parents weren’t different, so as soon as I mentioned I wanted a dog, they gave me a Tamagotchi instead.
I am not a parent myself but think a Tamagotchi is the dream of every parent; it sure was my parents dream. They hardly take up any space or incur any costs. Kids keep it in their pockets and in the process learn to be more responsible and take care of something. The only real mess they can make is run out of batteries.
I was about 9 when my parents gave me one. I was skeptical since all I wanted was a dog, but as soon as I pulled up the battery tab my “pet” was alive! Now I had to take care of it. I named it Tommy.
I’d spend big chunks of my day making sure Tommy was happy, fed and clean. Forget about it for a day and it would end up very upset, or worse still – it would end up dead.
If that’s not responsibility, I don’t know what responsibility is.
Fast forward to a couple of months back when I was visiting my mum and she handed me a box with some of my old belongings. This was the moment we all dread where our mums tell us to keep our crap in our own houses. Among some of my childhood memories was Tommy, which by now was out of battery.

For a moment I thought I should just go out and get myself some batteries. But then it occurred to me that Tamagotchis were all about the experience of taking care of something, and I should be able to write software that replicates this experience on my phone. That’s why today we are going to create our own SMS-powered Tamagotchi.
What you’ll need
- A Twilio account and one Twilio phone number
- Node.js and NPM installed. While we’ll be using Node.js in this example, Twilio also has helper libraries for C#, Java, Ruby, PHP and Python right here.
If you don’t want to go through the entire build, feel free to checkout the code repository here.
Run it now!
Want to skip right to playing with your Tamagotchi like it was 1999? I’ve got you covered:

If you want to understand how everything works and add your own personal touch to your Tamagotchi, follow the next step-by-step instructions.
The Embryo
We’ll begin by creating a new node application that uses Hapi as it’s application framework. You can have this application running from any directory, I have mine running from ~/Projects/JavaScript/twilio-tamagotchi.
From within that folder run the following:
You will then be asked several questions but at the end of the process your package.json file will have been created, which will save us from having to create it manually. You can leave most of the options as default, except for the entry point, which we will change to be app.js.
Create a new file called app.js and add the following to it.
A simple “hello world” in Node.js and Hapi is as simple as that. We require our dependencies, create a new server and tell it where to run from, add any routes we may want, and start the server we just created.
The example above has only one route that when accessed will return “hello world” to the screen. We will modify this route later as it will be the entry point that will allow us to interact with our Tamagotchi.
Back in the terminal, run the following:
This will install all the dependencies we need including Hapi and the Twilio library for Node.js. Notice a new folder called node_modules was automatically created. This contains all of our dependencies.
Now run the following from terminal again:
In your browser, navigate to http://localhost:8000, and you should see a “hello world” message on the screen. Congratulations, you are ready to start building your Tamagotchi.
The Egg is Laid
Now that we have our basic application up and running, we need to start writing the logic that will bring our Tamagotchi to life.
We will start off by creating a configuration file called config.js that will be used throughout this tutorial. Having that will make it easier for us to reuse values later on.
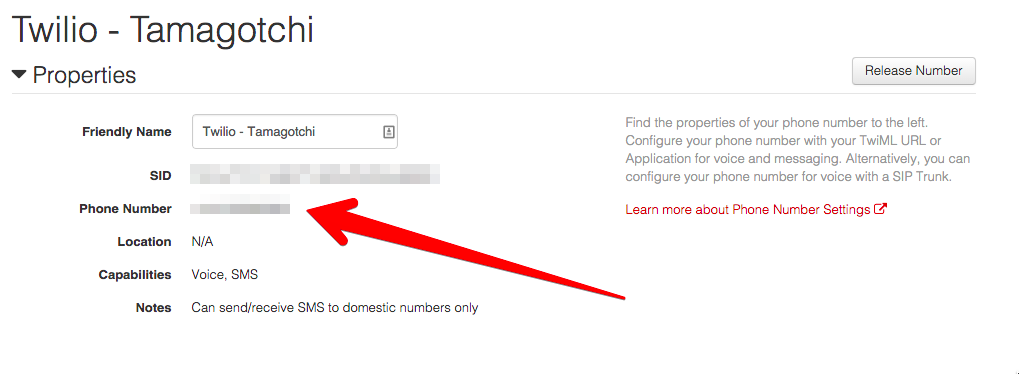
Now we need a Twilio number in order to configure the number variable. To do that, go to Numbers in your Twilio account dashboard and buy one in your country of choice if you don’t already have one.
Copy that number and add it to the TWILIO_NUMBER environment variable, or directly into your config file if you prefer.
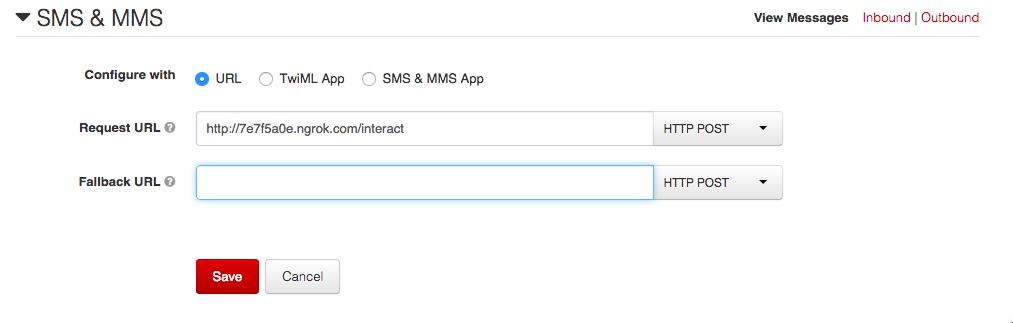
Under SMS & MMS we will change the Request URL to point to your local environment. Because Twilio needs access to it, we will use ngrok to make our local environment accessible externally. My colleague Kevin Whinnery wrote a great blog post on getting up and running with ngrok.
Once Ngrok is running it will acquire a unique URL for your web application that will make it accessible to Twilio.

Copy this URL and paste it as follows to the Request URL and then save:
Now create a new file called tamagotchi.js. This file will be the object responsible for the life of our tamagotchi. All the interactions will happen here.
Tamagotchi is the main object and constructor for our pet. It has attributes that relate to the life and well being of our little creature. It gets initialised with a name which you will provide later, the food and game options, and some default attributes.
Just under the last line of the code above we will add some of the actions we can use to interact with our pet. These are all the things that will keep it happy.
Now that we have defined all the actions to enable us to communicate with our pet, we need to make sure we have a way of getting information about its wellbeing. So we will implement some status functions.
All the methods above read information about our pet and return it in a readable way.
At the very bottom of the file, add an exports so our object is made available outside of this file.
The Incubation
We have created all possible interactions we need with our Tamagotchi, but we need to make sure we can talk to it. We will use SMS for that, so create a new file called message.js and add the following to it.
Above we are creating one method to initiate SMS messages via Twilio’s REST API and one to reply to interaction messages via TwiML. Both methods take a message as a parameter
It’s time to refactor the file app.js so it communicates with our tamagotchi. Open that file and add the following three new requirements at the top.
Change the server creation to use the port from our config file instead of having it hardcoded. This will be useful if we later want to change the port in which our tamagotchi runs.
We are also adding three variables – tamagotchi, pet and food. These will be used later on.
We no longer need our “hello world” route, so you can get rid of that and replace it with our much more robust route, which orchestrates the entire communication with our tamagotchi.
Now we need to know when our pet is alive and ready to be named. We do this by changing the server startup at the end of the file as follows.
The Egg Hatches
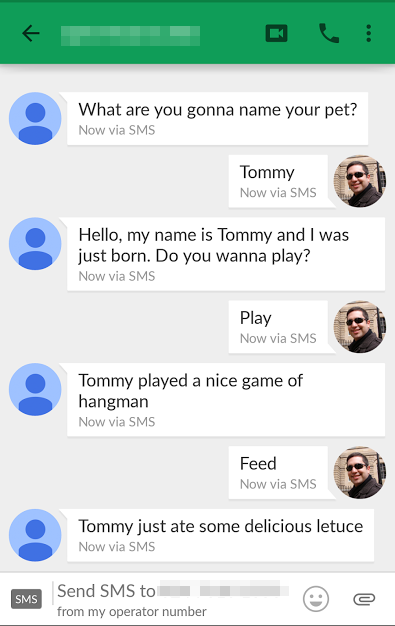
Go back to terminal and run your application again. It should now send you a text message asking you to name your pet. You will now be able to interact with it and check its status.
Adding Personality
No being is truly complete unless it has personality. Our pet is no different so how about we give it some intelligence?
Let’s go ahead and add some random actions to it, so whenever we interact with it, our pet also does something else randomly, that way it can go to sleep and wake up on its own and also learn to do some of its necessities without any human intervention.
Open up the tamagotchi.js file and add a requirement for message.js.
Also, add the following two functions right after the checkHappiness function.
The odds function adds some randomness and returns a boolean based on two numbers and the chance of something happening. So for example odds(10,2) means there is an 80% chance a number above 2 will be picked between 0 and 10.
The aiSimulate function uses a mix of our pet’s current status and some randomness from the odds function. That way nothing is really predictable when it comes to the life of our pet.
Open up app.js and at the bottom of our route where we send the messages, add a call to the aiSimulate function:
Now every time you interact with your pet, it will also do something else randomly based on its status and mood.
It’s alive!
Just like in the 90’s, you can take your pet with you wherever you want. You will get a new pet every time you restart your application, and as long as you remember to feed, play and clean it, it should live a very happy life. It will also bring you back the joys of taking care of your own little creature.
How about adding MMS so you also get a picture of your pet to get that extra peace of mind about how it feels? Can you make it even more intelligent and interactive? Which other old school toys can you replicate with software and Twilio?
I would love to see what you come up with. Reach me up on Twitter @marcos_placona, by email on marcos@twilio.com or +MarcosPlacona on G+ to tell me about it.

Related Resources
Twilio Docs
From APIs to SDKs to sample apps
API reference documentation, SDKs, helper libraries, quickstarts, and tutorials for your language and platform.
Resource Center
The latest ebooks, industry reports, and webinars
Learn from customer engagement experts to improve your own communication.
Ahoy
Twilio's developer community hub
Best practices, code samples, and inspiration to build communications and digital engagement experiences.