How to Control Your Raspberry Pi with Twilio SMS
Time to read:
October 12, 2022
Written by
Reviewed by

Did you know that you can remotely control your Raspberry Pi with an SMS?
Yes, you read it right: “you can remotely control your Raspberry Pi with SMS”.
It has always been entertaining to control a device with SMS. Not only is it really cool, but it can be very useful in many situations.
By using Twilio Programmable SMS coupled with a Python program, you can achieve this goal.
In this tutorial, you will discover how it is possible to control your Raspberry Pi with SMS, how to design such a system, and finally, with a practical example, you can learn how to control light by SMS.
How is it possible?
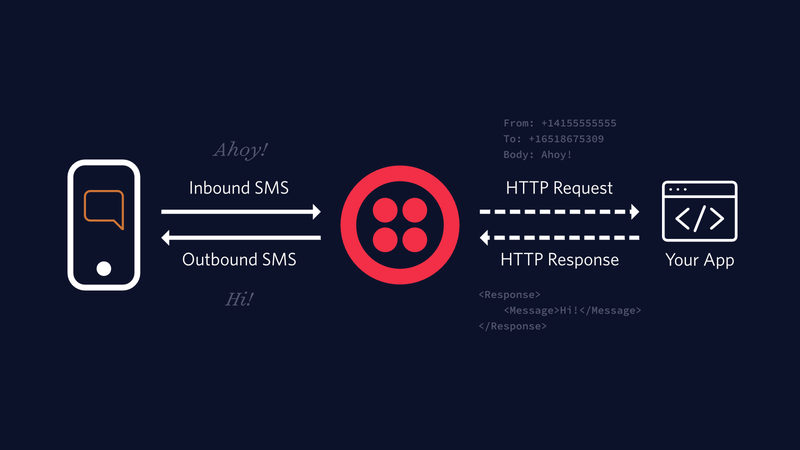
When you receive an SMS on your phone, you get a notification: a popup message, a sound, etc. This notification is driven by the event “received SMS”. In the programming world, the notification is a callback for a specific event. We can say that a callback is an action triggered by an event.
Twilio has a particular way to handle SMS events. When an SMS is received on your Twilio number, Twilio can call a webhook, which is an HTTP callback.
The webhook is similar to the notification you receive on your phone, but with much more power. You can do whatever is possible on the backend side of an HTTP server. You can react by answering the SMS directly, calling another phone, or doing a specific action.
Here is a schema that shows the process:
As seen before, a webhook is an HTTP callback: a GET or POST to a specific URL.
A Raspberry Pi, on the other hand, is a computer that runs on Raspberry Pi OS, an operating system based on Linux. You can host a web server or web application on it. The most exciting part is that you can run your custom web application on it. And it can be written in Python.
Python also offers you many libraries to manage your Raspberry Pi GPIO pins. So with an HTTP server application written with Python, you can manage and remotely control your Raspberry Pi.
To summarize the process, this is how it is possible:
- A Twilio number receives an SMS.
- Twilio calls a webhook that points to the URL of your Python web application hosted on your Raspberry Pi.
- The Python web application gets all the parameters from the SMS and performs an action on the Raspberry Pi GPIO.
You can imagine this system as talking to your Raspberry Pi with SMS texts.
Design of the system
Requirements
To design the system, you will need some hardware and software.
Hardware requirement
- One Raspberry Pi: a Raspberry Pi 3 Model B is used in this tutorial, but you can use any model of the board.
- One LED
- 330 Ohm resistor
- One breadboard: half size is enough
- Jumper wires
Software requirement
- Raspberry Pi OS (formerly called Raspbian): the operating system for Raspberry Pi
- Python 3
- Twilio account with a phone number. Here is a link to create an account if you don’t have one already: Twilio | Try Twilio Free.
- Ngrok (You can learn more about using Ngrok in 2022 here.)
The whole system's interaction
Because any schema is more valuable than thousands of words, here is a schema showing the interaction among all parts of the system.
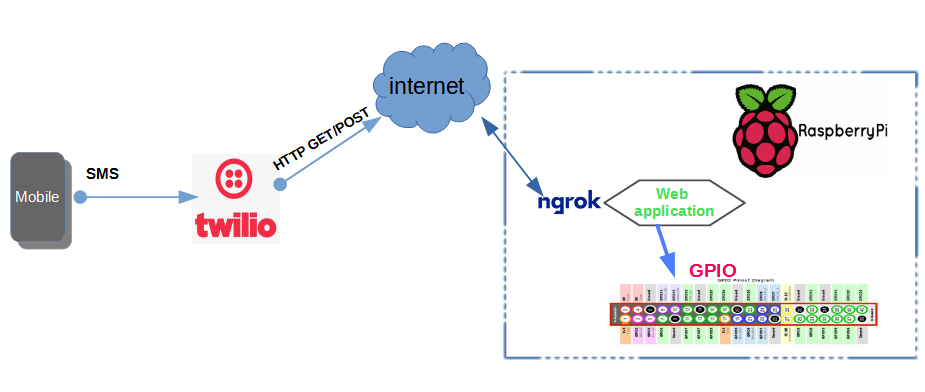
An SMS is sent to your Twilio number, and then the Twilio service will call a webhook to a URL exposed by a web application via Ngrok on your Raspberry Pi. Next, the web application interprets the SMS content, and then performs an action on the Raspberry Pi GPIO.
That is how the whole system interacts. One important part is that your web application needs to understand the SMS content.
For that, we will create a message protocol that defines each specific action.
Design of a communication protocol based on SMS
Any two parties who want to exchange information need to understand each other in order to communicate correctly. It is similar to human language. Imagine a Japanese man talking to an English man, each using their own mother language without any translator. Their communication will fail because they cannot understand each other. If they want to communicate correctly, they need to use a language that both parties can understand.
A protocol is a set of rules, conventions, and data structures that define how two parties exchange information in order to understand each other. In human language, grammar defines rules and conventions, so we can call it a protocol.
To control Raspberry Pi by SMS, we need to define a protocol that it can understand.
Let's define that each action you perform on your Raspberry Pi is associated with an object. We can call these objects “controlled objects”. Each action can have a parameter. Then we can define a format for the protocol, like below.

So every time you want to control something on your Raspberry Pi, you will send something following this format. For example, if you want to switch on a light, you will send: Light:switch:on.
Light is the controlled object, switch is the action, and on is the parameter.
Putting it all into practice
You can see and download the code for this project from the GitHub repository here. First, I will walk you through how the code works, and then you will have a chance to test the system yourself.
Build the message protocol handler
A controlled object is defined by a GPIO channel and can perform an action.
The base class for the controlled object is described by the following code in rpi_control/controlled_object/base.py:
Every “controlled object” we want to set will inherit from the RaspObject class. And any method defined for the class will be an action that can be performed on the object.
To understand the SMS text, the system needs to translate the controlled_object part to a RaspObject and the action to a method. Then the system can execute the action by calling the corresponding method on the RaspObject with the parameter. The following diagram shows the process:
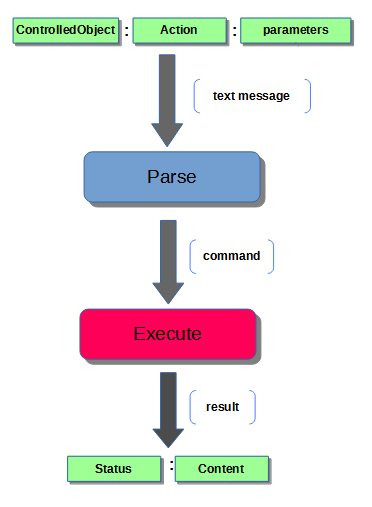
Finally, the execution returns a text result with the same format as the SMS command, separated by “:”. The status in the result can be “OK” if everything was done correctly, or “ER” if there is an error.
Each line in an SMS that has the format “controlledObject:action:parameter” will be evaluated as a command and will have a proper result. This permits sending multiple commands to control the Raspberry Pi with a single SMS. Below is the code that performs parsing and execution of any SMS message. You can see this code in rpi_control/evaluation.py:
The entire code can be seen and downloaded from my GitHub repository here.
Build the web application
In order to be used by a webhook, the message handler should be exposed by a web application. For that, a web application built with Flask will do the job.
It will take the SMS content from the webhook request, evaluate the content with the message handler, and then send back the response. Here is the source code, which you can see in webapp.py:
from flask import Flask, request, redirect
from twilio.twiml.messaging_response import MessagingResponse
from rpi_control.evaluation import evaluate
from config import TWILIO_SMS_CONTROLLED_OBJECTS

app = Flask(__name__)

@app.route("/sms", methods=['GET', 'POST'])
def rasp_twilio_sms_control():
    """perform action defined in a twilio SMS"""
    # get the SMS content
    sms_content = request.values.get('Body', '')
    # evaluate the sms content
    print(sms_content)
    results = evaluate(TWILIO_SMS_CONTROLLED_OBJECTS, sms_content)

    # prepare the response and send it back
    sms_resp = MessagingResponse()
    response_content = "\n".join(results)
    sms_resp.message(response_content)

    return str(sms_resp)

if __name__ == "__main__":
    app.run(debug=True)
Example with a light switch control
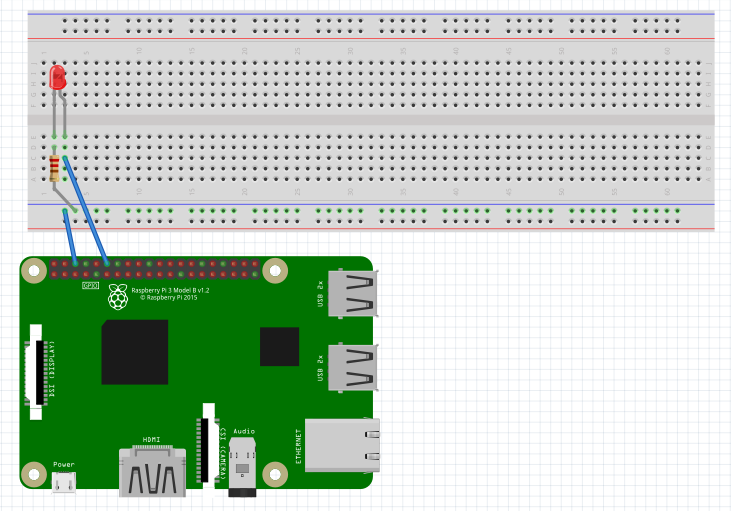
For this example, we assume that light is represented by an LED.
So you will need an LED, a 330 Ohm resistor, and of course your Raspberry Pi. In order to connect the LED to your Raspberry Pi, I recommend you follow the instructions in the "Building the Circuit" section of this tutorial: Turning on an LED with your Raspberry Pi's GPIO Pins.
Once you have connected the LED to your Raspberry Pi, the circuit should look like this:
Clone the following code from GitHub, and then enter into the project directory:
Light as a controlled object
The code contains the message handler and also the base class to control an object with a Raspberry Pi. Light is a controlled object that can perform a switch action. The switch action will take the parameter “on” or “off”.
Here is the code for the Light object. You can see it in rpi_control/controlled_object/light.py:
We can have multiple controlled lights. For the test, let's assume we need to control the light in the garage. By instantiating a Light, we can have a Light object. It has been added to the config where all controlled objects are set. The config file is the config.py in the root folder of the project.
We can control the light by sending an SMS like this: GarageLight:switch:on or GarageLight:switch:off.
Run the code
To run the code, you will need to install some additional requirements:
First, set up a virtual environment:
Then, install the following Python packages:
Next, install ngrok:
Ngrok is a tool that allows your web application to be accessible over the internet when running it locally. It’s like your web application is hosted somewhere on the internet.
Download it from here: https://ngrok.com/download. Then run the following command to set it up on your Raspberry Pi:
If this is your first time using ngrok, you should also create an account and get your own personalized auth token. Then you can run the following command to add your auth token to the ngrok configuration, replacing <token> with your own auth token:
Now you can run your code with these commands, running each one in its own terminal window with your virtual environment activated:
The link shown in the output of the ngrok command is the one you need to set in your Twilio SMS webhook.
In your Twilio Console, go to Phone Numbers > Manage > Active numbers, then, select your number and scroll down to the section labeled Messaging.
Paste your ngrok URL into the field next to Webhook in the section labeled A MESSAGE COMES IN, followed by the /sms endpoint. The full URL should look something like this: https://XXXX-XX-XXX-XX-XX.ngrok.io/sms.
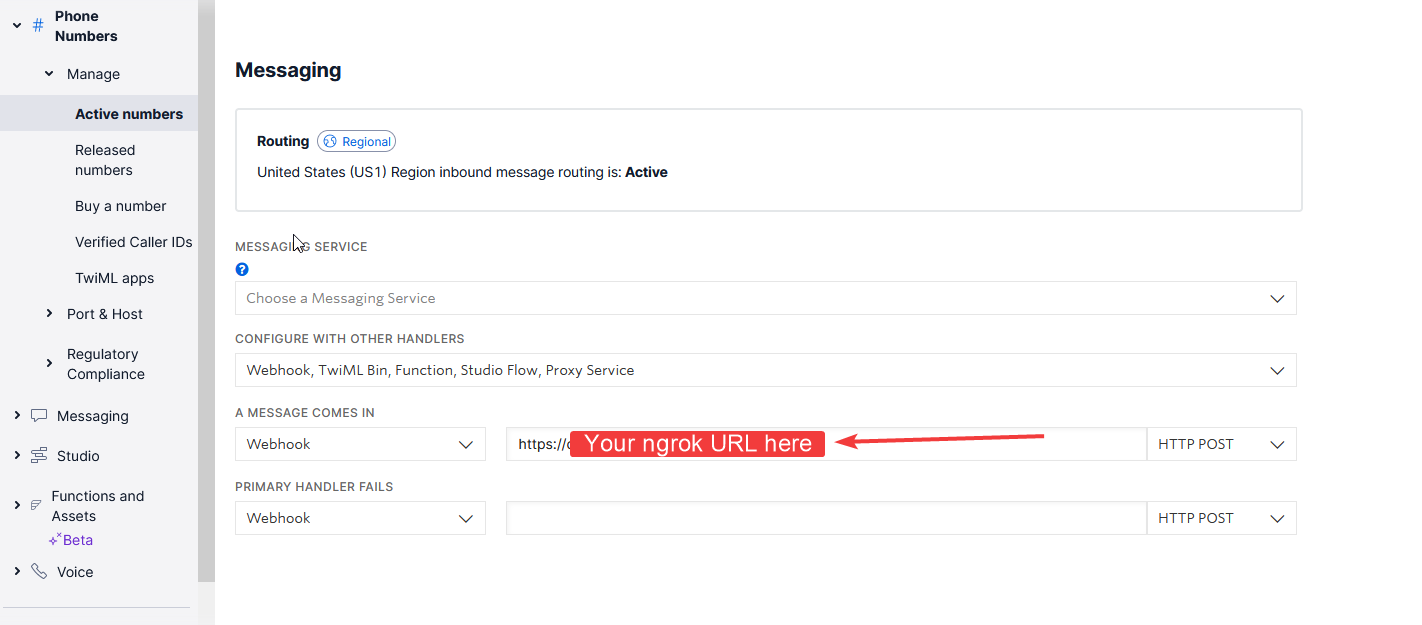
Once you have pasted in your webhook URL, click the Save button.
Test the system
Time to test it. Send the following SMS to your Twilio number:
GarageLight:switch:on

You should be able to see your LED on now and receive an SMS response like this: OK:GarageLight switched on.
Conclusion
Remote control is something really cool and useful. In this tutorial, you learned how to control a Raspberry Pi with SMS via the Twilio SMS service. In practice, you learned how to control a light with SMS. Now you can continue to add more controlled objects to your Raspberry Pi.
Imagine opening your door, switching on your radio, and watering your plant with a single SMS.
If you want to develop this project further, something to consider is that you can add more security by filtering the SMS sender so not everybody can send a command to control your device. Happy building!
About me: I’m a lead Python developer with 8 years of experience, passionate about electronics, IoT, and vintage mechanics. You can find me on Twitter or read my blog here: http://www.curiousmanjournal.ml/.


Related Resources
Twilio Docs
From APIs to SDKs to sample apps
API reference documentation, SDKs, helper libraries, quickstarts, and tutorials for your language and platform.
Resource Center
The latest ebooks, industry reports, and webinars
Learn from customer engagement experts to improve your own communication.
Ahoy
Twilio's developer community hub
Best practices, code samples, and inspiration to build communications and digital engagement experiences.