Create an SMS bot on AWS Lambda with Claudia.js
Time to read:
December 19, 2016
Written by
This post is part of Twilio’s archive and may contain outdated information. We’re always building something new, so be sure to check out our latest posts for the most up-to-date insights.

SMS chat bots and AWS Lambda go well together if you want to build a bot that can reach people all over the world without worrying about your underlying infrastructure. In just a few steps we’re going to see how easy it is to deploy a Node.js chat bot on Lambda using Claudia.js.
What is Claudia.js?
I’ve always liked the idea of Amazon’s Lambda service, but the first time I tried to use it I found the deployment process troubling. As I uploaded the zip file of my project to the AWS dashboard, yes that is how you deploy to Lambda, to test my work I thought to myself, “There must be a better way.”
Thankfully I wasn’t the only one, so tools like Claudia.js, Serverless and Seneca were born. Each of them offer various features and different methods of deploying apps to Lambda. I was recently drawn to Claudia.js not only because it makes deploying applications to Lambda easier, but because it comes with Claudia Bot Builder, a framework that abstracts away the differences between a host of bot platforms. Together they make it really easy to write and deploy bots to Lambda, so let’s build an SMS bot to see how it all works.
Before we start
There are a few things we’re going to need to get this project off the ground
- A Twilio account and a Twilio phone number that can receive SMS messages
- An AWS account
- Node.js v4.3.2, the version that runs on Lambda (you can install multiple versions of Node.js using nvm)
Don’t worry if you’re just trying this out, both Twilio and AWS have free tiers that you can use to build this bot.
Now we need to prepare AWS for use with Claudia.js.
Setting up AWS
Claudia.js will need access to your AWS account, so it’s best to create a profile that only contains the permissions that Claudia.js needs to deploy our bot. To do so, go to the Users section of the Identity & Access Management service. Create a new user and give it a recognisable name.
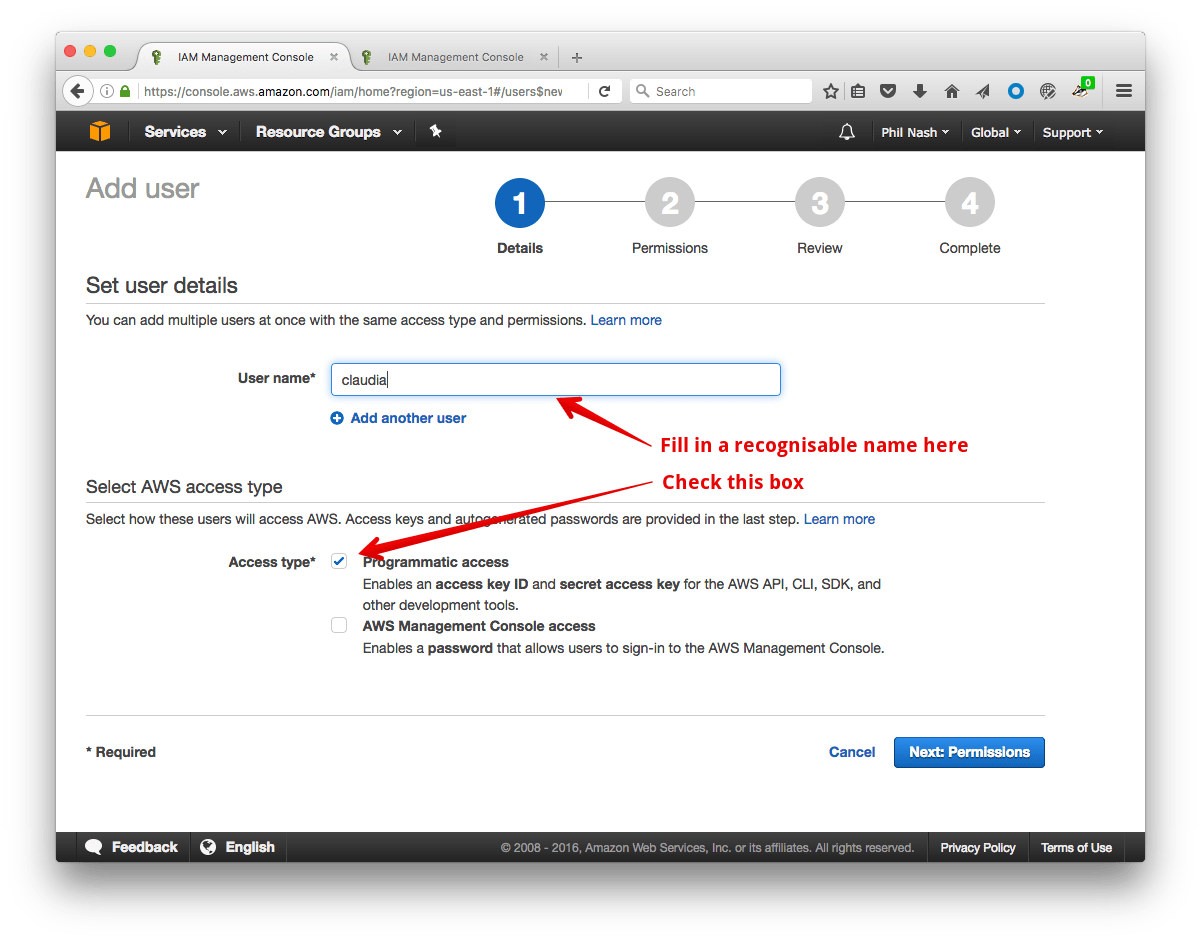
Make sure “Programmatic Access” is checked. Click “Next: Permissions”. On the next screen you will be able to select the permissions the user has. We need three permissions for this user: AWSLambdaFullAccess, IAMFullAccess and AmazonAPIGatewayAdministrator.
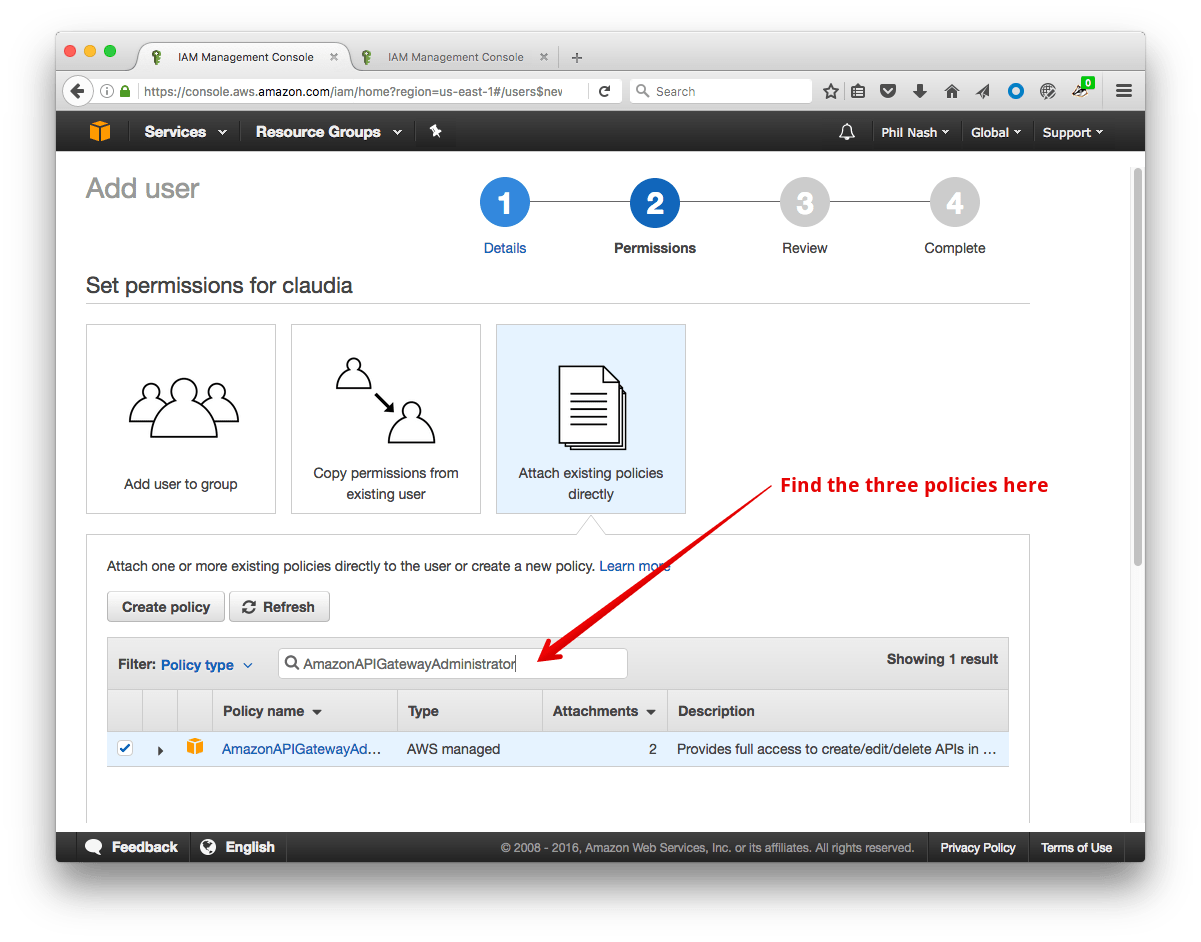
Click “Next: Review” to review your user and ensure they have the correct permissions, click “Create User”. You should see the success screen and your new user’s Access Key ID and Secret Access Key. Don’t move on from this screen yet, these credentials will only be shown to you once!
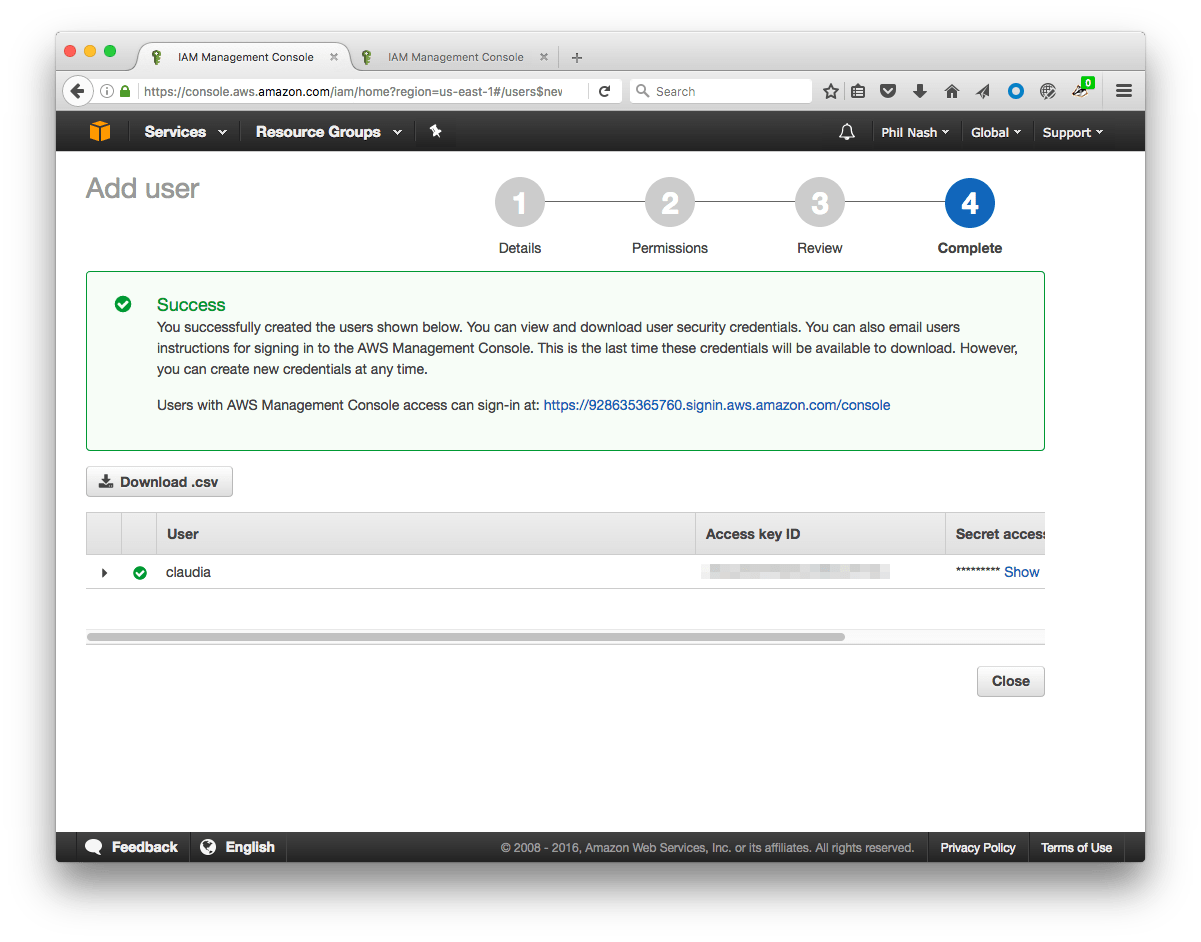
Claudia.js uses the AWS Node.js module so we need to store the credentials in the conventional location; either ~/.aws/credentials on Mac or Linux and C:\Users\USER_NAME\.aws\credentials on Windows. If you don’t already have a credentials file, create one in the location described previously and add the following:
We’ve now setup a profile called “claudia” that we can use with Claudia.js.
If you’d like to learn more, there is an in depth tutorial on setting permissions up for the AWS Node.js SDK in the AWS documentation.
Creating our bot
Now that we’ve set up the permissions for Claudia.js we can start our bot. First up jump into the command line, create a directory to keep the bot’s code in and and start a new Node.js project:
Not seen --yes before? It accepts all the defaults from npm init without you have to tap enter the whole way through!
Install Claudia.js as a development dependency.
We’ll also need the Claudia Bot Builder as a dependency.
Create a file called bot.js and open the project in your favourite editor.
Some helpful npm scripts
Before we write our bot, we’re going to put a couple of helpful npm scripts in place. We have installed Claudia.js as a development dependency and we need to run the executable, so npm scripts is the easiest place to do that. Open package.json and add the following to the scripts section:
The create script will do all our initial setup, adding the Lambda function and configuring AWS API Gateway so that we have URLs for the bot platforms’ webhooks. If you named your AWS profile differently in ~/.aws/credentials use that as the --profile argument.
The update script will deploy updates to your bot. Enough of this config, let’s write a bot!
Writing the bot
Open up bot.js and start by requiring the Claudia Bot Builder.
Then we pass a handler function to the botBuilder which will deal with incoming messages. We also pass an object of options, in this case so that we can limit the platforms we are creating our bot for to just Twilio for now.
Then export the bot.
And that’s it! We’ve created a bot that will respond to every incoming message with “Hello world!”.
Ok, that’s a pretty boring bot. Let’s have it do something a bit more interesting. I found the simplicity of building my first bot with Claudia so inspirational I wanted to share some more inspiration with you. I called this bot quote-bot, so we’re going to have it return inspirational quotes when you ask for one, otherwise it will return a greeting.
We’ll first install a couple more dependencies:
Let’s do a simple test to check if the incoming message wants a quote. For this we’re going to look for the string “quote” in the incoming text. For more complicated use cases, I’d start looking at natural language processing or a cognitive service like the Watson Conversation API, Luis or wit.ai.
If we do need a quote, we’ll use the node-fetch module to look up a random quote from the Forismatic API. For asynchronous tasks like this, Claudia Bot Builder requires us to return a Promise which later resolves to the message to respond with. If you want to learn more about Promises, including more node-fetch examples, check out this guide to Promises by Dominik.
If we don’t ask for a quote, we’ll generate a random greeting with the greeting module.
As you can see, the message object that is passed to our handler contains the text of the message sent to our bot. You can also get the original request sent to the endpoint with message.originalRequest.
Deploying the bot
We are now ready to deploy our bot. On the command line run our create script:
This is where Claudia.js is doing all the magic. It creates the Lambda function and configures the AWS API Gateway for all our potential bots. In the output at the end you can see the URLs you can use for webhooks for all the supported services.
We’re not quite done yet as we need to configure our bot for receiving Twilio webhooks. Run:
This will update your bot, though we haven’t changed anything just yet, and finally ask for your Twilio account details. Enter your Account SID, your Auth Token (which you can find in your Twilio console) and the phone number you want to use.
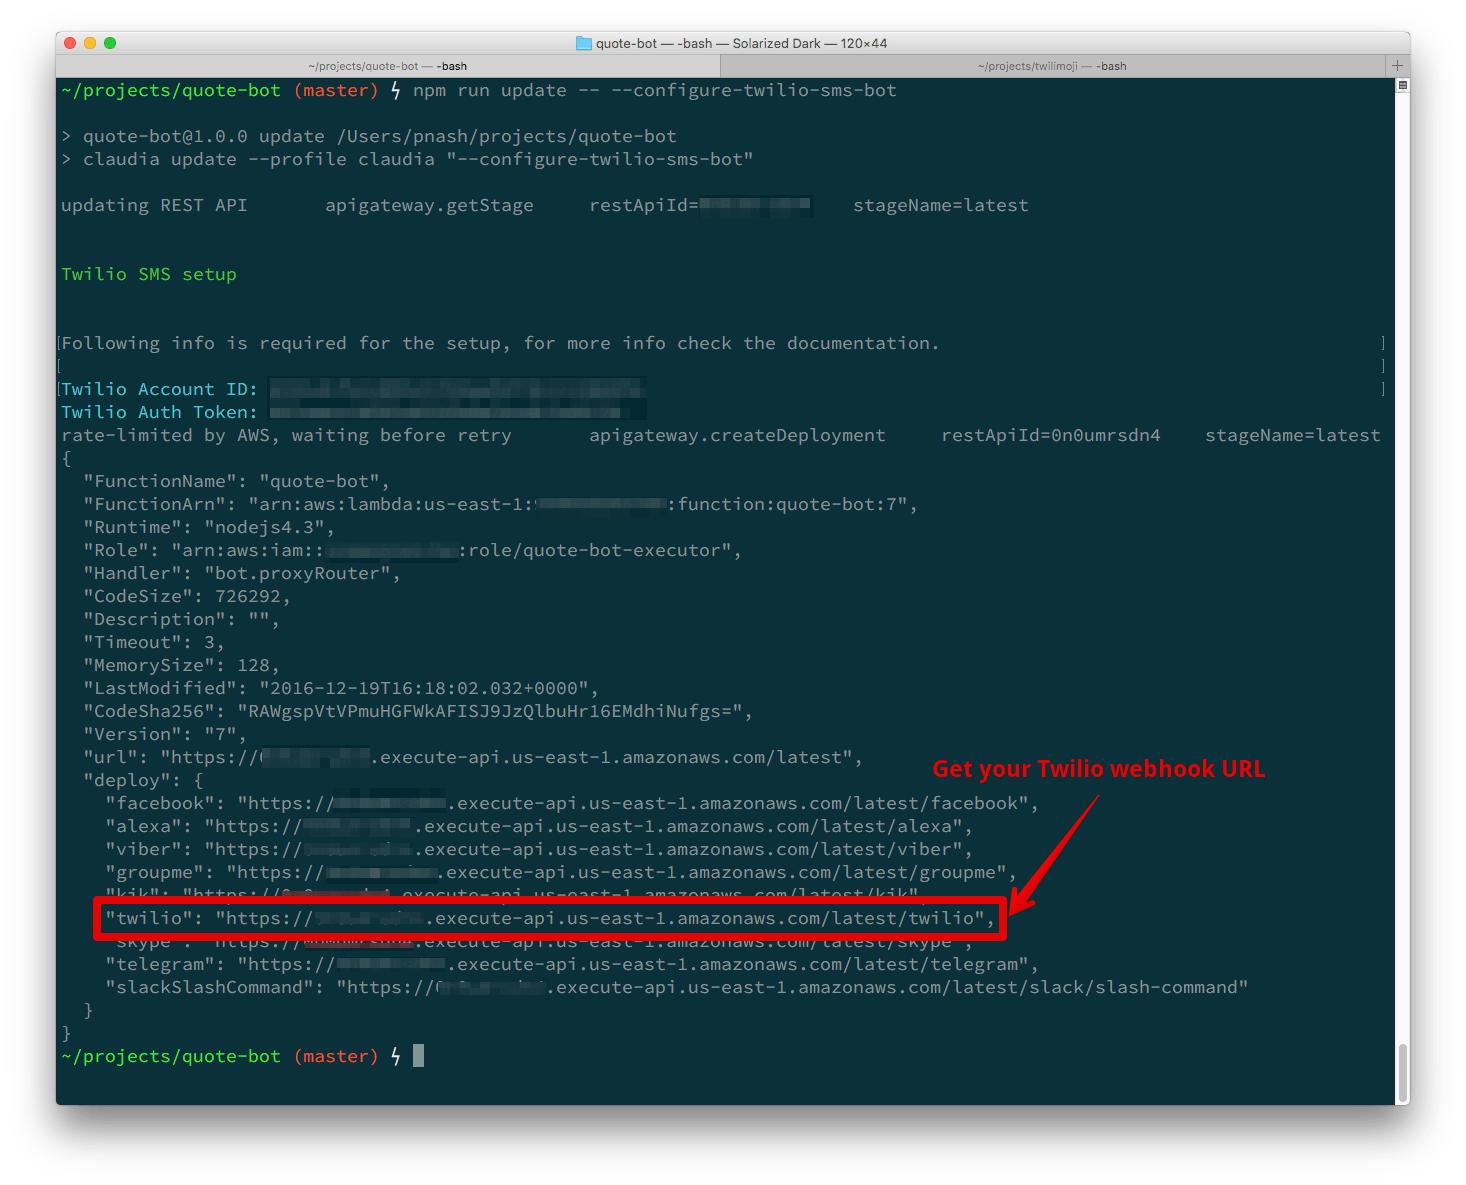
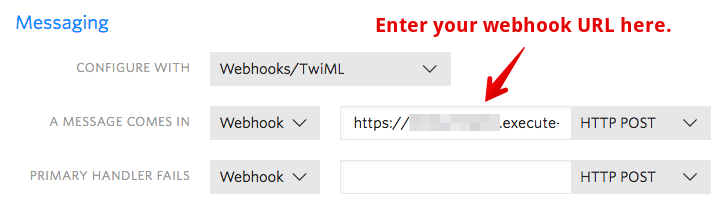
From the phone numbers page of the Twilio console, click on the number you want to use. You should be on the number edit page now, so take the webhook URL that was output from the script and enter it into the webhook field for the messaging settings of that Twilio phone number:
Everything is in place to send your first message to your bot. Grab your phone, enter your number and ask for a quote.
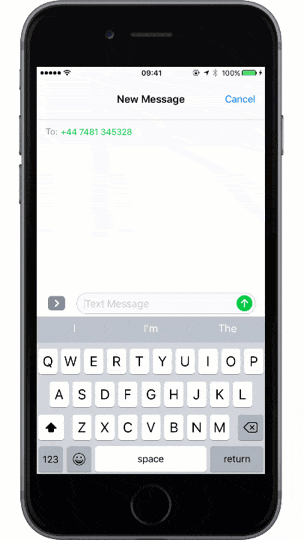
Want to give this a go yourself? Send an SMS message to my bot at +447481345328 if you’re in the UK or +12016903488 if you’re in the US.
Bots, bots, bots
That is all you need to do to get a bot running on AWS Lambda with Claudia.js. If you want to check out the complete code for this, take a look at the GitHub repo for this project.
Now you can create any bot you fancy, run it on AWS Lambda and have the power of Node.js and a world of APIs and AI at your fingertips.
Why not try hooking your bot up to another service as well? Claudia Bot Builder supports Twilio as well as Facebook Messenger, Slack, Telegram, Skype, Kik and GroupMe.
What do you think about Claudia.js and AWS Lambda? Have you built a bot of your own yet and what did you use? Drop me a note in the comments or hit me up on email or Twitter.


Related Resources
Twilio Docs
From APIs to SDKs to sample apps
API reference documentation, SDKs, helper libraries, quickstarts, and tutorials for your language and platform.
Resource Center
The latest ebooks, industry reports, and webinars
Learn from customer engagement experts to improve your own communication.
Ahoy
Twilio's developer community hub
Best practices, code samples, and inspiration to build communications and digital engagement experiences.