Implementing Long Lasting Sessions with Twilio and Google Dialogflow CX
Time to read:
June 14, 2022
Written by

If you’re communicating with a business that has an intelligent bot, and you’re chatting with it via a digital interaction (eg. SMS, WhatsApp, Webchat, Facebook Messenger, etc), there’s nothing more frustrating than the bot failing to understand the simplest of requests. In this type of situation you typically get a bot response that says something like, “Sorry, I didn’t understand that, can you say it again?”
If this happens, its not always because the business built a stupid bot. On the contrary, it can simply be a problem that manifests because the business didn’t pay close enough attention to the length of time that a session remains active between a bot and a user. As an example, Google Dialgflow CX has a 30 minute timeout (for data privacy purposes) on sessions between a bot and a user, which means that once a user has waited more than 30 minutes to respond to the bot, the session will expire and the next reply from the user will be treated as if the user was starting over, even though the user was expecting the bot to continue where they left off.
Not a great customer experience, right? Let’s pretend you are interacting with an airline’s intelligent Dialogflow CX bot in an attempt to book a flight. The bot has done a great job helping you through the process of finding a flight, confirming the date and time, baggage, etc, and all that is left is for you to make a payment with the bot. Before confirming your credit card details with the bot, you receive an emergency phone call and it takes you 45 minutes to resolve over the phone. After hanging up, you respond to the bot confirming your credit card info, only to have the bot respond with a generic welcome message “Hi, I’m your airline concierge. How can I help you today?”Why did the bot respond this way? Clearly it should have understood the credit card confirmation and finalized the flight purchase right? Now as the user I have to start all over again!?!
If the session was still active in Dialogflow CX, then yes the bot would have understood the command, but since 45 minutes elapsed, the session expired in Dialogflow CX, and thus the next response from the user was treated as an initial intent.
Thankfully, as a business, there’s a way to solve this problem if you expect your users may have delays longer than 30 minutes between their responses to your Dialogflow CX bots. Google refers to this as “Long Lasting Sessions”, and Twilio can help you build a fully cloud native solution to this problem without having to host any application logic or connect to a database. In this blog, I’ll provide you code samples that you can use to build long lasting sessions into your digital bot interactions, and explain how it all works so that you can extend what I’ve built to meet your own requirements.
Prerequisites
Before we can get started, you’ll have to create or log into a few accounts.
On the Dialogflow CX side:
- Create a project
- Enable billing on Google
- Enable the Dialogflow CX API (choose "No, I'm not using them" under "Are you planning to use this API with App Engine or Compute Engine?")
- Set up a Service Account and create a key file by navigating to the Key tab on your newly created Service Account page (json). This will result in downloading the key as a JSON file, which we will need in a later step
On the Twilio side:
- Create a new Twilio account, or use an existing one.
- Buy a Twilio phone number.
Solution Overview
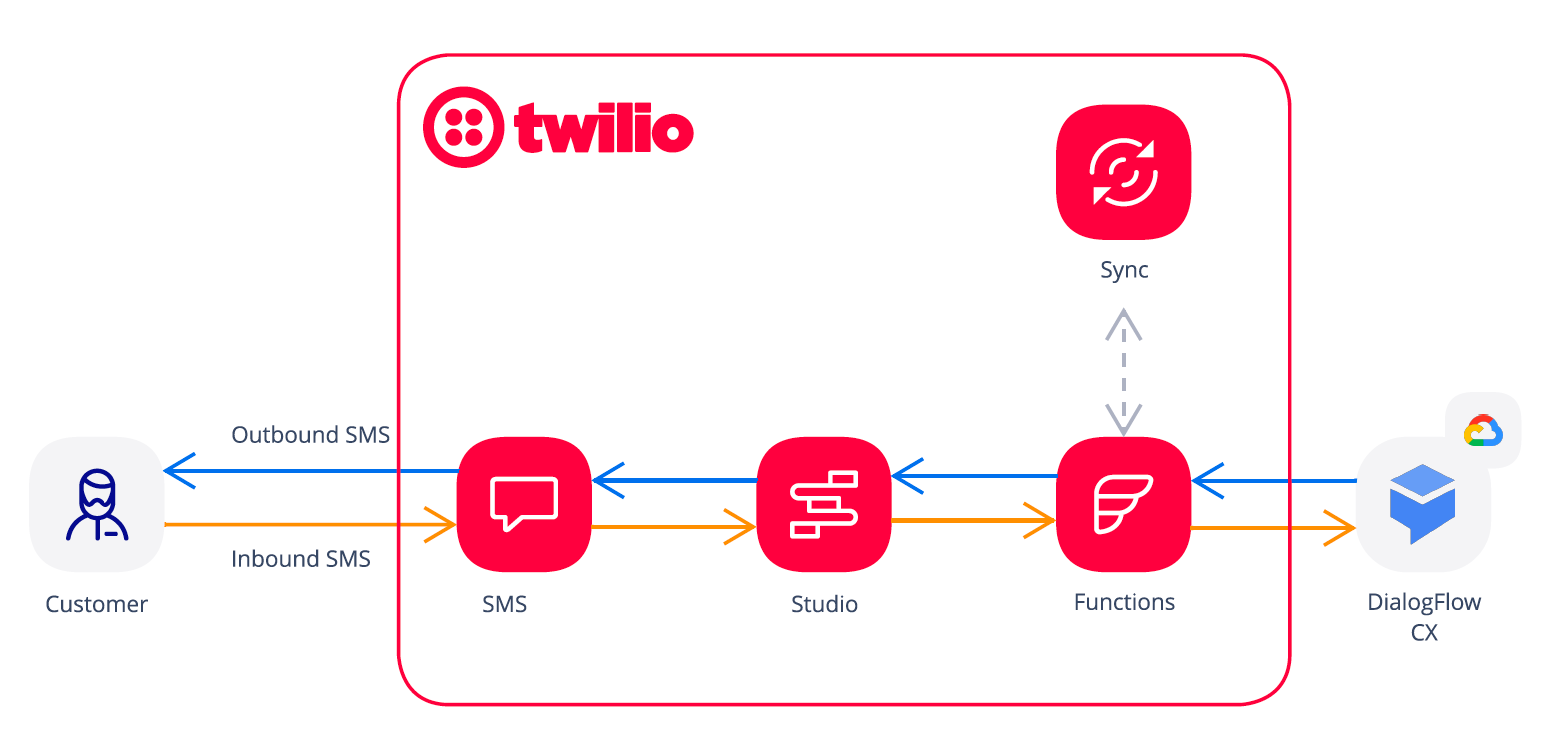
At a high level, the below diagram shows the basic interaction flow between user and bot as facilitated through Twilio and Dialogflow CX. This is the solution we will be building as part of this blog post. We will start with the Dialogflow setup, then do the Twilio setup, and at the end we will test that everything works the way it should.
DialogFlow CX Agent Setup
Create the agent
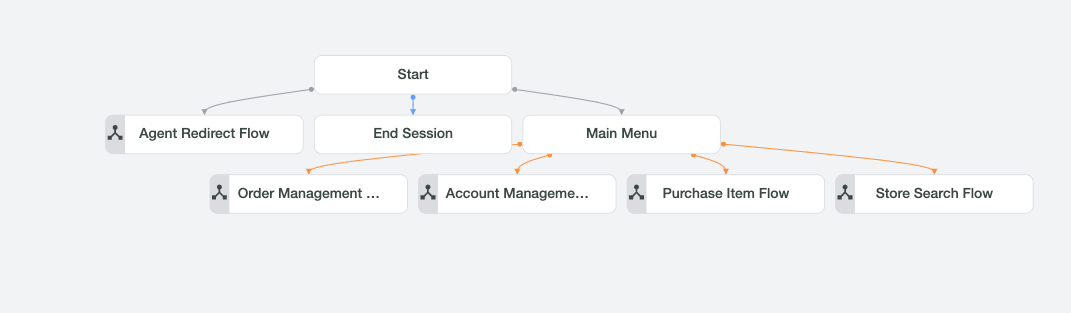
For this exercise, we’re going to use a pre-built agent which handles order and account management rather than building a bot from scratch.
Import the Order and account management agent. Once complete, you should end up with something like this:
Test the agent (optional)
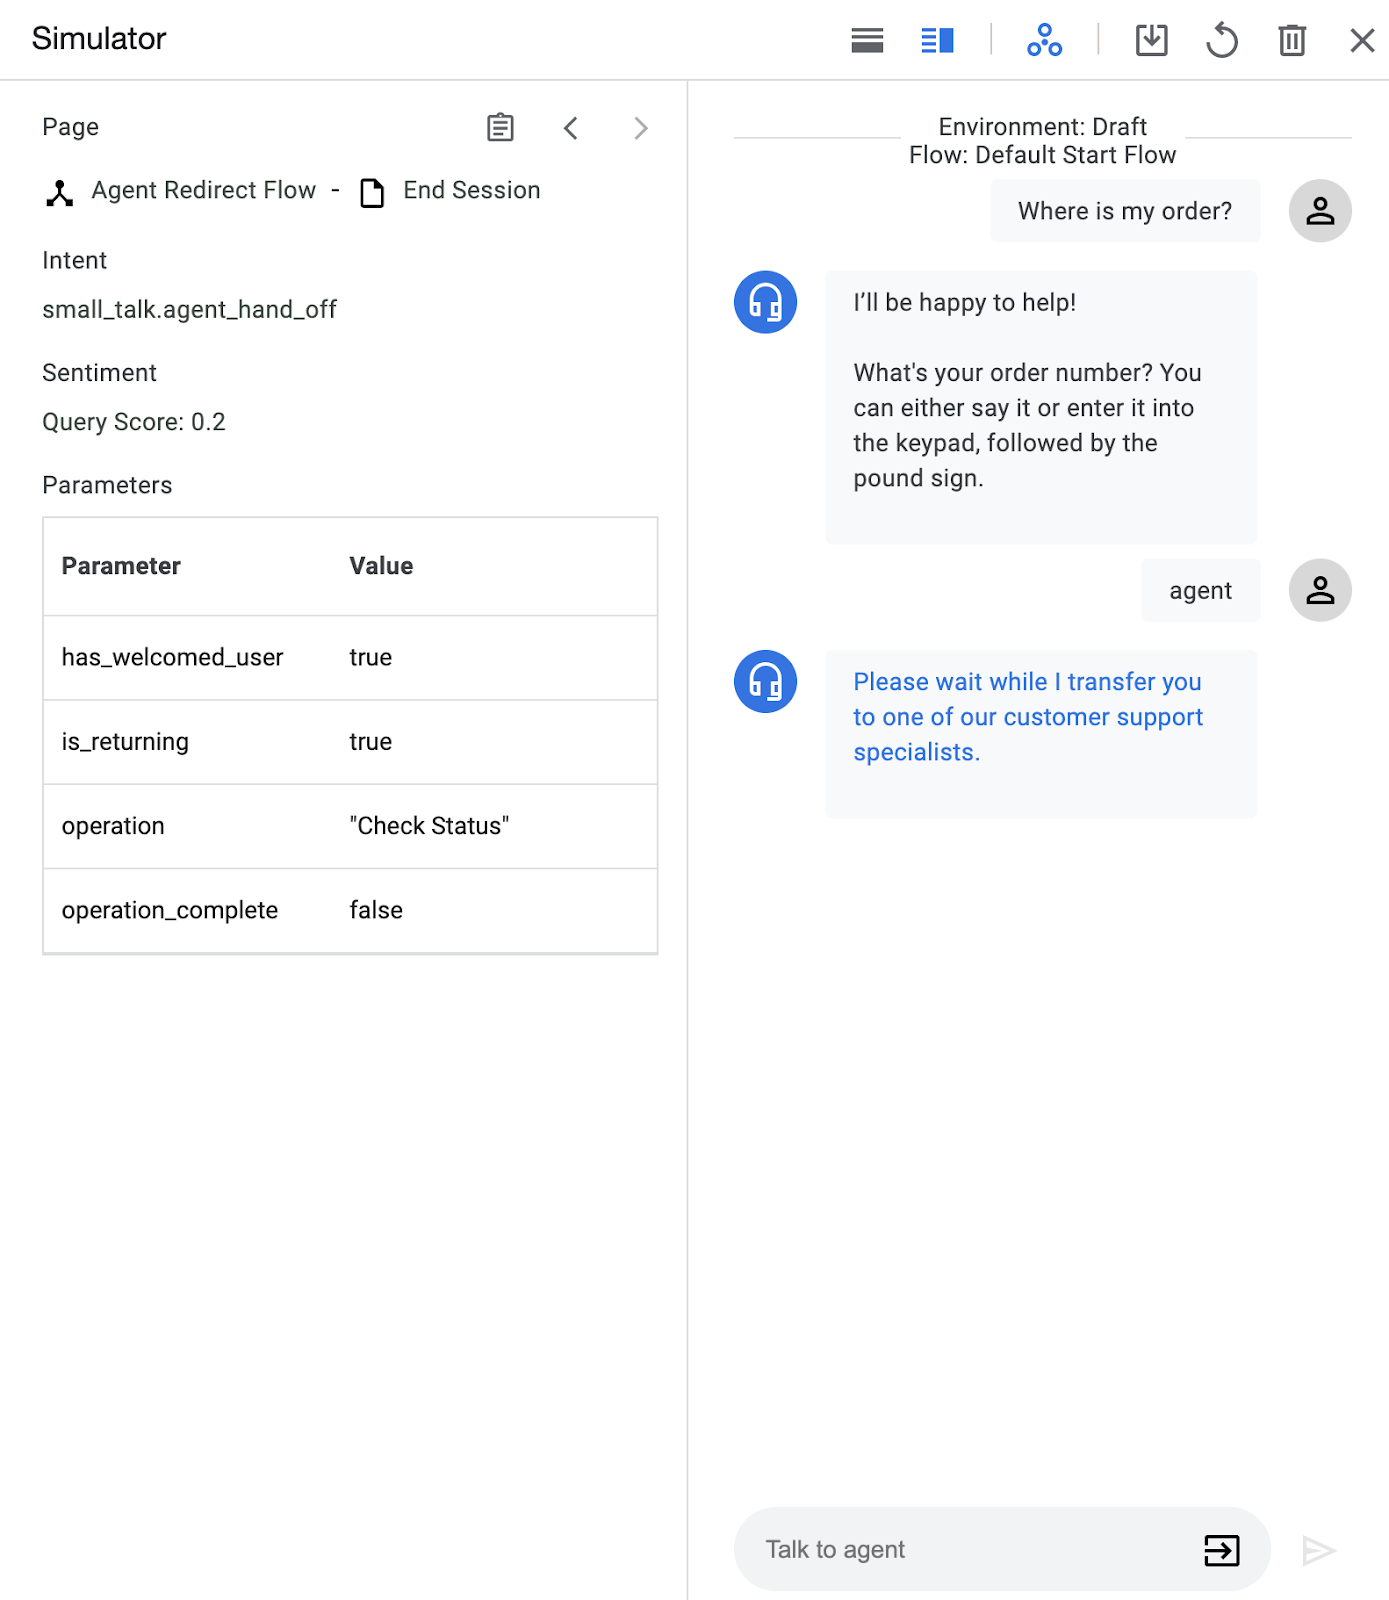
Dialogflow CX also has a built-in Simulator that allows you to test how the bot responds and builds test cases that can be re-executed later.
- Click the Test Agent button (top right of the page) to open the Simulator
- Enter where is my order? on the message text field. You should get a prompt asking for an order number.
- Instead of answering with a random number, enter agent
- You should be told you are being transferred to a human.
Twilio Setup
Setup your Twilio Studio Flow
If you’ve followed the Pre-requisites, then you should have already bought a Twilio number that will be used to broker the exchange between a user and the Dialogflow CX agent.
Before we can configure the number, we need to setup a Twilio Studio flow that will act as the broker. If you’re new to Studio and need a primer on how it works, take a detour and check out our “Get Started with Twilio Studio” overview.
Once you’ve got your bearings on how Studio works, you’re going to be importing a flow to fast track your Studio configuration. You can find the flow to import in github.
Once the import is complete, your flow should like like this…
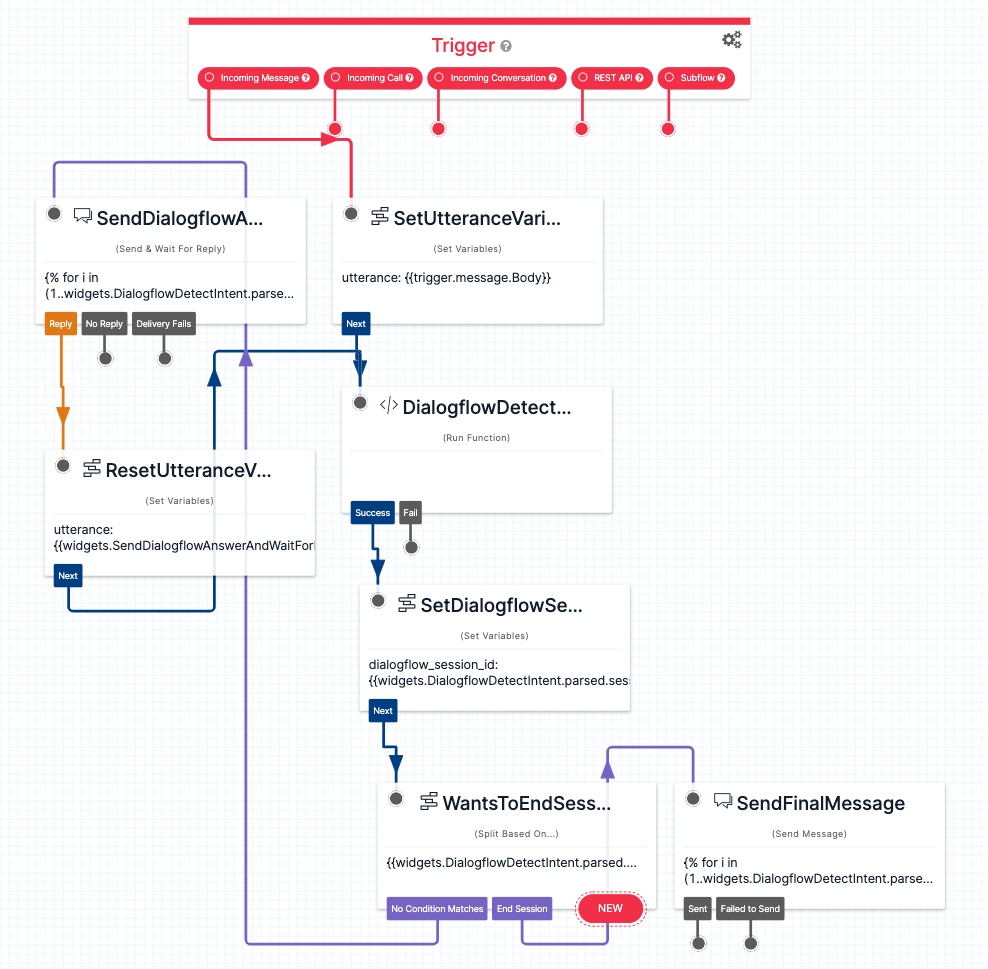
All the logic you need to facilitate the session between user and bot is already here for you, with the exception of the DialogflowDetectIntent Run Function widget, which you will need to update once we’ve created a Twilio Function to support the integration.
As an aside, if you’re curious about how this flow was built, or you’re looking to make changes to the flow after you’ve got everything running, I would suggest the following reading material:
- Liquid Template Syntax for Studio
- Twilio Studio Widget Library - Take a look at the documentation for the widgets I used in the flow above.
Ok, now let’s get our Twilio Function setup so that we can later update our Studio Flow properly.
Twilio Functions
Like Studio, if you are new to Functions, I would start here for a primer on how Functions work and how you can utilize them to build integrations like we will in this blog.
Once you’re comfortable, I have pre-built Twilio Function code that you will need to pull in to get started. You’ll need 3 things from the Github project to complete the setup:
- detectIntentLongLastingSession.js - This is the core Javascript file that is the linchpin for the integration between Twilio and Dialogflow CX.
- sync.js - This is a helper file that you need to store session information in Twilio Sync that allows for long lasting sessions to be revived.
- .env - This file has all of the Environment Variables that you will need to include with your Twilio Function, and provides context for where you need to find these for your own Dialogflow CX agent.
First, you need to create a Twilio Function Service that will be used as the Serverless container for your Function code.
Next, within the service you just created, use the “Add+” button to manually add the 2 functions from the github project above. The example below shows how you can do this.
Once you’ve added both of the 2 functions and saved them, you can start adding your Environment Variables by using the .env file above as your guide. Start with the ACCOUNT_SID and AUTH_TOKEN, since you can find those at your Twilio Console Dashboard.

For the other Environment Variables, there’s a bit of work to be done before you can set those, but in the .env file we’ve provided instructions on how to find and/or create the other variables that you will need to add. Please follow those instructions to finalize your Environment variables.
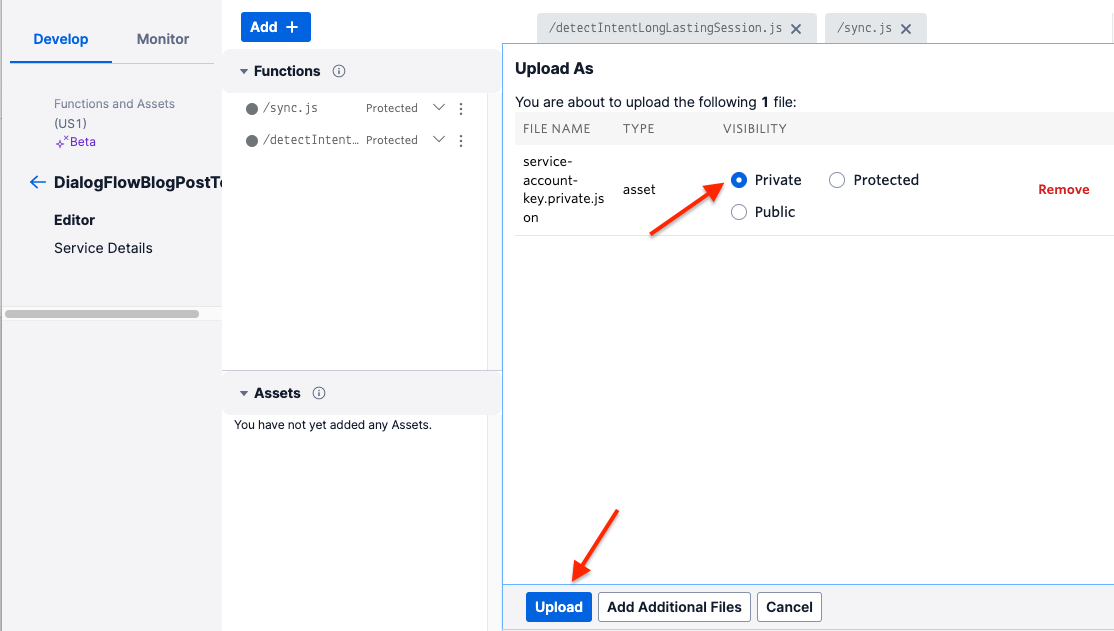
Once you have all the Environment variables added, you’re ready to add the final piece of the solution, which is to add the Google Credentials JSON key you downloaded in the Prerequisite step #1(d) as an Asset to your Twilio Function Service.
Similar to the process of adding your functions, use the “Add+” button and select “Upload File”, then browse to select the JSON key. Once you select the key, be sure to mark it as “Private” and then click the blue “Upload” button to upload the file as an Asset (see below).
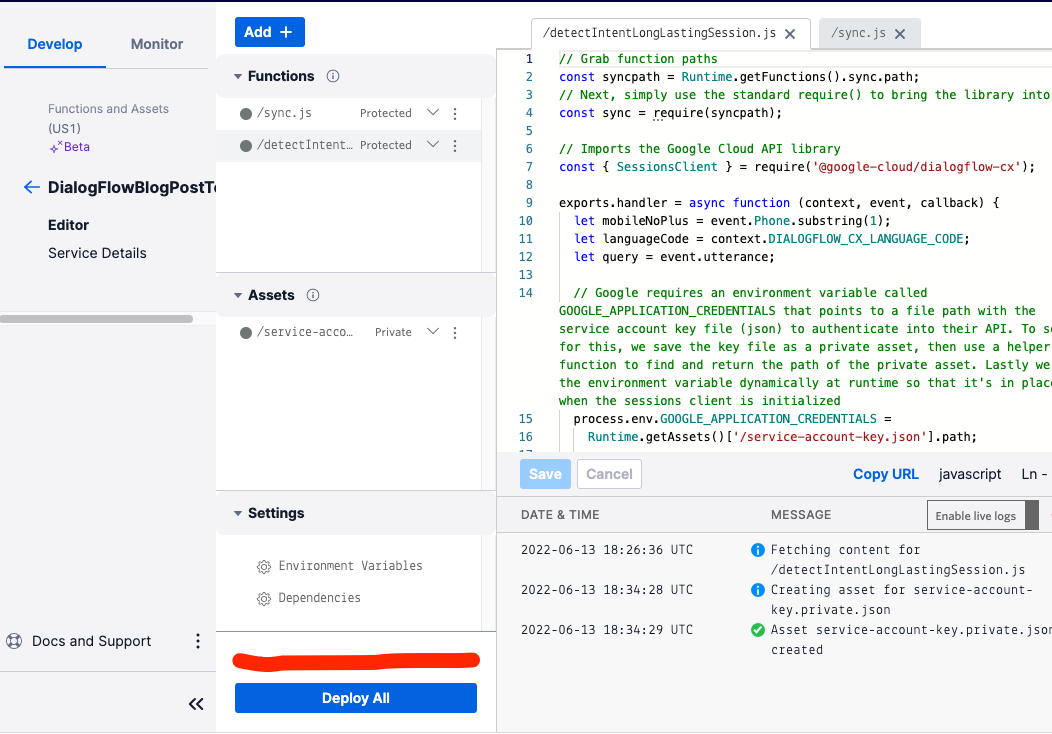
Once you’ve uploaded the JSON key credentials, you should be all set to deploy the Function Service to the Twilio cloud! Click the blue “Deploy All” button, and after the deployment finishes, you will see green checkmarks on each of your 2 functions and the JSON key file Asset.
Now you are ready to configure your Studio Flow to point to the Functions you just created!
Link your Twilio Studio Flow to Twilio Functions
Head back to your Studio Flow and update the Run Function widget to point to your detectIntentLongLastingSession.js function. Save and then click “Publish” at the top of the screen to deploy your Studio Flow to the Twilio cloud.
That’s it! Your Studio Flow, Twilio Functions, and Dialogflow CX agent should now all be setup and ready to go. Our last step will be to configure our Twilio number to point to Studio.
Configure your Twilio Number to point to Studio
Using the Twilio Number you purchased in the Prerequisites section, go ahead click on and configure the number to point to your Studio Flow.
You’re all set! Time to test that everything is working as expected!
Testing the Solution
Happy Path User<->Bot Flow
Running happy path tests should be very simple. You can kick off an interaction with the Dialogflow CX Order Management bot by sending a greeting like “Hi there” as an SMS message to the Twilio phone number you configured. From here, you will be able to have a conversation with the Order Management bot all the way to its natural conclusion.
Long Lasting Session Retrieval
There are a few different ways to test retrieval of long lasting sessions. The most basic and intuitive way would be to wait 30 minutes during a session with the bot until you send the next intent over SMS, which then the session will have expired and the logic to revive the session will be triggered. You can certainly do it this way, but there’s a quicker way to simulate the same logic.
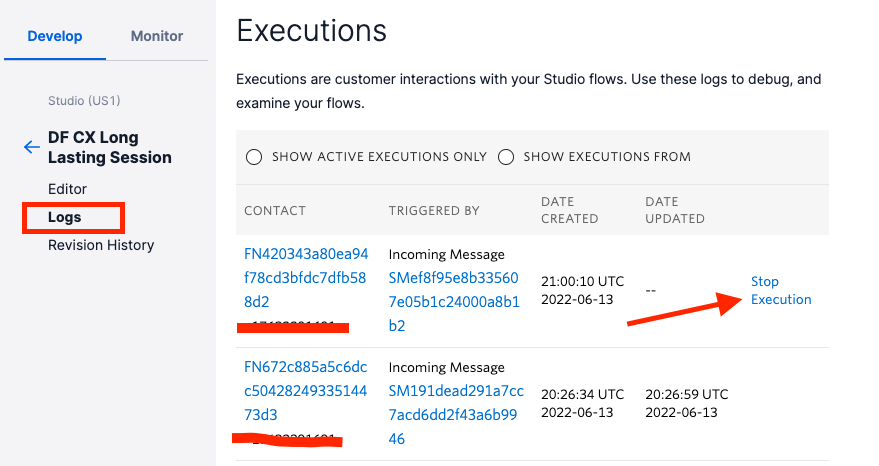
The way to simulate this properly is, during an active session (eg. perhaps after the Order Management bot asks for your order number), head to the logs page in your Studio Flow. You’ll find the most recent Studio Flow Execution has a “Stop Execution” button. Click on this to end the execution manually (effectively what this does is delete the session on the Twilio side, such that the logic for long lasting session retrieval gets hit by your Twilio Function).
Now go back to your SMS conversation with the bot and respond with a 4-digit order number. Twilio will pick this up as a long lasting session, revive the session details that Dilogflow CX needs to resume from where the session left off, and respond to the SMS intent accordingly. Without long lasting sessions enabled, Dialogflow would have responded with something like “Sorry, could you repeat that?” because sending the order number would have been out of context.
That’s it! Now you have long lasting sessions working with Twilio and Dialogflow CX!
It Works! But How? And How do I make changes?
There’s actually a lot to unpack here with Twilio Studio, Functions, and Sync that makes the interaction and session management work, so in this section of the blog, I will dive into the details to help you understand the “how” behind building this solution, and hopefully give you some confidence that you can edit any part of this example from here to tailor it to your exact requirements for your custom Dialogflow CX bot.
How does Dialogflow CX handle Long Lasting Sessions?
For the DetectIntent API, Google explains how to work with Long Lasting sessions in this documentation. As stated there, Google doesn’t support maintaining session data for longer than 30 minutes. There are reasons for this, but at a high level it has to do with how Google handles Data Privacy.
Furthermore, Google requires that session creation and the 30 minute timeout be handled client-side. With this in mind, an implementation that allows for a Long Lasting session must be well thought out to make efficient use of resources.
The implementation I chose for this blog relies entirely on a Twilio-native solution that utilizes short term storage in the Twilio cloud via Twilio Sync Maps. A detailed solution diagram, including the decision logic embedded in Twilio Functions, can be found as a PDF in Github.
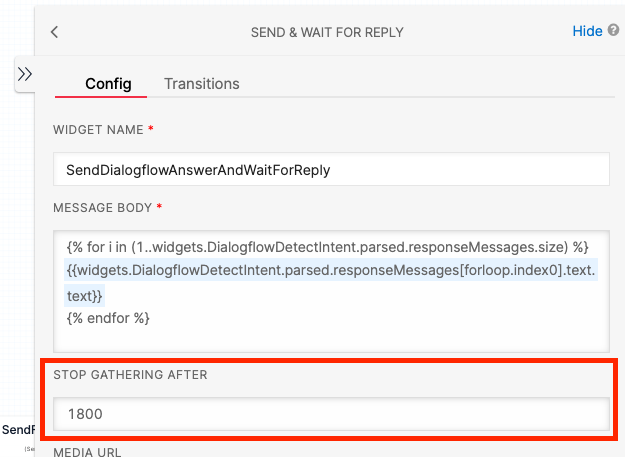
Because we have to manage the session timeout on the client side, I opted to leverage the timeout configuration option inside of our Twilio Studio Send & Wait For Reply widget (I labeled this “DialogflowAnswerAndWaitForReply” as the flow widget name) by changing the default timeout from 3600 to 1800 seconds (ie. 30 minutes). With this configuration, the Studio execution itself will expire after 30 minutes, and our Twilio Function will interpret this as if the session expired in Dialogflow CX.
How is Studio handling the facilitation of user<->bot?
The Studio Flow starts with an inbound message trigger, which in our example is inbound SMS. The first widget grabs the body of the message text that was sent and creates a variable called “utterance” to store that text.
From here, Studio calls our Twilio Function for detect intent, passing the utterance, the user’s phone number, and the dialogflow sessionId as parameters into the function call. If this is the first incoming message from user to bot, then our Twilio Function will determine that there is no session and will proceed to creating one (there’s much more to the Function code that we’ll get into in a bit). Once the Function finishes execution, it returns control to Studio and passes the Dialogflow CX Intent data back to Studio in a callback, and we include the sessionId appended onto this payload.
Next, we set a variable for the sessionId and assign it the value we sent in the Function payload. From here, we check the name of the current Dialogflow CX Page that facilitated the most recent intent capture. If that page was the “End Session” Page, then we finish the Studio Flow execution with the final Dialogflow CX Agent reply to the user, ending the Studio Execution and thus the session on the client-side. For any other Page, we assume the session is still active and subsequent intents needs to be processed, and thus we use the Send & Wait For Reply widget to send the Dialogflow CX Agent reply to the user, and await that reply for up to 30 minutes before timeout. If we get that reply, we send it back to Dialogflow CX as the next utterance, and the cycle continues until a conclusion is reached.
How do Twilio Functions and Twilio Sync work together here?
When Studio invokes our Twilio Function, this is where the meat of the interaction between Twilio and Dialogflow CX occurs, as well as the logic to use Sync as a short term storage mechanism to enable Long Lasting sessions.
The Function code is self-documenting, so please have a read at the in-line comments for highly detailed information on each step of the process. At a high level, our Function is taking care of the session creation and management, as well as all the logic to invoke Sync and Dialogflow CX properly.
As far as the storage schema for Twilio Sync, we’ve taken the liberty to create a payload structure that can be used not only to store the metadata necessary to revive long lasting sessions when appropriate, but also to store the context for each interaction between bot and user, as this information may be useful for downstream processes, like escalating to a live agent and having that agent be presented with the full exchange that just took place between user and bot.
We use the user’s phone number as the Unique Name of the Sync Map, as this provides a way to uniquely address the Map resource to add items to it, query it, or delete it. We use a timestamp as the Map Key, because Sync Map Items have a lexicographic ordering that allows us to retrieve the last item in the array of Map Items at any time. This is exactly what we need to do when reviving an expired session, since we store the Parameters and CurrentPage from Dialogflow CX for each intent response, and if we are to successfully revive a session, we need the most recent of these to pass to Dialogflow CX to continue where the session left off.
What are the best Tools to use to Test the Sync functionality?
My favorite tool to run rapid testing against this type of solution is Postman. With Postman, you can save and store direct API calls to Twilio Sync to ensure the solution is working properly. For example, I often used the “Read all MapItem resources” endpoint and set the “order” parameter to “desc” so I could see in real time the Sync storage was being populated correctly, as well as deleted appropriately when the End Session occurred.
How can I use Logging on Twilio and Dialogflow to troubleshoot?
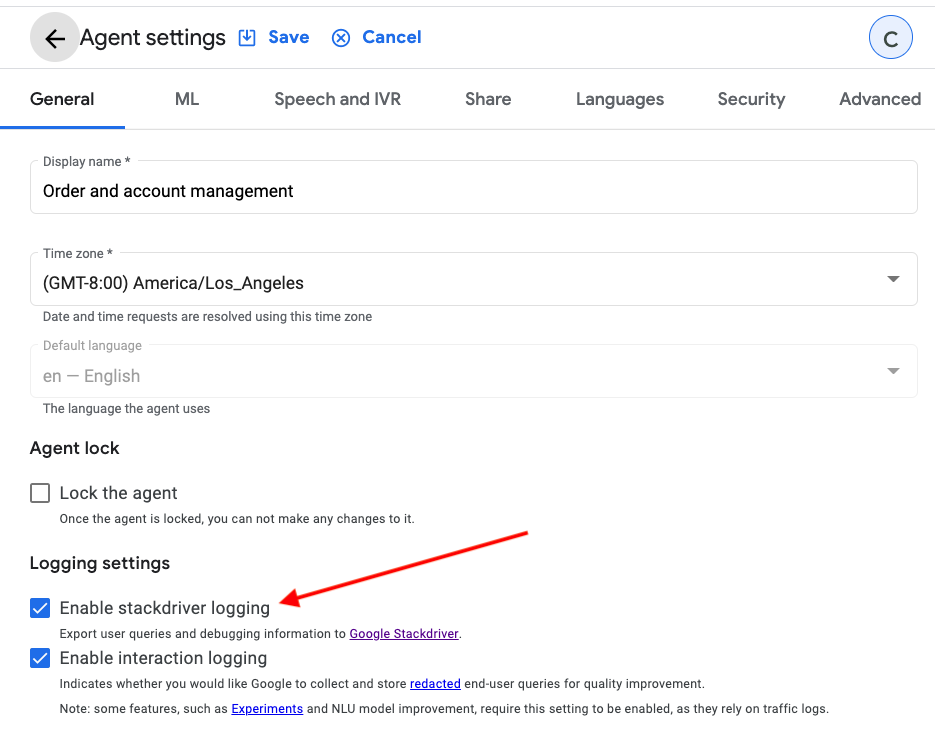
On the Dialogflow CX side, I recommend you turn “Enable stackdriver logging” on in the Agent Settings configuration, at least through the phase of testing your Agent. There’s a link underneath to the Logging Dashboard, and interrogating the logs to understand both queryInput (ie. user->bot) and queryResult (ie. bot->user), including the JSON schema in case you plan on tweaking any logic, was immensely valuable to my iteration on this solution.
On the Twilio side, there are a few different ways you can troubleshoot:
- Add console logging to Twilio Functions. The Functions UI also has a toggle where you can Enable Live Logs to debug your functions
- Use the Twilio Studio Execution Logs, or subscribe to events in Studio using Event Streams
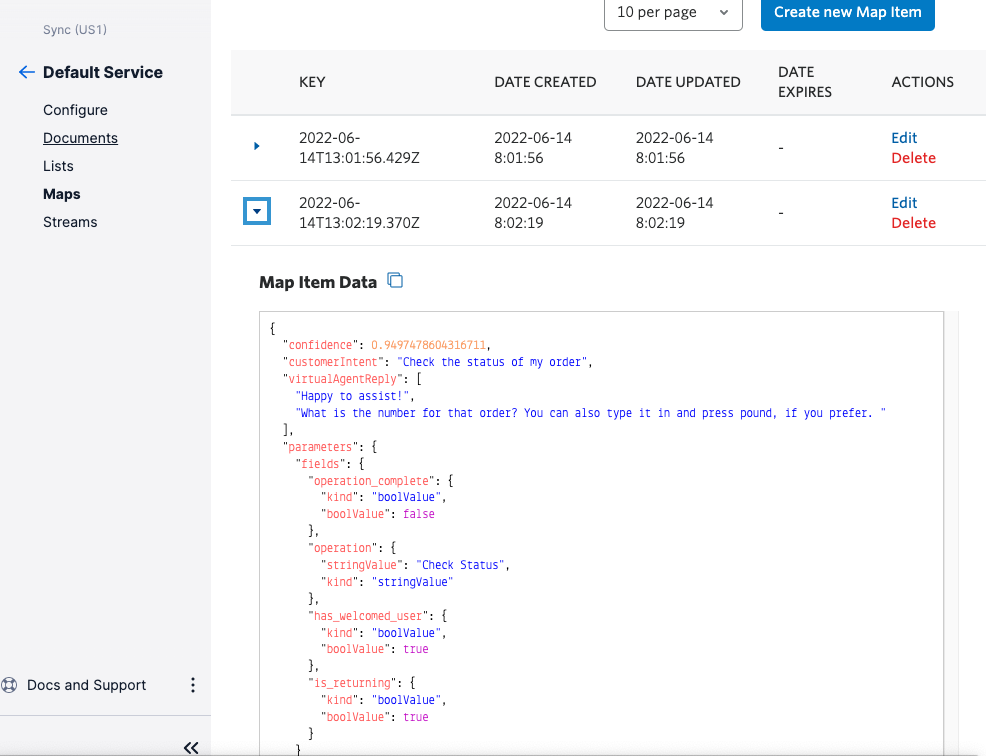
- For Twilio Sync, I use Postman, but you can also use the Twilio Console, which has a clean UI for viewing Sync Map Items (see below)
Considerations beyond this Example
What about other Digital Channels like WebChat, WhatsApp, etc?
You can essentially get all of these other digital channels “for free”, because Twilio Studio’s “Incoming Message” trigger supports any Twilio message-based channel. For example, if you wanted to also support WebChat in addition to SMS, you include a Split Based On widget as the first execution point for an Incoming Message, and run transition logic between “web” and “sms” as the channel type.
What about Escalating to a Live Agent?
If you need to extend your bot’s capabilities to be able to escalate to a live agent, Twilio already has a solution blueprint we have outlined in our blog called Connect Twilio Flex Digital Channels to Google Dialogflow CX. In fact, most of the components we built around Studio and Functions are very similar, with the exception of Long Lasting sessions, but if you need that you can combine the work you did here and simply add the TaskRouter and Flex components that are articulated in that blog post.
If you are looking at extending the capabilities of Live Agent Handoff with Google Dialogflow CX CCAI, Twilio can help you build a solution architecture to use AnalyzeContent instead of DetectIntent. Just reach out to sales for help and we can get you started.
What about connecting to a Voice Channel as well?
Twilio currently has a powerful managed, 1-click integration with Google Dialogflow CX for Voice in Private Beta, and will be releasing to Public Beta in Q32022. In the meantime, if you are interested in the Private Beta, please check out our Customer Facing documentation to get started.

Related Resources
Twilio Docs
From APIs to SDKs to sample apps
API reference documentation, SDKs, helper libraries, quickstarts, and tutorials for your language and platform.
Resource Center
The latest ebooks, industry reports, and webinars
Learn from customer engagement experts to improve your own communication.
Ahoy
Twilio's developer community hub
Best practices, code samples, and inspiration to build communications and digital engagement experiences.