Encrypting Cookies with Angular Universal and Node.js
Time to read:
March 13, 2019
Written by

Cookies are a ubiquitous feature of web applications, as anyone clicking GDPR notifications for the last several months has realized. Securely handling the data in those cookies is just as much a requirement as the consent notification. Encrypting your Angular and Node.js application cookies is a way to prevent unauthorized access to confidential and personal information, and it’s easy to implement.
As you know, using an httpOnly cookie helps prevent cross-site scripting (XSS) attacks. (You can learn more in another post.) But what about protecting one registered user’s data against another registered user? Are cookies vulnerable to attacks from trusted users?
This post will demonstrate how authenticated users can get unauthorized access to other users’ cookie data. It will also show you how to encrypt your cookies so the data can only be read by your code, not by users.
The code in this post uses the cryptography library in OpenSSL to perform the encryption and decryption, but it doesn’t require you to know much about the library or cryptography to use it. You also won’t need to perform a complicated install or build process to use cryptography. (Big sigh of relief here, right?)
Prerequisites for encrypting cookies with Angular Universal and Node.js
To accomplish the tasks in this post you will need the following:
- Node.js and npm (The Node.js installation will also install npm.)
- Angular CLI
- Git (For Windows users, the Git installation will also install an OpenSSL executable.)
- The EditThisCookie extension for Google Chrome
To learn most effectively from this post you should have the following:
- Working knowledge of TypeScript and the Angular framework
- Familiarity with Angular observables and dependency injection
- Some exposure to Angular Universal and server-side rendering (SSR)
There is a companion repository for this post available on GitHub.
Create the project and files for the components and services
In this step you will initialize the Angular project with npm. You will also add server-side rendering, create a sign in page, a home page, and two services.
Go to the directory under which you’d like to create the project and execute the following command line instructions to initialize the project and add server-side rendering:
Execute the following command line instructions to create the AuthorizationService and AuthGuardService service classes:
Execute the following commands to create the SigninPageComponent and ProtectedPageComponent component classes:
Implement the server and RESTful endpoints
This step implements the Node.js server and the API endpoints, and it creates a couple users for demonstrating the application’s functionality. In a production application you would be validating the user sign in information against a persistent data store, like a database, and you’d be doing some cryptography with that as well so you don’t get caught storing secrets like passwords in plaintext. In this app you’ll be hard-coding them for simplicity’s sake.
Replace contents of the server.ts file with the following TypeScript code:
In the code above, note the two users john and kate, and their uid values, passwords, and secrets. They’ll appear later.
If you are an eagle-eyed and experienced JavaScript developer you will have noted the use of JavaScript double-negation in the /auth/isLogged endpoint. This is a way of determining the truthiness of an object. There is a Stack Overflow Q&A on the subject of not-not with extensive commentary, but the easiest—and by far the drollest—way to remember what is does was provided by Gus in 2012: “bang, bang; you’re boolean”.
Also note the API endpoint responsible for user authorization: /auth/signIn. Whenever the username and password match, the code sets up an httpOnly cookie on the client side. The cookie isn’t encrypted at this point, so you’ll be able to read and change the contents with the EditThisCookie extension for Chrome.
The presence of the cookie indicates a user is signed in:
If a user signs out, all that needs to happen is to remove the authenticated user’s cookie:
Another endpoint responds with data from the user’s record in the users array:
Create components and services
The server’s API endpoints are going to be consumed in two places, the ProtectedPageComponent and AuthorizationService classes. The ProtectedPageComponent class displays the user data stored in the mySecret field of the users array.
Replace the contents of the src/app/protected-page/protected-page.component.ts file with the following TypeScript code:
Replace content of the src/app/protected-page/protected-page.component.html file with following HTML markup:
Of course, customer secrets should be available only to them. An AuthorizationService class will provide the functionality necessary to sign the user into the app and redirect them to the target URL containing the user secret: /protected-page.
The class also returns two observables, one that indicates if the user is signed in, and another that sets the user’s status to ‘signed out’ and redirects them from /protected-page (or any page requiring a signed-in user) to /signin.
Replace the contents of the src/app/authorization.service.ts file with the following TypeScript code:
Now that the AuthorizationService class is implemented you can make use of it in the logic for a signOut button.
Add the following import statement at the top of the src/app/protected-page/protected-page.component.ts file:
Modify the ProtectedPageComponent class constructor in the same file to read as follows:
Add the following code to the bottom of the protected-page.component.ts file to implement the signOut method:
The AuthorizationService class is also used by the AuthGuardService class, which you can implement now.
Replace contents of the src/app/auth-guard.service.ts file with this TypeScript code:
The AuthGuardService class is used to protect routes and pages requiring a user to be authenticated and authorized in order to access them. In this application, the /home route is implemented with the ProtectedPageComponent. The AuthGuardService class implements the CanActivate interface, which enables Angular routing to invoke the service when the route is activated.
As you can see in the code above, whenever unauthenticated users are redirected to the /signin page.
Implement the /signin page by replacing the contents of src/app/signin-page/signin-page.component.ts with the following TypeScript code:
Implement the template for the /signin page by replacing the contents of the src/app/signin-page/signin-page.component.html file with the following HTML markup:
To work with the FormGroup object introduced in the SigninPageComponent you need to import ReactiveFormsModule in the AppModule class.
Insert the following import statement into the src/app/app.module.ts file:
And add it to the imports array of the @NgModule decorator as follows:
The services and components all come together in the application’s routing directives.
Replace the contents of the src/app/app-routing.module.ts file with the following TypeScript code:
Remove all the contents of the src/app/app.component.html file except the routerOutlet element:
If you want to catch up to this step using the code from the GitHub repository, execute the following commands in the directory where you’d like to create the project directory:
Build and test the application
To build and run the application, execute the following npm command line instructions in the encrypted-rsa-cookie-nodejs directory:
Navigate to http://localhost:8080 with your browser.
You should be redirected to the /signin page, as shown below. This demonstrates that the AuthGuardService and routing are working as intended.
Enter the credentials of the first test user (defined in the server.ts file).
Username: john
Password: abc123
Click the Sign In button.
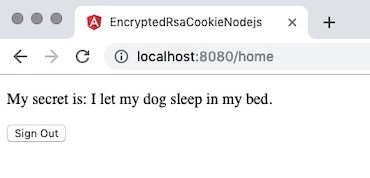
You should see a feline-related secret. This demonstrates that the user is authenticated and allowed to access the /home route and also authorized see the mySecret data for uid 1, john. The application should appear in the browser as in the illustration below:

Now check Kate’s credentials.
Click the Sign Out button and enter the credentials for uid 2.
Username: kate
Password: 123abc
Click the Sign In button.
You should see a canine-related secret. This demonstrate that the values of mySecret are being correctly retrieved based on the value of uid in the users array in the server.ts file. Your results should be similar to those shown below.
Both users need to use their credentials to see their secret data.
But can they see only their own secret data?
Examine how the /secretData endpoint in the server.ts file determines how to find the value of mySecret`:
The server code reads the contents of the authorization cookie received with the request. Based on the value of uid, it looks for the corresponding user in the users array and returns value of the mySecret field for the user. The cookie has an httpOnly attribute, so it can’t be read by malicious JavaScript code and compromised by a hacker.
But what happens if Kate signs into the application and changes her cookie value manually? You can simulate that with the EditThisCookie extension for Google Chrome.
Install the EditThisCookie extension, then follow these steps with the application running:
- Navigate to http://localhost:8080
- Sign in using Kate’s credentials: username: kate, password: 123abc
- Click on the EditThisCookie icon in the top right corner (next to the address bar)
- Click on the
authenticationcookie and change its value from2to1 - Reload the page
Ooops. An unauthorized access to data! Kate is able to see the canine secret associated with John.
Encrypt the cookie
You can prevent unauthorized access to data stored in cookies with encryption. Because the cookie data won’t be shared with any other system (a third-party system or an internal system like a microservices architecture) only a private RSA key is necessary. This makes the key easy to generate and use.
Windows users
If you have installed Git, you can find the openssl.exe executable in the C:\Program Files\Git\usr\bin directory. Note that this directory may not be included in your path and you will need write access to the target directory to create the privkey.pem file. Regardless of where you generate the file, its final destination should be the encrypted-ras-cookie-nodejs directory.
macOS users
On macOS, you can install an OpenSSL by using brew package manager:
Linux users
If you are Linux user you can install OpenSSL using the default package manager for your system. For example, Ubuntu users can use apt-get:
In keeping with the preceding prerequisites for your operating system, execute the following command line instruction to generate the private RSA key:
The key you generated is going to be used in the encrypt() and decrypt() methods in the server.ts file.
Insert the following TypeScript code after the users array initialization in the server.ts file:
Now you can change implementations of the /auth/signin and /secretData endpoints in server.ts:
As you can see, the /auth/signin endpoint now uses the crypto library and the privkey.pem key to encrypt the value of the authentication cookie. The /secretData endpoint decrypts the value of mySecret based on the encrypted value of uid, which is highly resistant to being hacked. Only if the encrypted value of uid matches a value in the users data store is an associated value for mySecret returned.
If you want to catch up to this step using the code from the companion GitHub repository, execute the following command line instructions in the directory where you’d like to create the project directory:
Rebuild and test the application
To rebuild and run the application, execute the following command line instructions in the encrypted-rse-cookie-nodejs directory:
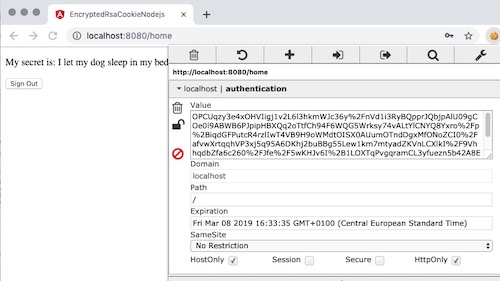
Navigate to http://localhost:8080 with Google Chrome. Sign in using the credentials of one of the test users (john or kate). Using EditThisCookie, check the value of the authenticated cookie. You should see a string like se43zECwOjU8LAvaVl8fIqOLOzYAVTQoGZKVi2fqg54tmDaapm... in the Value field.
Your actual value will be determined by the encryption algorithm, so it will be different. This value is substantially more difficult to interpret and change than the 1 or 2 used when this was a plaintext field. It would be almost equally difficult to change successfully if it was an email address or an order number.
The results are illustrated in the screenshot below. Note that the HttpOnly field is checked, so the cookie is still inaccessible to JavaScript running on the client.
Experiment with signing out as one user and signing in as another to see how the AuthGuardService class and other components govern the application’s routing.
Finally, note that the EditThisCookie extension for Chrome has a lot of power. You may want to disable it when you’re not using it, or uninstall it.
Summary of encrypting data in Encrypting cookies with Angular Universal and Node.js
Beware! Your “trusted user” might not be trustworthy.
To protect your customers you need to consider every possible way in which the security of your application might be compromised and then implement an effective response. Storing values outside of the app in encrypted form is one of the steps which brings you closer to effective security.
In this post you learned how to use an authentication cookie to restrict access to user secrets by using the data in the cookie to perform authorization functions. You saw a first-hand example of how unauthorized modification of a cookie value can result in unauthorized access to confidential data. Most importantly, you learned a technique for encrypting cookie fields to prevent unauthorized modification of their values.
Additional resources
For more information about security and authorization check out these previous posts on the Twilio blog:
- Build Two-factor Authentication in Angular with Twilio Authy
- Building Expedited Two-Factor Authentication into Angular Apps with Authy
Maciej Treder is a Senior Software Development Engineer at Akamai Technologies. He is also an international conference speaker and the author of @ng-toolkit, an open source toolkit for building Angular progressive web apps (PWAs), serverless apps, and Angular Universal apps. Check out the repo to learn more about the toolkit, contribute, and support the project. You can learn more about the author at https://www.maciejtreder.com. You can also contact him at: contact@maciejtreder.com or @maciejtreder on GitHub, Twitter, StackOverflow, and LinkedIn.

Related Resources
Twilio Docs
From APIs to SDKs to sample apps
API reference documentation, SDKs, helper libraries, quickstarts, and tutorials for your language and platform.
Resource Center
The latest ebooks, industry reports, and webinars
Learn from customer engagement experts to improve your own communication.
Ahoy
Twilio's developer community hub
Best practices, code samples, and inspiration to build communications and digital engagement experiences.