How to Create an iCal Calendar Feed with PHP using Laravel Lumen
Time to read:
November 13, 2018
Written by

iCal, short for iCalendar, is an internet standard file format used to store calendar information. Being a standard format, it is compatible with most online calendars, giving you access to important dates regardless of your preferred client (Google Calendar, Outlook Calendar, Apple Calendar, etc.). Even popular online services use the iCal format to help their users remember important dates. Airbnb, for example, uses the iCal format to store room availability giving users the ability to export their Airbnb calendar and view it on an external calendar.

In this tutorial, you’ll learn about the iCal format and how to create an iCal calendar feed using Lumen, a PHP micro-framework by Laravel that allows you to quickly build elegant APIs.
Tutorial Requirements
For this tutorial, you will need:
- A PHP development environment
- A global installation of Composer
- A global installation of ngrok
- A PostgreSQL Database
- Postman
The iCal Object
Below is a sample iCal object:
The iCal object has three parts: begin, body and end. The iCal object must start with BEGIN:VCALENDAR and end with END:VCALENDAR. The body consists of a sequence of properties and one or more calendar components.
In our example above, we have two properties, VERSION and PRODID. While there are many other properties, these two must be present in an iCal object in order for it to parse correctly.
PRODID is your company details in the format: Business Name//Product Name//Language. VERSION is the current version of iCal.
A calendar can have multiple components, each grouped inside a begin and end delimiter. A component is a collection of properties that express a particular calendar semantic. For example, the calendar component can specify an event, to-do, journal entry, time zone information, free/busy time information or an alarm. In our example above, the event properties are grouped inside the BEGIN:VEVENT and END:VEVENT delimiters.
Here is some information on a few properties of an event component:
- UID: A unique ID for the event (required).
- DTSTAMP: The date the event was created (required).
- DTSTART/DTEND: The start and end timestamps of an event in UTC format.
- SUMMARY: The event title.
For more information on the iCal object and its properties, please check out the official documentation.
Setup
Starting a Lumen Project
Lumen is a fast PHP micro-framework by Laravel. This micro-framework makes it very easy to bootstrap a new project with the ability to handle up to 1900 requests per second.
To start a new lumen project via Composer, run the following command:
The last part of the command is the name of our project. I have named mine "iCal". Once we run the command, Composer downloads all required dependencies and prepares our application.
Let’s check if everything worked as expected. We will start our application by running the command:
Our application is now served on localhost port 8000. On your browser, navigate to http://localhost:8000/. You should see the version of lumen you’re using. At the time of writing this tutorial, it is version 5.7.4.
Database and Environment Configuration
The next step is to create a database and configure our connection to the database. Lumen supports four database systems: MySQL, PostgreSQL, SQLite and SQL Server. I am using PostgreSQL for this tutorial. I have created a database called events.
When we created our Lumen application, a .env file was created for us. Once you have created your database, go ahead and update the database credentials in the .env file. Here is what your updated .env should look like:
That is everything we need to do to connect our database. We’re making good progress, however, we have no way of testing our database connection just yet. Let’s go ahead and make a migration.
Create a Migration
Migrations allow you to build, modify and share the applications database schema with ease. For our events application, we need one table called tech_events. It should have the following columns:
- id
- name
- starts
- ends
- status
- summary
- location
- uid
- created_at
- Updated_at
To create a migration we will use the make:migration Artisan command:
The new migration is placed in the database/migrations folder. If you open up the newly created migration, this is what you get:
Inside the up() method, we create a table and define its columns. The down() method reverses the migrations if we need to.
Let’s go ahead and update the up() method with the columns we require. This is what we have:
In the above code we have added columns using this format $table->string('name'). This means we have a column called name and its datatype is a string.
Now that we have defined our schema, let’s do a migration to check if it translates to our database. Run the artisan command:
Check your database for the above migration. I am using Postico to check the database. This is what the database looks like:
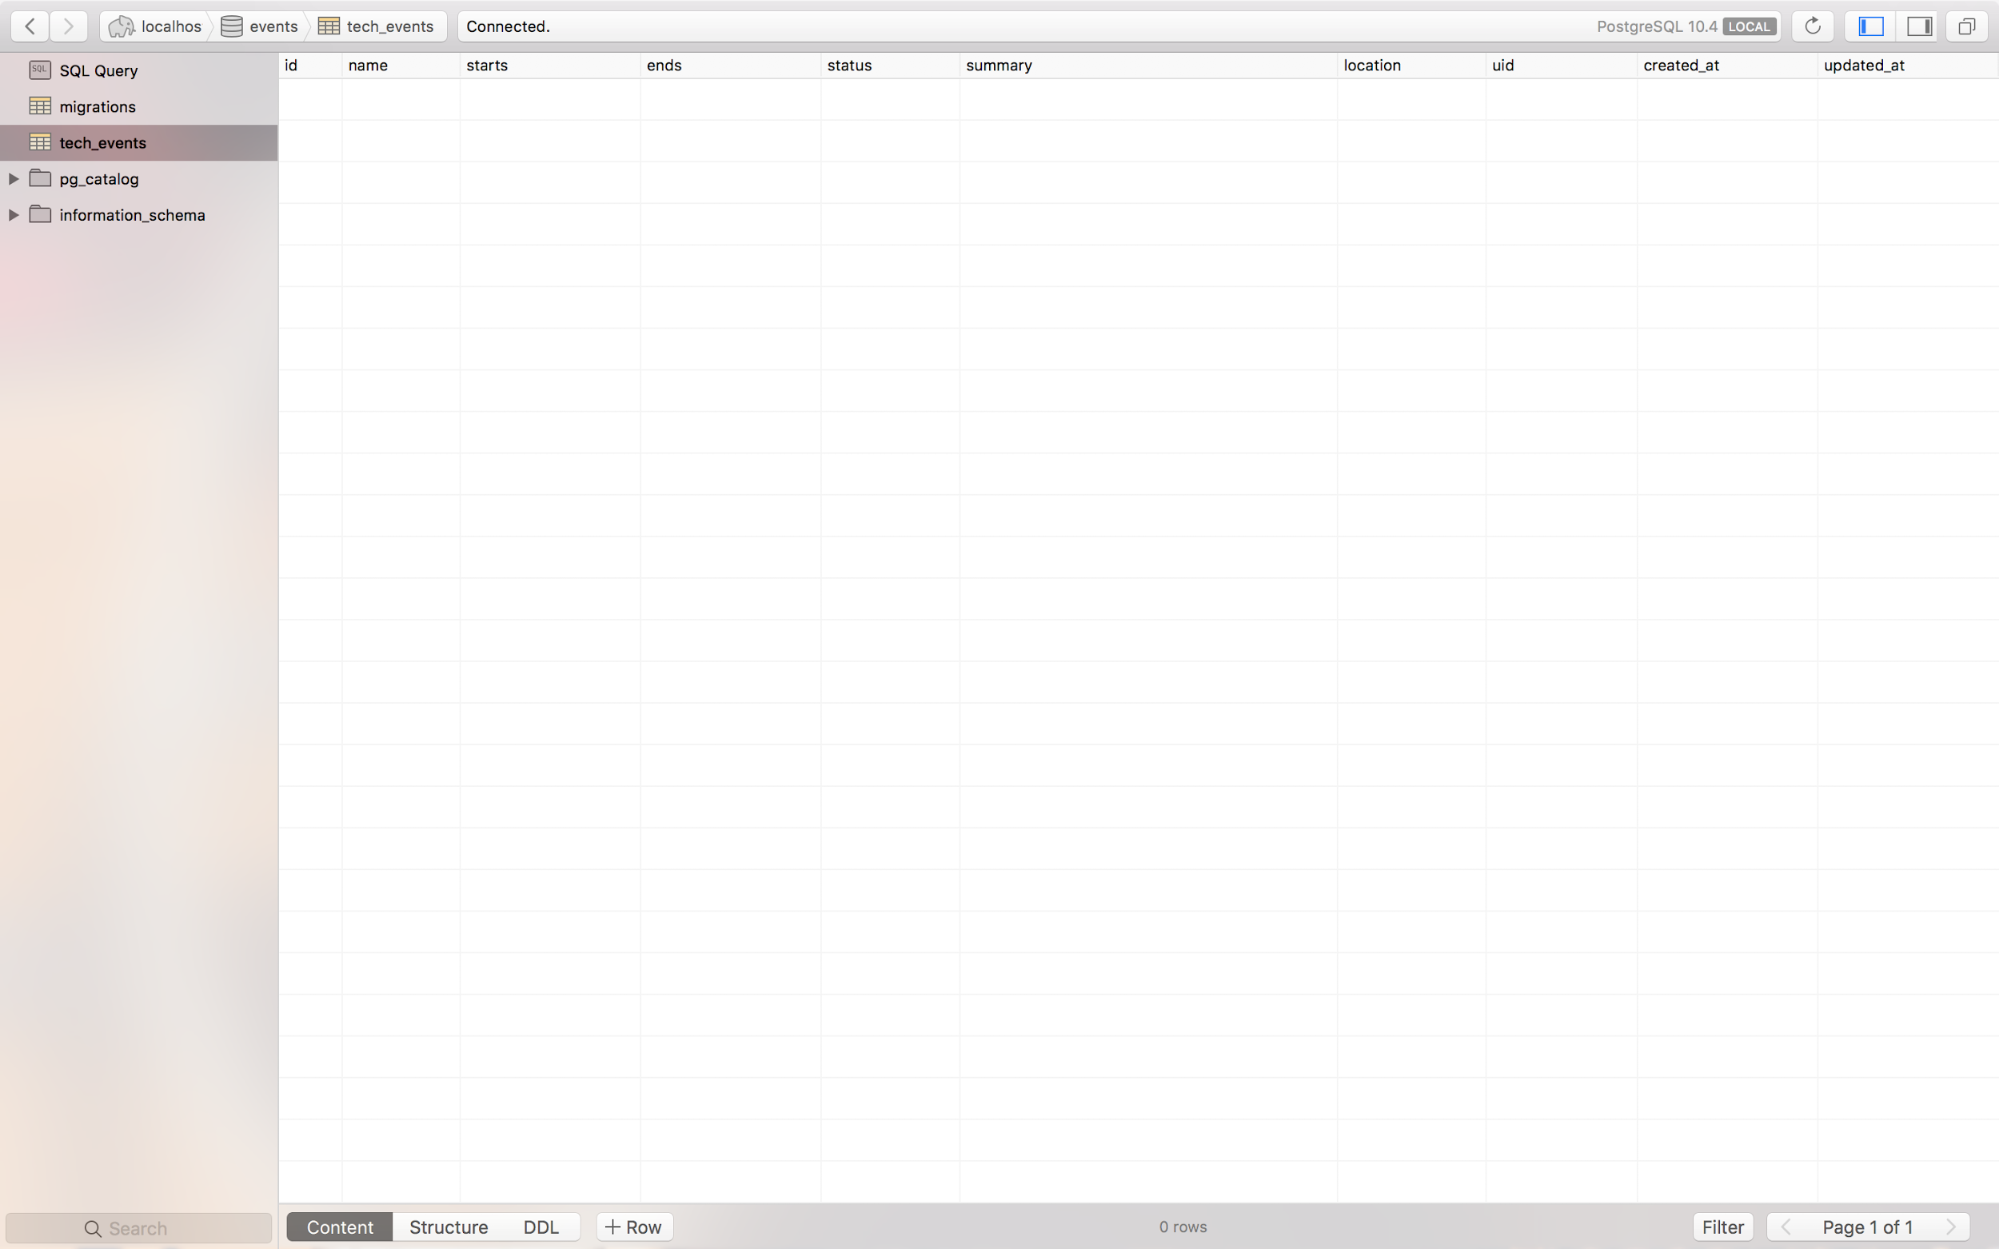
Great! We have now set up our database, connected it and defined the schema for our tech_events table.
Create the Tech Events Model
We will use Laravel’s Eloquent ORM to interact with our database. To do so we will need to enable the Eloquent ORM by opening the file bootstrap/app.php and uncommenting these lines:
Models are typically inside the app folder. In our app folder, we have a file called User.php. By default, Lumen comes with the User model when we create our application.
If we had many models, a good practice would be to create a folder and store our models in it. Since we are only adding one more model, let us leave it in the app folder.
Create the file app/TechEvents.php and add the following code in it:
We have defined our model. We can now interact with our database using Eloquent. In order to build our calendar feed, we will need some events in our database. Let’s go ahead and seed some data in our database. More on models can be found in the documentation.
Seed Tech Events Data
Lumen provides an easy way to add fake data using factories. We define our model factories in the database/factories/ModelFactory.php file. Let’s have a look at what our file looks like by default:
We can see a model factory is defined for the user model. It has the name and email fields. The Faker library is used to generate fake data for the fields. It is one of the dependencies that was installed when we created the application. You can confirm this by checking the composer.json file under "require-dev". Let us update the file by adding a model factory for the tech events model:
We have imported Carbon, a PHP extension for DateTime. We have also declared a variable called $startTime. This generates a random date within a month from now. For this tutorial, our events will only last two hours. In the 'ends' field we add two hours to the $startTime.
In order to seed our database with fake data, we need one more step. In the file database/seeds/DatabaseSeeder.php, we have one method called run(). When we run seeders, this is the method that is called.
This method uses model factories to generate and insert data into the database. Let’s add our newly created model factory:
By calling factory(TechEvents::class, 10)->create() inside the run method, we are indicating that we would like to generate and insert ten records into our database.
It is time to check if we have done everything correctly. Run the command:
Your database should look like this:

We have now successfully added data to our tech_events table.
Building our iCal object
The iCal Controller
We need one controller for this tutorial. In the directory app/Http/Controllers. Create a controller called ICalController.php and add the following code:
In the getEventsICalObject() method, we start by using Eloquent’s all() method to fetch all the events from the database and store them in the $events variable. Secondly, we define the iCal format. This is used to transform our timestamps into UTC format. Then we begin building our iCal object by looping through each event and adding them to the iCal object.
After closing the object we add the required headers. That includes the file name in .ics format. I have named mine "cal.ics".
Lastly, we get rid of unwanted spaces which would otherwise make the .ics file invalid.
Creating an Endpoint
So far we have worked on the code that fetches the data and creates the iCal object. Since we still have no way of testing this code, we need to create an endpoint. Inside routes/web.php add this line of code:
We have just declared a route. The method to access this route is GET and the URL to hit the endpoint is http://localhost:8000/ical-events.
Let’s go ahead and test this out on Postman. Make sure your application is running on port 8000. If it isn’t, you can run the command:
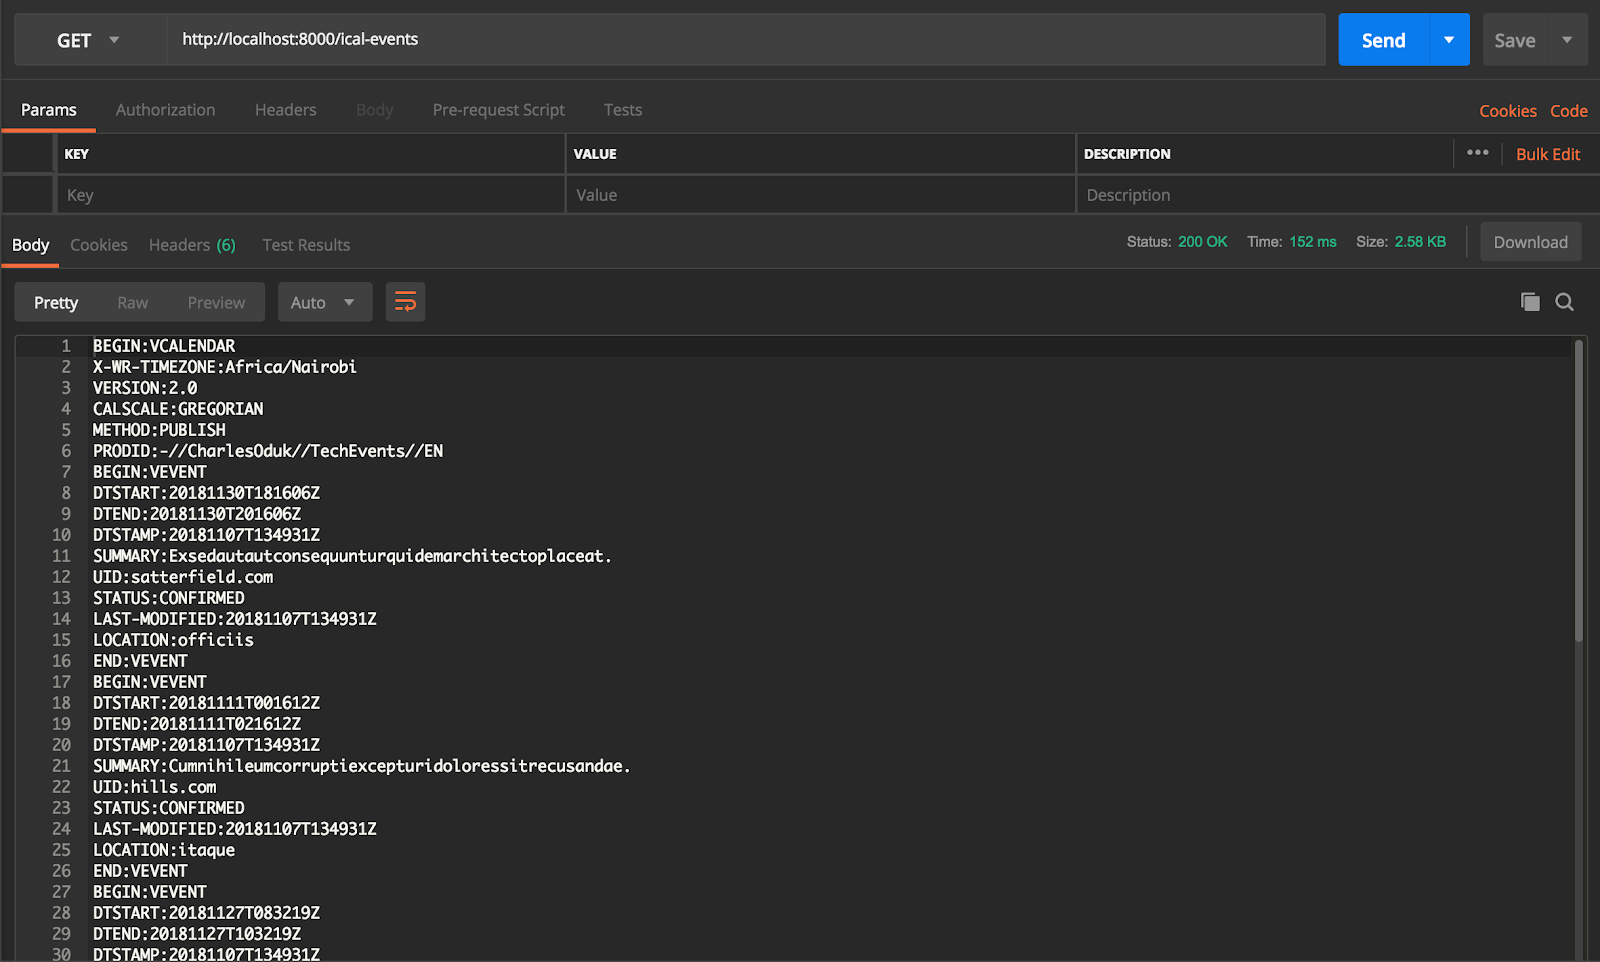
Success! We are able to get our events into the iCal format. We need to test this out on different calendars to see if it works. In order to test it on Google and Outlook, we need our application to be accessible through a public URL. This is where ngrok comes in!
While still running the application on localhost, open up a new terminal and run the command:
Test on Google and Outlook
Google Calendar
To test it out on google:
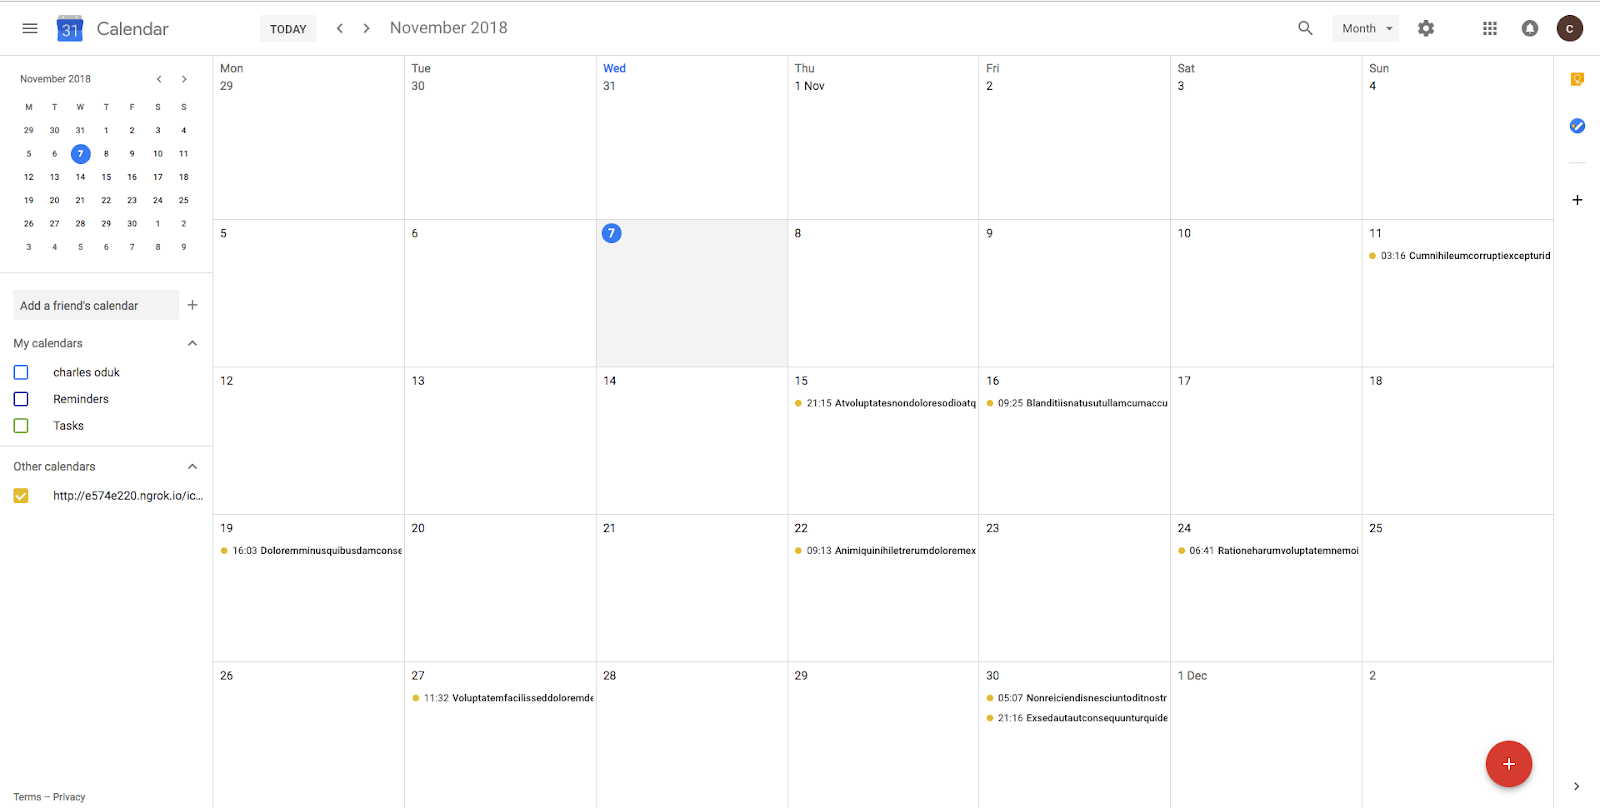
On the left, click the + icon, next to "Add a friend’s calendar" input box. Select "From URL" then enter the URL you got from ngrok. Mine is http://e574e220.ngrok.io/ical-events.
Your calendar should now have the events from your database.
Outlook Calendar
To test it on Outlook, on the top menu bar, click “Add Calendar”. Then click “From Internet”, to enter the URL and name your calendar. Click save. That’s it!
Conclusion
All done! We have successfully created an iCal feed and tested it out on Google and Outlook. You can now test it out on different calendars, including your local calendaring application such as Apple Calendar.
Next Steps?
You can create a scheduling application and add the option of downloading an iCal file or giving users a URL to access the iCal feed.
Also, you can request users to opt into SMS reminders to their calendar using the Twilio SMS API. This tutorial on sending SMS reminders from PHP is a great place to start.
I look forward to hearing about the amazing application you build. You can find the complete code on Github. You can reach me on:
Email: odukjr@gmail.com
Github: charlieoduk
Twitter: @charlieoduk
Happy Coding!


Related Resources
Twilio Docs
From APIs to SDKs to sample apps
API reference documentation, SDKs, helper libraries, quickstarts, and tutorials for your language and platform.
Resource Center
The latest ebooks, industry reports, and webinars
Learn from customer engagement experts to improve your own communication.
Ahoy
Twilio's developer community hub
Best practices, code samples, and inspiration to build communications and digital engagement experiences.