Identify Unknown Phone Numbers with Python 3, AWS Lambda, Twilio Lookup and SMS
Time to read:
December 07, 2018
Written by
This post is part of Twilio’s archive and may contain outdated information. We’re always building something new, so be sure to check out our latest posts for the most up-to-date insights.

Ever receive a text, probably from an old friend, but you don’t have their number saved? And you’re too embarrassed to ask, “Who is this?”.
Don’t worry. We’ve all been there. But today, we’re here to tell you that we have a solution to avoid this situations! Let's build a small Python app that uses Twilio Lookup and SMS to help you lookup phone numbers over text on the go.
The Tech Stack of Our App
Our app will use two AWS products and two Twilio APIs:
- AWS Lambda: the serverless environment which will hold our functions
- Amazon API Gateway: our API which exposes our Lambda to our Twilio number
- Lookup: to look up the phone number and see who it belongs to
- SMS: to send us a text with the phone number.
Here’s how everything will work together:
- We’ll send a text message to our Twilio phone number
- That will trigger a POST request to a URL provided by our Amazon API Gateway which says, “Hey, Amazon! Take this information and use it when you run my functions in my Lambda.”
- Our functions will parse the number you want to lookup from the text message and see if it can find a name associated with the number.
- Then it will send the information it found to the number who requested it using Twilio’s SMS API
Sounds pretty cool, eh? You’ll feel like a “serverless Python guru” after you build this. Trust us.

Sign Up for Twilio & Get a Number
In order to getting started, we need to do a few things. First, make sure you sign up for a Twilio account. Then get your first Twilio phone number. We’ll configure this later.
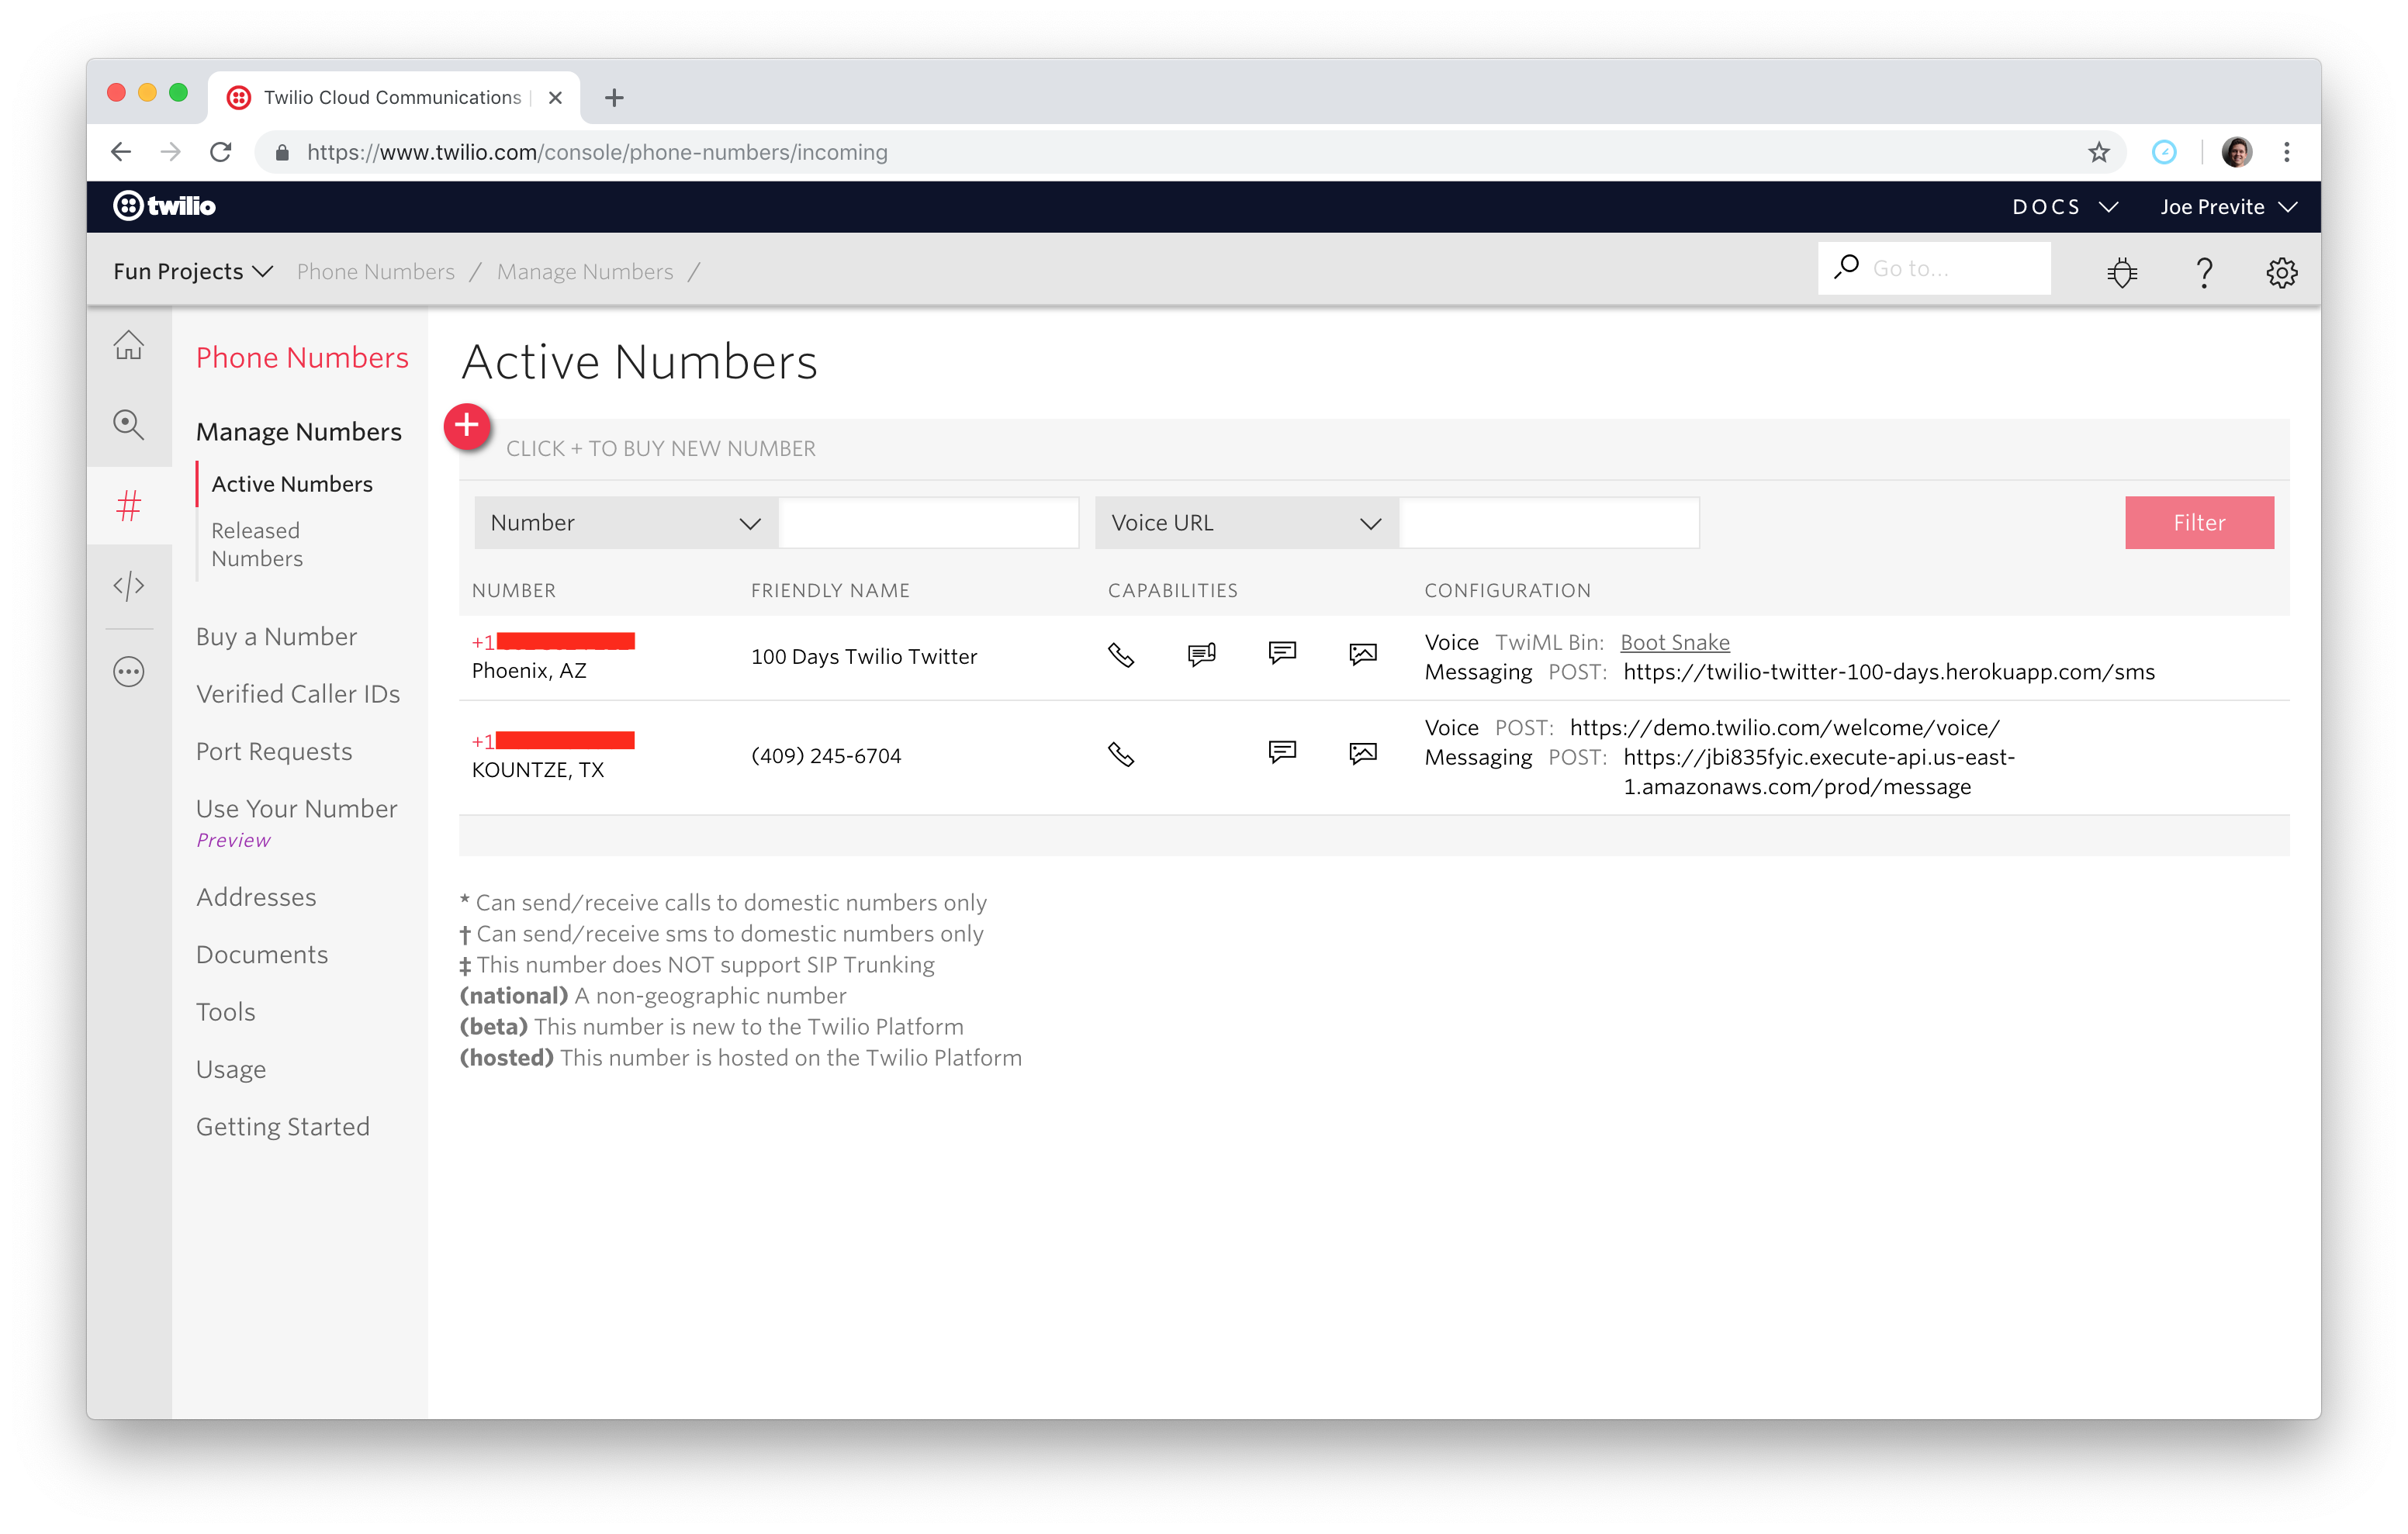
Click the red ‘+’ icon to purchase a Twilio phone number.
Set Up Our AWS Lambda Function
To get started with AWS Lambdas, head to the AWS Lambda page and click ‘Create an Account’. Select Lambda from the AWS Management Console screen.
Click ‘create a function’ then select ‘Blueprints’. Search for ‘microservice-http-endpoint-python3’ and select the card that looks like this:
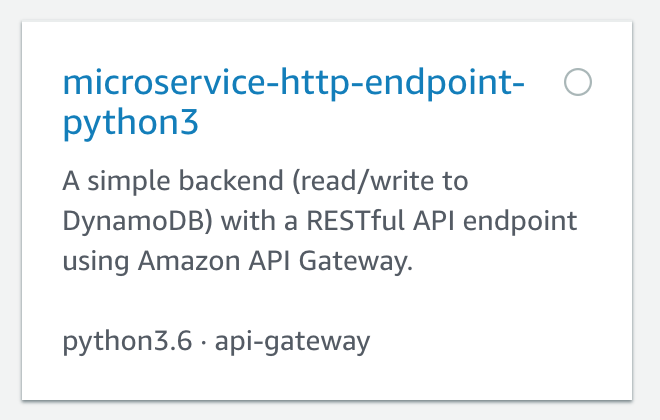
Select ‘microservice-http-endpoint-python3’ from the Blueprints.
Give your function the name ‘twilio_lookup_function’. For Role, select ‘Create a new role from one or more templates’.
Name the role ‘myTwilioRole’. Scroll down and select ‘create function’ to finish.
Great! Our AWS Lambda Function is scaffolded out. Before we leave this section, scroll down to ‘Environment Variables’. We need to add our Account SID and Auth Token from Twilio, and our Twilio phone number. You can obtain the first two from the Twilio Console and the Twilio number you purchased earlier. Once you have all three ready, add them in like so:
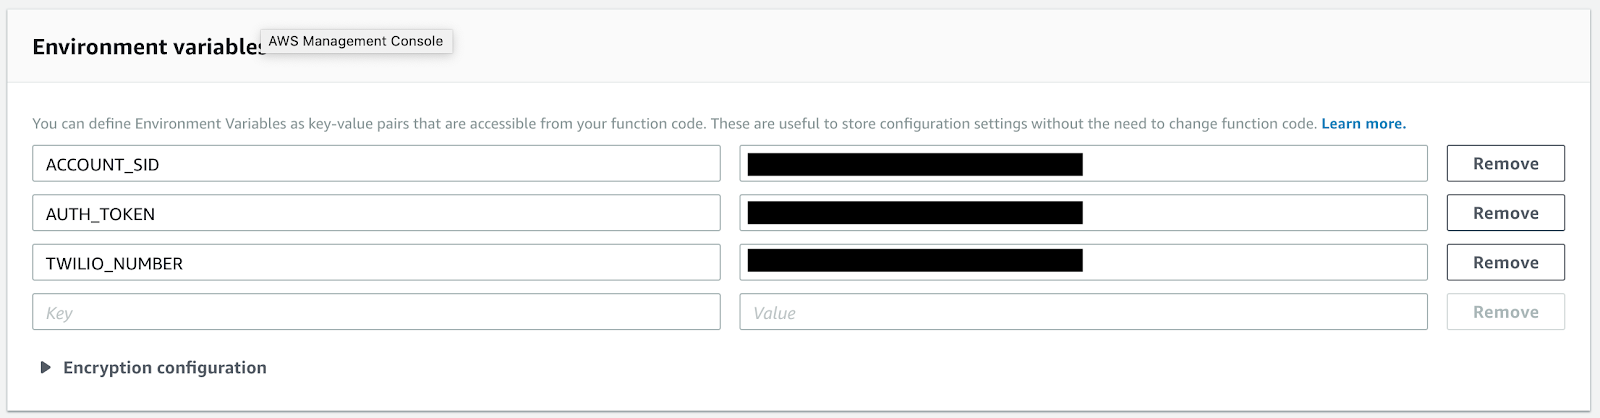
Add your ACCOUNT_SID, AUTH_TOKEN and TWILIO_NUMBER as environment variables.
Great! Our AWS Lambda Function is setup. Now we can move on to the Amazon API Gateway.
Set Up Amazon API Gateway
The next service we’re going to use in our project is called API Gateway from Amazon. From the API Gateway Console, click ‘Create API’. Then follow these steps to get it set up.
For the name, you can call it ‘twilio_lookup_api’, then click create.
On the next screen, click ‘Actions’ and select ‘Create Resource’.
Under Resource Name, you can use ‘Twilio Responder’ and use /message for the path. Next, select ‘Actions’ again and click ‘Create Method’ and select ‘POST’.
In the ‘Lambda Function’ field, type the name of your function (i.e. ‘twilio_lookup_function’) and click Save.
Click Integration Request, then scroll down to ‘Mapping Templates’. Click ‘Add mapping template’. Put application/x-www-form-urlencoded in the field and click the checkmark. Click yes to secure the application in the pop-up.
Scroll down to the code editor and paste the following code in:
Note that this code comes from the AWS Developer Forums to help us “split our HTTP parameters into JSON key/value pairs” as mentioned in this in-depth tutorial in the Twilio Docs.
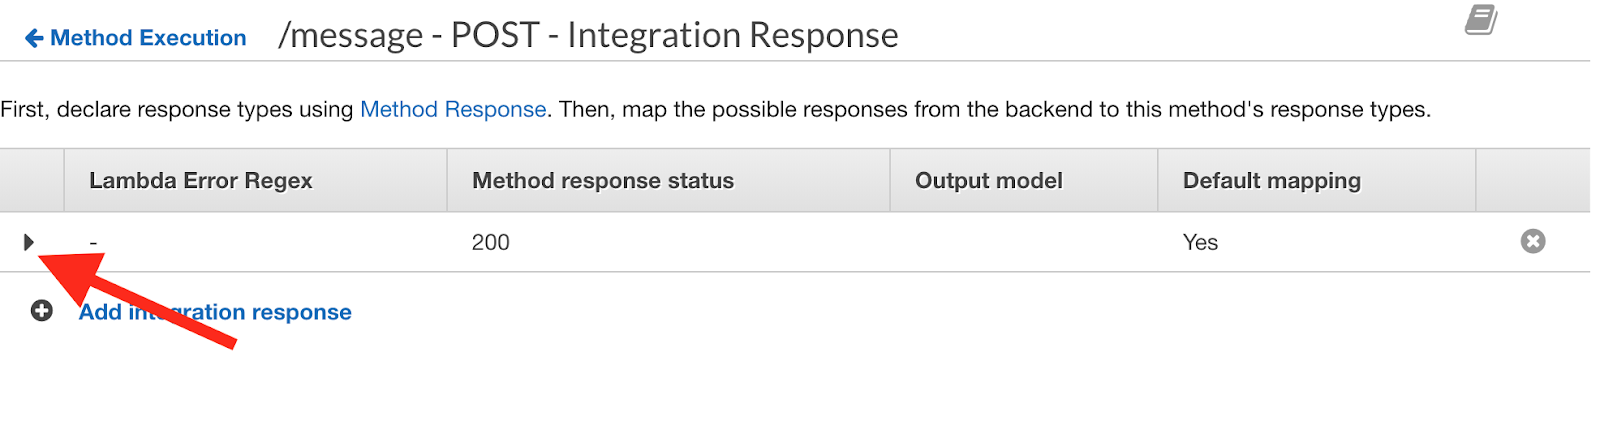
Scroll back up to the top and select ‘Method Execution’ to return to the previous screen. Click ‘Integration Response’ then click the left arrow on the side (see screenshot below) to expand the Method Response.
Click ‘Mapping Templates’ and click ‘Add mapping template’. Paste in the field application/xml and click the checkmark. In the editor on the right, paste in this code and click save.
You can return to the previous screen by scrolling to the top and clicking ‘Method Execution’.
To recap, the reason we had to make adjustments in the ‘Mapping Templates’ sections of both the Method Request and the Method Response was because of the shape of the data we need for our application to work. Twilio will be sending data in the form application/x-www-form-urlencoded and we need it in JSON for our Lambda, and then Twilio expects a response in application/xml so in the response we convert it from application/json.
If you get stuck in this section at all, check out this in-depth tutorial in the Twilio Docs which walks through it all in more detail.
Deploy and Use Our API Gateway
Now that our API Gateway is ready to work with Twilio, we can deploy it! Select ‘Actions’ and then click ‘Deploy API’. For stage, select ‘[New Stage]’ then name it ‘prod’ for production.
On the left side, select ‘Stages’. Click on the arrow next to ‘prod’ to toggle it and then click on ‘POST’ under ‘/message’. Here, you’ll find your Invoke URL.
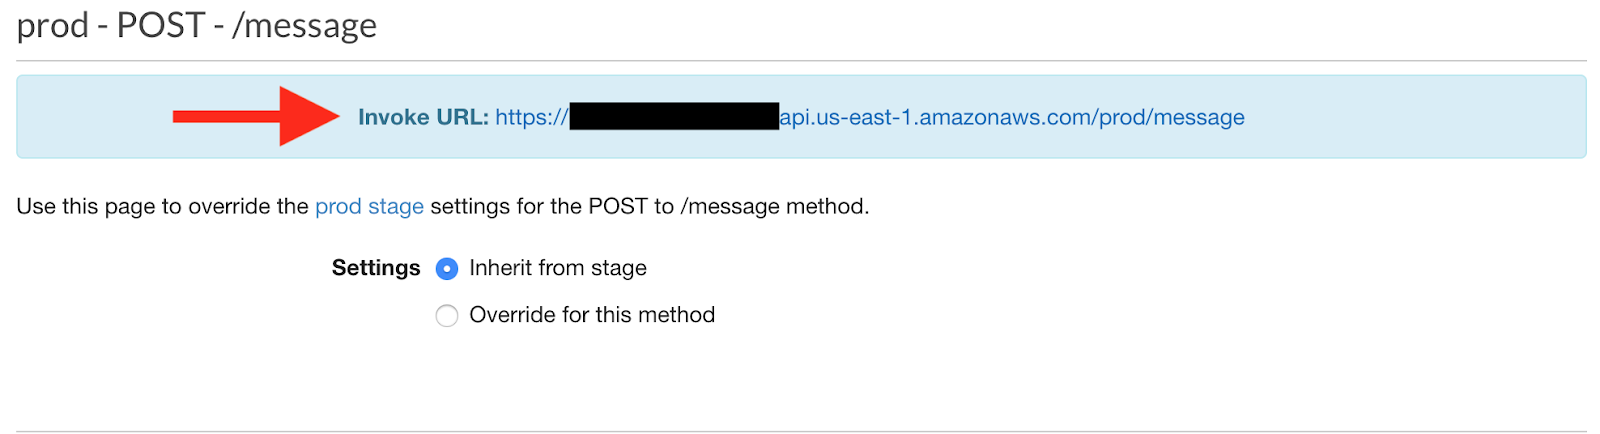
Copy that URL and save it for later. We’ll hook it up to our Twilio phone number at the end.
Parsing the Phone Number From Our Text
When a text message is sent to our app, we’ll need to do a few things:
- Check to make sure a US phone number was sent (area code + seven digits)
- Remove spaces, dashes and parentheses
- Add the country code to the front
This is the first of three functions we’ll be using inside our app. We’ll organize them all in a file called helpers.py in our local development for now. From the command line, run the following from the root of your project:
Inside that file, we’re going to first add our module imports and variables. Add the following to the top of your file:
If you take a look at the code, we’re using dotenv to manager our environment variables, or pieces of our app that are secret like Account SID and auth token and then importing os to read those variables and re for working with regular expressions(more on that soon).
Next, let’s add in our parse_number function which will be used to parse the text message to get the phone number we want to look up. After we add it, we’ll walk through it line-by-line to understand what it is doing for us:
We check to make sure to make sure the message has at least 2 digits. Then we replace the ‘%2B’ with a ‘+’ because when we receive the text message, it will have converted the ‘+’ to unicode. So, we convert it back.
Then we clean up the number by removing any dashes, parens, or spaces. The rest checks the length of the number. If it’s less than 10, the number is too short. If it equals 10, we add the country code. If it’s greater than 10, we compare the first two characters to our country code to see if it’s already there.
Essentially, the function returns the phone number if it’s valid, otherwise returns False.
Send a Message in Response
The next function we’re going to write is called send_message. As you might assume, it will allow us to send a message in response. Add this to your function after parse_number.
This function accepts a message and a to_number and then runs the function to send a text using Twilio's SMS API.
Checking for the Caller Name
Using the Lookup API, we can check if there’s a caller name available. Add this function after the previous function:
When you pass in the number_to_lookup and call this function, it checks to see if the name exists. If it does, it returns the name registered to the number you are looking up. Otherwise, it returns False.
We’ve added all the functions we’re going to be using in our app. Your helpers.py should look like this:
Do the Thing!
Now that we’ve made written these three awesome helper functions, it is time to make some magic happen! Create a new file in the root of your project called lambda_function.py. This will be the function that runs when we a text message is sent to our number. Add the following code to lambda_function.py:
After importing our modules, we’re able to access and use the functions we wrote earlier. First, we parse the phone number that comes on the Body key in the event dictionary. If there’s a number, we proceed to look up the caller name. If we find one, we send it in the message, otherwise we tell them we couldn’t find it. At the end of the function, we return a Response so Twilio knows we’re done.
Create a Deployment Package
All of our code is ready to go. Our last step in our text editor/terminal is to create what’s known as a deployment package. This is essentially all our code bundled up and ready for production.
We’ll be using a virtual environment for the deployment.
From the root directory, run:
While you're still at the root directory, run this to activate the environment:
Install the libraries necessary for this project. In this case, we need Twilio's helper library, and the python-dotenv library.
If you're developing on Windows and running into issues with the dotenv, try the following:
Deactivate the environment:
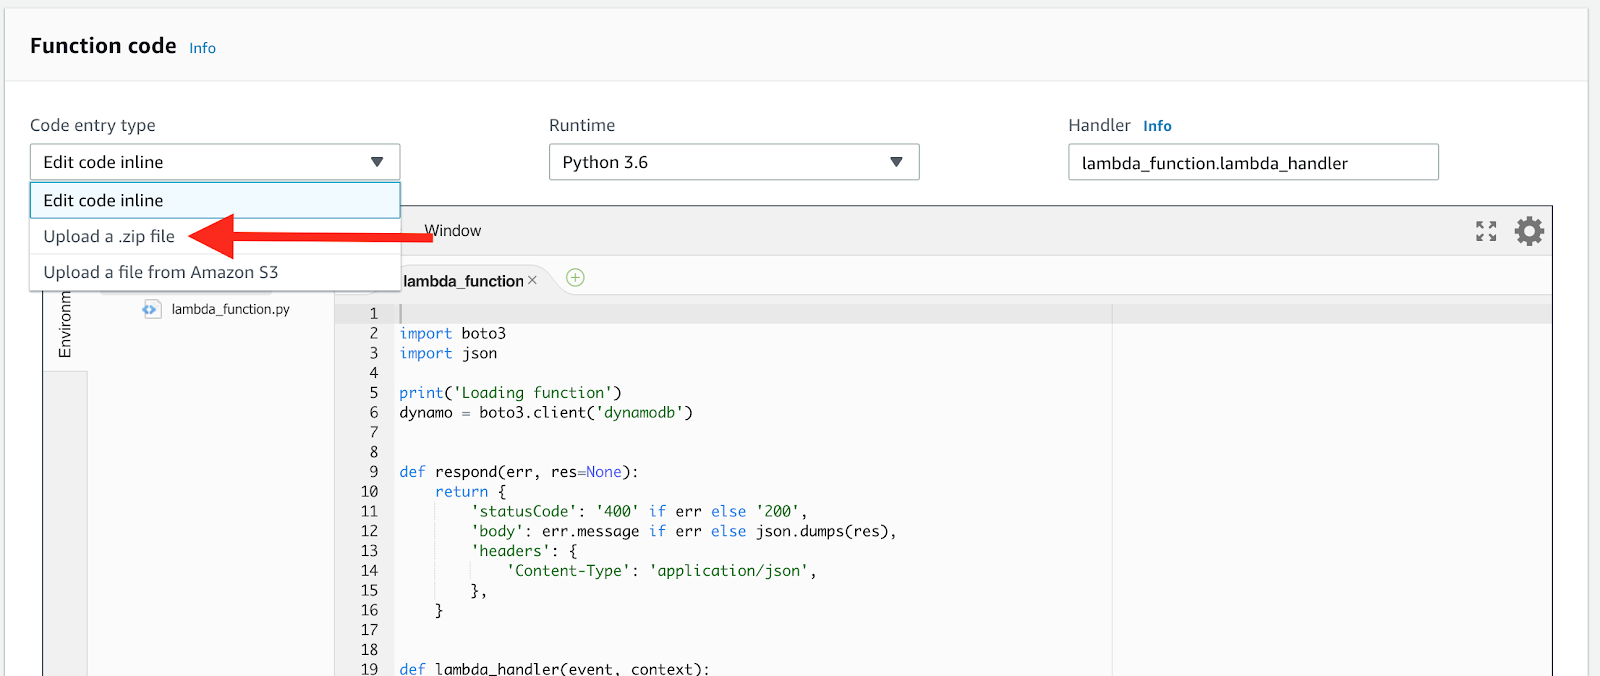
Move your lambda_function.py file into the v-env/lib/python3.6/site-packages directory. Zip the contents of /site-packages directory. Note that you must zip the contents, and not the directory itself. We recommend doing this via the command line.
Upload that zipped directory called function.zip to your AWS Lambda function via the AWS Lambda console.
Then click ‘Save’ up in the top right.
Wire Up Our Function to a Twilio Number
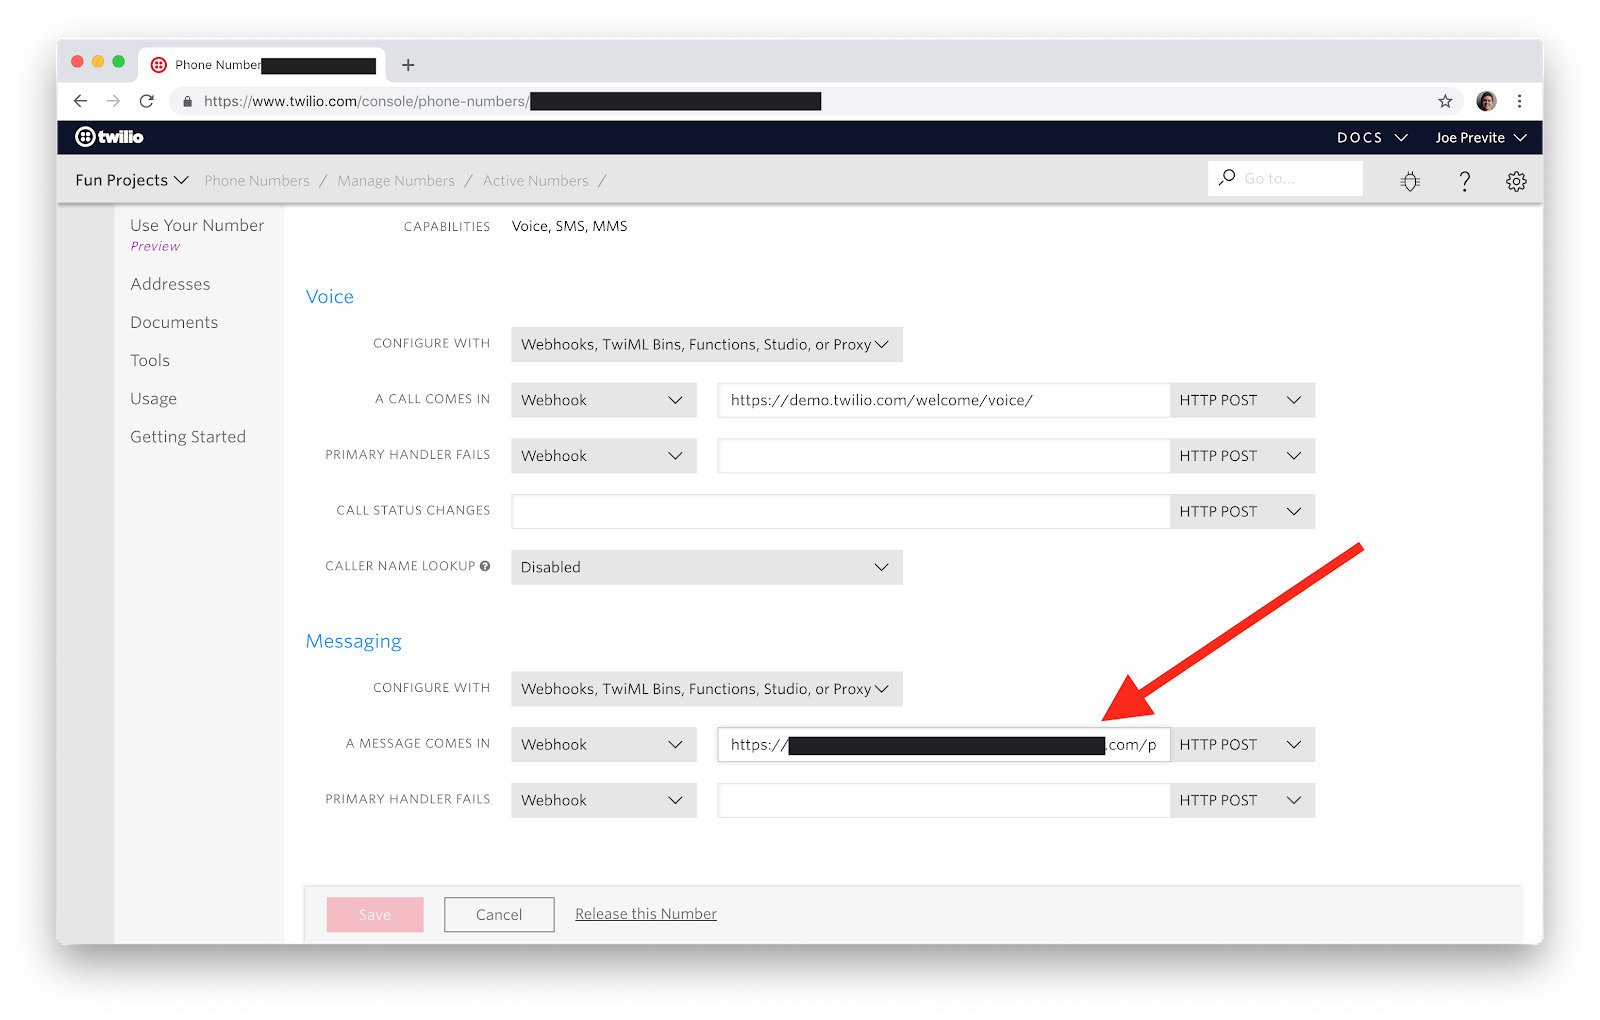
Everything looks good to go from here. Our final step is to connect our Twilio Number and our AWS Lambda Function. Remember that Invoke URL you copied from your ‘prod’ stage in the API Gateway? Grab that!
Now, go to the Twilio console and navigate to your Twilio number. Click on the number to configure it then under “A message comes in” paste your Invoke URL. Double check that it has the ‘/message’ at the end.
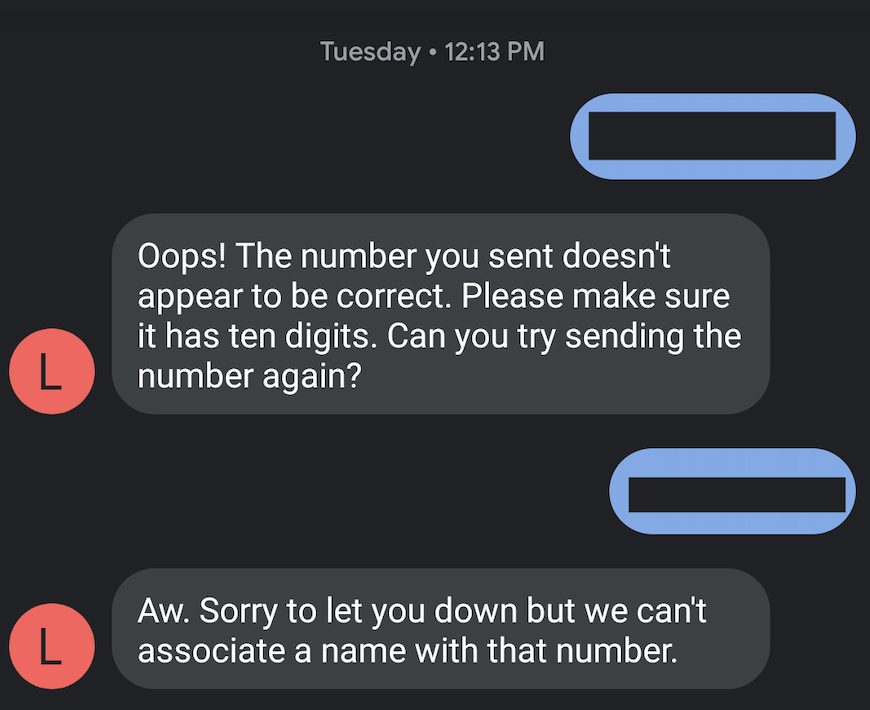
To confirm that it’s working, follow these steps:
- Text your Twilio phone number a 9 digit number like “602555123”. You should receive our custom error message “Oops! The number you sent doesn\'t appear to be correct. Please make sure it has ten digits. Can you try sending the number again?”
- Then try sending a message with your cell phone in it. Either your response will have a name (hopefully yours) that is associated with the number, or it will tell you ‘Aw. Sorry to let you down but we can't associate a name with that number’.

Now you have nothing to fear when you receive a text or call from an unknown number. You can use your handy-dandy app to uncover these strangers.
Wishing you could build the same app in JavaScript? We’ve got you covered. Check out “Identify Unknown Phone Numbers with JavaScript, Twilio Lookup and SMS” for another sweet tutorial.
If you enjoyed this tutorial, tweet us and let us know! @jsjoeio @RyanKauffman80


Related Resources
Twilio Docs
From APIs to SDKs to sample apps
API reference documentation, SDKs, helper libraries, quickstarts, and tutorials for your language and platform.
Resource Center
The latest ebooks, industry reports, and webinars
Learn from customer engagement experts to improve your own communication.
Ahoy
Twilio's developer community hub
Best practices, code samples, and inspiration to build communications and digital engagement experiences.