Incident Notification and Escalation Loop using Programmable Voice
Time to read:
September 13, 2021
Written by

Systems and Infrastructures are constantly monitored, and monitoring teams need to dispatch technicians to fix issues as fast as possible when an incident is raised. Using the Twilio API you already can call a single number to reach a technician and deliver a message, or call several numbers and deliver the message to the first person who answers. In this article we introduce an escalation loop: define several people to be called in case of an incident and call them in order, one after the other, until one of them accepts the call.
For this to happen, we created a reusable set of Twilio Functions that can be triggered by a simple call to a REST API. The code for this solution is available on Github and can be easily deployed on your Twilio project.
Prerequisites
Before you can build the escalation and notification loop, you'll need to register or work through a few things.
- If you haven't yet, register for a free Twilio account
- Purchase a phone number to use as your from number
Awesome – you're now ready to work through the tutorial.
Escalation list
The first step in starting an escalation loop is to provide an ordered list of phone numbers to call. This solution uses an Array of objects, each one specifying the phone number to call and the number of attempts before moving to the next escalation step:
Calling a number
When we try to reach on-call technicians we need to take into account that they may not answer the phone right away, and we don't want to leave a message on their answering machine. So we are using Twilio's built-in Answering Machine Detection to detect and filter those cases.
Twilio Programmable Voice call creation flow lets you pass a webhook url, which is notified once the call is connected or if the call is unsuccessful.
We create a first Twilio Function that starts individual calls, that we name /call/start. It requires two parameters (phone numbers) to and from in order to initiate the call. We also use the machineDetection parameter to enable synchronous machine detection.
Once the call is placed, Twilio will start calling the webhook and provide a set of parameters, including CallStatus and AnsweredBy, that we can use to understand if a real person successfully answers the call.
We are going to handle these asynchronous events in a second Twilio Function /call/webhook, that takes appropriate action depending on the call status. Here is how it looks like :
In the code we are using the CallStatus to detect if the call has been answered, and AnsweredBy to detect if the call was answered by an answering machine.
Loop through the escalation list
The two functions above only perform one call. To implement the escalation we need a third function that loops through the numbers and calls them one by one: the function called /start , which is also the entry point for the entire loop and receives the list of numbers to call.
This function is called by the incident monitoring system when an incident requires the on-call technician to be called. This API should be provided with the escalation list as outlined above. This function parses the list, finds the next phone number on the list, and invokes /call/start to start calling that number.
Tie everything together
To summarize, the solution is made up of the following three functions (endpoints):
start: this is the entry point to trigger the escalation processcall/start: this function start a voice call to a single phone number enabling the Answering Machine Detection algorithmcall/webhook: this function receive the outcome of the call triggered in call/start (e.g., busy, answering machine, etc) and call the start function to move to the next escalation step or complete the loop
Now that we have all the components required to call everyone on the escalation list, let's see how they are linked together.
The main function /start gets the original escalation list, and calls /call/start to dial the number. /call/webhook then gets the call statuses and delivers the message when required.
When the person does not answer the phone, then /start needs to attempt to either call again the same person or the next person in the list. In order to do that, /call/webhook needs to notify /start. The entire flow is represented below:
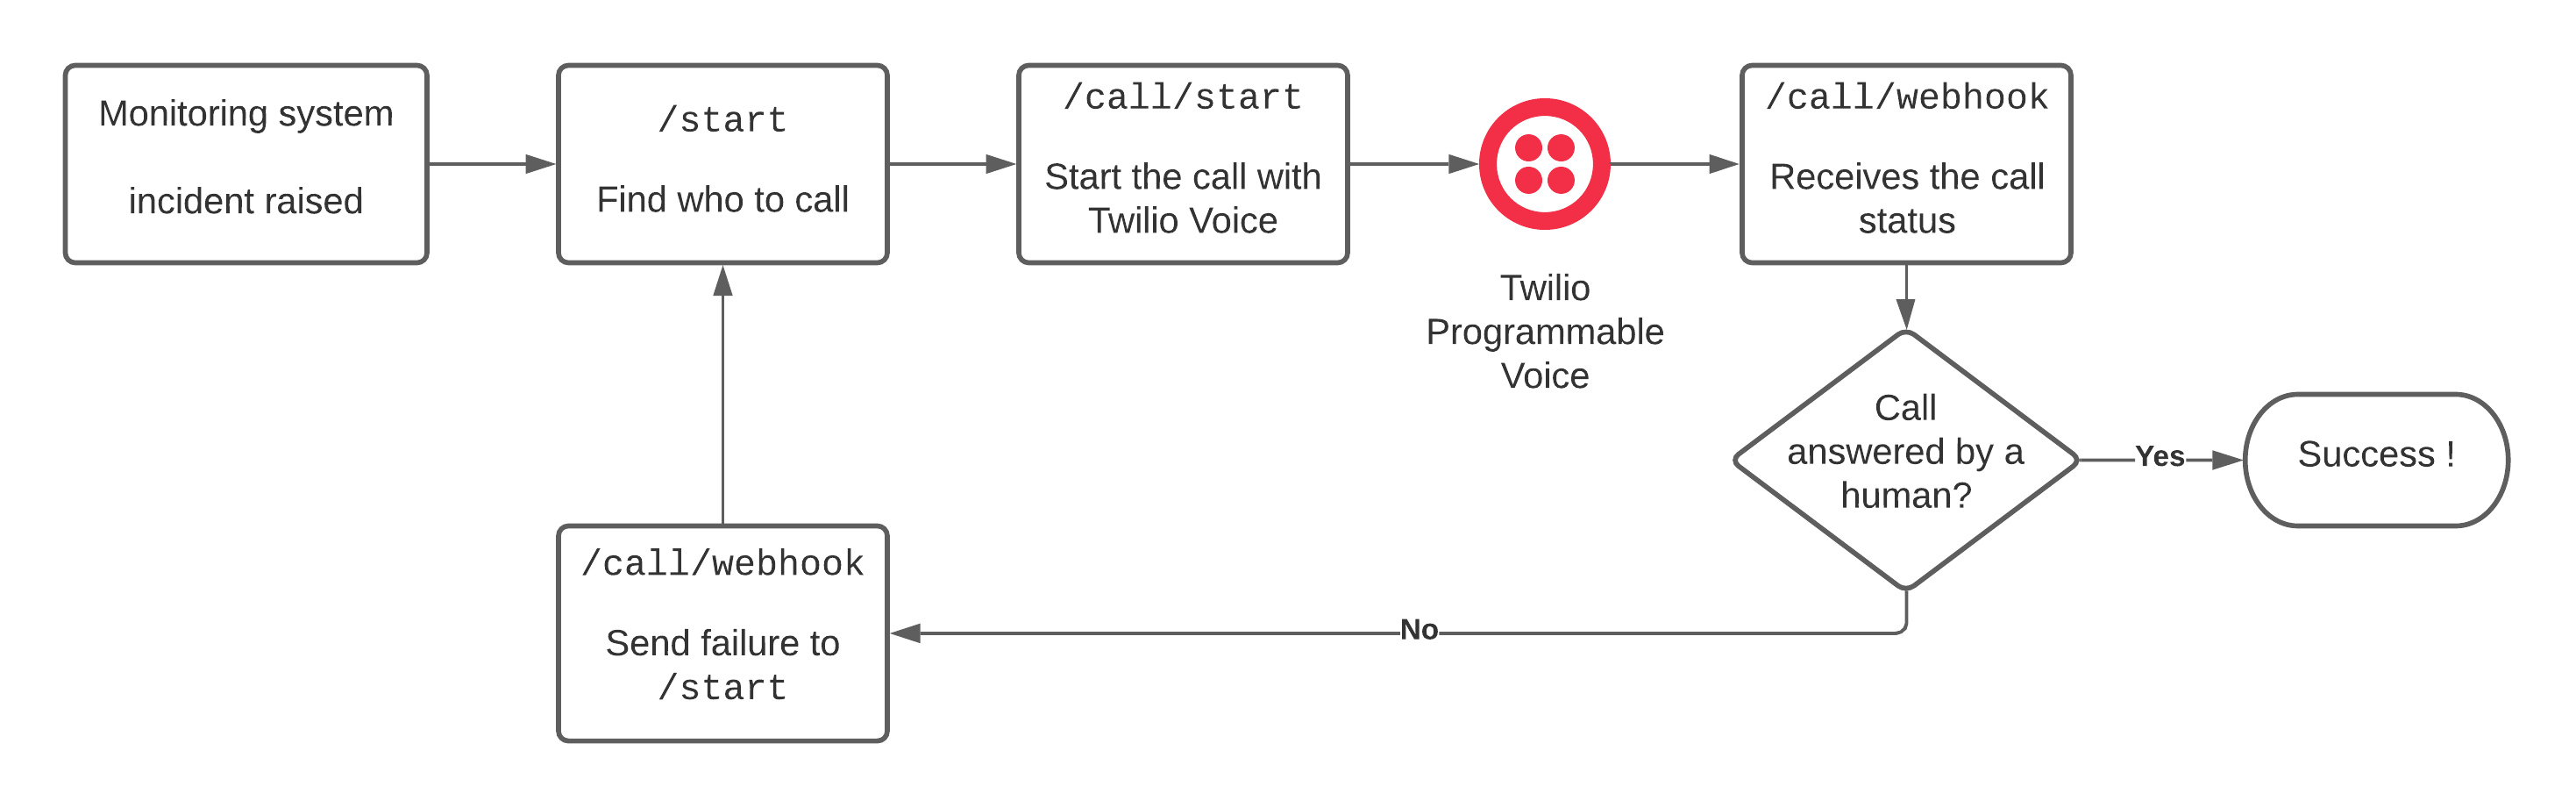
All the functions here are stateless, i.e., they don't store any information for later use. This means that a different approach is needed to make sure all the parameters are passed along during the execution escalation loop. In order to achieve that, each function in the solution passes the full list of arguments to the next one as argument of the call (e.g., POST payload or GET query parameters). During the flow execution, /start is the only function that reads and modifies the list of numbers, and then passes it along with the other parameters.
Let's see how that works with an example
- Your backend sends a request to
/startwith your escalation list. In this case we are calling two numbers, attempting the first twice and the second only once:numbers=[{number:'+33612345678',attempts:2},{number:'+33687654321',attempts:1}] - The function finds the first number to call, decrements the remaining attempts, then sends a request to
/call/start?to=+33612345678&numbers=[{number:'+33612345678',attempts:1},{number:'+33687654321',attempts:1}]to ring +33612345678. Note the "numbers"-parameter is not used by this function, it is only passed along. - The calling function uses the Twilio API to call the number, with a callback url configured to notify
/call/webhook?numbers=[{number:'+33612345678',attempts:1},{number:'+33687654321',attempts:1}]when the call is connected. - The webhook function receives the numbers-parameter so it can then feedback the information with a request to
/start?numbers=[{number:'+33612345678',attempts:1},{number:'+33687654321',attempts:1}] - The loop will now start again, calling the first number once (second attempt) and the second number once.
Next Step
This solution implements a simple dynamic escalation loop. The sequence of numbers to call and the number of attempts is dynamic and can be decided based on the type of incidents and your team structure.
In addition to that, other useful parameters for your escalation loop might be:
- Message to be played when the escalation call is answered, for example describing the incident and what tasks need to be done. This can be achieved either using a prerecorded message (i.e.
<PLAY>) or through Twilio text-to-speach engine (i.e.<SAY>) - Request an active confirmation that the escalation has been received. This can be achieved using Twilio’s
<GATHER>to collect speech-to-text data or DTMF tones - Setup a feedback webhook, that the loop will notify when someone has accepted the call or when no one answers.
All of these parameters are implemented in the solution in this GitHub repo. The README explains all the additional parameters as well as guide you through the procedure to easily deploy the solution to your Twilio project.
Find the project on Github: https://github.com/jlbrs/incident-notification-escalation-loop
Giuseppe and Jonas are Solutions Engineer helping out clients in EMEA. They focus on helping customers build creative and scalable solutions on Twilio. You can reach them at gverni / jlerebours [at] twilio.com.

Related Resources
Twilio Docs
From APIs to SDKs to sample apps
API reference documentation, SDKs, helper libraries, quickstarts, and tutorials for your language and platform.
Resource Center
The latest ebooks, industry reports, and webinars
Learn from customer engagement experts to improve your own communication.
Ahoy
Twilio's developer community hub
Best practices, code samples, and inspiration to build communications and digital engagement experiences.