Keep Me Posted with SendGrid and Github Actions
Time to read:
May 24, 2023
Written by
Reviewed by

Have you ever had to monitor a website occasionally to know when you can buy tickets, or know when it was updated for the last time? Or whether new positions in a workshop that you really want to join are available? This kind of task might be a little boring, and, as human beings, prone to errors. In my case, I’ve decided to look for PhD positions. How could I keep myself posted about recent positions without checking it manually? And get it done for free?
In this blog post, you'll learn how to monitor a website (or multiple ones!) and get an email whenever you need it with Python, GitHub Actions, and SendGrid.
Prerequisites
To complete this tutorial, you are going to need:
If you've got all that, you’re good to go!
What would you like to keep yourself updated about?
Writing code without knowing the kind of information you’d like to have and how to access it can lead you to building the wrong thing. That’s why this is an important question, and it will motivate you throughout this tutorial, in case you want to build something for your own usage. In my case, well… I’d like to be informed about new PhD positions in machine learning in Germany by email. Quite specific, huh? But let’s break this down and use it as an example in this project. It’s going to be useful later on.
“I’d like to be informed by email about new PhD positions in machine learning in Germany every week”.
- How would I like to be informed? By email, and SendGrid is going to be used for this. SendGrid is a great tool to send emails and has a beautiful and easy to use API.
- Where can I find new PhD positions? Well, this is tricky because there isn’t a single source of information. At the same time, it is an opportunity to build my own crawler, check for university APIs or open data, and even check if there are any cool projects on GitHub that already solve this problem. I’ve found PhD-Seeker, which is a nice CLI written in Python that does the job.
- Would it be possible to filter the data I’ve found by keywords? For my case, filtering by the topic is something important, and PhD-Seeker does it well. But, you can also use Python to create additional filters.
- Can I filter by location? By the time this tutorial was written, PhD-Seeker doesn't have a published version that does this. That’s why you’ll write a Python script to select desired countries.
- How can I get it every week? That’s where GitHub Actions kicks in. It’s possible to create a scheduler and run your Python script for free from there.
Now you should have an idea of what you are going to do! Let’s find some PhD positions!
Finding new PhD positions
PhD positions? Really? I know, I know… But bear with me. This is going to be fun!
After figuring out what information should be sent, let’s prepare a repository on GitHub.
First, create a directory called phd-seeker-notifier, and change into this new directory. Then, create a virtual environment, so you can keep the dependencies isolated.
Now you need to install PhD-Seeker and its dependencies. The latest version available on PyPI when this tutorial was written is 0.4.5.
Time to play around with it! You’ll just need to run:
When running phdseeker, it will search by default for PhD positions in “Computer Science, Machine Learning, Deep Learning” and save the results in CSV and XLSX files. The preferable file to use is CSV, given that it is an open format and fully supported by Python.
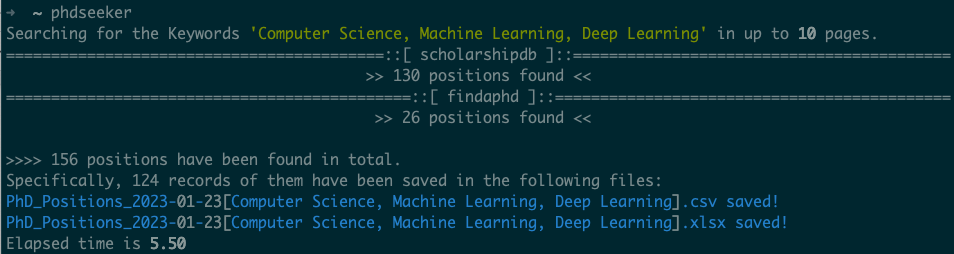
You can have a peek at the first lines by running the following, replacing the date with the date you're running this code:
Here is the result I got:
As you can see, the file has the data organized by country, date, title, and link! Nice. This is all you need! But you’ll still have to get your hands dirty creating a filter by country.
Creating a Python script to filter positions by country
PhD-Seeker creates a CSV file with the latest PhD positions and their countries. But, considering that you’re likely only interested in a specific country, it can be a hurdle to have to look through all the positions that are out of your range of choice.
Python has a really nice built-in module to work with CSV files, which makes it easy to read data from them. In the previous step, PhD-Seeker generated a CSV file. Now you’ll write a script from it, and filter by the countries wanted. Later on, this script will be used to select the positions that are going to be sent via email.
All the steps seem straightforward here: read the CSV, filter countries out, send the email. Time to write a Python script to do the job. Create a new file called filters.py and enter the code below.
Let’s understand what is going on here. In the method from_csv_to_dict, the file path for the CSV file is expected, and so the file can be opened. The class DictReader converts each row into a dictionary, making it easier to manipulate the data. The information wanted is stored in a dictionary called position, that is added to a list data. Please keep in mind that you have to import the csv module! Notice that you can change the names of the attributes/fields if it works better, as it was done in last_updated. The column is called Date, but it holds information about how long ago the position was posted or updated (e.g. 3 days ago, 27 minutes ago), so it makes sense to change it.
Time to filter positions by country! Here you can be creative and filter the positions by continent, multiple countries, and so on. I’ve decided to keep it simple and just filter the data for a single country. To achieve this, the code iterates over all positions and compares if the country listed for a given position matches with the country wanted. It’s possible to make it case-insensitive, in order to avoid issues that may arise due to differing cases. It is also nice using typing hints, so you can have an idea about the expected data structure for this method.
Then, just below the from_csv_to_dict function you added earlier in the filters.py file, add the following function:
After this, you can read the CSV of PhD positions from PhD-Seeker, and filter it by a country. What about printing the positions and checking if the filtering works well?
Printing the positions with style
Reading a big chunk of text from the terminal might be a bit boring, so that’s why libraries like rich exist. It will make the text look nicer in the terminal. If you’re not feeling like installing a new dependency, it’s fine. Just replace rich's code with Python’s print method.
In order to keep the filter methods separated from the CLI code, create a file called cli.py. Now create the method print_found_positions. It needs to receive a country and a list of positions. To make a nice table with rich, a new object called Table is created. Using the method add_column, it is possible to add the columns as headers with the alignment, style, and whether the column should be wrapped or not. After preparing the table, it’s time to iterate over the positions, adding them as rows in the table. At the end of print_found_positions, a console is created and the table is printed.
This is the expected table format when the function is called. Doesn't it look appealing?

All the pieces needed to fetch the positions, filter them, and show them to the users are ready. Let’s put them together and give it a try! For this, you need a way of passing the parameters to the script. That’s what the next section is about.
Creating a CLI out of the script
Creating a CLI in Python is straightforward, and it gives you all the features you need without the urge to install new dependencies. This script will have to receive the country the user is interested in and pass it to the method filter_by_location and then to print_found_positions. In the cli.py file, off you go — update the file to include the following code:
In this script, argparse, the built-in Python parser for command-line interfaces, is imported. At the end of the file, the line if __name__ == "__main__" is used to call the main method when the script is executed. In the method main, an ArgumentParser object is created, and the optional argument country is added to it. Note that while the argument has a default value, you can also make the country required by removing the dashes from the beginning of --country and removing the default parameter. There are also a few attributes that you can use to make the CLI more friendly, such as type and help. They provide users with hints and guidance while interacting with the CLI.
After declaring the arguments, the arguments passed to the CLI are accessed through parse_args — for instance, args.country to get the country passed in by the user.
In this code, you’ll also notice that inside the try/except block, the list of CSV files in the current directory are checked. To recap: PhD-Seeker is used to find PhD positions; it will generate a CSV file with the positions available. Then, the script is fetching the first CSV file found; if there is none, it means that PhD-Seeker wasn’t called.
Now it seems that you’re almost there! But there is one piece missing in this project: sending an email.
Sending an email with SendGrid
Twilio strives to create APIs that make developers’ lives easier, and their approach is no different with SendGrid! First, you’ll need an API key that will be used to authenticate with SendGrid. After logging in to your account, go to “Settings”, click on “API Keys”, and then “Create API Key”.
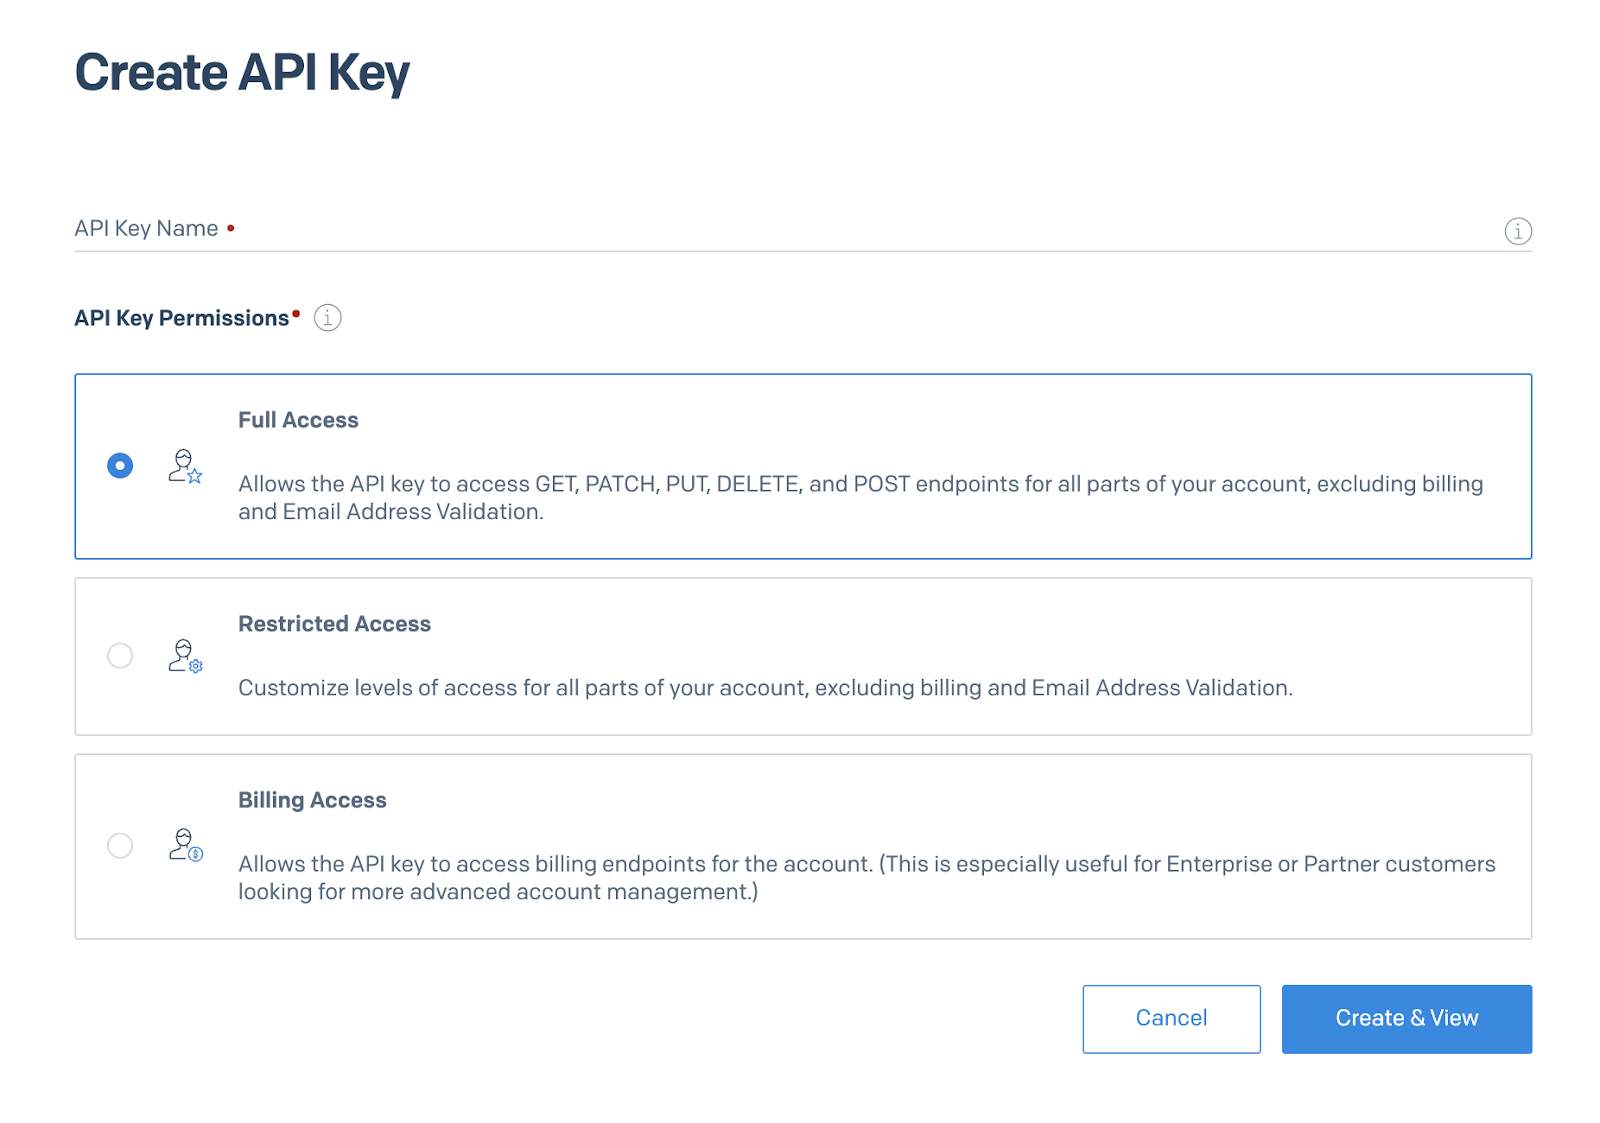
Choose a name for your Key that clearly identifies its purpose and is easy to remember. Select “Full Access” permissions, so you can send emails having all the features needed. You can also select custom permissions with the “Restricted Access” option. You are all set — click “Create & View”.
Important: your key will be displayed here only once. Make sure you store it in a safe place. After clicking the “Done” button, it won’t be displayed again.
Now that you have the key, it’s time to send emails! Yay! Before you dive into Python code, configure the environment variable SENDGRID_API_KEY with the key you just created. You can do it by running (in a UNIX-based shell):
Key configured, it's about time you write an email with Python! I mean, some code that writes and sends emails. 🙂 First, create a Python file called notify.py (you can see its content further below in this section).
There, create a function called send_email that will receive the open positions and their countries. To send an email with SendGrid’s library, you only need to create a SendGridAPIClient object, passing in your API key. At the beginning of the code below, load_dotenv is called. This library is quite helpful in loading the environment variables, whether they are in memory only or in a .env file. (A custom file can also be specified.)
Taking a look at the method send_email, you can notice that sending the email will only require creating a Mail object and calling its send method. For this, it is necessary to pass as parameters the from_email, to_emails, subject, and html_content (body). Since emails can often change and also might need to be protected for privacy reasons, it’s better to store these in environment variables: FROM_EMAIL and TO_EMAILS. Please note that TO_EMAILS can receive more than one email (separated by commas). You can replace the placeholder emails in the section below with the actual email addresses you'd like to use for this project.
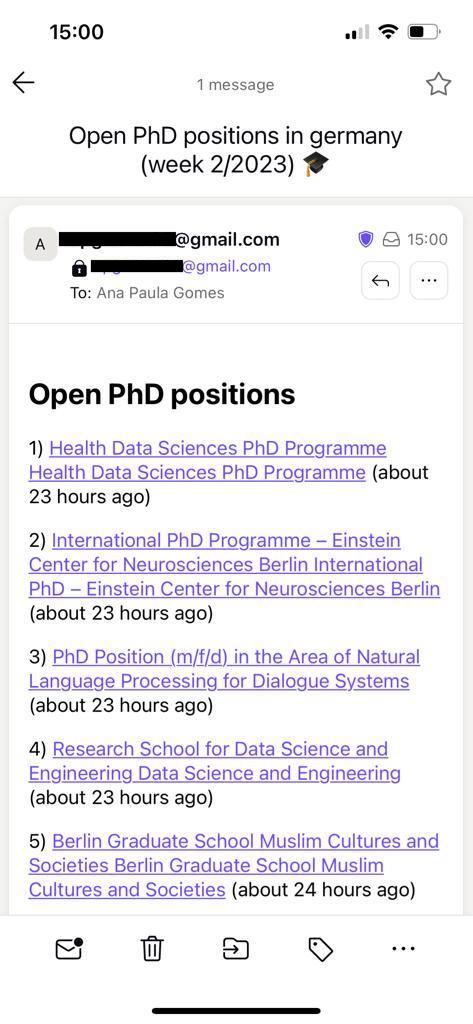
From this point on, you can start to prepare the message. It is essential to think of a subject and a body for the email that transmits the message wanted. To differentiate between emails, the week number and year are included in the email's title to help with searchability. Something like “Open PhD positions in Germany (week 6/2023) 🎓”. You can use the country as part of the subject, and use the current date to check the week number and the year. That’s what is being done in the first two lines of send_email.
Moving to the body: it would be nice to list the positions and how long ago they were posted. Something like:
This can be achieved by combining the number of the position (starting with one) and HTML to create the anchors (hyperlinks) — you can see this in the creation of the variable positions_html.
The code is almost ready! Go back to cli.py and replace the line # TODO send email with the call to the method you just created. The method main will look like this:
In your terminal, you can run the CLI using python cli.py or adding the country as a parameter with python cli.py --country “<country-wanted-here>”. This is what the email will look like when it arrives in your inbox:
You can explore the potential of sending emails with SendGrid in other blog posts, like Send Emails with Embedded GIFs and Images with SendGrid and Python.
The PhD positions are being fetched, filtered, and the emails sent. Now you are at the point to schedule this script to execute every week!
Push your code to a new GitHub repository. You will need it to follow the next section, and to configure a schedule.
Scheduling emails with GitHub Actions
With GitHub Actions, you can automate, customize, and execute your software development workflows right in your repository. It’s quite handy for configuring a CI/CD integration with this project but also for scheduling actions. To create a workflow, you need to create the folder: .github/workflows. The flag -p will create nested folders for you.
Inside this folder, you are going to create the file search_and_notify.yml. This file can be named as you want, but I recommend that you be explicit about it, since you can have multiple different workflows in a single repo. Below you can see the whole workflow. Try to read it — it shouldn’t be too complicated to get a grasp of what it is doing. I’ll break it down for you right after.
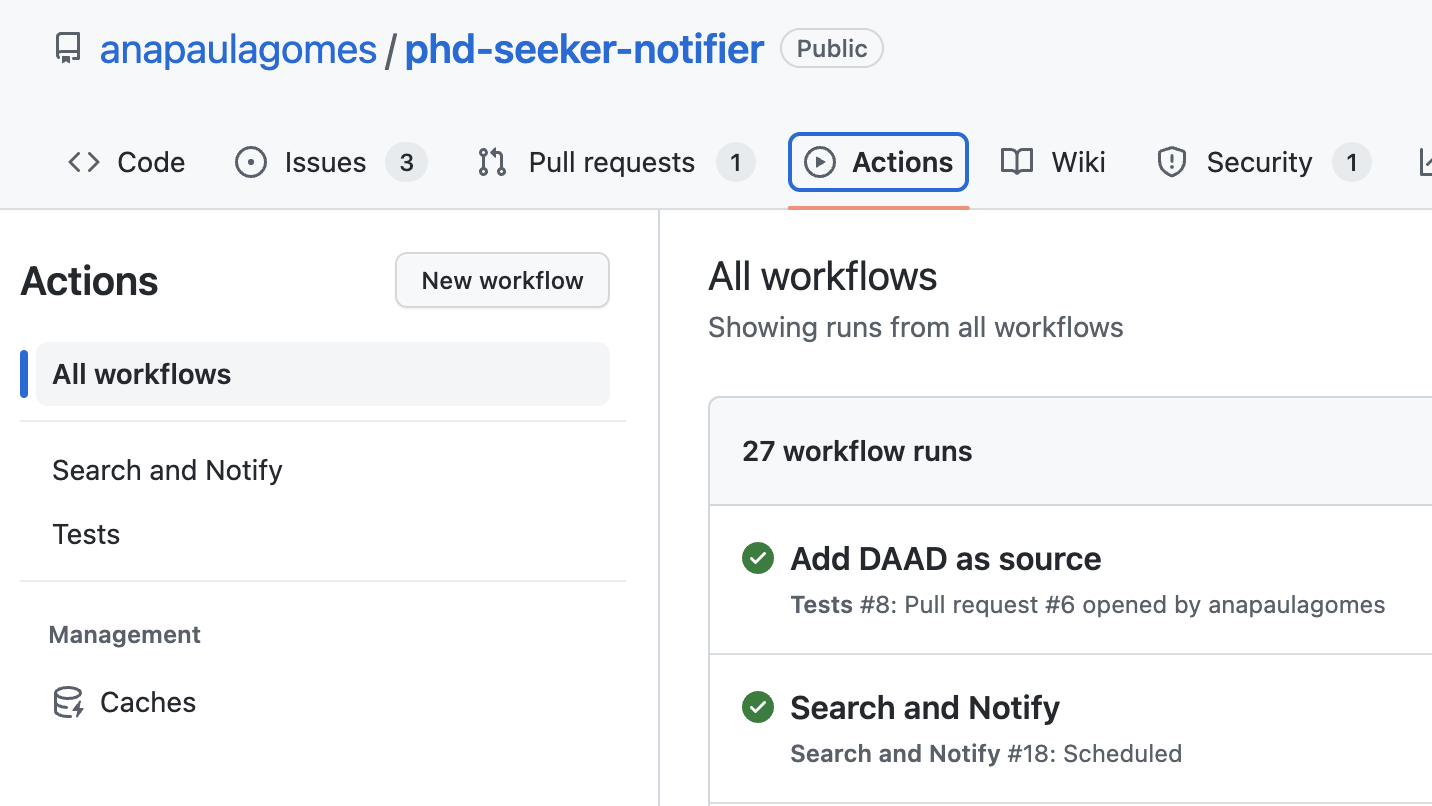
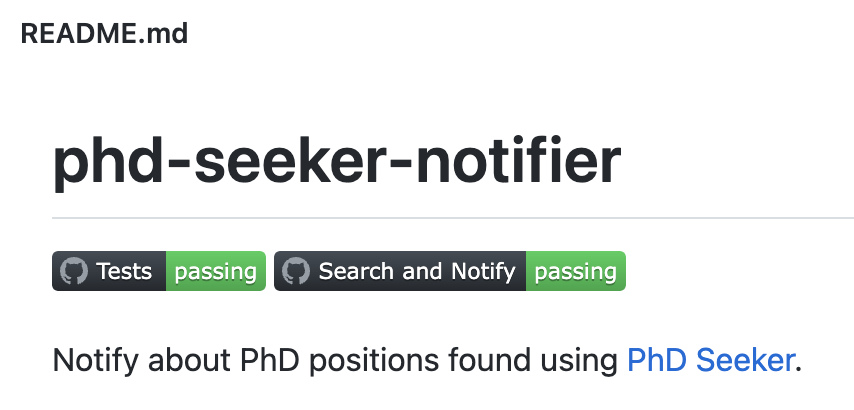
At the beginning of this workflow is its name. The name will appear in the Actions tab in your GitHub repo (see the left side of the image below). For each workflow, it is possible to create a badge to add to the README. This name will appear there too.
In the section on, there is the most important part: when the script will be executed. The workflow will be triggered at the time defined by cron. In this workflow case, it will be every Monday at 9 AM (UTC). The following section permissions holds the permissions for this workflow. Here, it only needs to read the code from your repository.
The section jobs has the steps needed to build and run the code. This workflow only has the step build, which is enough, since the code and its execution is straightforward. Ubuntu is used to run the code (runs-on). The steps section, inside build, details the necessary environment configuration required to set up the machine that will run our script:
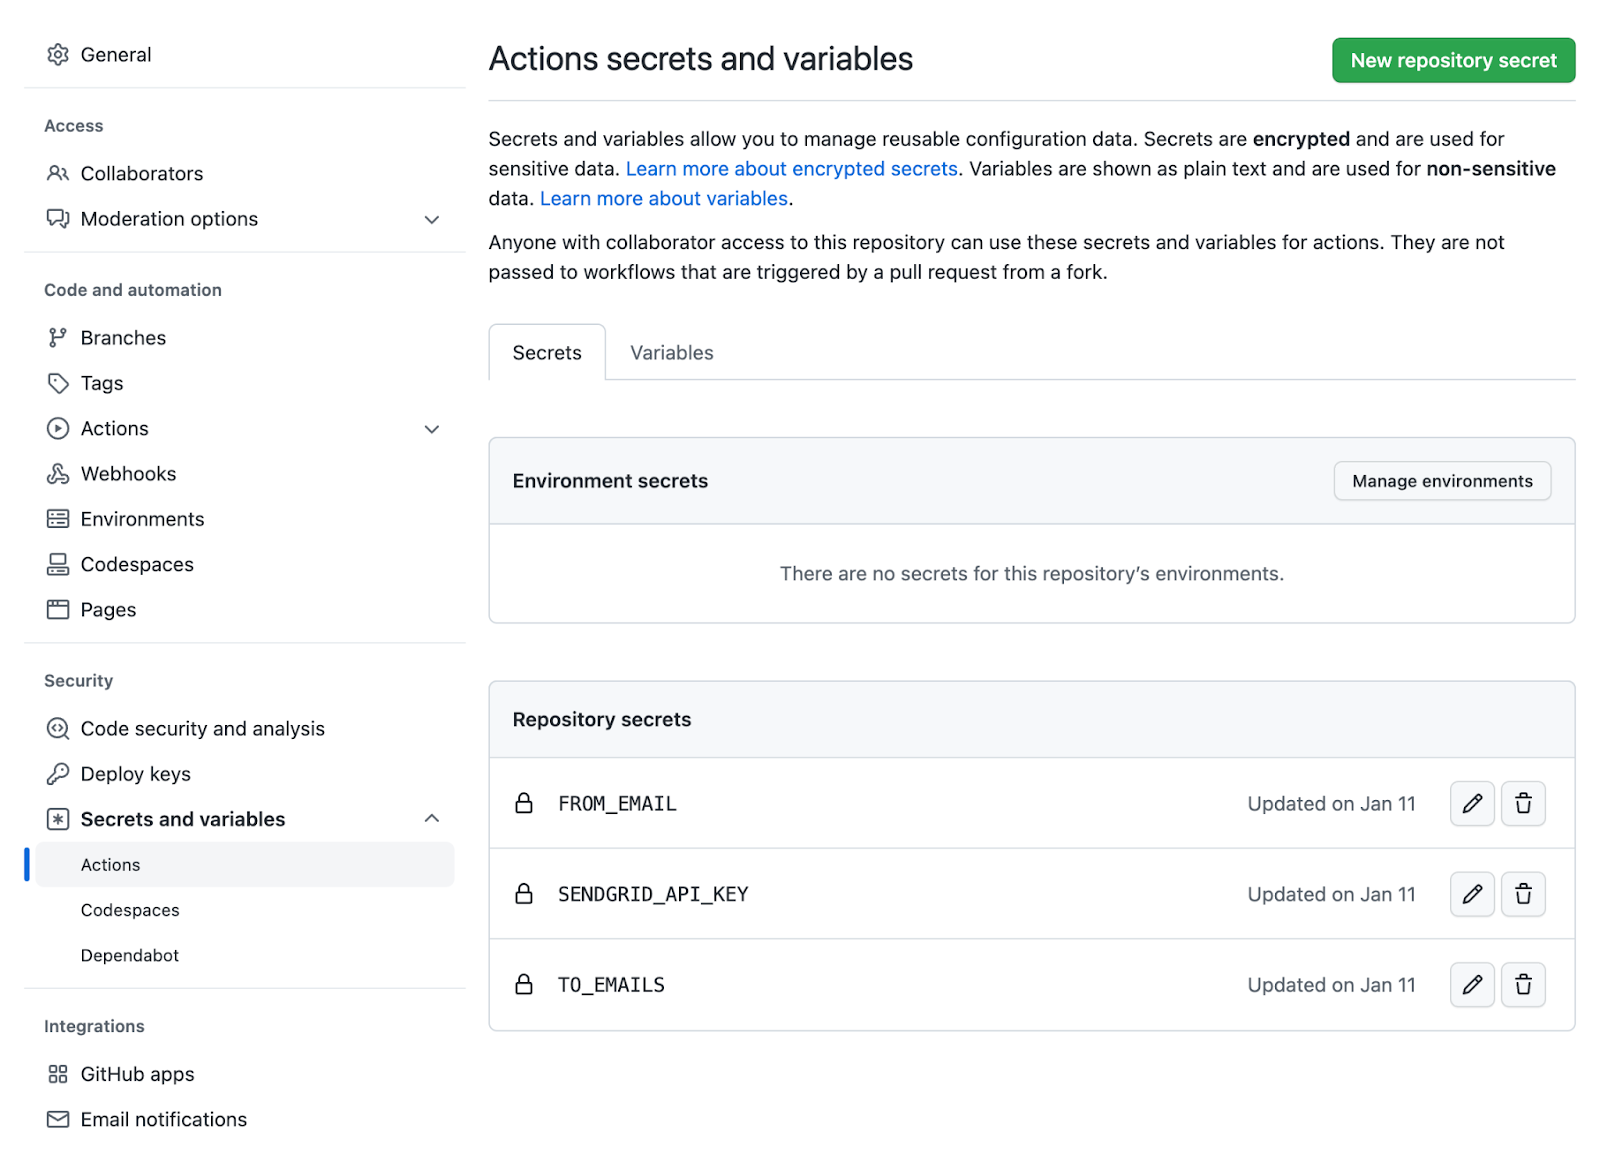
- uses: actions/checkout@v3: You must specify the version of Actions used.- name: Set up Python 3.8: Here, you can choose the name you desire. The most important part is specifying which Python version should be installed. See more here.- name: Install dependencies: In this step, you need to specify all the steps needed to install the dependencies and enable the script to run.- name: Find PhD positions…: To run, the Python script requires the CSV file from PhD-Seeker. Here, the script will run with the keywords wanted.- name: Notify: The dependencies are installed, and you have the CSV file. Time to run the script and get an email with juicy PhD positions! Yay! An important detail here is whether the environment variables are set. You need to configure the environment variables for your repo in Settings > Security > Secrets and variables > Actions > Repository secrets (see image below). Under the sectionenvyou can find the environment variables and access them from your repository secrets using${{ secrets.VARIABLE_NAME }}.- The step
runwill wrap it up! It will run the CLI, filtering by country, and sending an email to the email from the env vars! Cool!
GitHub Actions is a powerful tool for side projects! The possibilities are numerous. Learn more about it here. You can see an example of this script and its steps and logs here.
You might be wondering if it is possible to run the workflow before the time configured. Yes, it is! You just need to go to your repository tab Actions, click on the desired workflow, and then Run Workflow. If all is configured correctly, you’ll receive an email with PhD positions!
Conclusion
In this post, you learned how to automate an everyday demand with Python, Twilio SendGrid, and GitHub Actions! In this project, if you wanted to, you could also send SMSs instead of emails, or choose to be notified daily or monthly, and, of course, learn about a different topic other than PhD positions. 🙂 You can see the full code in the branch twilio-blog-post in the PhD Seeker Notifier repository. There you’ll also find an additional filter, showing how to filter the positions by the date. The sky is the limit!
There are many other projects that you could build as well! Have you ever thought about what things from your daily tasks could be automated? I highly recommend you give it a try! Can’t wait to hear about what you’ve built!
Ana Paula Gomes is a software engineer at metr. She’s an active open-source contributor, involved in different Python projects — most of them related to civic tech initiatives. Obsessed about automating manual work, and her dog Tonino, Ana is continually looking for ways to make machines work for her, and have some fun with creative work. You can follow her work on her GitHub.


Related Resources
Twilio Docs
From APIs to SDKs to sample apps
API reference documentation, SDKs, helper libraries, quickstarts, and tutorials for your language and platform.
Resource Center
The latest ebooks, industry reports, and webinars
Learn from customer engagement experts to improve your own communication.
Ahoy
Twilio's developer community hub
Best practices, code samples, and inspiration to build communications and digital engagement experiences.