Send Emails with Embedded GIFs and Images with SendGrid and Python
Time to read:
November 11, 2022
Written by
Reviewed by

A common use case when sending emails is to add images to them. You may want to include your company logo as a heading, or maybe make a point in a way that can only be done with a GIF meme. But if you search how to do this you will find that there isn’t clear and concise information out there. In this article I’m going to show you what your options are if you want to include images or GIFs in your emails when using SendGrid with Python.
Requirements
To work on this tutorial you will need the following items:
- Python 3.6 or newer. If your operating system does not provide a Python interpreter, you can go to python.org to download an installer.
- A SendGrid account. If you are new to SendGrid, click here to create a free account. A free SendGrid account allows you to send up to 100 emails per day.
Creating a Python Environment
To enable Python to send emails through SendGrid, you’ll begin by making a new directory on your computer called sendgrid-image-tests or similar, then creating a new Python virtual environment in it.
For macOS and UNIX users, the commands are:
For Windows users, open a Command Prompt or PowerShell window and use the following commands:
If the Python virtual environment was created and activated successfully your prompt should have been modified with a (venv) prefix.
Now you can install the sendgrid package in your virtual environment:
SendGrid Configuration
Before you can send emails with SendGrid, you have to create an API key that you will use to authenticate with the service. Log in to your SendGrid account, then on the left sidebar, click on “Settings” and then select API Keys. In the API Keys page, click the “Create API Key” button.

You need to give your API key a friendly name. For this tutorial I chose the name Image Tests. I selected “Full Access” for permissions, which gives the API Key the ability to perform all the necessary email sending functions and more. If you prefer to create a key that has very specific permissions, then select “Restricted Access” and configure your access as needed, but ensure that you allow mail sending.
When you click the “Create & View” button you will be presented with your key. This key will never be shown again, so you need to click on it to copy it to the clipboard before you dismiss the panel by clicking the “Done” button.
You now have your SendGrid API Key in your clipboard. To make it available to Python, store it in an environment variable. If you are using bash or a similar UNIX-based shell, do it as follows:
If you are following this tutorial on a Windows command prompt, then replace export with set. If you need detailed help on creating environment variables, I have written an article on using environment variables with Python that you may find useful.
Before you continue, you may also want to save your SendGrid API Key in case you need it later. To do this, paste it in a text document and store it in a secure place.
Send a Test Email
Before looking at how to embed images, make sure you are able to send emails by running a short test. Write the code below in a file named send-test-email.py:
Before you can use this script, you have to edit it to use real sender and recipient addresses and names to replace the placeholders that I put in the highlighted lines. Since this is a test, you can use a pair of email addresses that you have control of.
Once you have edited the emails, run the script as follows:
A few seconds later the email should be in the inbox of the address you selected as recipient. If you do not receive the email, you can use the Activity Feed dashboard to determine if there are any delivery problems with the email address you selected, or if there was any other issue.
Make sure you are able to receive emails before you proceed to work with images.
Two ways to embed images
As the section title suggests, I’m going to show you two different options for including images in your emails, each with their pros and cons. In all the examples that follow, I’m going to insert this little animated GIF of the SendGrid logo at the top of a test email similar to the one above:

Method #1: Using image links
The first method is very straightforward. The idea is to upload your image to a public server and then link to it from the HTML email. For this you can upload your image to your own server if you have one, to a public S3 bucket in your AWS account, or any other service that allows you to upload files to be served publicly.
Copy the following application into a file named send-email-with-image-link.py to test this method.
Note that the highlighted line adds an <img> tag to the HTML content of the email. The URL that is shown in this example links to the SendGrid logo above, at the location on which it is hosted on this blog. If you prefer to use your own hosted image, you can edit this URL to point any image or GIF that you like.
Before testing this example, remember to edit the sender and recipient emails as you did with the test email above.
Run the application to send a test email:
When you receive the email, open it in your email reader. If you are lucky, you will see the SendGrid logo at the top of the email. Unfortunately for a lot of people, the email is going to look like this instead:
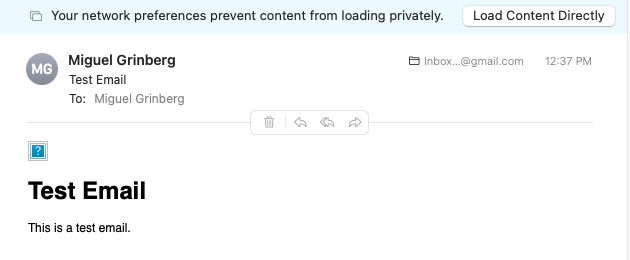
This happens because most email readers do not automatically load external resources linked in emails. Email readers that do this will show a button or menu option to request that the remote content is loaded. With my email reader, clicking the “Load Content Directly” button makes the logo appear. In many situations, forcing the user to click a button before they can see the images is a dealbreaker, but luckily there is another way.
Method #2: Using inline attachments
To ensure the email reader doesn’t hide your image, you must send it along with the email. The bad news is that this can increase the size of your emails considerably. If you decide to use the solution I’m about to present, you must be careful and only use small and/or well optimized images.
In the example that follows, the GIF file is included in the email as an inline attachment. Save the code below to a file named send-email-with-inline-attachment.py.
This version adds an Attachment object to the email message. However, a traditional attachment would not work, as most email readers would only offer the option to download it, without displaying it in the body of the email.
The trick is to create an inline attachment by setting the attachment’s Disposition as such. As with other attachments, the file name and type must be provided as well, so that the recipient’s email reader knows how to handle the file.
The filename that is given in the attachment can be any filename that you like, and in particular it does not need to match the actual filename of the file as you have it on your disk. If the recipient decides to right-click the image and attempts to save it, this is the name that will be suggested for them to use.
The image type must be the correct MIME type for the image. Below you can see what the MIME types are for the most common image formats:
image/gif: Graphics Interchange Format (GIF)image/jpeg: Joint Photographic Expert Group image (JPEG)image/png: Portable Network Graphics (PNG)image/svg+xml: Scalable Vector Graphics (SVG)image/webp: Web Picture format (WEBP)
The actual image data has to be provided in the attachment as a base64 string. To be able to create this string, the application first reads the file data from the file, and then applies Python’s base64 encoder to it.
The last parameter used to configure the attachment is the “Content ID”. This is an identifier of your choosing that will be used in the HTML body of the email to reference the image. For this example, the attachment is given a sendgrid-logo content ID.
If you look at the HTML body in this example, the <img> tag is still there, but it has a strange URL that starts with a cid: prefix. This is a not widely known, yet valid URL format that is specifically designed to reference an inline attachment by its content ID.
Before you test this example out, right-click the SendGrid logo above and save the image to your project directory with the name sendgrid.gif. Update the sender and recipient emails as before, and then run the test application with:
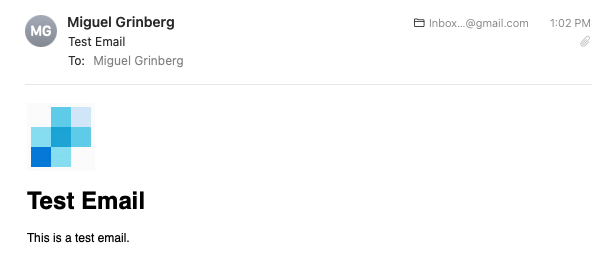
Your email reader should now display the inline image automatically.
Conclusion
I hope this was a useful tutorial and you now have two working examples to help you decide what’s the best image embedding option for your needs.
I can’t wait to see what you build with SendGrid!
Miguel Grinberg is a Principal Software Engineer for Technical Content at Twilio. Reach out to him at mgrinberg [at] twilio [dot] com if you have a cool project you’d like to share on this blog!
Related Resources
Twilio Docs
From APIs to SDKs to sample apps
API reference documentation, SDKs, helper libraries, quickstarts, and tutorials for your language and platform.
Resource Center
The latest ebooks, industry reports, and webinars
Learn from customer engagement experts to improve your own communication.
Ahoy
Twilio's developer community hub
Best practices, code samples, and inspiration to build communications and digital engagement experiences.