How to Build a Low-Code SMS RSVP System with Airtable, Twilio Functions, and Twilio Studio
Time to read:
July 20, 2022
Written by
Reviewed by

Airtable is a great tool for prototyping applications that require a database. However, when using multiple API’s in an application, it can get complicated and tricky to juggle all the functions and parameters from different services.
In this post, we will make a simple, serverless RSVP system with Twilio Functions and Twilio Studio that will scan an Airtable guest list for phone numbers, send a personalized message to each of them, and then update our Airtable records with the responses from each of the invitees as to whether or not they wish to confirm their attendance. Let’s get started!
Prerequisites
Before you begin, you will need a few things:
- Twilio account—sign up with this link for a free trial account and receive $10 credit when you upgrade your account
- Twilio phone number—configure one here
- Airtable account
Airtable setup and layout
Let’s first start with what we need from Airtable. I’ll walk you through setting up a new Airtable base, but if you already know how to do this, feel free to skip right ahead to the required modifications for this tutorial.
Starting a new Airtable base
If this is your first time setting up an account, go through the on-screen instructions to make your first base. Skip everything that offers you the ability to skip. Don’t worry about the contents or name of the base, we are going to make a new one from scratch.
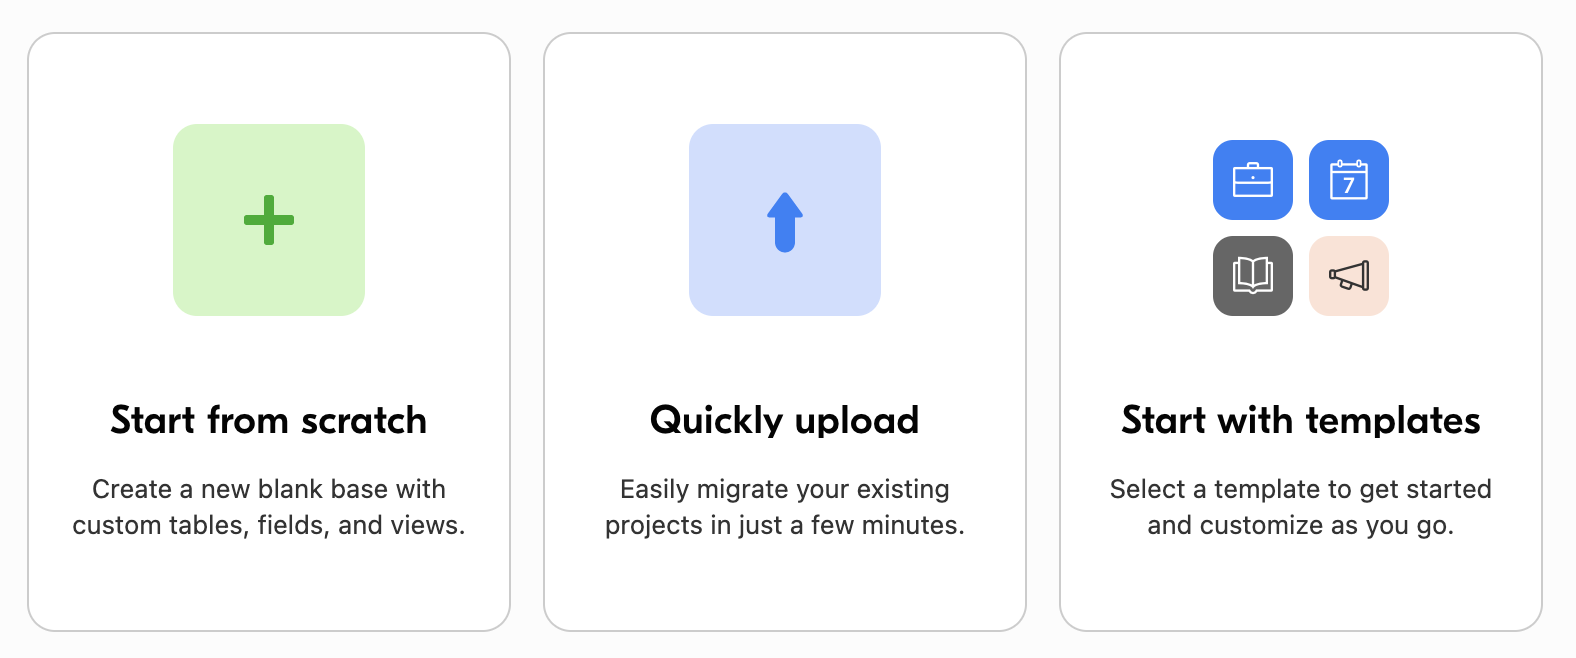
Once you are on the main page (or if you already have an Airtable account), proceed to click the tile with the green + sign that says “Start from scratch.” Similarly, you can also click the gray + sign that says Add a base if it is visible to you.
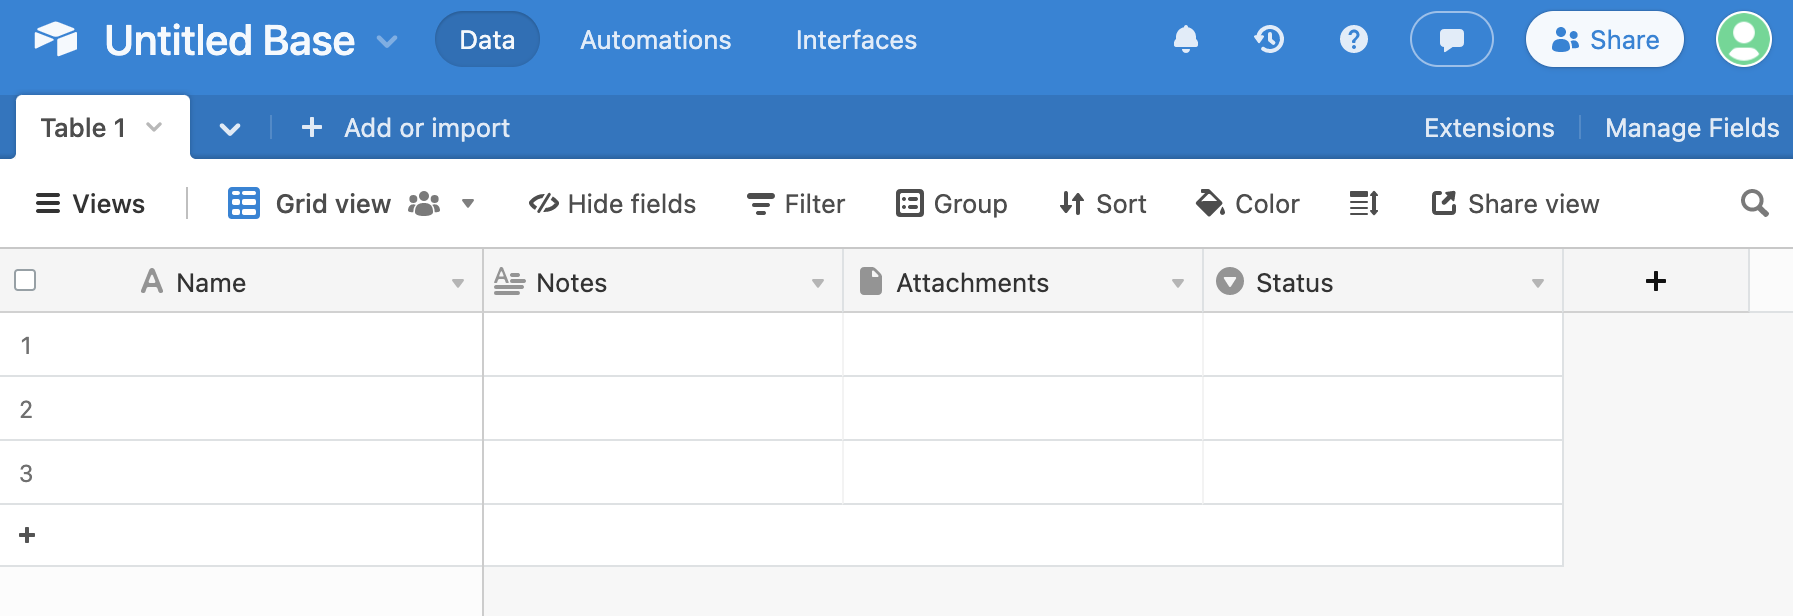
Once we have created a new base, our default base should look like this:
Modify the default Airtable base
If you skipped ahead because you already know your way around Airtable, here are the modifications we need to make to the default base in order for our Twilio Functions to be able to read the records (rows) of our table:
- Click once to change the “Untitled Base” name to “RSVP”
- Double click to change “Table 1” to “Guests”
- Double click to change the first column “Name” to “Number”
- Double click to change the second column “Notes” to “Name”
- Delete the remaining “Attachments” and “Status” columns from the table by clicking the gray caret icon and clicking Delete field
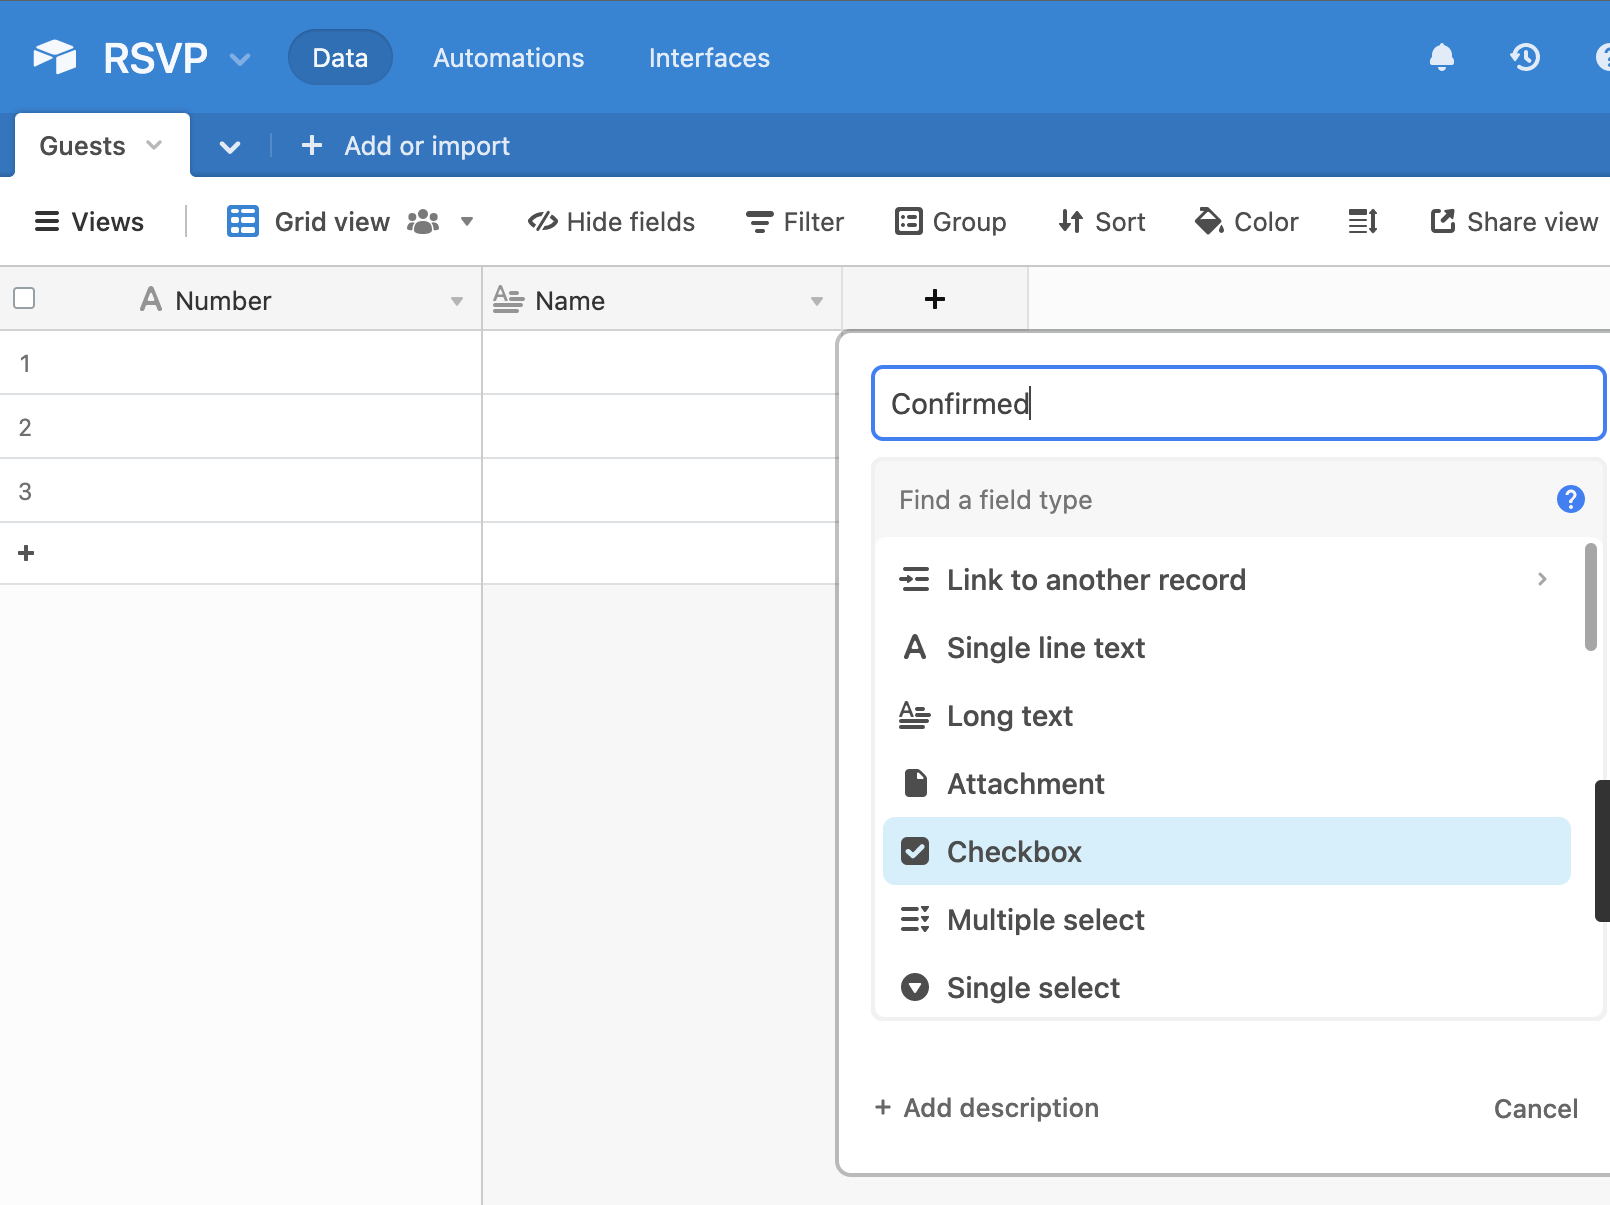
- Add a new column by clicking the black + icon and set it to “Checkbox” and name it “Confirmed”
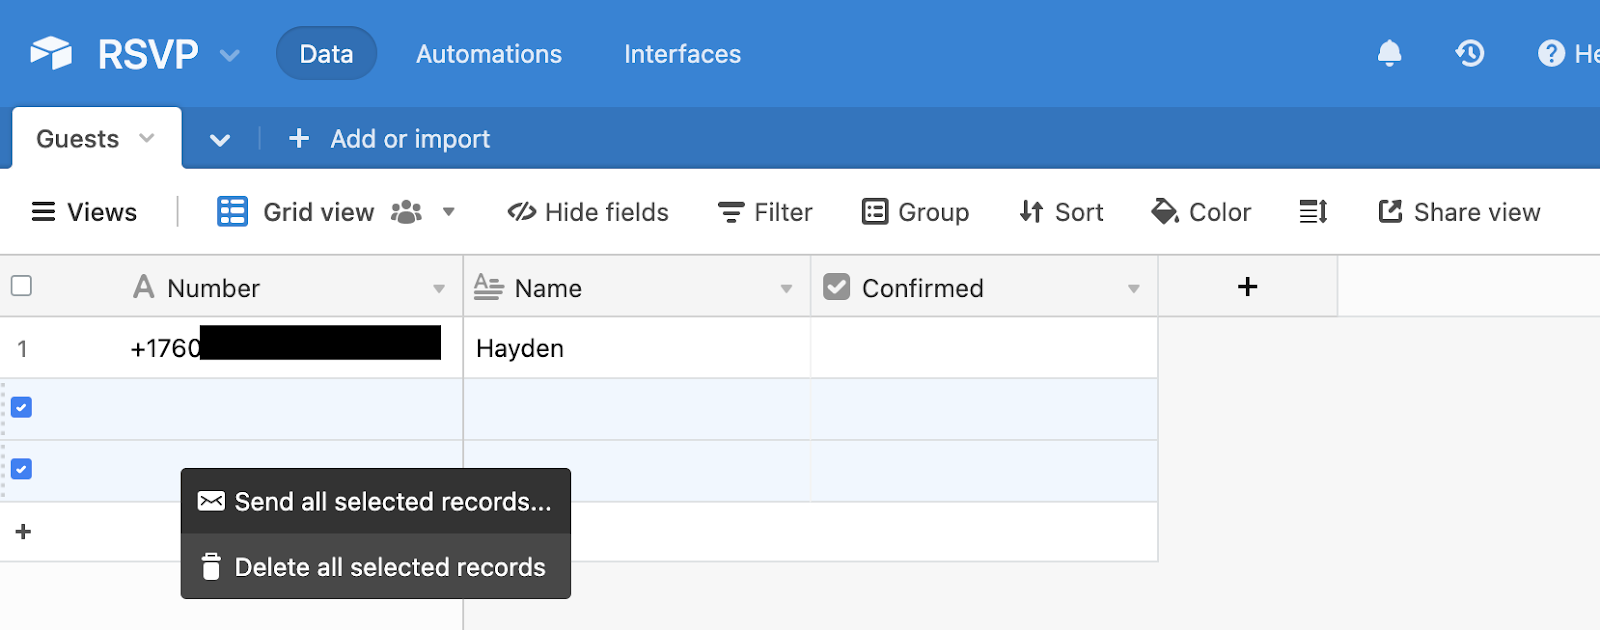
Let’s populate this table with some guests! I am going to use my own phone number in international format for easy testing, along with my name. Leave the Confirmed box unchecked.
Go ahead and delete the empty rows since we only need one number for now. You can do this by checking the boxes on the far left side of each row and once they are highlighted, right clicking and selecting Delete all selected records.
That’s all for setting up our table. Let’s now gather the credentials we need in order to integrate our Airtable with Twilio Functions. This includes the Airtable API key and the Base ID so our function knows that we are looking at RSVP and not some other base in our account.
Gather Airtable credentials
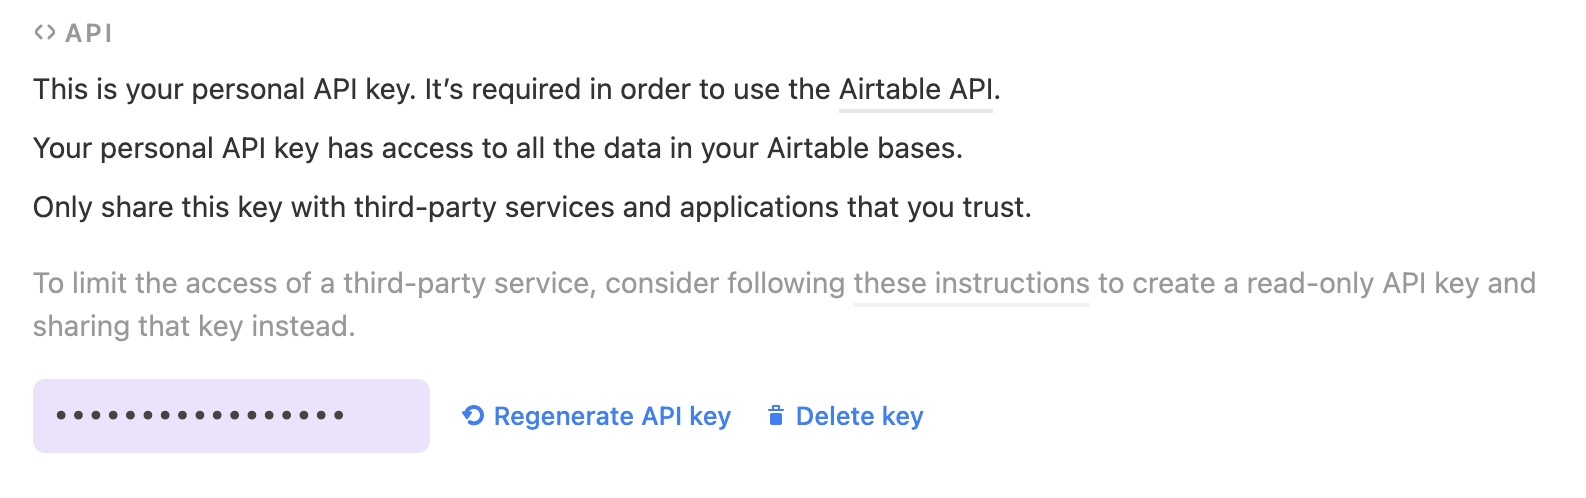
To find your Airtable API key, go to your account page and scroll down to the API section where you will find a box that has a censored code that reveals itself when you click on it. This is your API key that is attached to your entire account.
If you haven’t generated an API key yet, it will instead be a gray button that says Generate API key, click it and the code will appear. Copy this code and keep it handy somewhere while we work through this tutorial.
The last piece of information we need from Airtable is our Base ID. This can be found automatically generated for us on the Airtable API docs page. Select the “RSVP” base that we just created, and your Base ID will be highlighted in the Introduction section of the doc:
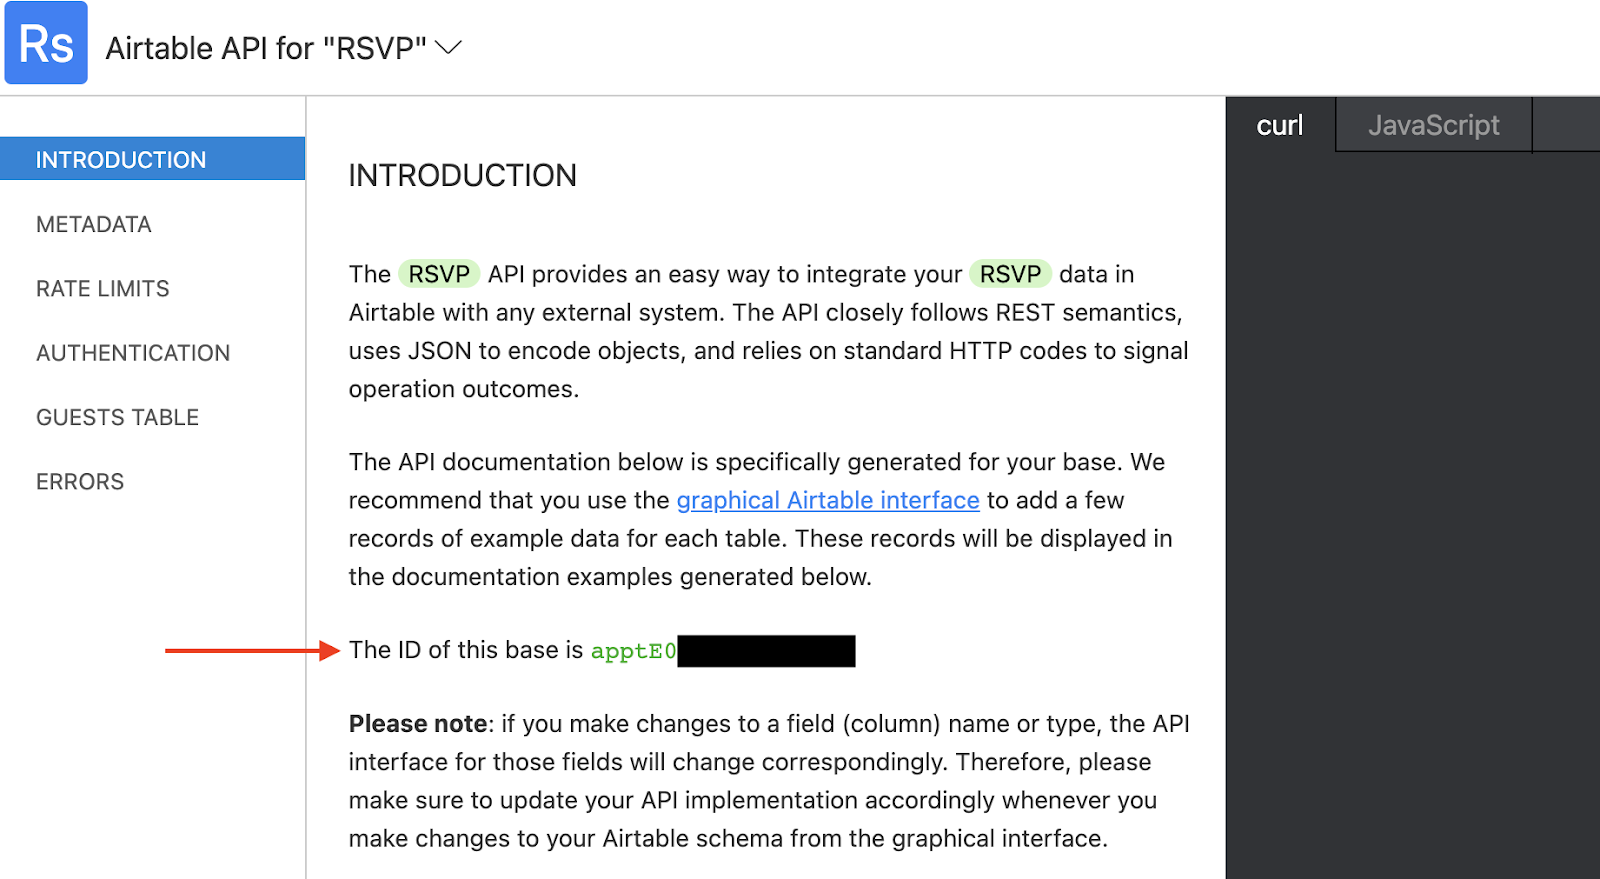
Copy this ID and keep it with your API key because we will need them in the next step!
Twilio Functions
Once you have set up your Twilio account and have a phone number, we will proceed to use a Quick Deploy App to integrate Airtable with Twilio Functions. Using Twilio Functions allows us to build our RSVP system without having to set up a server, which means less time maintaining and more time partying!
Go to this Twilio code exchange page and use the text fields to supply our copied Airtable API Key, Base ID, and the name of our table (in our case, “Guests”).
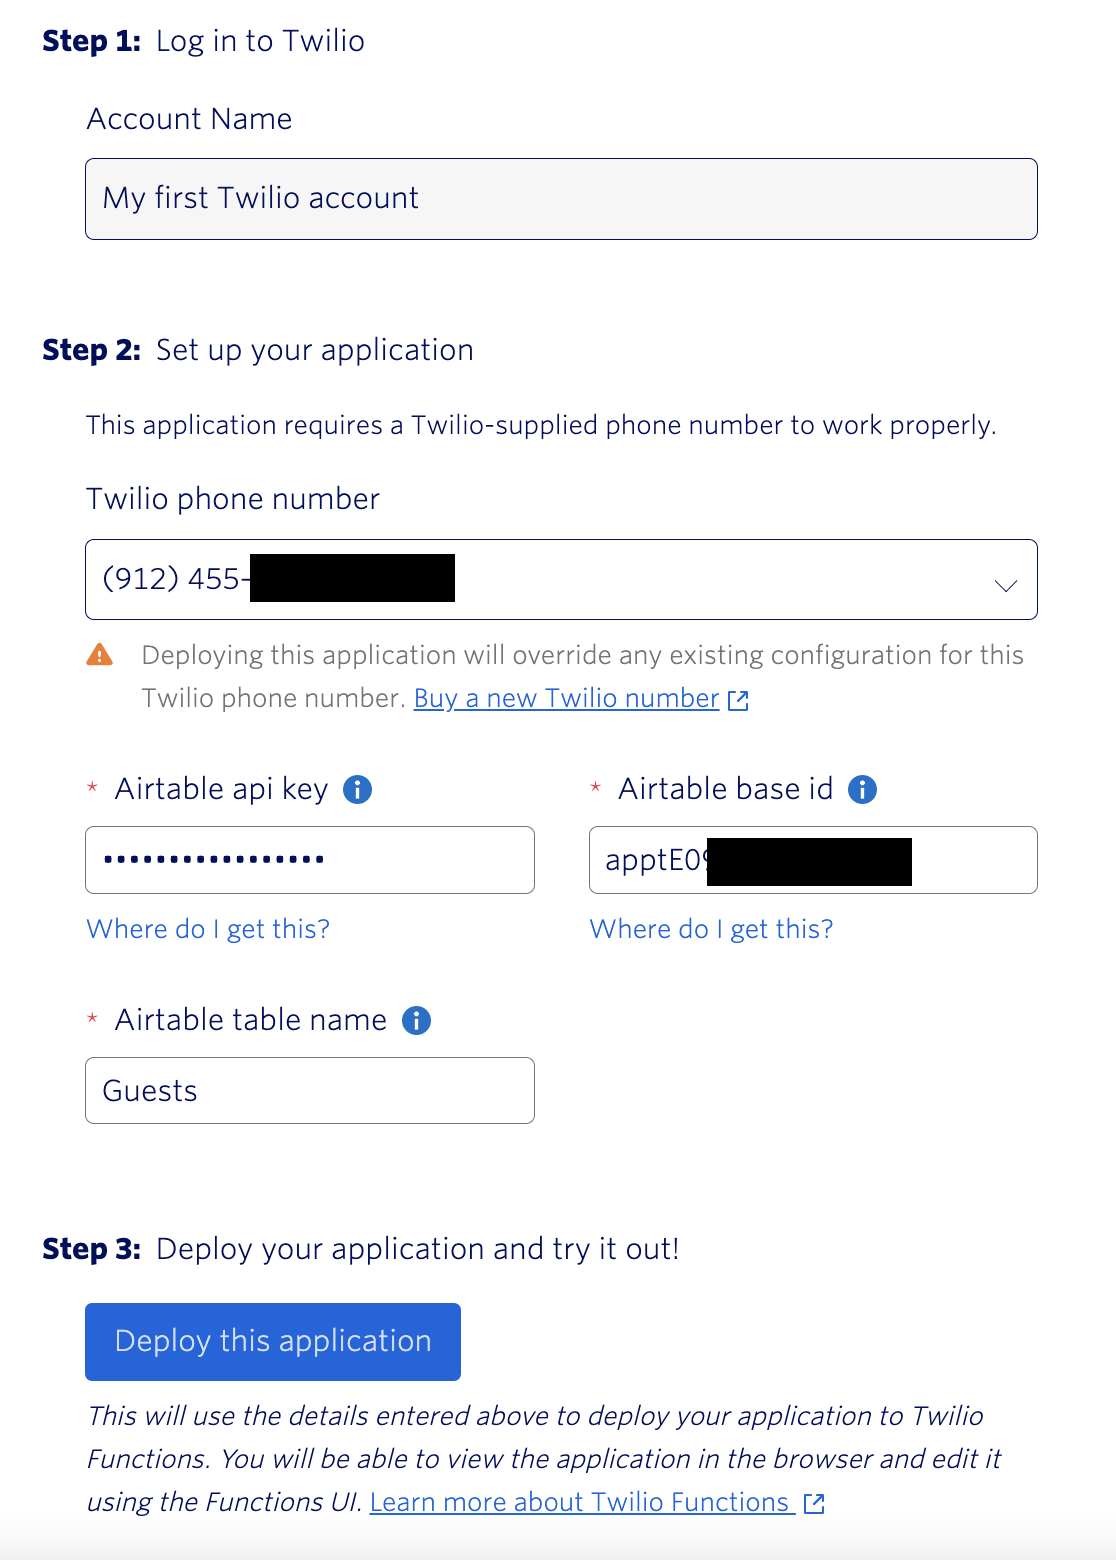
Click the blue button that says Deploy this application and wait a moment while it sets up our Twilio Service for us. When it is done, another blue button will appear that says Go to live application. Click this button, and it will take you to a new screen which tells us our live application with Twilio is ready to use. Click the blue and white button that says Edit this application and let’s take a look at our Functions!
Navigating Twilio Functions

Let’s take a look around here. If you scroll down in the Environment Variables section, you will see that the app has already set up our environment variables.
Yours should have:
AIRTABLE_TABLE_NAMEAIRTABLE_BASE_IDTWILIO_PHONE_NUMBERAIRTABLE_API_KEYTWILIO_SMS_WEBHOOK_URL(don't worry about this one, we don’t use it)
Confirm you have the correct values to these variables by clicking the eye icon to view them. If any variable has the wrong value, simply click the Edit button and fill in the correct value, then click Update.
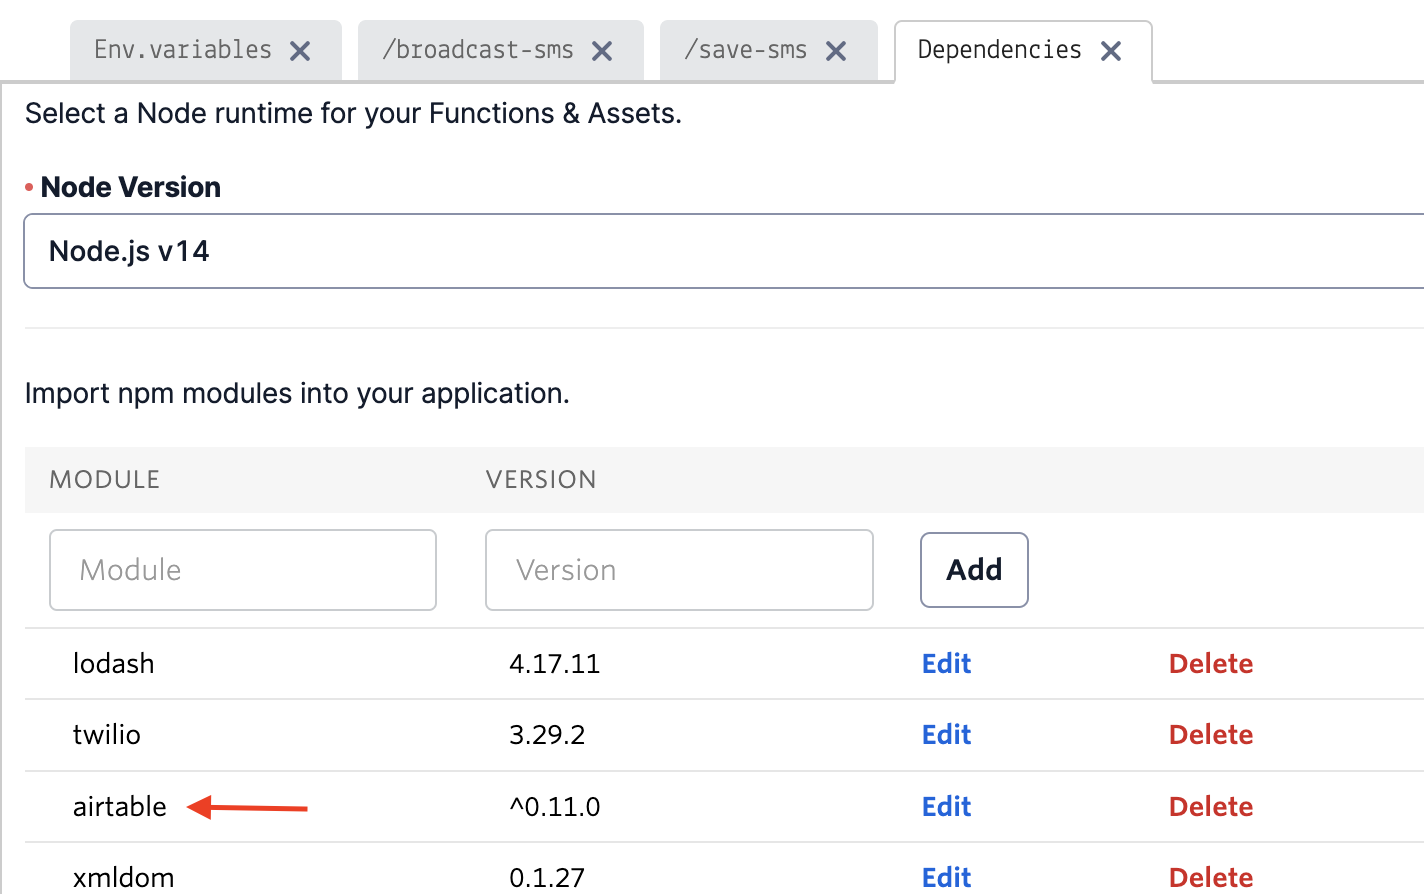
In the lower left corner under the Settings section of the sidebar, click on Dependencies to view all the dependencies our application is going to use. Confirm airtable is listed.
Modify the broadcast-sms function
Now in the sidebar in the upper left, just below the blue Add + button, we have two functions: /broadcast-sms and /save-sms. Click on each of these in order for new tabs to open on the right side of the Env.variables tab. In these functions, we will see some pre-written code for us.
There are some things we need to change in these functions, so let’s start with /broadcast-sms. Click the tab that opens this function in the editor window so we can view the code, it should look like this:
The only things we have to change here are the contents of the highlighted .create function. We want to change “From” to “Number” so that our Twilio function can read all the phone numbers we listed in our Airtable “Number” column (which in our case, we only supplied our own). We also want to change the string assigned to body: to let the recipients know that they are being invited to an event!
Here is what that .create function should look like after these changes:
The ${record.get(‘Name’)} part of this code is how we make our message personalized. This allows us to go through each record of our Airtable and fill in the number associated with that record in the to: field by using record.get, and the ‘Name’ that is on the same record gets inserted into the body: field using the same mechanism. Remember to change the single quotes to backticks in order to use JavaScript string templating.
Feel free to customize this message in any way you wish!
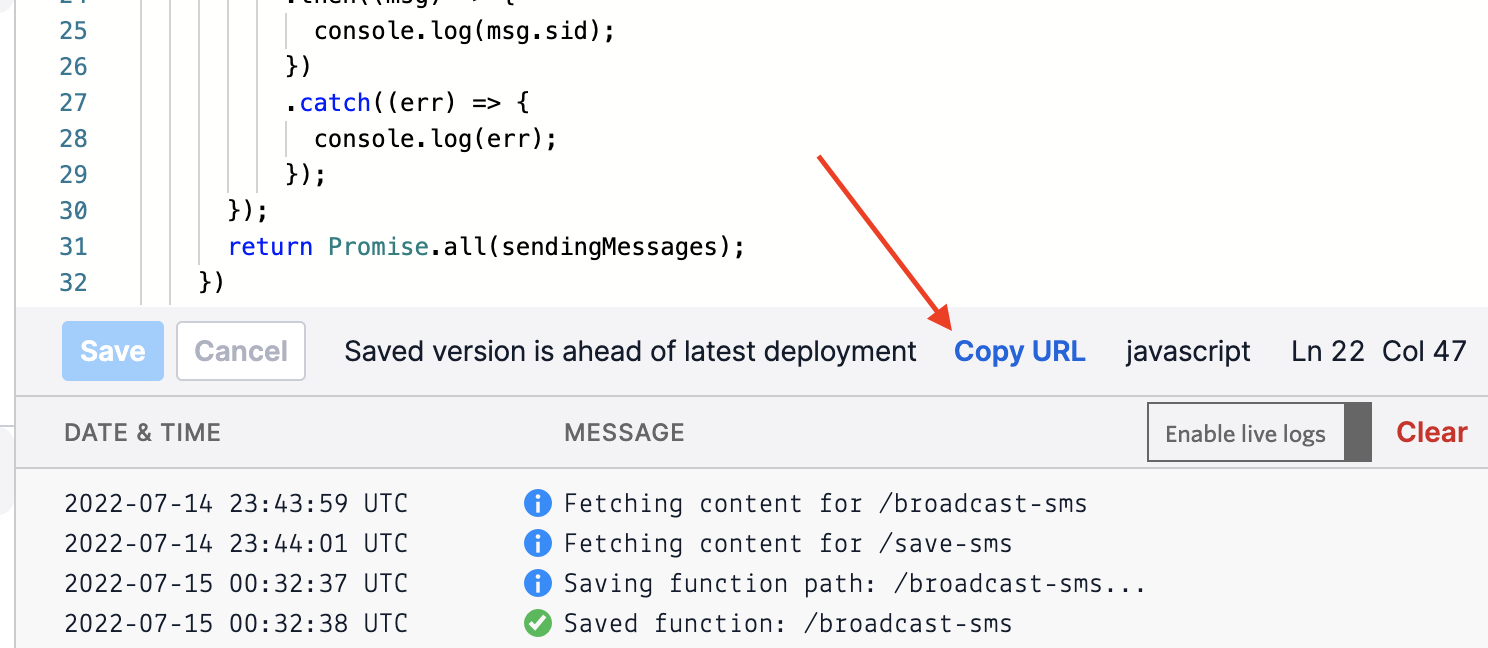
Once you have changed this .create function on our Twilio page, go ahead and click the blue Save button on the lower left and then click Deploy All. Wait a moment while it deploys. Since this particular function is designated as Public, we can test it straight from the browser!
On the right side of the console, there is a blue Copy URL link. Click that link, and then paste it in a new tab on your browser. You should see a new text message come in on your phone with the body: field as the content of the message.
Modify the save-sms function
Now let’s move on to the /save-sms function. We will basically change everything in this function, since we are not creating new records, we only want to update existing ones by checking the checkbox under our “Confirmed” column for each number that responds “yes” to our RSVP.
Open up the /save-sms function and delete everything that exists in there and paste the following instead:
What this code is doing is first accessing our base records and matching the phone number that the incoming text message came from with a number in the “Number” column. It will insert an object with “id” assigned the value of the record id obtained from record.getId() as well as a “Confirmed” status set to true into an array called confirmation. We need this array because in the next .then section of the code, we pass this into Airtable’s .update function which according to Airtable’s API docs, accepts an array. The update happens in real time.
We will test this /save-sms function in the next step with Twilio Studio!
Twilio Studio
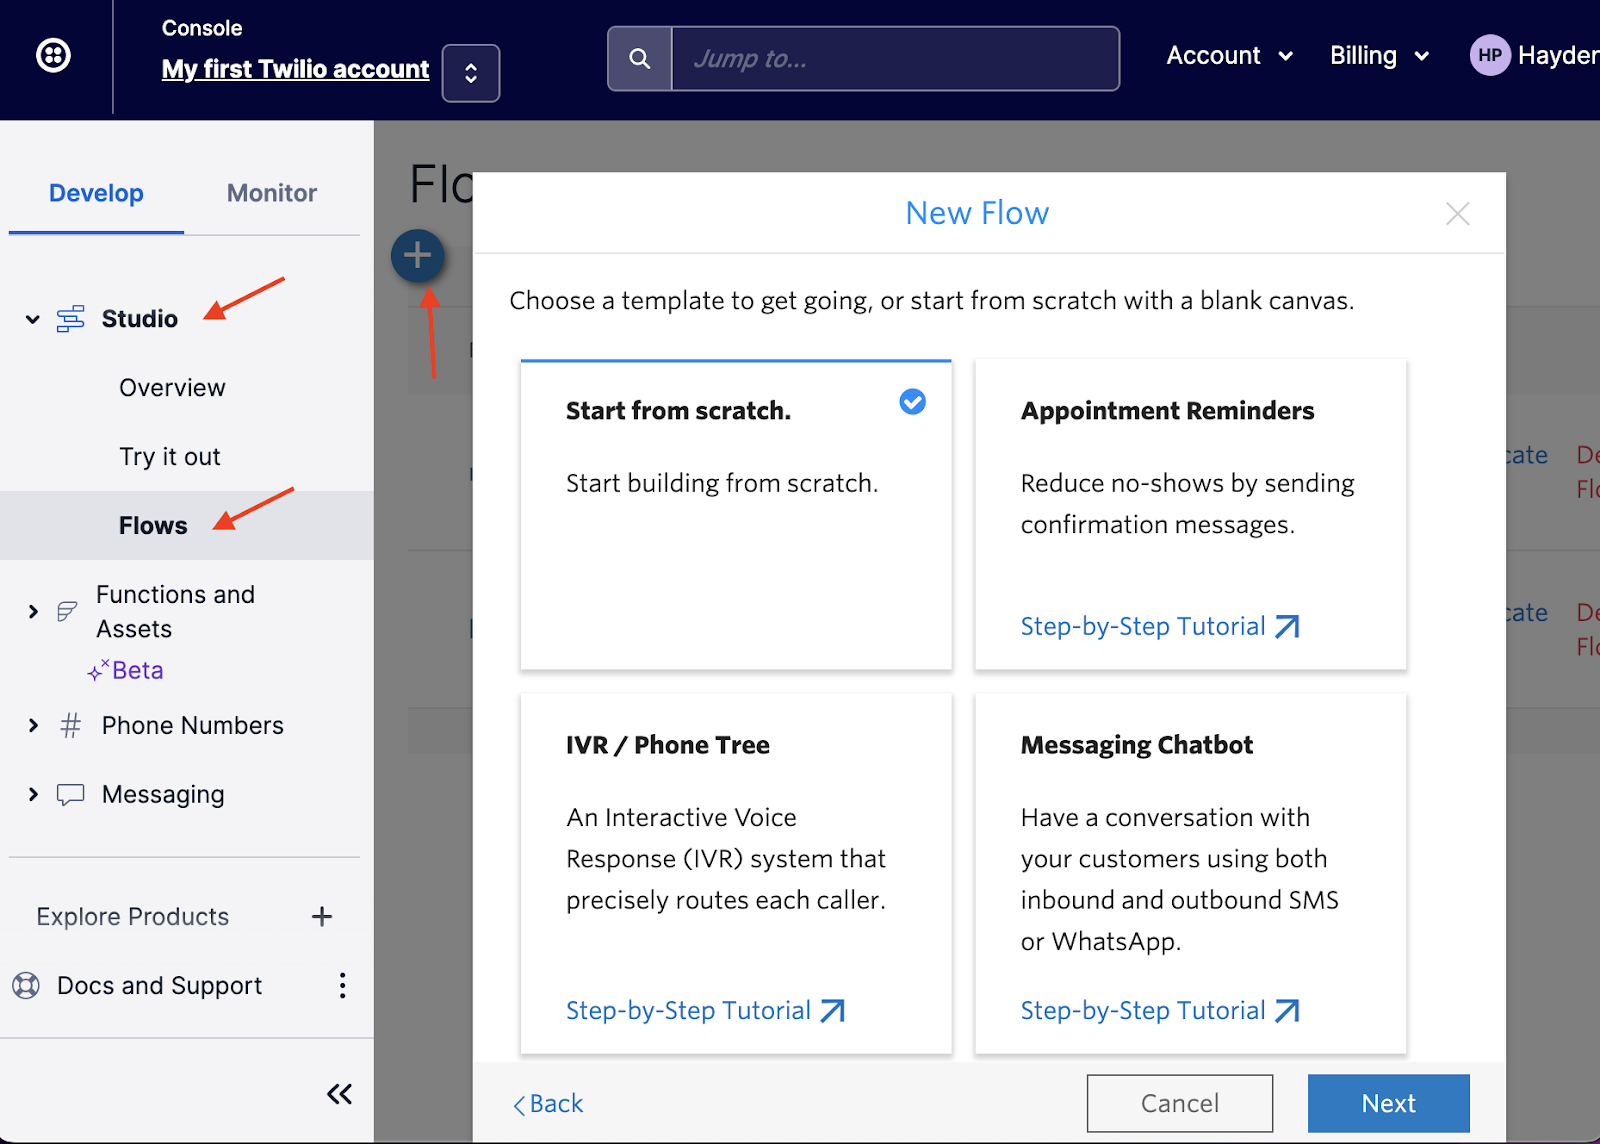
Navigate to your Twilio Console dashboard and in the sidebar click Studio and then go to Flows. If this is your first time making a Flow, click the blue “Create new Flow” button. Otherwise, click on the circular blue button with a “+” sign in it.
When prompted, name the new flow “airtable-rsvp” and click the blue “Next” button, and then click to select the “Start from scratch” tile, and hit “Next” again.
This will open a new Flow with a big “Trigger” widget to start. Here is a preview of what our completed Flow will look like when we add all the widgets:
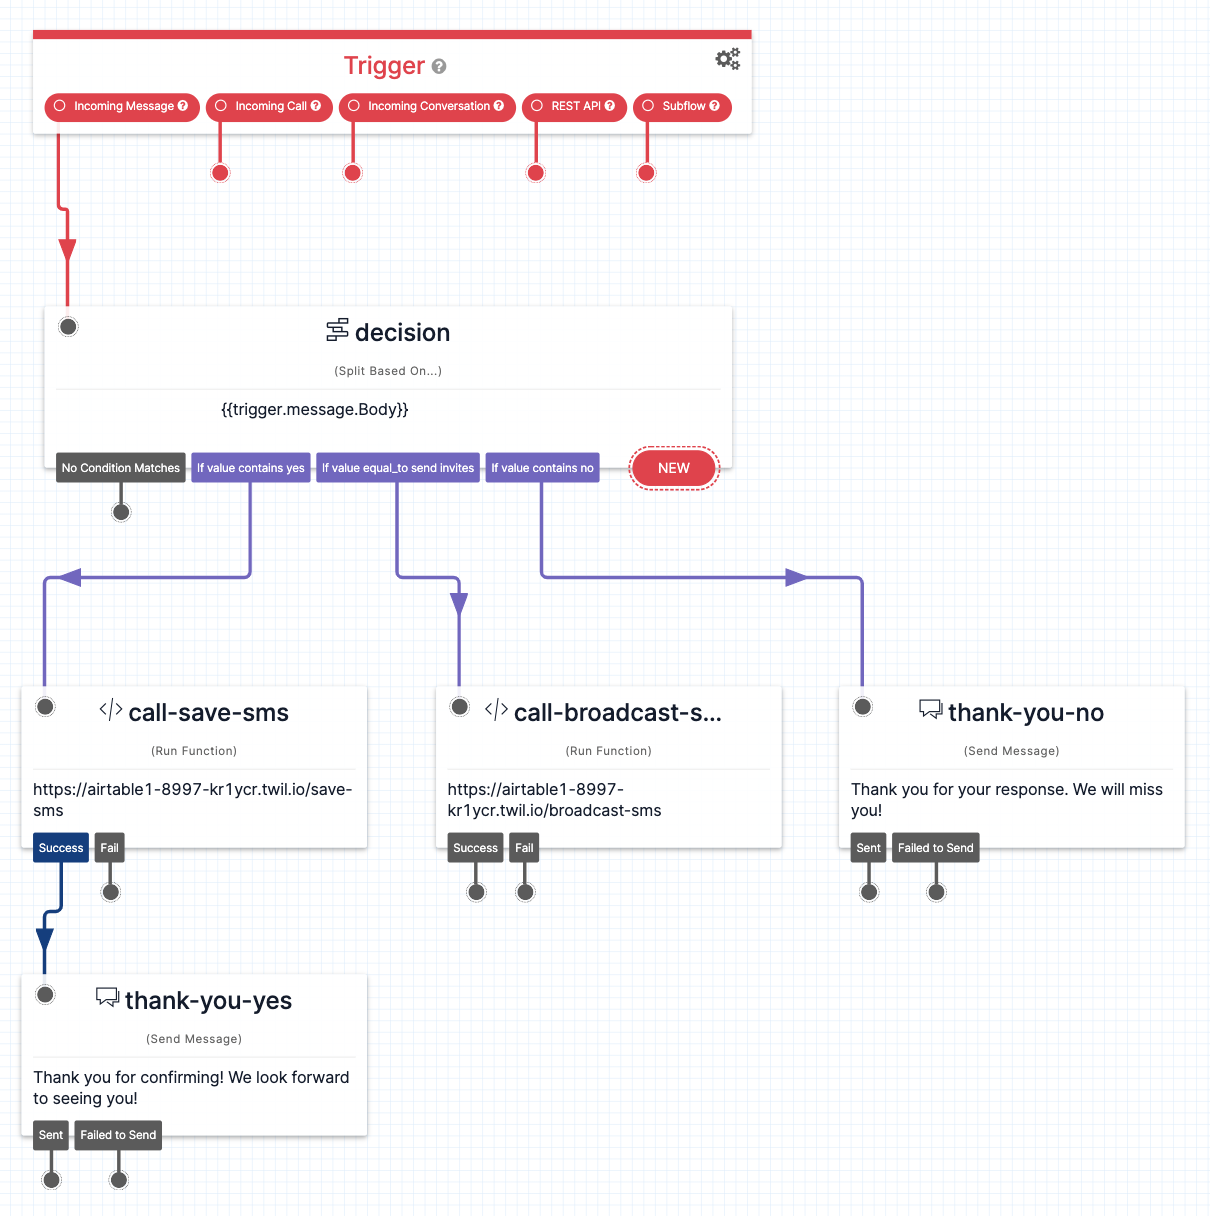
We want our system to respond differently to incoming messages.
If we (the one looking for RSVP’s) send a message “Send invites” to our Twilio number, we want /broadcast-sms to be called to send all the messages that we manually entered into our Airtable. This will do exactly what we did when we copied and pasted our /broadcast-sms URL into the browser.
If others reply to our broadcast with a “yes” message, we want to call /save-sms so that their confirmation is logged and updated on our table. We will also follow up with a quick “thank you” message, letting them know that we received their confirmation.
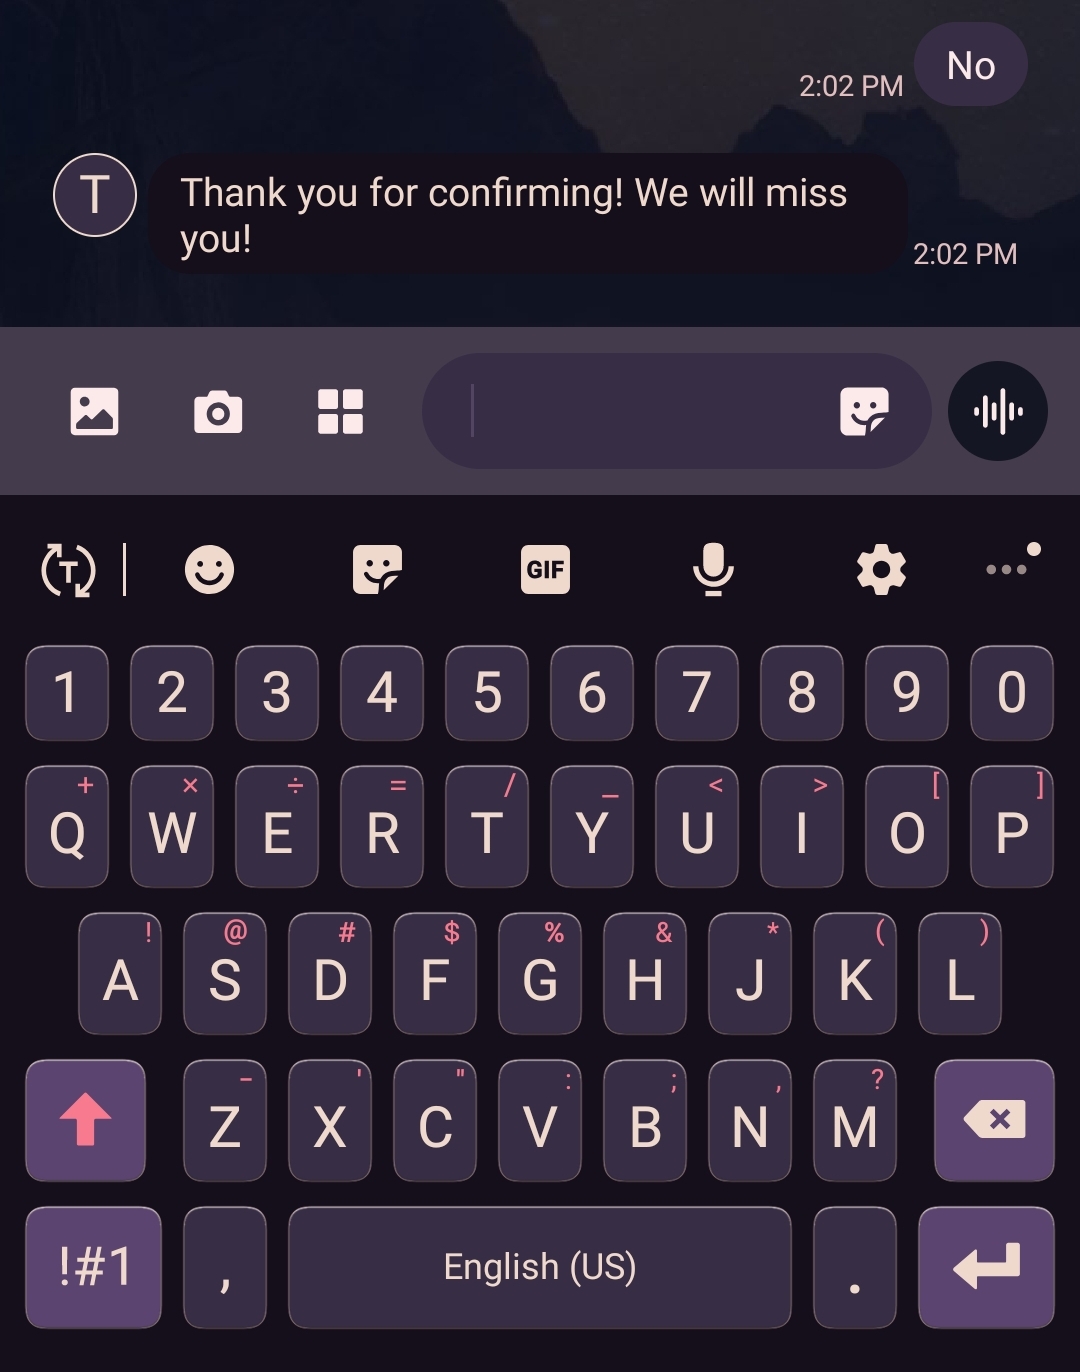
Alternatively, if others reply with “no”, we don’t want to call either function because confirmation is false by default, so we will just send a quick thank-you message to let them know we appreciate their response.
Set up our Flow widgets
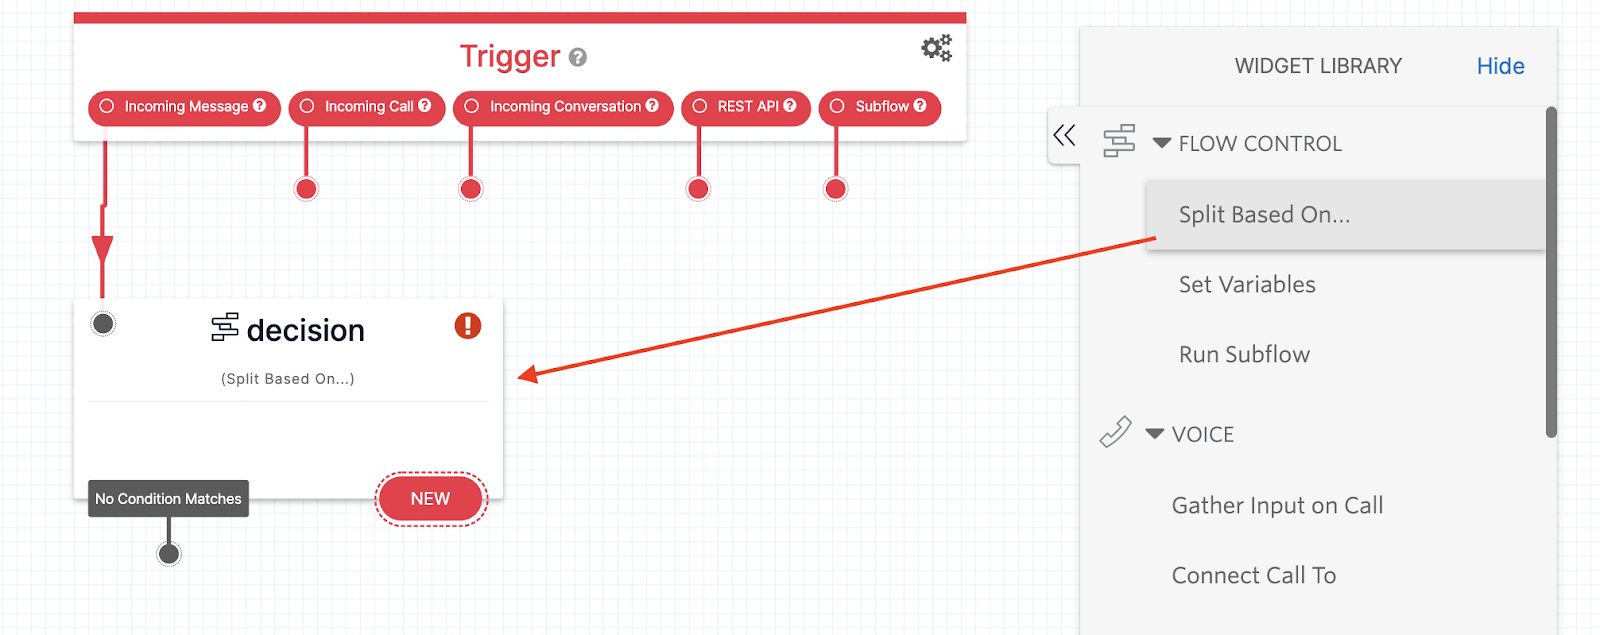
Let’s start first with going to the right side panel called Widget Library and clicking Split Based On… Drag this widget into our Flow space and drop it directly under the Trigger widget.
Rename this split widget from “split_1” to “decision” and connect the Incoming Message piece of Trigger to the gray dot on the upper left corner of our newly named “decision” widget.
Let’s bring out two more widgets and place them under “decision” in a row. Go back to the Widget Library and drag out two Run Function widgets.
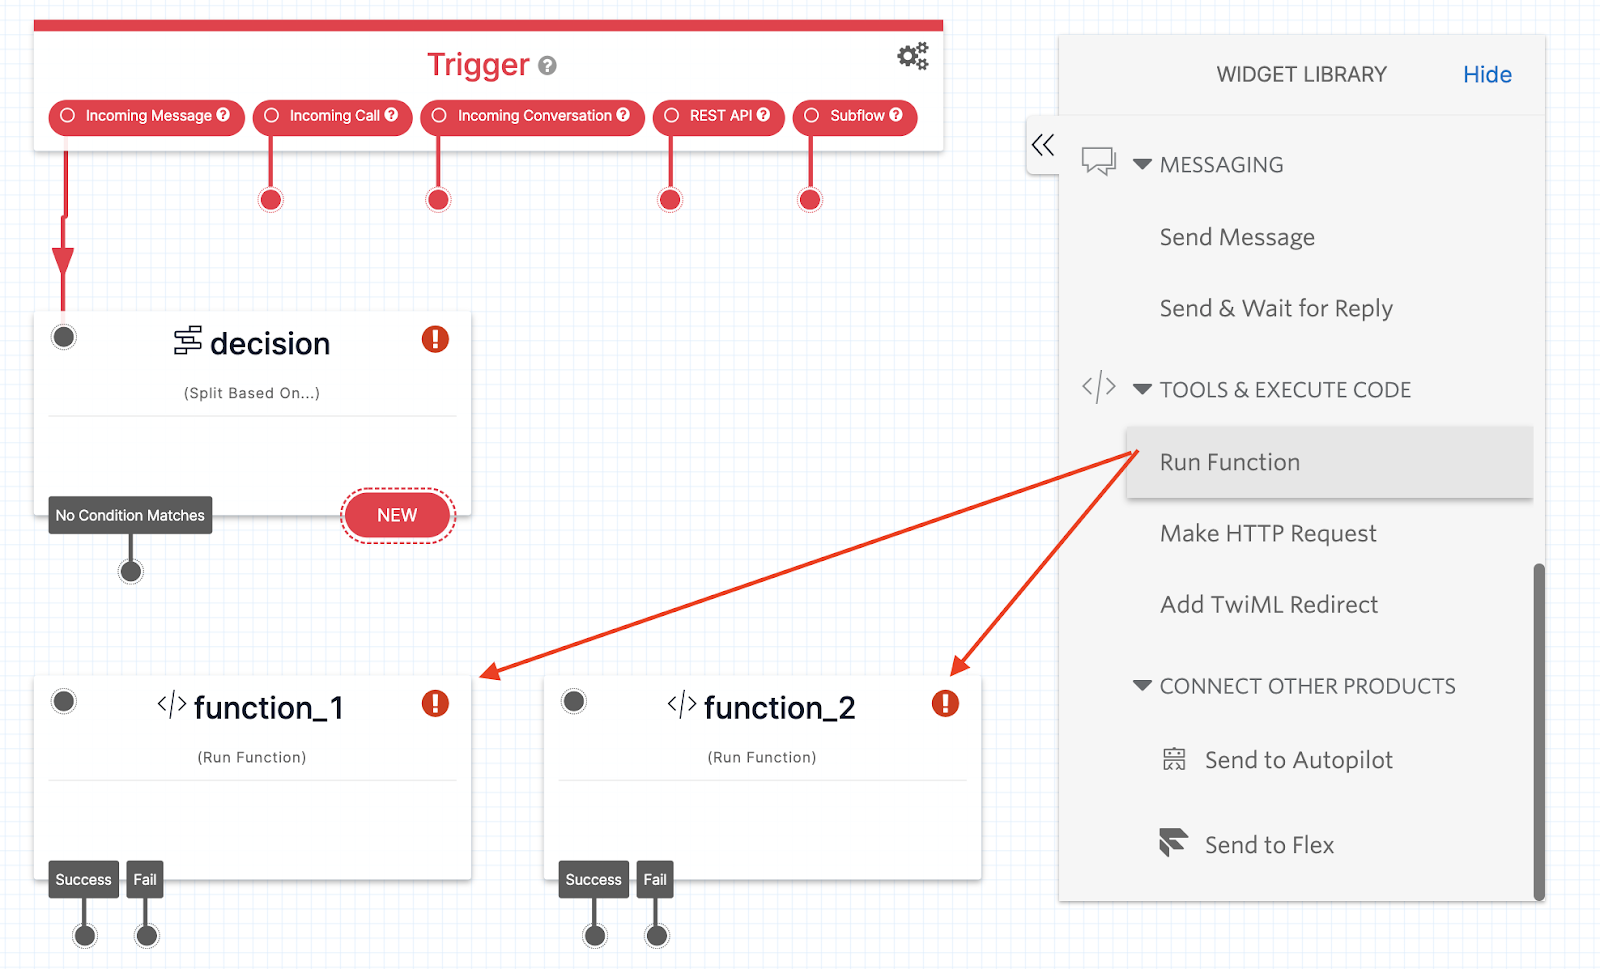
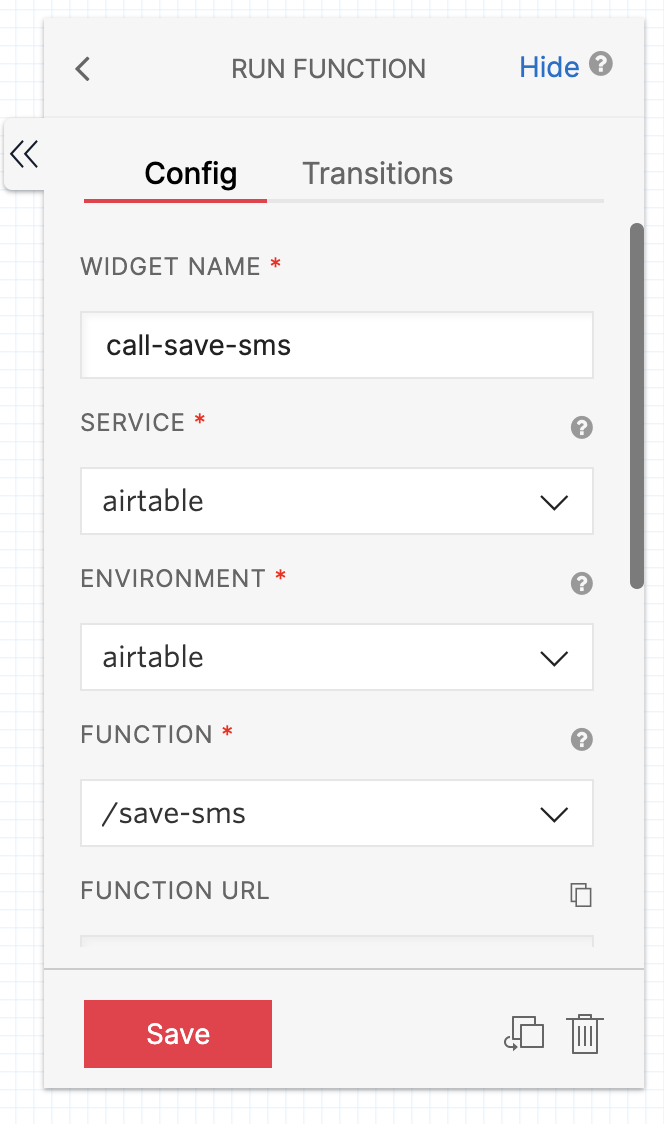
Clicking on the widget will open up its Config settings where we can rename the function and modify how the widget behaves. Rename “function_1” to “call-save-sms” and rename “function_2” to “call-broadcast-sms” so it is clear which functions they are going to be calling.
We also want to scroll to the bottom of these configure settings for “call-save-sms” to Function Parameters and hit the blue plus “+” button. Under key, enter “fromNumber” and under value, enter {{trigger.message.From}}. Click the gray Save link under the value textbox, and then click the red Save button at the bottom of the panel.
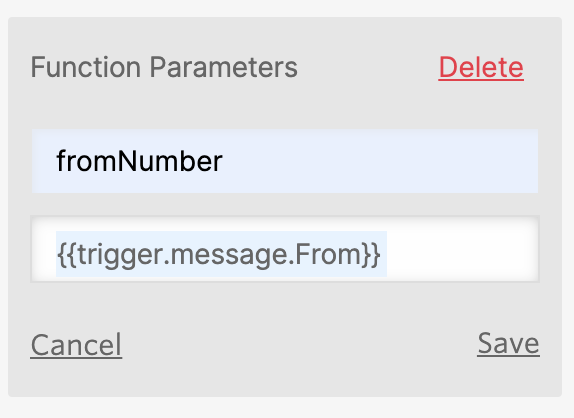
This parameter we passed in shows us the path of the value. It came from the trigger widget (which is the very first widget being accessed) and we are looking at the incoming message, and the From value is simply the number that sent the message. In our code of the /save-sms function, we can see that we are accessing this parameter on line 9:
We access this variable through the event argument. To learn more about the handler method arguments, here is an informative Twilio Runtime docs page for reference.
Complete the same steps above for our “call-broadcast-sms” widget, except we don’t have to add function parameters to that one since it gets all the information it needs from Airtable.
Click and drag out two final widgets: the Send Message widgets and place one beside our function widgets and one directly under “call-save-sms” for easy linking.
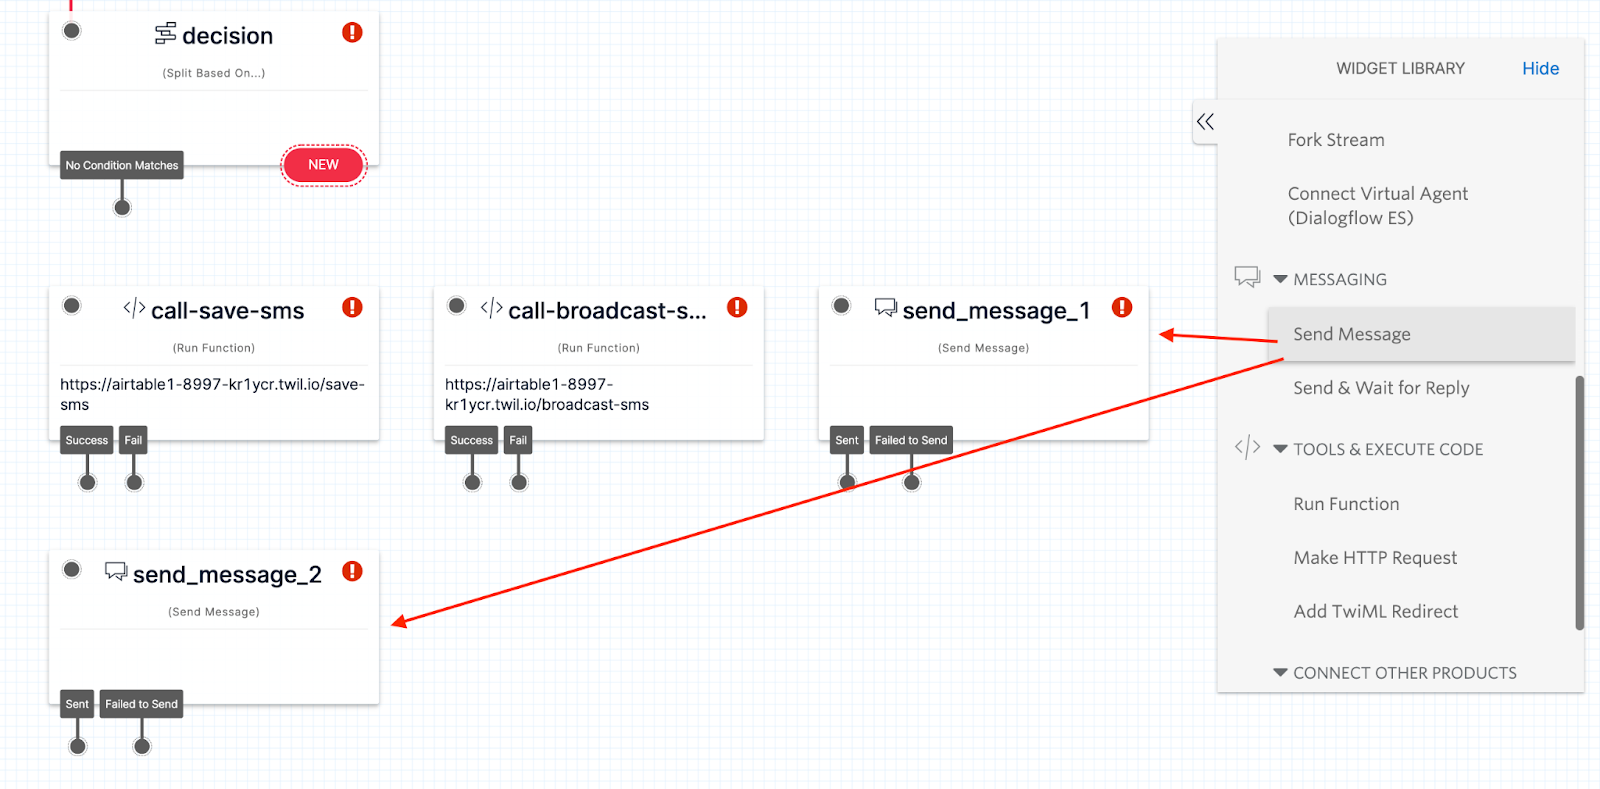
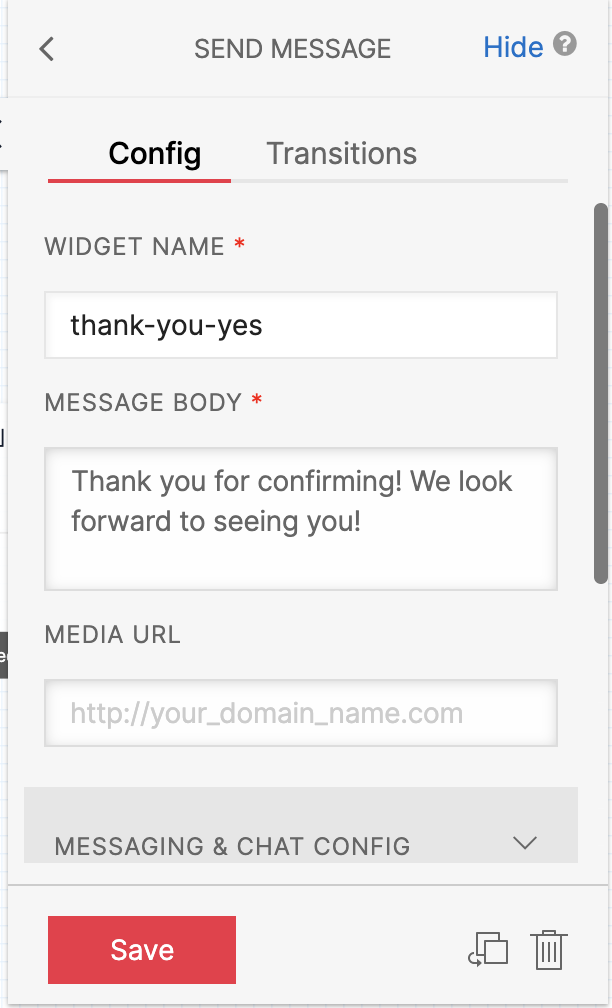
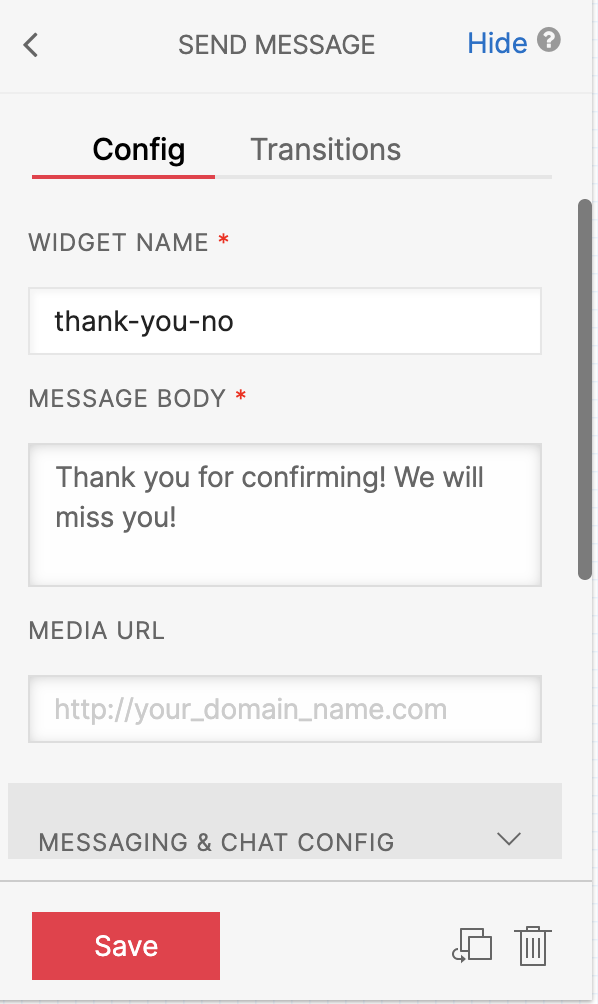
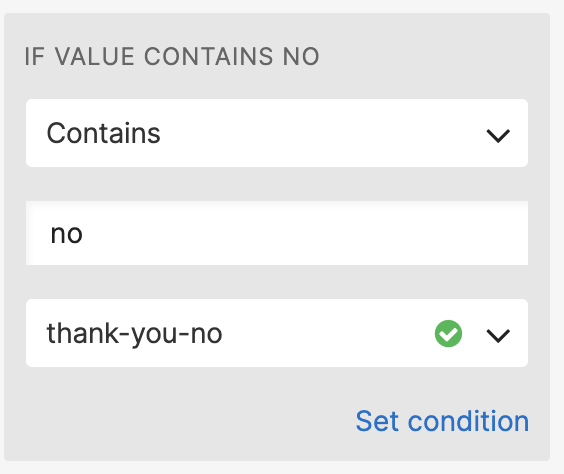
Rename “send_message_1” to “thank-you-no” and “send_message_2” to “thank-you-yes”. Under the Config options, write a custom message to address whether or not the respondent said “yes” or “no” to the RSVP.
Here is an example of what I wrote:
Modify the widget transitions and behavior
At this point we have all our widgets ready. Let’s start with “decision” and link different keyword phrases to our functions and message widget.
Click on “decision” and open up its Config panel. In the dropdown menu under Variable to test, select trigger.message.Body. Similarly to our “call-save-sms” widget, this will look at the message text and search it for a phrase upon which to split the flow.
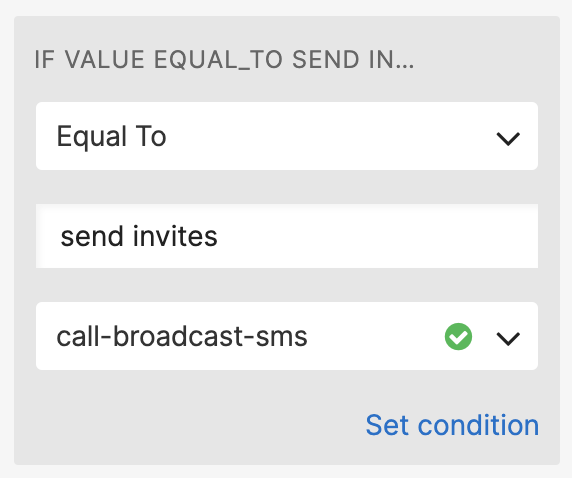
Beside Config, there is another tab labeled Transitions, click on this to open the panel where we will set our conditions. In this tutorial, we will set three conditions:
- When the text message contains “yes”
- When the text message is equal to “send invites”
- When the text message contains “no”
However, feel free to customize the conditions any way you wish. There is also a “No condition matches” option, which will trigger when the message text has none of these three options. I left this blank because it is mainly used when building a chatbot, but it is not needed for the purposes of this tutorial.
If you wish to use this option, feel free to send another message indicating they had responded with an unrecognized message and remind them of their options. Keep in mind that we don’t want our guests to know about the “Send invites” option because that would resend all the invitations again. All we want from them is either a “yes” if they plan on attending the event, or a “no” otherwise.
Here is how I set up my conditions:
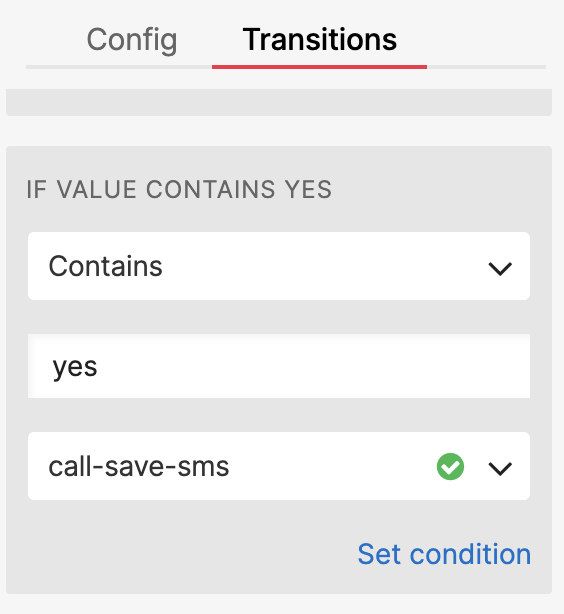
Click the red Save button at the bottom of the panel and see how all the links are hooked up automatically for us. There is only one more link left and that is for sending the “thank-you-yes” message after the “call-save-sms” function widget. Click and drag the “Success” link down to the “thank-you-yes” widget, or alternatively, click on the “call-save-sms” to open its Config panel and navigate to Transitions to set the “If success” field to “thank-you-yes”.
Our Flow should be complete at this point so go ahead and click the red Publish button at the top of the page and let's get ready to test!

Test our Studio Flow
Go back to our Twilio Console dashboard and navigate to Phone Numbers -> Active numbers and select the phone number that we want to use for our RSVP system. Scroll down to Messaging and change the option under A message comes in to Studio Flow. In the dropdown menu next to it, select “airtable-rsvp”, the Studio Flow we just published.

At the bottom of the screen, hit the blue Save button.
Let’s start by sending a text message to our Twilio number with “Send invites”. Since I only listed my own number, I should receive the personalized message we set up in /broadcast-sms as a reply.
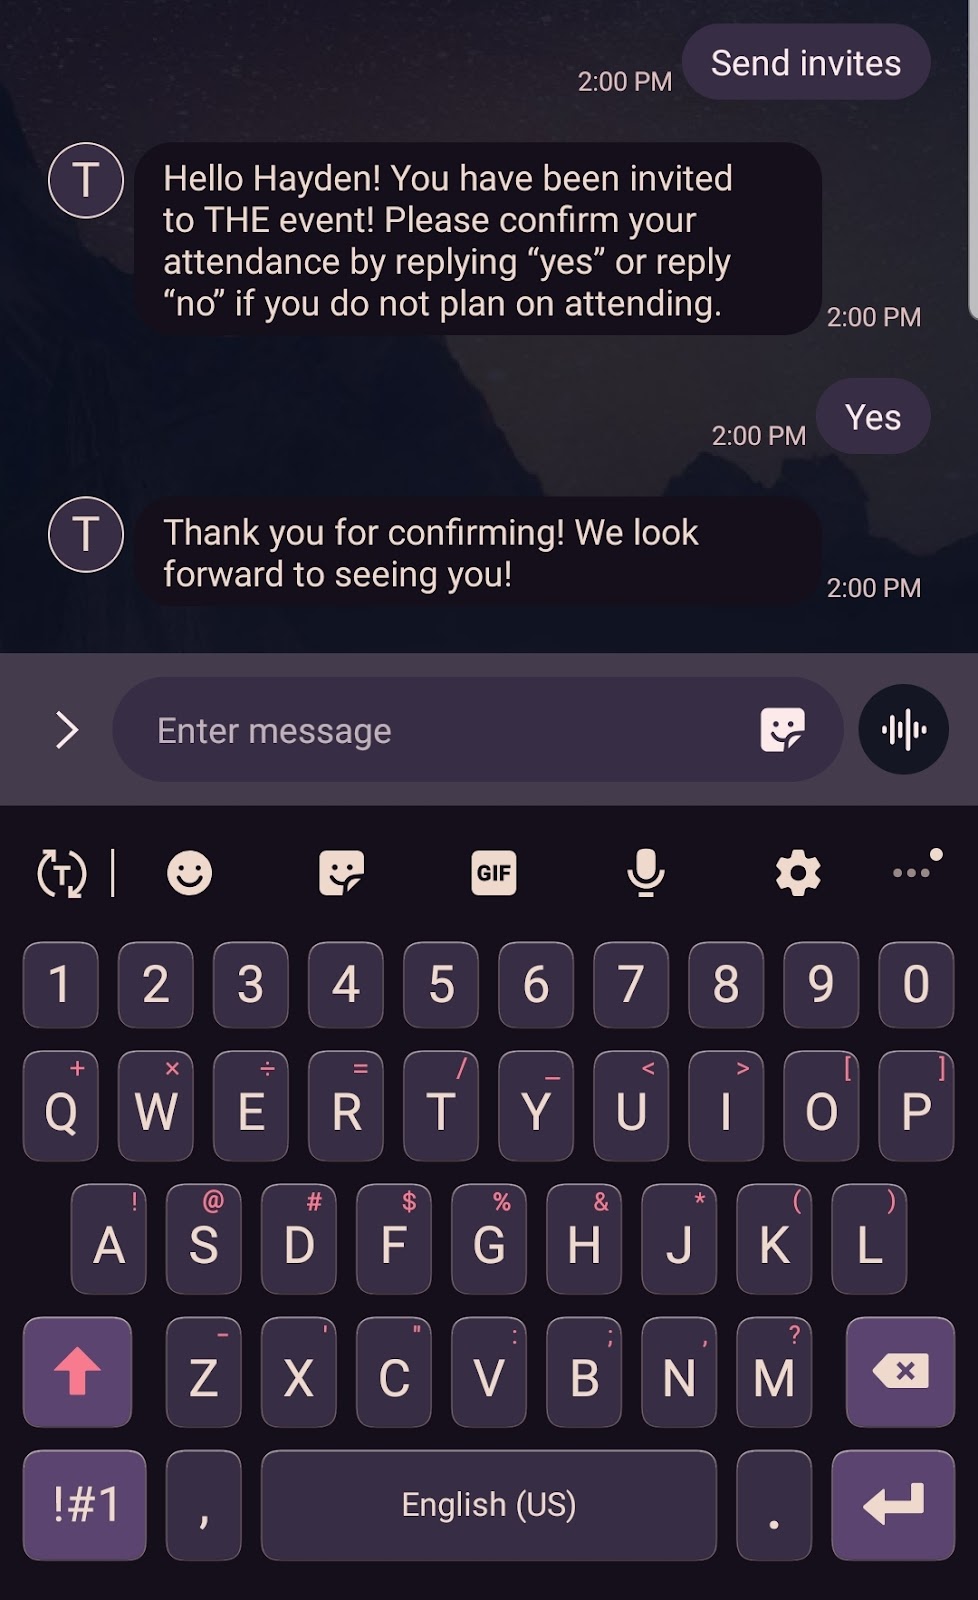
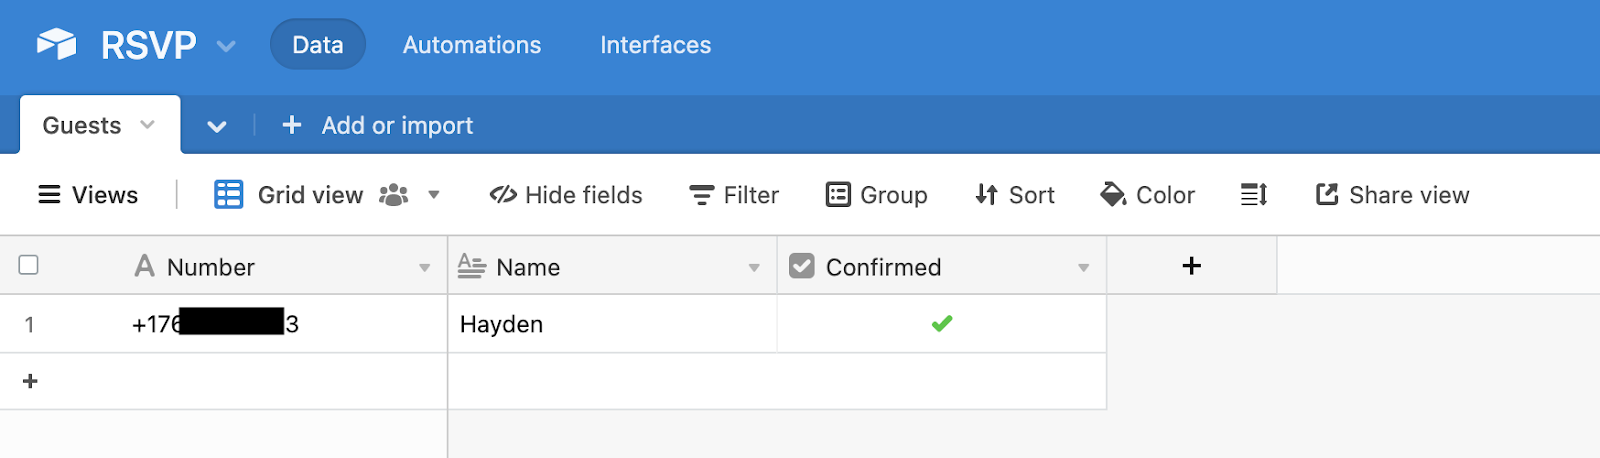
Upon sending “yes” as a response, take a look at our Airtable to see that our checkbox was checked under “Confirmed”!
Let’s up the ante a bit and populate the table with some numbers that don’t belong to us. Don’t worry, we are not going to “Send invites” to random numbers! All we want to see is whether or not the /save-sms function locates the correct number from the fromNumber parameter we passed in from our Studio Flow.
If you follow this procedure, after you enter additional records into your Airtable, wait a few moments for the Airtable to save and refresh the page. Go ahead and text “yes” to the number again and see if the checkbox associated with your phone number is checked, as opposed to all the fake numbers.
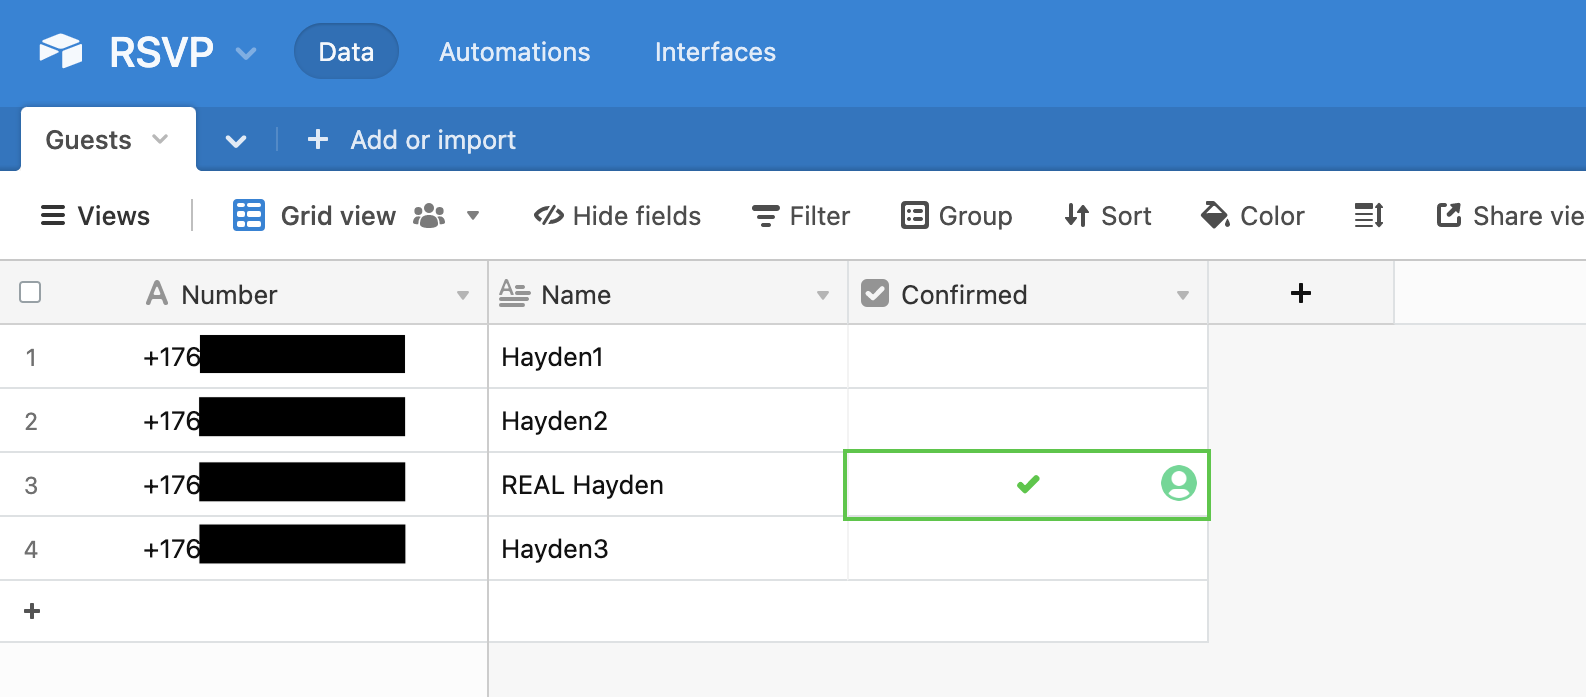
It looks like it found me! Try this out with your friends and see if you can get similar results with a bulk sms!
Errors and Debugging
What is a software project without hiccups? There are a number of areas where a project like this could go wrong.
One way to know if something has formally thrown an error in our Twilio Functions is to navigate to our Console dashboard and in the sidebar where we previously accessed Studio, click on the tab labeled Monitor at the top of the panel. Click down to Errors and then finally Error logs.
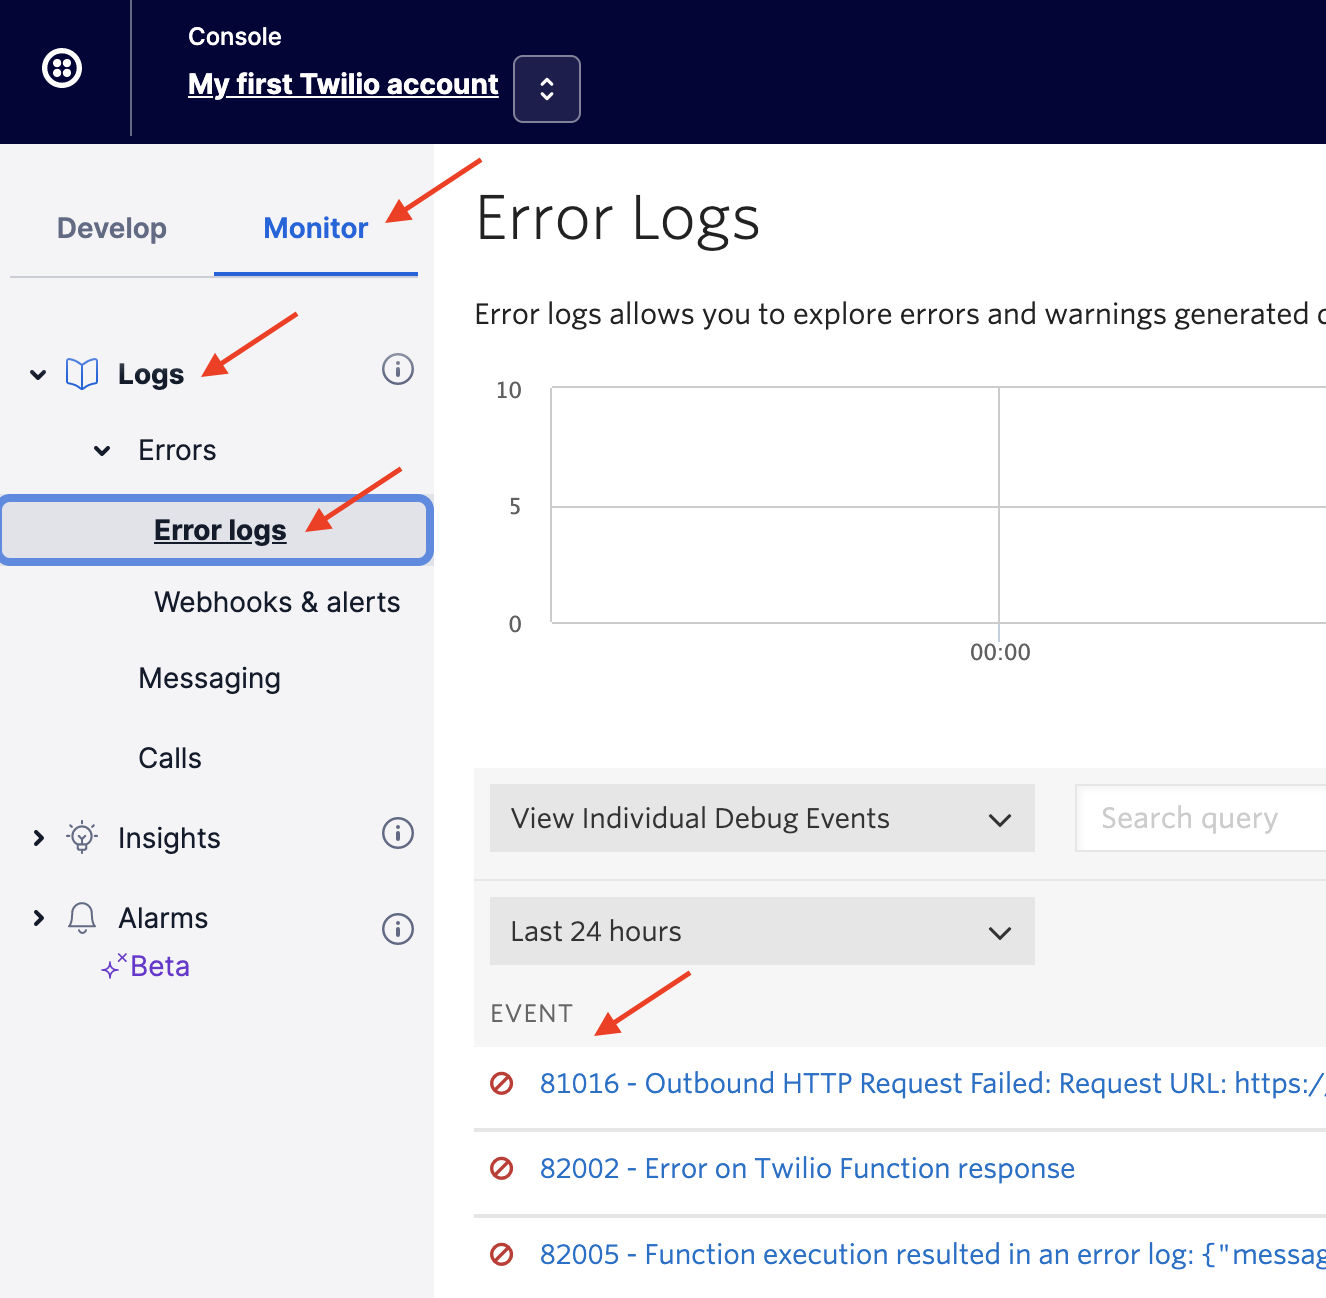
Under Event you will see a list of errors that were thrown during the execution of your Twilio Function. Here we can find clues as to what might be the problem.
However, if this doesn’t provide us any clues, there is a way to console.log information in our Functions and view it in real time as it executes. Re-open one of our Functions by going back to the Develop tab in the sidebar of our Console and navigating to Functions and Assets -> Services, and then locate our “airtable” service in the table. Clicking on the hyperlink will take us to our /broadcast-sms and /save-sms functions.
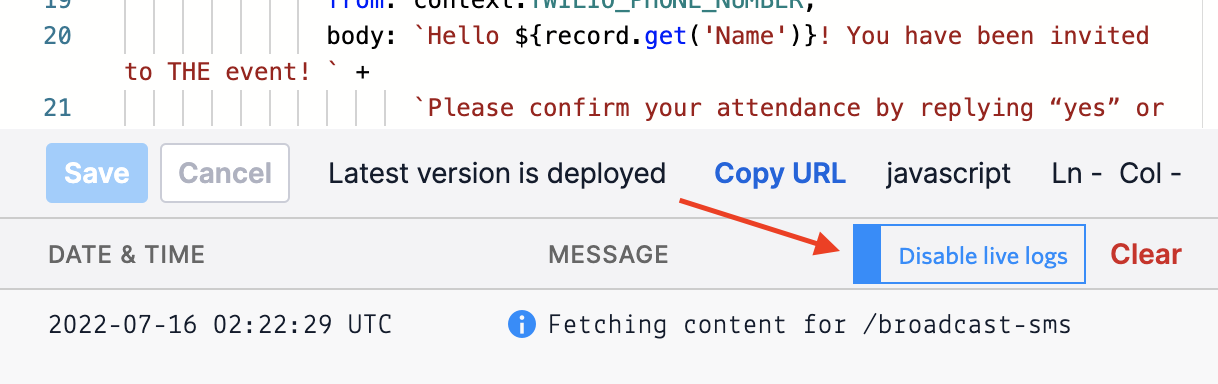
In either function, there will be a grayed-out toggle labeled Enable live logs and clicking it will turn it blue and change the text to Disable live logs. If this toggle is enabled, any console.log command in the function will output in the Message field below the editor.
Conclusion
Now you have your very own serverless RSVP system that will keep track of all your guest responses through SMS! For further tutorials on various Airtable and Twilio topics, I recommend checking out more posts on our Twilio blog to find inspiration for your next project. If you found this guide helpful or have any input for me, don’t hesitate to send me an email with your feedback. And please don’t forget to send me an SMS invite to your next shindig!
Hayden Powers is a Developer Voices intern on Twilio’s Developer Network team. She enjoys enthusing over creative ideas and endeavors, and hopes you will reach out to her with yours at hpowers[at]twilio.com or on LinkedIn.

Related Resources
Twilio Docs
From APIs to SDKs to sample apps
API reference documentation, SDKs, helper libraries, quickstarts, and tutorials for your language and platform.
Resource Center
The latest ebooks, industry reports, and webinars
Learn from customer engagement experts to improve your own communication.
Ahoy
Twilio's developer community hub
Best practices, code samples, and inspiration to build communications and digital engagement experiences.