Make and Receive Phone Calls from the Browser with Twilio Programmable Voice, Python and JavaScript
Time to read:
April 21, 2021
Written by
In this tutorial, we are going to write an application that uses the Twilio Programmable Voice API to make and receive phone calls from a web browser. We will also implement a UI that allows us to make, accept, and reject phone calls.
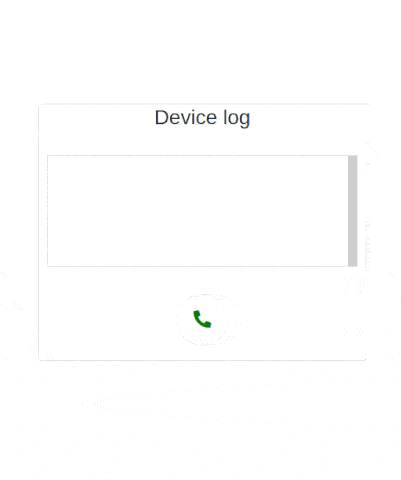
By the end of this tutorial we will have an application that looks like the following:
Tutorial requirements
To follow this tutorial you are going to need the following components:
- A free or paid Twilio account. If you are new to Twilio create a free account now. If you create your account using this link and later upgrade to a paid account, you will receive $10 in credit.
- A Twilio phone number capable of making and receiving phone calls. Get one now if you don’t have it.
- Python 3.6+ installed.
- ngrok installed. ngrok is a reverse proxy service that creates a secure tunnel from a public endpoint to a locally running web service. We will need to use ngrok to create a secure URL that allows Twilio to connect to our application.
- A cell phone or telephone capable of making and receiving phone calls, to test the project.
Basic concepts and Application logic
The goal of this tutorial is to build a web application that allows us to make and receive phone calls in the browser. We will use the Flask framework to implement the required webhooks and serve the client application.
The application client will use the Twilio Client JS SDK (twilio.js) to create a Twilio Device.
A Twilio device is our main entry point for making and receiving phone calls in the browser. In order to set up a connection between a Twilio device and Twilio’s servers we will need to generate access tokens in our application server.
Access tokens are short-lived credentials that can be distributed safely to client-side applications that we can use to authenticate Twilio Client SDKs likeVoice,Conversations,Sync, and Video. To generate access tokens in our server, we will need to use a Twilio API key.
A Twilio API key is a credential that grants us access to the Twilio API. An API key allow us to:
- Authenticate with Twilio's API
- Create and revoke Access Tokens
Access tokens will grant the client access to a TwiML Application (TwiML app). Twilio relies on a TwiML Application within our account to determine how to interact with our server.
TwiML (the Twilio Markup Language) is a set of instructions we can use to tell Twilio what to do when we receive an incoming call, SMS, or fax.
Creating the project structure
In this section, we will create our project directory, and inside this directory, we will create the standard directories for a Flask application. After that, we will create and activate a virtual environment. Lastly, we will install the Python packages needed to build this web application.
Open a terminal window and enter the following commands:
Here we cloned a starter project that was created for this tutorial and set the name to twilio-in-browser-calls, after that we navigated into this project directory. This project contains the boilerplate code that we will use to build our application.
You will find the following standard directories for a Flask application inside :
static: this is where all static files are stored.templates: this is where all templates are stored
The static subdirectory has the following contents:
css- This is where we will store all CSS files. Inside this subdirectory you will find a file namedstyle.css, this file will be responsible for styling our application client UI.images- This is where we will store all images. Inside this subdirectory you will find a file nameduser.png, we will display in our application client UI.js: This is where we store all our Javascript files. Inside this directory you will find a file namedmodals.js. This file contains the code to manage the modals stored in thetemplatesdirectory.
The templates subdirectory has three files: call_in_progress_modal.html, dial_modal.html and incoming_call_modal.html.
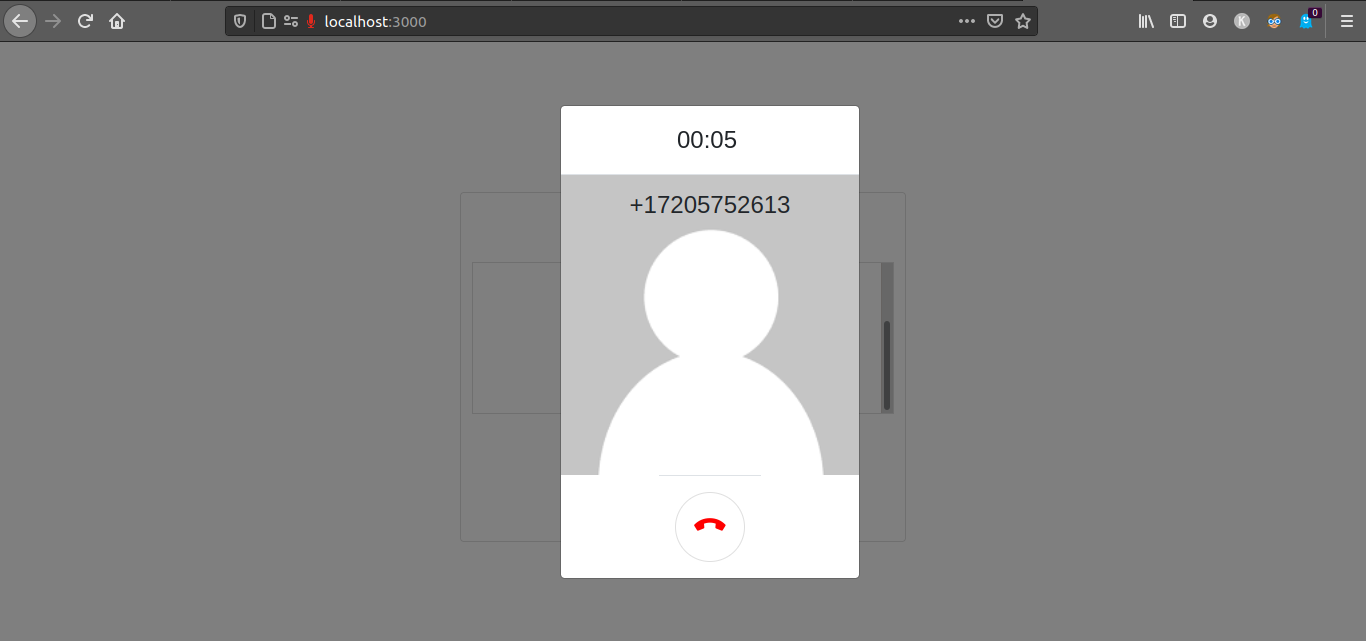
The call_in_progress_modal.html file contains the HTML code that implements a modal that will show during a call. This modal shows the duration of the call in progress, the number you are calling, and a button with a red phone icon that will allow you to end the call. This is how this modal looks:
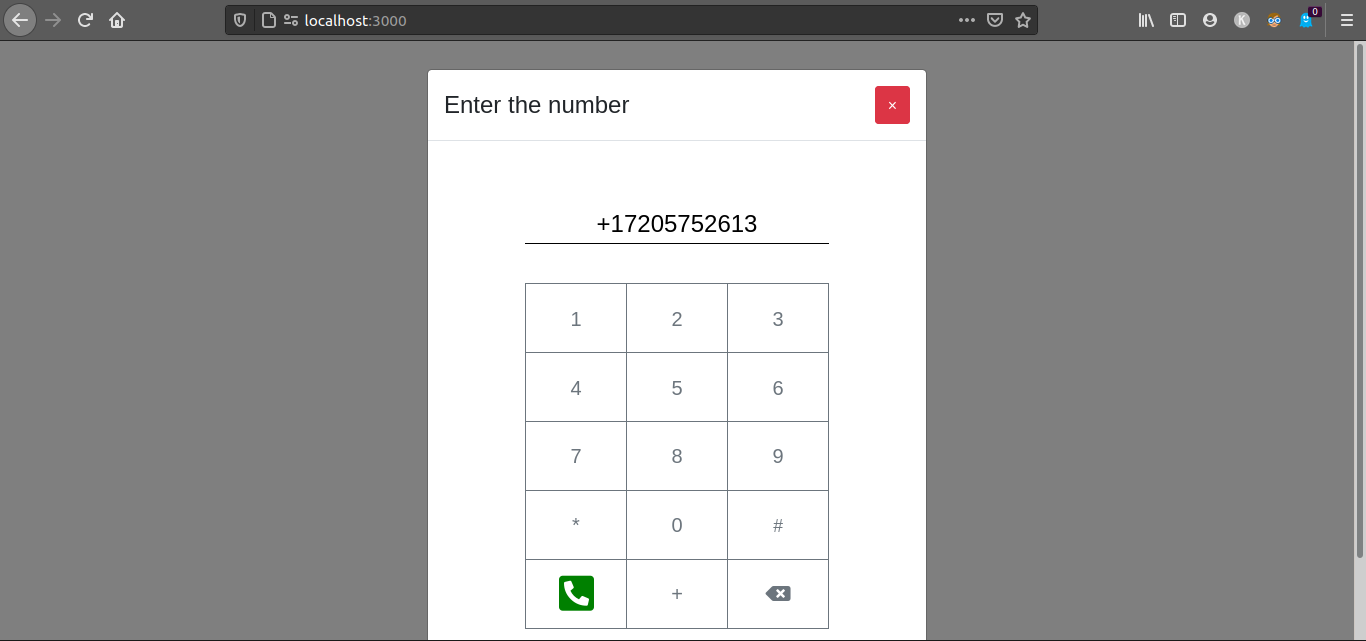
The dial_modal.html file contains the HTML code that implements a modal that will show when you wish to dial a phone number. This modal shows a number pad and button with a green phone icon. This is how it looks:
The incoming_call_modal.html file contains the HTML code for a template that implements a modal that will only show when you are receiving a call .This modal shows the number that is calling you, and two buttons, one button with a green phone icon and another with a red phone icon. The first button will allow you to accept an incoming call and the second to reject it.

Inside our working directory create a virtual environment and activate it. If you are using a Unix or Mac OS system, run the following commands to do it:
If you are following the tutorial on Windows, run the following commands instead:
Now that we created and activated our virtual environment we can install the libraries that we need to create our application:
In the command above we used pip the Python package installer, to install the following packages that we are going to use in this project:
- Twilio, a Python package for communicating with the Twilio API.
- Flask, a Python micro-framework for building web applications. We will use it to create a webhook to interact with Twilio and to create the client UI to make and receive phone calls.
- Python-dotenv, a library that reads key-value pairs from a file and adds them as environment variables. We will use this module to retrieve our Twilio credentials stored in a
.envconfiguration file.
For your reference, at the time this tutorial was released these were the versions of the above packages and their dependencies tested:
Aside from the Python packages mentioned above, we will use the following front end libraries:
- Bootstrap, a powerful front-end framework used to create modern websites.
- Twilio Client JS SDK (twilio.js), a library that allows you to make voice calls from a web browser.
- JQuery, a fast, small, and feature-rich JavaScript library that makes things like HTML document traversal and manipulation, event handling, animation, and Ajax much simpler. We will use it to perform some DOM manipulation and event handling.
- Font Awesome, a popular iconic SVG, font, and CSS toolkit. We will use some of the icons designed by them in our application client.
Creating a TwiML Application
In this section, we will use the Twilio console to create a “TwiML App”, in which we will later store the URL of the webhook we’ll build.
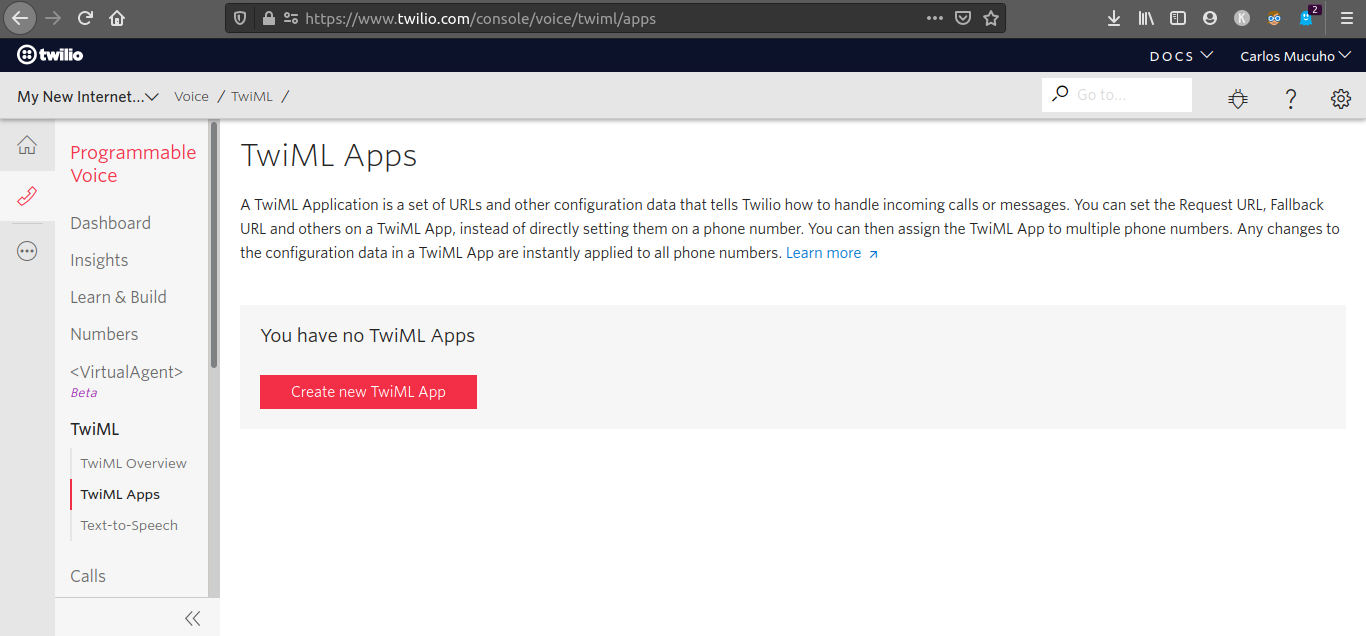
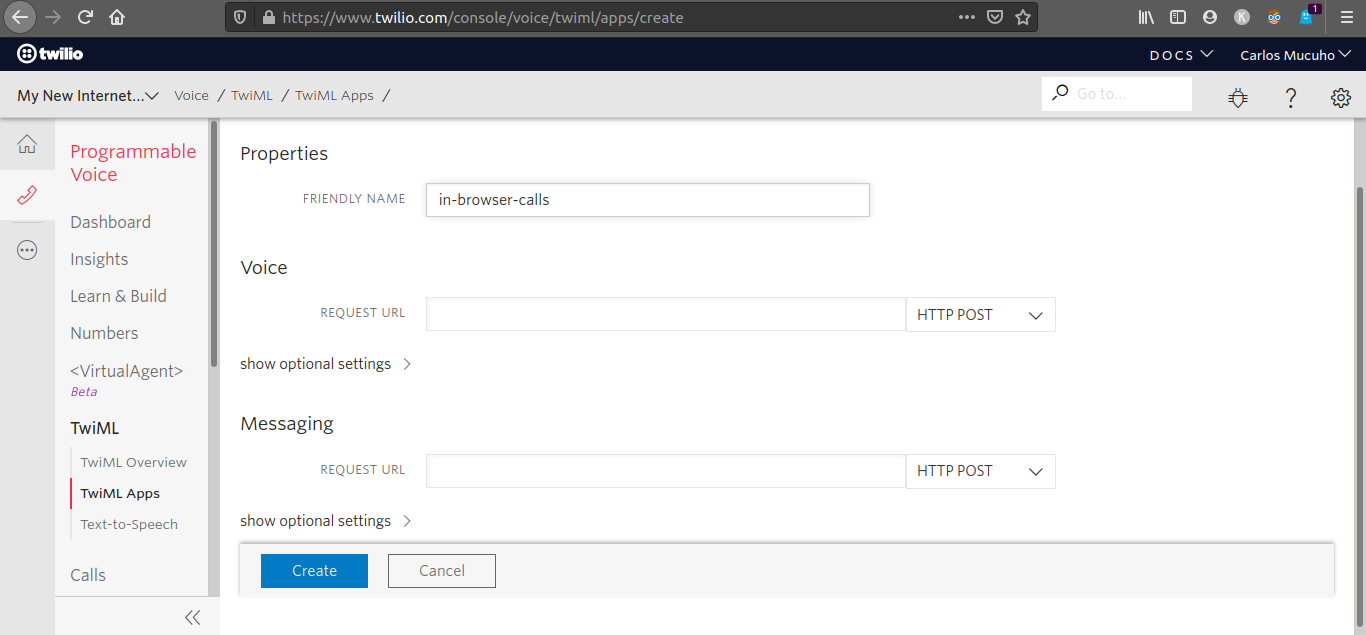
Open a new browser window and navigate to Twilio account Console > Voice > TwiML > TwiML Apps. Click in the “Create new TwiML App” button, or the red “+” icon if you already have other TwiML apps.
Enter the name for your TwiML app in the “Friendly Name” field, for example, in-browser calls. Leave the other fields empty for now. Click the “Create” button to create the TwiML application.
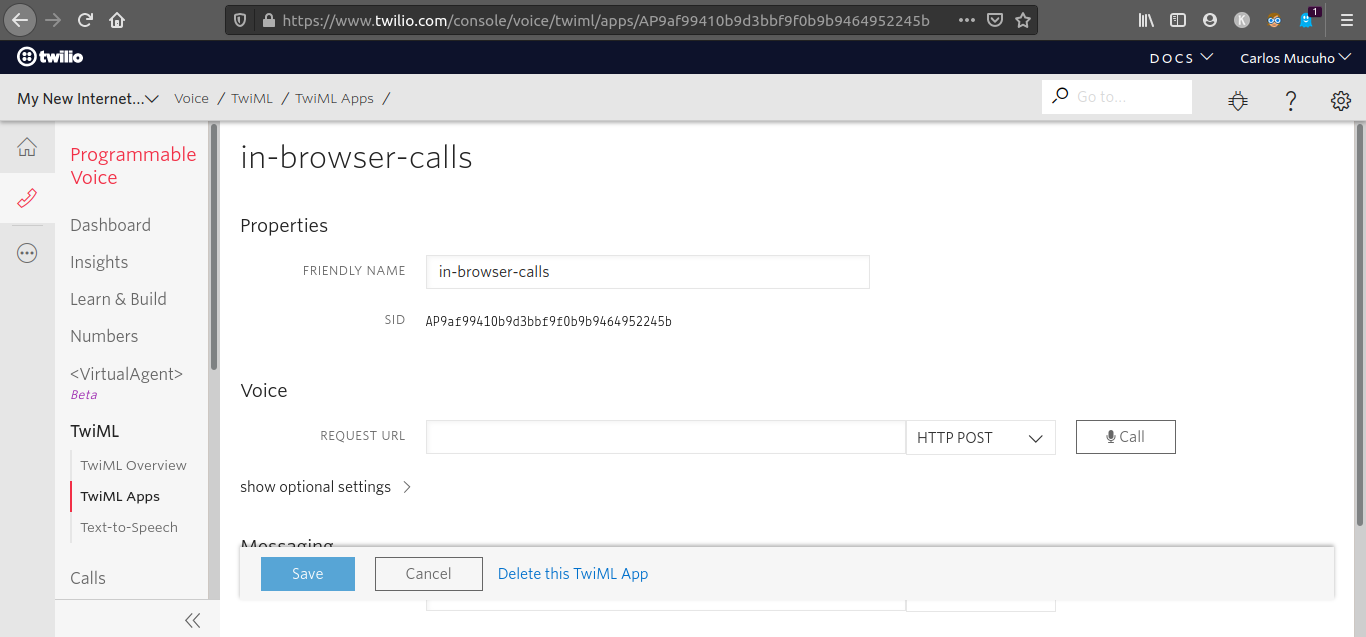
You will be redirected back to the TwiML Apps dashboard. Click on the TwiML App you just created. On the page for this app, select the SID value and copy it to the clipboard.
In the project’s root directory, create a file named .env and enter the following contents in it:
Creating a Twilio API key
For the next step we are going to create a Twilio API Key for the Voice API. The API Key is going to be used to generate access tokens, which will allow the front end running in the browser to make calls to Twilio APIs.
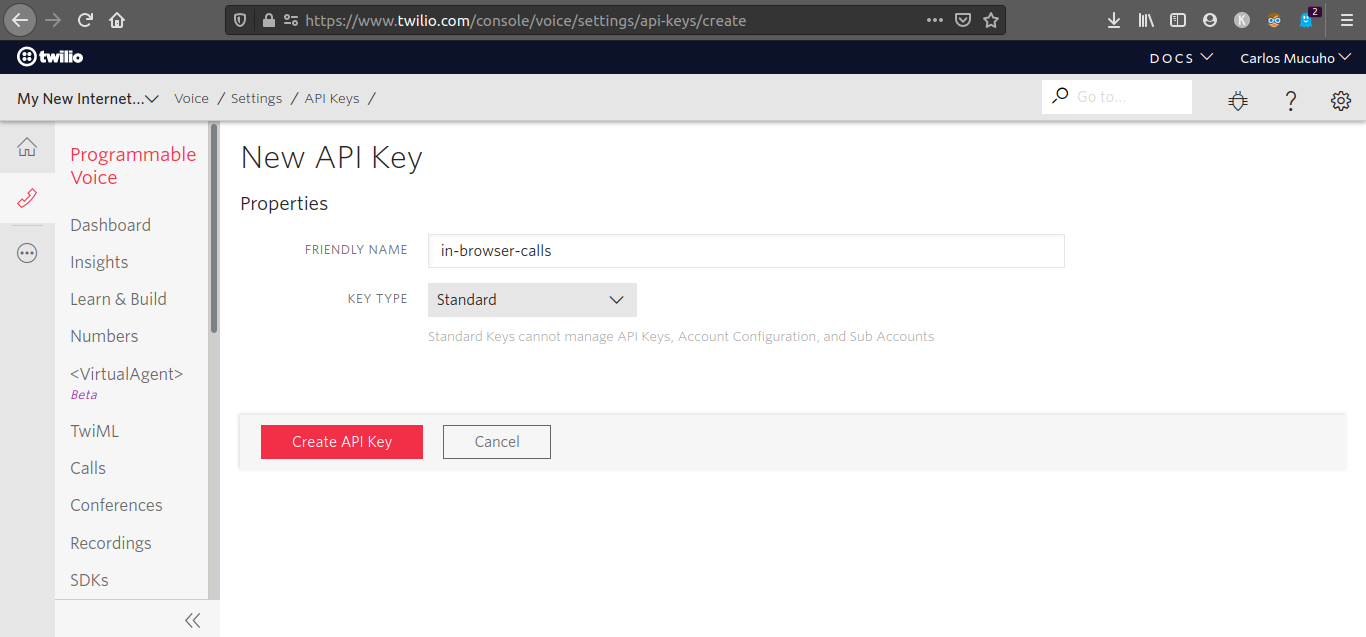
Navigate to Twilio console > Voice > Settings > API Keys in your browser. Click the “Create new API Key” button, or the red “+” icon if you already have other API keys.

Enter the name for your API key in the “Friendly Name” field, for example, in-browser calls. Leave the “Key Type” as “Standard”. Click the “Create API Key” button to create the API key.
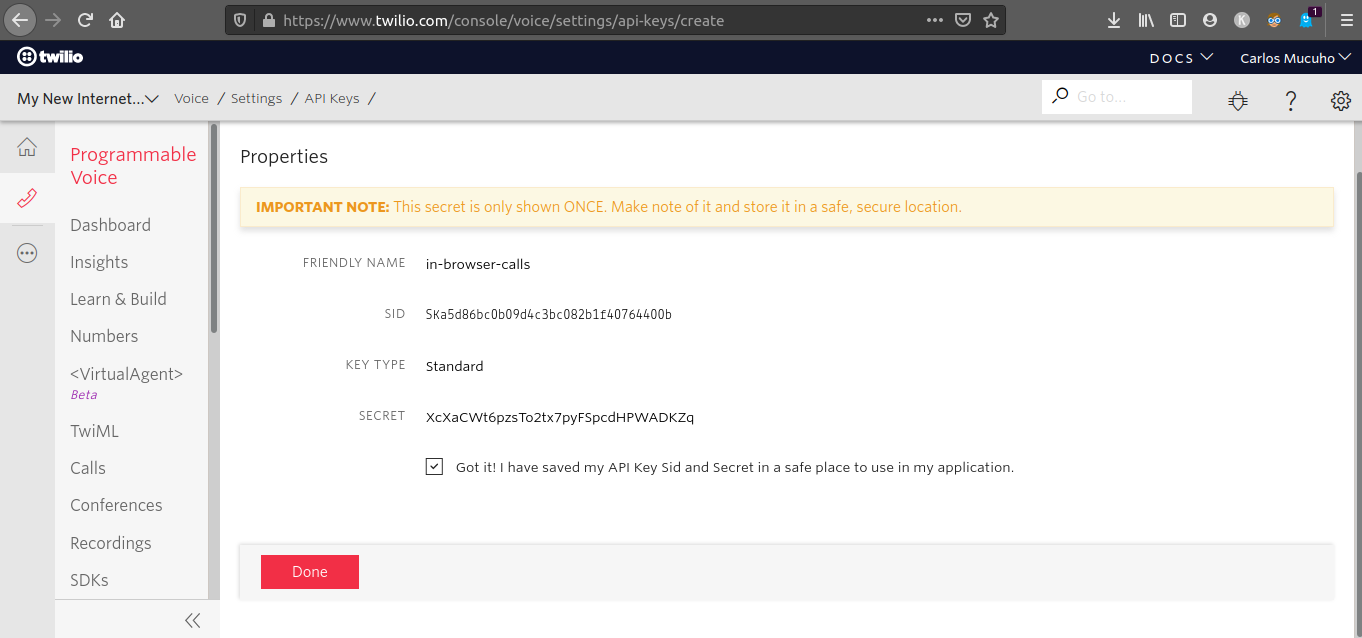
You will be redirected to a page where you will find information about your new API key. Copy the “SID” and “Secret” values and paste them in your .env file as TWILIO_API_KEY_SID and TWILIO_API_KEY_SECRET. Your .env file should now look as follows:
Check the “Got it!” field, and then click the “Done” button.
Now go to the Twilio Console home page and copy the Twilio Account SID value to the .env file as follows:
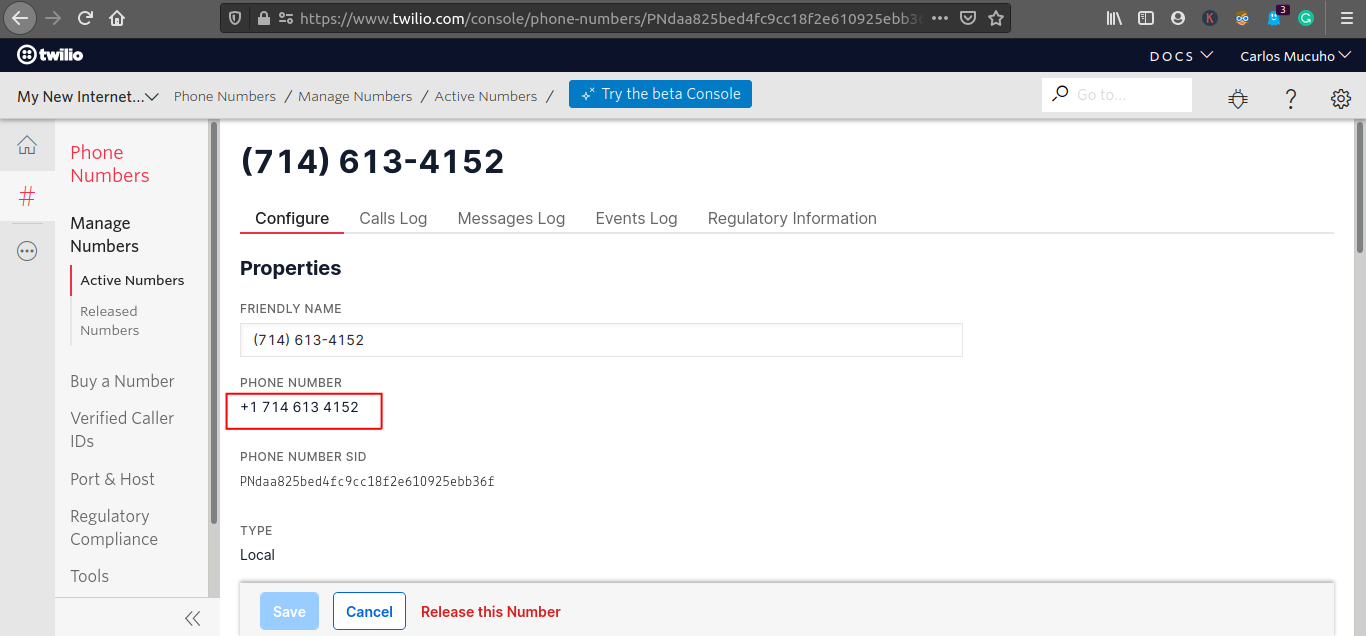
Next, go to your Twilio account console > Phone Numbers > Manage Numbers > Active Numbers, select the number that you purchased for this tutorial and you will be redirected to a page where you can configure this number. Locate the “Phone Number” field, copy the phone number that shows under this field and paste it in the .env file as TWILIO_NUMBER. Remove any spaces between the digits, but leave the initial plus sign, ensuring the number is in E.164 format.
Your .env file should look like the following once the phone number is added:
Creating the Flask Application
In this section, we are going to create the logic of our Flask application, which will provide the supporting functions needed by the front end to make and receive phone calls.
Creating the application server
In this subsection, we are going to create the endpoints needed to make and receive phone calls. We will need to create the following endpoints:
/- this endpoint will be responsible for serving the application UI (client)./token- this endpoint will be responsible for generating and returning access tokens to the client./handle_calls- this endpoint will be responsible for generating the TwiML instructions needed for making and receiving phone calls.
In the root directory of your project, create a file named main.py. Open it using your favorite text editor and then add the following code to it:
Here, we imported all the packages that we are going to need to build our server application:
flaskwill be used to define the endpoints of the application.- The
twiliopackage will be used to interact with the Twilio API, allowing us to make and receive phone calls through the Twilio device that will be created in the client. load_dotenvwill be used to import our Twilio account credentials from the.envfile.pprintwill be used to format and print the data received when Twilio sends a request to the/handle_callsendpoint to notify that there is a call.oswill be used alongsideload_dotenvto retrieve the credentials stored in the.envfile
Add the following code to the bottom of the main.py file:
The application starts by importing the environment variables stored in the .env file with a call to load_dotenv(). This allows us to retrieve the five configuration variables that we need for this application.
We then create a Flask application instance in a variable named app and with that, we create the / endpoint of our application. This route is serving a template named home.html that we will create later on.
Add the following code bellow the / route :
This adds the /token endpoint, which will be invoked by the client to request an access token.
When this endpoint is triggered, we create a variable named identity and assign to it our Twilio number. An identity is unique to a user and may be signed in on multiple devices simultaneously. On an application server meant to be used by multiple users, we would need to decide, based on the token request that would be sent to us, who the user is and what they are allowed to do. To figure out who the user is (their identity), we would use our existing login system or identity provider (e.g. session cookies, an API token, or any other mechanism that is used to secure your API requests). In this tutorial, however, we are the only user, so we do not need to work with multiple identities and the Twilio number that we purchased for this tutorial works well for this purpose.
We then use the account_sid, api_key, api_key_secret, and identity to create an access token. The token needs to be provisioned with “grants”, which determine what operations the client presenting the token is allowed to perform. For this application we create a voice grant object that is configured with the sid of the TwiML App created earlier.
To complete the endpoint we return the access_token and identity to the client in JSON format.
Add the following code bellow the /token route :
This block adds an endpoint named /handle_calls. This endpoint will be invoked by Twilio whenever we are making or receiving a phone call.
When this endpoint is triggered, we use pprint to print the contents of the request.form, and then we create a TwiML response object and a TwiML dial object. In the dial object we set the callerId to the Twilio number that we purchased for this tutorial, this way when we call a phone number using this application the recipient’s phone will show this number instead of anonymous.
After that, we use conditional logic to check if the request.form object has the property named To, and if this property value isn’t the same as our twilio_number. What this test achieves is make sure the invocation of the endpoint was for making a call (and not receiving one), which is the first case we will handle.
Once we are sure this is a request to make a calll, we set the number that we want to dial to the value in request.form['To'], append the dial object to the response object, and return the response object as a string back to Twilio, which will execute these instructions and dial the requested number.
The bottom part of the script is a standard conditional that executes the Flask development server on port 3000 when the script is invoked from the command line.
Creating the application client
In this subsection, we will create the front end that will allow us to make and receive phone calls in the browser.
Creating the home page
Create a file named home.html inside the templates directory. Open it and then add the following code to it:
This template implements a page that shows a console where we can monitor the state of the Twilio device that we will create soon using JavaScript. We have included in this template the call_in_progress_modal.html, dial_modal.html and incoming_call_modal.html templates that came with this project’s boilerplate. This page also shows a button with a phone icon. Whenever we press this button a modal will open and in this modal, we will enter the number we wish to call.
Aside from the Bootstrap, jQuery, FontAwesome, and twilio.js files, please notice how we are including the following files in this template :
style.css- this file contains some of the CSS used for styling our applicationmain.js- this javascript file contains the code for creating a Twilio device and connecting it to our TwiML Application .modals.js- this javascript file contains the code for managing the modals of our application.
The style.css and modals.js files came inside the project’s boilerplate repository. We are going to create the main.js file in the next subsection.
Creating the Twilio device
Create a file named main.js inside the static/js directory. Open it and then add the following code to it:
Here we creat the Twilio device that will allow us to make and receive phone calls in the browser.
First, we use the getJSON() function provided by jQuery to send a GET request to the /token endpoint in our application server and retrieve an access token. After retrieving the token, we use twilio.js and the token to create a Twilio device and connect it to our TwiML Application.
After creating the Twilio device, we add a few event listeners to this device and some code that will allow us to interact with this device using the UI.
Making Outbound Phone Calls
In this section, we are going to use our application to make outbound phone calls. But before we can do that, we need to run the application, set up ngrok, and configure our TwiML app.
Open a second terminal window in our project directory, activate the Python virtual environment, and start the application by running the following command:
After running the command above you should see something similar to this:
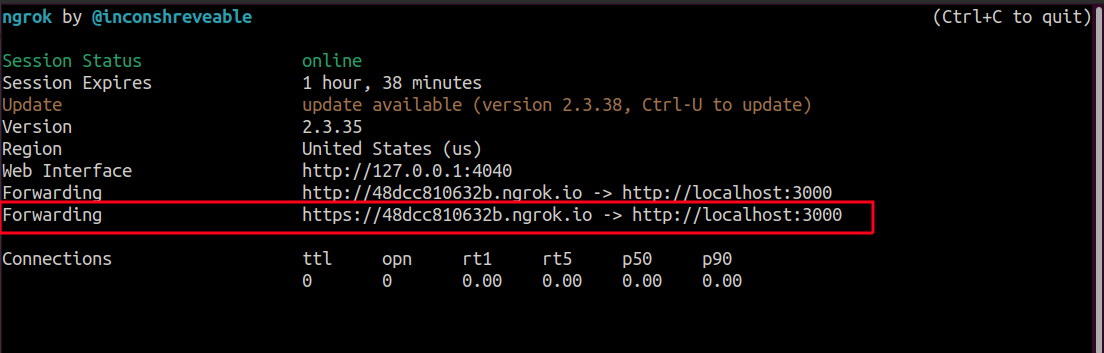
Copy the https ngrok URL to the clipboard. Then go to your Twilio account Console > Voice> TwiML > TwiML Apps dashboard and select the TwiML app you created for this tutorial.
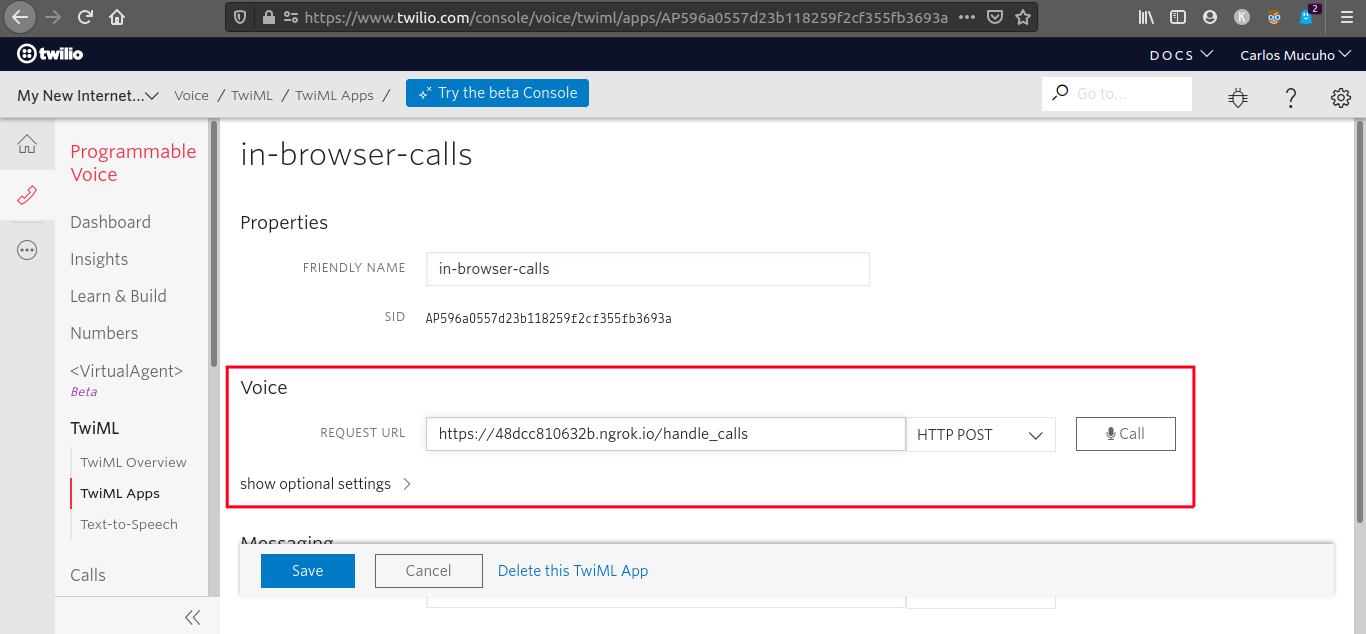
Locate the “Voice” section of the TwiML App configuration and paste the https:// URL provided by ngrok followed by /handle_calls in the “Request URL” field and click the “Save” button. This will create a webhook that connects your application to the TwiML App.
In this example, the ngrok URL is https://48dcc810632b.ngrok.io/handle_calls. The first part of the URL will be different every time ngrok is launched.
Now, connect a headset with a microphone to your computer, after that open your browser and type http://localhost:3000/ in the address bar. You should see something similar to this:
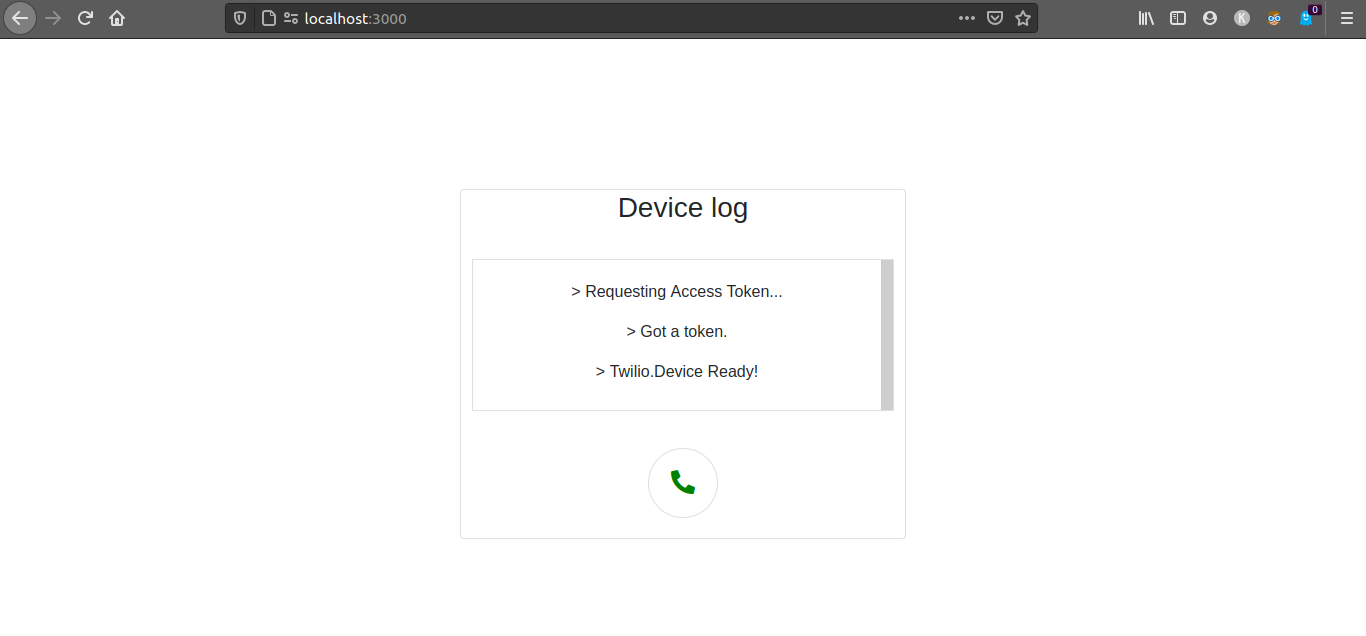
Once you see a message saying Twilio.Device Ready!, your Twilio device is working as it should. Click on the button with the green phone icon, and you should see the dial modal:

Use the numbers in the pad to insert the number that you would like to call or just type it in using your keyboard in the insert field above the pad, and once you are ready click the green phone to make the call.
Once you click this button, your browser will ask for your permission to use the microphone, grant the permission. Once the number that you are calling answers your call you will see the call in progress modal:

Go to the terminal running our Flask application, and the request data that Twilio sends to our /handle_calls endpoint will look similar to the following:
Since the value of the property To (the number we called) isn’t equal to our Twilio number, the code inside the if statement in the handle_calls endpoint ran.
Responding to Incoming Phone Calls
In the previous section, you were able to use your application to make phone calls but so far the application can’t receive any calls. To be able to receive calls, we will need to add some additional code to main.py, main.js, and home.html, as well as configure the number that we purchased for this tutorial in the Twilio console to be able to receive phone calls.
Go back to the main.py file and replace the code in the /handle_calls endpoint with the following:
Here we have added the else statement to the /handle_calls endpoint. The code in this part will run if the number receiving the call is the number that we purchased for this tutorial, which means that we have an incoming call.
We are setting the callerId in the TwiML dial object to the value of the Caller property in request.form. As the name suggests, Caller is the number that is calling our Twilio number. This is so that we can see who is calling us in our application UI. We are also setting the client in the dial object to the identity value that we used when we created an access token in the /token endpoint.
To complete the incoming call flow, we append the dial object to the TwiML response object, and then return this response object as a string.
Go back to your main.js file and add the following code bellow the device.on(‘disconnect') listener :
Here we have added an event listener that will allow your Twilio device to monitor incoming calls and show the incoming call modal once it detects one.
Go to your Twilio console > Phone Numbers > Manage Numbers > Active Numbers dashboard and select the number you purchased for this tutorial.
Locate the “Voice & Fax” section of the phone number configuration and select “TwiML App” in the “Configure With” field, after that select the name of the TwiML app you created for this tutorial in the “TwiML App” field. This will bind the Twilio number you purchased for this tutorial with the TwiML App you created, this way every time this number receives a phone call it will retrieve the webhook URL and other configurations in the TwiML App and use it to respond to the call. In our case, it will send a POST request to https://48dcc810632b.ngrok.io/handle_calls containing the caller number and other useful information.
Go back to your browser and navigate to http://localhost:3000/, wait for the Twilio.Device Ready! message to show on the page, and then use a device capable of making phone calls to call the Twilio number you purchased for this tutorial. Once the number is ringing you should see the incoming call modal :

Press the button with the green icon to accept the call, and the one with the red phone icon to reject it.
Go to the terminal running our Flask application, and the request data that Twilio sends to our /handle_calls endpoint will look similar to the following:
Conclusion
In this tutorial, we learned how to use the Twilio Voice API to make and receive phone calls in the browser. We learned how to use the Flask framework to build the application client that allowed us to interact with a Twilio device created with the Twilio Client JS SDK.
The code for the entire application is available in the following repository https://github.com/CSFM93/twilio-in-browser-calls.
Carlos Mucuho is a Mozambican geologist turned developer who enjoys using programming to bring ideas into reality. https://github.com/CSFM93
Related Resources
Twilio Docs
From APIs to SDKs to sample apps
API reference documentation, SDKs, helper libraries, quickstarts, and tutorials for your language and platform.
Resource Center
The latest ebooks, industry reports, and webinars
Learn from customer engagement experts to improve your own communication.
Ahoy
Twilio's developer community hub
Best practices, code samples, and inspiration to build communications and digital engagement experiences.