Milestones For Onboarding your SMS Project to Twilio
Time to read: 9 minutes
December 02, 2021
Written by
Reviewed by

Whether you are a small or medium-sized business, a large enterprise, or an ISV, Twilio is able to support your SMS needs. Navigating the setup, requirements, and compliance can seem daunting at first so the Twilio Customer Onboarding team is here to help you through the process.
In this guide, we will share the milestones that we track while supporting a customer to build and deploy a messaging product. By the end of this article, you’ll have a checklist of actions that will help you launch your messaging project successfully.
Defining the success of a launch
Your use case and business goals will be key drivers in what success looks like and therefore each project will be unique. Overall, we define success to mean that you can:
- Send at your desired volume.
- Reach your target audience.
- Achieve optimal throughput with minimal filtering.
- Use our messaging product and its features confidently.
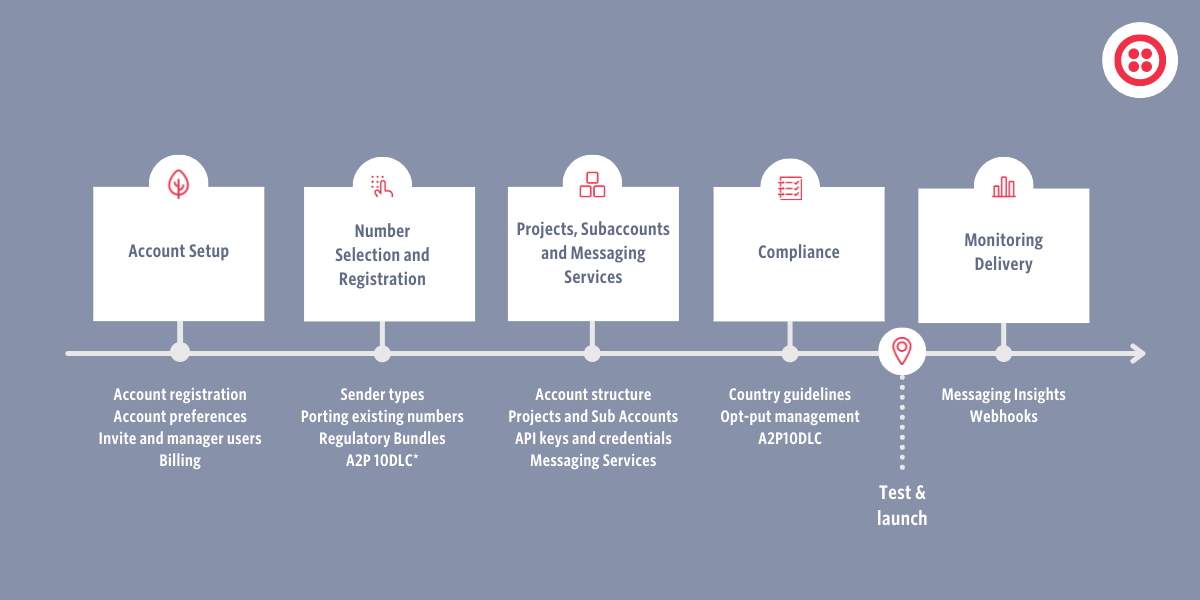
The graphic below outlines the milestones along the way toward launching your SMS app. We’ll provide guidance for each one in the sections that follow.
Before you proceed, we advise that you take a moment to identify which of the descriptions below best applies to you and your team. It will help you make informed decisions about roles and permissions within your Twilio account. It’ll also help you proactively manage your billing strategy.
- Single developers and hobbyists: The lead (and only) developer will be the account owner and have control over all roles and responsibilities related to the account including billing.
- Small development teams: The project manager or lead developer should own the project and grant access as required to the developer team. Consider who on your finance team might need to have access to the billing center on your account.
- Enterprise project team and ISVs: We recommend that one business unit (BU) manage your account internally. In this case, the main BU’s key player -- the Project Lead or a Lead Developer -- should own the account. This account owner can grant administrative access to the project leads in the other BUs. Alternatively, an IT services administrator could own the account and grant administrative access to the various project leads. You’ll need to work with finance to determine how to distribute the cost of the project across BUs.
Milestone 1: Set up your account
When you first sign up for an account with Twilio, you become the owner of your organization. As the owner, you are able to perform various administrative tasks, such as create projects, invite other users, assign roles to users, and establish your basic account settings.
Go to Manage Accounts and follow these steps to complete your account set up:
- Under User Settings > Overview, enable two-factor authentication.
- Under Managed Users, you can invite users with different roles and permissions to your account. Once the invited users have accepted, they are able to access the project.
- Under Notification preferences, determine who among your users should receive the various alerts available.
- Visit the Billing Center in your console and review the payment process. Also update your billing information if necessary.
- Determine if your business case would benefit from any of Twilio’s Editions, which will enhance your data, security, and audit capabilities.
Milestone 2: Select and register your number types
This milestone enables you to purchase and register the right types of numbers for your SMS needs. Before we dive in, let’s review the high-level steps you’ll need to complete:
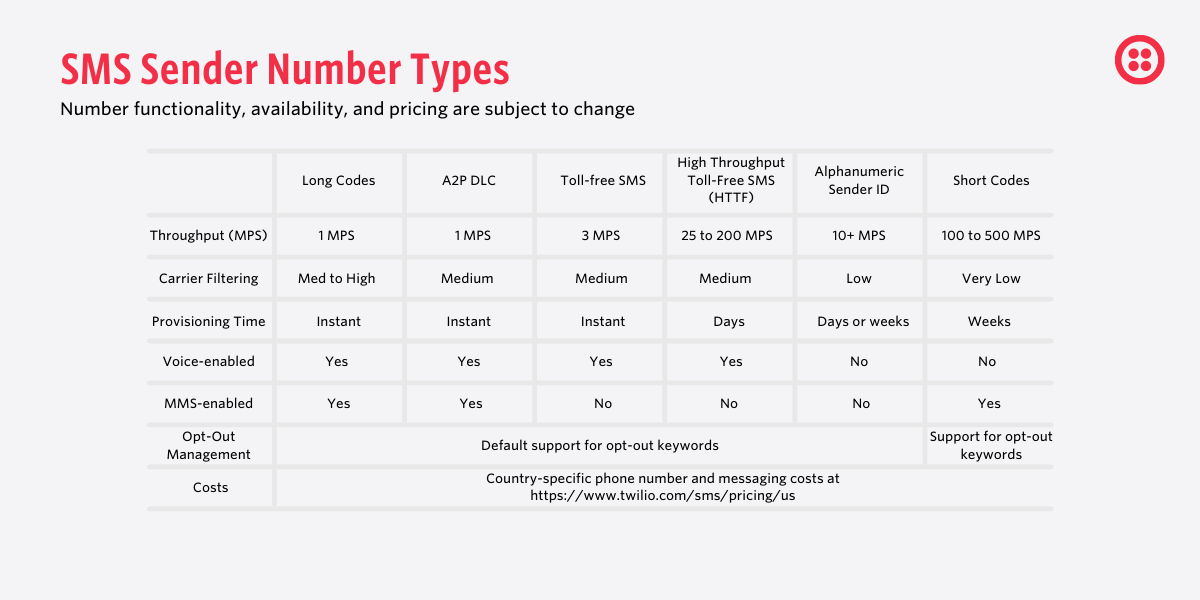
- Decide on the sender type(s) you need. See Sender Types below for help with this decision.
- If you desire to do so, port eligible existing numbers to Twilio. Keep in mind there are different processes for US and international numbers.
- Gather and submit documents to fulfill regulatory requirements for different countries. See regulatory bundles below for details.
- Buy your phone number(s), or complete the short code application.
- If you are in the US and plan to use A2P 10DLC, follow the steps in either the Direct Brand A2P 10DLC Onboarding Guide, or the ISV US A2P 10DLC Onboarding Guide to register your business profile and brand with the Trust Hub.
Now that we’ve reviewed the steps in the milestone, we’ll share a bit more about sender types and regulatory bundles.
Sender Types
Below is a summary of the questions you should be able to answer in order to decide on the type of numbers you’ll need.
- Use case: Are you sending marketing (e.g. promotions, engagement notifications) or transactional messages (e.g. alerts, status notifications). Note: Twilio Verify is purpose-built for one-time password (OTP) notifications so that may be a better choice if OTP is a main use case.
- Countries: To which countries are you sending?
- Throughput: What is the volume of messages you expect to send in each of these countries? Think about peak volumes during the year to answer this question.
- Messaging strategy: Do you require two-way communication for your use cases? That is, should the user be able to respond to your business’s messages?
- Sending options: Do you need voice-enabled or multimedia-enabled numbers?
- Timeline: How quickly do you need to be able to start sending?
- WhatsApp: If you need to send WhatsApp messages, there is a different onboarding process. Here is a good starting point to request initial access, followed by the steps outlined here.
With answers to these questions in mind, have a look at the table below to get a snapshot of your number options. If you’re still unsure about this decision, an account executive or Twilio professional services expert can help you figure it out.
Regulatory Bundles
Before you can start purchasing most numbers you will need to submit regulatory bundles. A regulatory bundle is a compliance package that contains documents to verify your business identity with local carriers and enforcement agencies.
Regulatory bundle requirements vary by country and regions; some countries have tighter regulations than others. Most countries require:
- A local business address.
- Proof of locally-registered business.
- Government-issued IDs/Driver’s Licence of authorised persons (such as directors of local business).
In general, short codes have the strictest requirements and cost the most but they offer the advantage of the highest throughput of any number type. Toll-free and mobile numbers tend to have fewer requirements. For alphanumeric senders, many countries also require a pre-registration process.
Milestone 3: Creating Projects, Subaccounts, and Messaging Services
Now it’s time to set up Projects, Subaccounts, and Messaging Services. In this milestone, you’ll architect the account structure you need to meet your business and organizational goals. Let’s review the steps required to complete this milestone and then address some of them in more detail.
- Review documentation on projects and subaccounts.
- Map out an account architecture for your business needs. See below for help with this step. Note: A Twilio onboarding team can help you architect your account structure. See the end of the article for how to get access to these services.
- Create the projects and optional subaccounts in the Twilio Console.
- Create and document API keys for each of your account users.
- Follow the steps in this document to create messaging services.
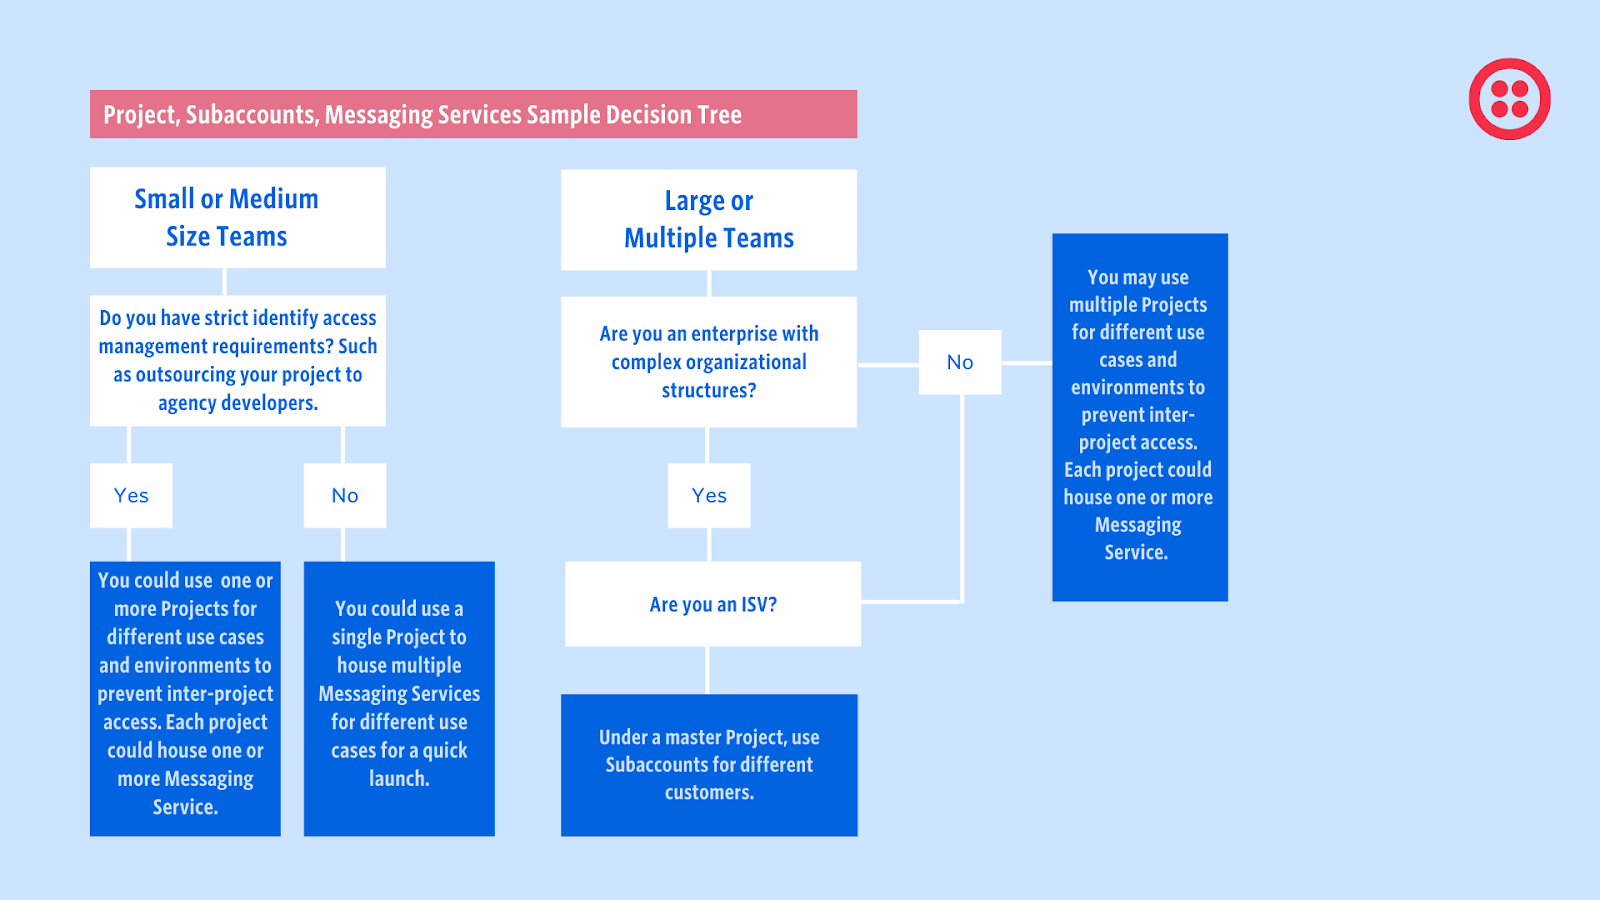
Definitions
- Organization: The highest-level container which includes all accounts, managed users, and billing information. An Organization is optional. If you have more than five projects and need more fine-grained user and account management, creating an Organization can help you.
- Twilio Projects: Projects are separate Twilio accounts with their own resources and account balance. Every customer will have at least one Project. You may choose to create more than one for different use cases or to segregate data or user access for different environments. A project can send messages without any additional Subaccounts or Messaging Services. However, a best practice is to segment sending for different use cases, billing structures, and ISV customers. You can have more than one Project if you have separate business units that would like to have full control over their sending and billing strategy, and/or have a need to independently operate sending use cases.
- Subaccounts: Subaccounts have their own resources, but are owned by a project and share that balance. Subaccounts are optional but strongly recommended for independent software vendors (ISVs) to separate usage from their different customers. Non-ISV business models may still benefit from Subaccounts if you need to segment your sending while maintaining a central account balance and ownership structure.
- Messaging Service: A Messaging Service is a bundling of messaging functionality around a common set of senders, features, and configuration. The same settings and feature configuration applies to all of the senders (long code numbers, short codes, toll-free numbers, etc.) in the Messaging Service’s pool. A Messaging Service can be configured as part of a Project or Subaccount and will be a scalable approach to addressing a specific use case within your strategy.
How do you know what projects, subaccounts, and messaging services you need?
We recommend you take time as a development team to map out the number of Projects, Subaccounts, and Messaging Services you’ll need, keeping in mind the roles and billing structure that will support your strategy. The following decision tree may assist you in jumpstarting your account architecture planning.
API Keys and credentials
Once you have your projects and messaging services set up, you will need to think about how to provide programmatic access to your development team(s).
Managing your API credentials and auth secret(s) is a key part of any security and development team. In each project, you are able to generate API keys for your development team to integrate with your Twilio account. It is your responsibility to keep your API keys and secret tokens secure and safe.
You can provision and revoke API Keys through our REST API or Twilio Console. There are two types of API Keys: Standard and Main.
- Standard API Keys give you access to all of the functionality in Twilio’s API, except for managing API Keys, Account Configuration, and Subaccounts.
- Main API Keys have the same access as Standard Keys, and can also manage API Keys, Account Configuration, and Subaccounts. Main API Keys give you the same level of access as if you were using account API Credentials.
Tip: You may use your account’s auth token to authenticate to our API. However, to be able to revoke access and rotate keys, please use API key credentials.
Milestone 4: Compliance Awareness
Sending messages comes with great responsibility! You may be sending messages to users in many different countries, each of which may have a unique combination of messaging rules and regulations. Here are some steps to help you stay on top of messaging compliance.
- Become familiar with the compliance guidelines for each country in which you are sending.
- Plan and implement customer-friendly opt-out and opt-in strategies. See below for more information.
- If you are sending SMS in the US, get familiar with the US compliance standards and ensure that you have completed A2P10DLC registration (as discussed in milestone 2).
Opt-out Management
Offering an opt-out option to your end users is a best practice and in some countries it is law. Twilio offers standard and advanced features to easily implement opt-out options for your users in different languages. By default, Twilio offers your users default opt-out keywords such as STOP, UNSUBSCRIBE, STOPALL, CANCEL, END, and QUIT. You can customise and add to this list of keywords and customise it to different languages. Please note that opt-out applies to two-way messaging. For one-way messaging, you should offer another way for your users to opt-out such as via URL link, contacting your support team, or texting to a different phone number.
While not mandatory, we also offer a way for your user to opt back in using default or custom keywords, which can be useful for your customers.
Note: Ultimately, you are responsible for the legal compliance of your messaging content and the opting in and opting out options of your uses. Consider consulting an onboarding expert for advice and implementation strategies around compliance awareness.
Milestone 5: Monitoring Delivery
Once you have started sending, you’ll want to monitor the delivery of your messages. There are two main ways to monitor messaging delivery.
- Twilio’s Messaging Insights, accessible from the Twilio console, is a real-time dashboard to check messaging delivery, error messages, and replies from your customers. To access Messaging Insights, open your Console and click Monitor on your navigation pane.
- Using our event webhooks allows you to post real-time delivery statuses to your callback API.
Having a good grasp of how to access and interpret the information on messaging insights can give you important data points on how your messages are performing. For information on setting triggers and alerts, refer to our documentation here. Understanding the basics of validating phone numbers using Twilio Lookup API can also help improve delivery of your messages.
A Twilio onboarding expert can walk you through how to use filters and dashboard reports, as well as how to observe latency, queue size, common error codes, and setting alerts.
Conclusion
We understand the process of setting up your Twilio SMS solution comes with a few complexities. Using the milestones we’ve outlined here, you will be able to plan, build, deploy, and monitor your new Twilio SMS solution efficiently.
Customer Onboarding Services
The steps and best practices shared above are a guide for getting started with your Twilio SMS launch. But sometimes you need help. The Customer Onboarding team offers product onboarding services tailored to your unique use case and budget.
If you’re interested, talk to a Twilio Account Executive to learn more about our Premier and Premier+ Onboarding offerings. We can't wait to help you build!
Yong Hui is a Senior Technical Onboarding Manager at Twilio working on the Professional Services team in Singapore.
Abby Ford is a Content Manager at Twilio on the Professional Serivices team. You can reach her at aford [at] twilio.com.

Related Resources
Twilio Docs
From APIs to SDKs to sample apps
API reference documentation, SDKs, helper libraries, quickstarts, and tutorials for your language and platform.
Resource Center
The latest ebooks, industry reports, and webinars
Learn from customer engagement experts to improve your own communication.
Ahoy
Twilio's developer community hub
Best practices, code samples, and inspiration to build communications and digital engagement experiences.