Phonestagram – Fun with Photo Filters Using Node, Hapi and CamanJS
Time to read:
November 11, 2014
Written by
This post is part of Twilio’s archive and may contain outdated information. We’re always building something new, so be sure to check out our latest posts for the most up-to-date insights.

For reasons that I have never been able to put my finger on, I have resisted signing up for Instagram. This was true before they were acquired by Facebook and is still true today. This is somewhat odd, because I generally consider myself an early adopter and haven’t hesitated to sign-up for new services in the past. I decided that perhaps I had misjudged Instagram, so I checked-out their website to see what they’re about. Here’s what it says:
Capture and Share the World’s Moments – Instagram is a fast, beautiful and fun way to share your life with friends and family.
Wow, who doesn’t want a fast, beautiful and fun way to share your life with friends and family? Well, me apparently. That being said, I like the idea of making pictures a little more awesome using photo filters and I decided to build my own cross-platform version of Instagram that will work with any phone that has a camera using Twilio MMS, Node, Hapi, CamanJS, LevelDB and Socket.io. You can try it now by texting “hello” to:
- (205) 379-6312 (US)
- (778) 765-0358 (Canada)
You will receive some instructions on how to use the service along with a list of the valid filters that it supports.
What You Will Need to Get Started
- A free Twilio account and MMS-enabled phone number
- An Ubuntu server with Node.js installed
For the purposes of this blog post I’m going to use a Digital Ocean droplet to power this service. Please check-out my my previous blog post for instructions on how to spin-up a Digital Ocean VPS with Node.js pre-installed and set-up a non-root user with sudo privileges.
Step 1: Install Cairo
You’ll be using the CamanJS library to apply filters to photos. One of its dependencies is node-canvas, which in turn depends on several binary libraries, including one called Cairo. Luckily it’s easy to install these libraries on a variety of systems. Follow the steps below to install them on your Ubuntu machine:
Now that your server is set-up you can start to write your app.
Step 2: Create the Node application and serve static files
First create a new directory for your app, change into it and run the command npm init . Give your app a name and stick with all of the defaults for now. Next, install the necessary modules like this:
Allright, you’ve gotten all of the prerequisites out of the way. Now it’s time to write some code! Open up a new file called index.js and use Hapi to create a very simple web app that serves static files:
Create a subdirectory called static and create a new file called index.html with the following content:
Start your node app with node . and open up a browser. Visit http://your_server_ip:3000/ and if everything is working you should see the word Phonestagram.
Step 3: Create a route to receive an incoming MMS
Ok, let’s upgrade your app from dumb file server to crazy smart MMS photo processor. Open up index.js and add a new route called /message :
Hapi lets you define a schema using the Joi module to validate incoming requests. Add Joi and Boom to your list of required modules and build a simple schema to validate the NumMedia parameter:
This schema as defined will do three neat things for you:
- Validate that a NumMedia HTTP POST parameter, if present, is an integer that is greater than or equal to 0.
- Convert that parameter from a String value into an Integer.
- Will allow, via unknown(), other POST parameters not specified in the schema.
Now, build out the skeleton for the handleMessage method:
The first block of code checks to see that the request to this URL is coming from your Twilio account and not just someone curl-ing from their command line. If the request isn’t from Twilio the method replies with an HTTP 403 forbidden response.
If the request is from your Twilio account, there are three cases you’re handling here:
- The user sends a photo and a filter command (happy case)
- The user sends a photo, but no filter command
- The user doesn’t send a photo
Let’s dive into the happy case, that’s where all the fun stuff happens.
Step 4: Apply the filter using CamanJS and reply with the new photo
In order to complete the happy case, your app is going to need to do the following:
- Download the photo that was sent via MMS to the local temp file system.
- Apply the specified filter to that local file.
- Save the resulting file to the app’s static directory.
- Send an MMS reply to the user with the new, filtered photo attached.
Modify the head of your Node app and require the following modules:
Next, hardcode a list of valid filters that users can apply.
In the handleMessage method create a twiml object. You will use this to send text message replies to the users.
Next, add some code to check and see if the filter sent in the text body of the MMS matches a filter in your list:
Now, tweak the if statement below to check for filterValid being true. If it is, send an immediate SMS reply to the user letting them know to hang tight. This is polite because depending on the size of the photo or the complexity of the filter it could take some time to get a filtered photo back.
The applyFilter method is where the magic happens. It creates a unique UUID which you will use as the filename when you download the user’s original photo to the server’s local file system. You’ll then use the Caman module to apply the filter and save the new file to the static directory, which makes it available to be served publicly. Finally you’ll delete the temporary file.
You might notice that the resulting file is being resized down to a width of 600px. This will help ensure that the new file isn’t too big and will successfully get sent via MMS. Feel free to tweak that value to your liking.
Now that you’ve got a new photo with an awesome filter applied, it’s time to send it to your grateful user. In order to do that, create an instance of the Twilio REST client towards the top of your program. This is what you will use to send an outbound MMS.
The sendPhoto method builds a fully-qualified URL based on the host of the server and the name of the new file.
Now that the happy case is out of the way, modify handleMessage to send the list of valid filters if they send one that your app doesn’t recognize:
Send the user general instructions on how to use the app if they don’t send a photo at all:
At this point you have built a fully functional Node application that accepts photos and a desired filter, applies the filter and sends the new photo back to the user. Let’s connect it to Twilio and test it out.
Step 5: Configuring the Twilio Messaging URL and Testing
Log-in to your Twilio account dashboard and click on Numbers. Edit your MMS-enabled Twilio number (US & Canada only) and edit the Messaging Request URL to point to your server’s IP address at port 3000 with the path /message . Click Save.

Now, set a couple of environment variables. On your Dashboard, you’ll see a Twilio Account SID and Auth Token. Run the commands below on the command line, substituting your credentials.
Lastly, start your Node app:
Now’s the moment of truth! Compose an MMS to your Twilio number with the name of a filter (try “nostalgia”) and attach a photo of your choice. If all is well, you’ll see something like this:
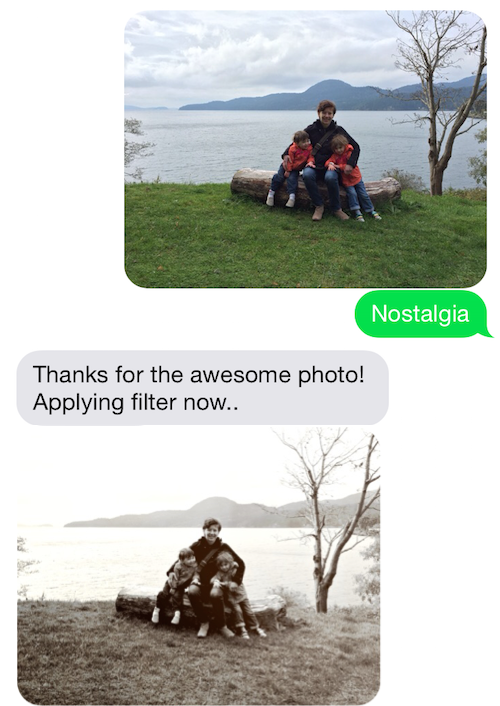
Boom! That’s pretty rad, huh? Thanks to my amazing wife and daughters for being part of today’s tutorial.
However, in order to be an Instagram replacement you still need to make it easy to share/display these news photos with people. Let’s wrap-up this application by building a simple webpage that displays the most recent photo that you’ve taken.
Step 6: Update the webpage in real-time with Socket.io
Open up static/index.html and add the following lines:
The img tag will contain the most recent photo. When the page is first loaded it will simply be blank. The first script tag loads the socket.io library. This will create a real time connection to your Node application and allow you to update the page without a reload. The next script tag defines two event handlers. The first event handler simply prints “Connected!” to the JS console upon a successful connection. The second event handler listens for the server to send a URL for a newly saved photo. A single line of JS does the job of updating the src attribute of the image.
Now that your web page is finished, you just need to add some code to your Node app to send new_media messages to the browser when new photos are saved. Open up index.js and add the socket.io module to the project and create an io variable.
Next, modify how you start the web server:
This binds socket.io to your web app. When requests come in from the socket.io client in the browser, they will get routed the socket.io module instead of Hapi. The last thing you need to do is to edit the sendPhoto method and use io.emit to let the client/browser know that there is a new photo to display:
Restart your Node server and test it out. Load the webpage and then send an MMS to your app. You should see the filtered version of that app appear on the webpage in real-time!
Step 7: Store metadata about your photos using LevelDB
The last part of this tutorial involves using LevelDB to store meta data about your photos. LevelDB is incredibly easy to work with in Node and this data will come in super handy if you decided to extend this app and attempt any of the challenges that I lay out at the end of this tutorial.
First, require the level module at the head of your app.
Next, create a handle to the database. This will either create a mydb directory or use one if it’s already there:
Last, save some data about your photos using db.put . LevelDB is a key/value store, so just use the UUID that you generated as the key and store whatever values you like. For each photo I’ve chosen to store the phone number of the user, the filter they chose and the name of the filtered photo on disk:
Wrapping up
In under 200 lines of JavaScript and markup you have created your very own Instagram replacement! We walked through:
- Installing graphics manipulation libraries on an Ubuntu server.
- Creating a simple Node web application using Hapi.
- Processing incoming photos using CamanJS.
- Receiving and sending MMS messages using Twilio.
- Updating a web page in real time using Socket.io.
- Storing data about our photos using LevelDB.
The complete source code for this app is MIT licensed and hosted on Github. Feel free to use or modify as you like!
Challenges Left to the Reader
While your app is cool, there are three features that would make it pretty epic if implemented:
- Show the last N photos on the webpage instead of just the last one. This will require some client-side JavaScript to build new DOM elements and keep track of the array of images currently loaded.
- Show the last N photos on a fresh page load. This will require pulling the photos out of LevelDB in Node and passing these images to the webpage when it loads.
- Restrict photos sent to the public website to an allowed list of phone numbers. After all, you don’t want just anybody to be able to update your awesome Phonestagram website, right?
Ok, that’s it. I hope you enjoyed this tutorial on building your own Instagram clone. If you tackle any of the challenges above, definitely post your code on Github and let me know about it (@crtr0 on Twitter). Happy hacking!

Related Resources
Twilio Docs
From APIs to SDKs to sample apps
API reference documentation, SDKs, helper libraries, quickstarts, and tutorials for your language and platform.
Resource Center
The latest ebooks, industry reports, and webinars
Learn from customer engagement experts to improve your own communication.
Ahoy
Twilio's developer community hub
Best practices, code samples, and inspiration to build communications and digital engagement experiences.