Embark on an Adventure to Build Your Digital Presence: Redirect a Website to Another Domain Name
Time to read:
July 23, 2020
Written by
Reviewed by
This post is part of Twilio’s archive and may contain outdated information. We’re always building something new, so be sure to check out our latest posts for the most up-to-date insights.

You might have reached the point in your career where you ask yourself the question, “should I invest in a personal domain name?” If you are a young professional who owns a GitHub page for their portfolio and is looking to build their online presence, then the answer is “yes!” It is absolutely time to build your digital brand.
Follow along this journey to learn how to quickly redirect your GitHub Pages site (normally located at your username.github.io) to your custom domain name in less than 10 minutes! Get ready to impress people by sharing a newly accessible URL to showcase your interests and hackathon projects.
Tutorial Requirements
- A GitHub repository with static files for your personal site. If you’re reading this, you might already have a functional portfolio site hosted on a GitHub page with a free github.io domain name but want to change your domain name. You do not need to have a fully completed portfolio while doing this tutorial, but you should have a repository to redirect users to.
- An account for Namecheap or Google Domains
Choose your Character (Domain)
Choosing your domain is just like selecting your character in your favorite role-playing game (or RPG). In the case of the web, you are represented as your domain name on the internet! It’s cool and beneficial to own a name that represents your work and digital presence where anyone in the world can access your domain.

As a student, it’s always nice to utilize our school emails to unlock awesome perks, such as FREE domain names! I like to use Namecheap because you can reserve an available domain name, heavily discounted. If you haven’t created an account yet, you can sign up for a free account with this referral link.
NOTE: You can skip this section if you have already registered your domain or are using another registrar to get started.
Here are some example domain names that were available for my website:
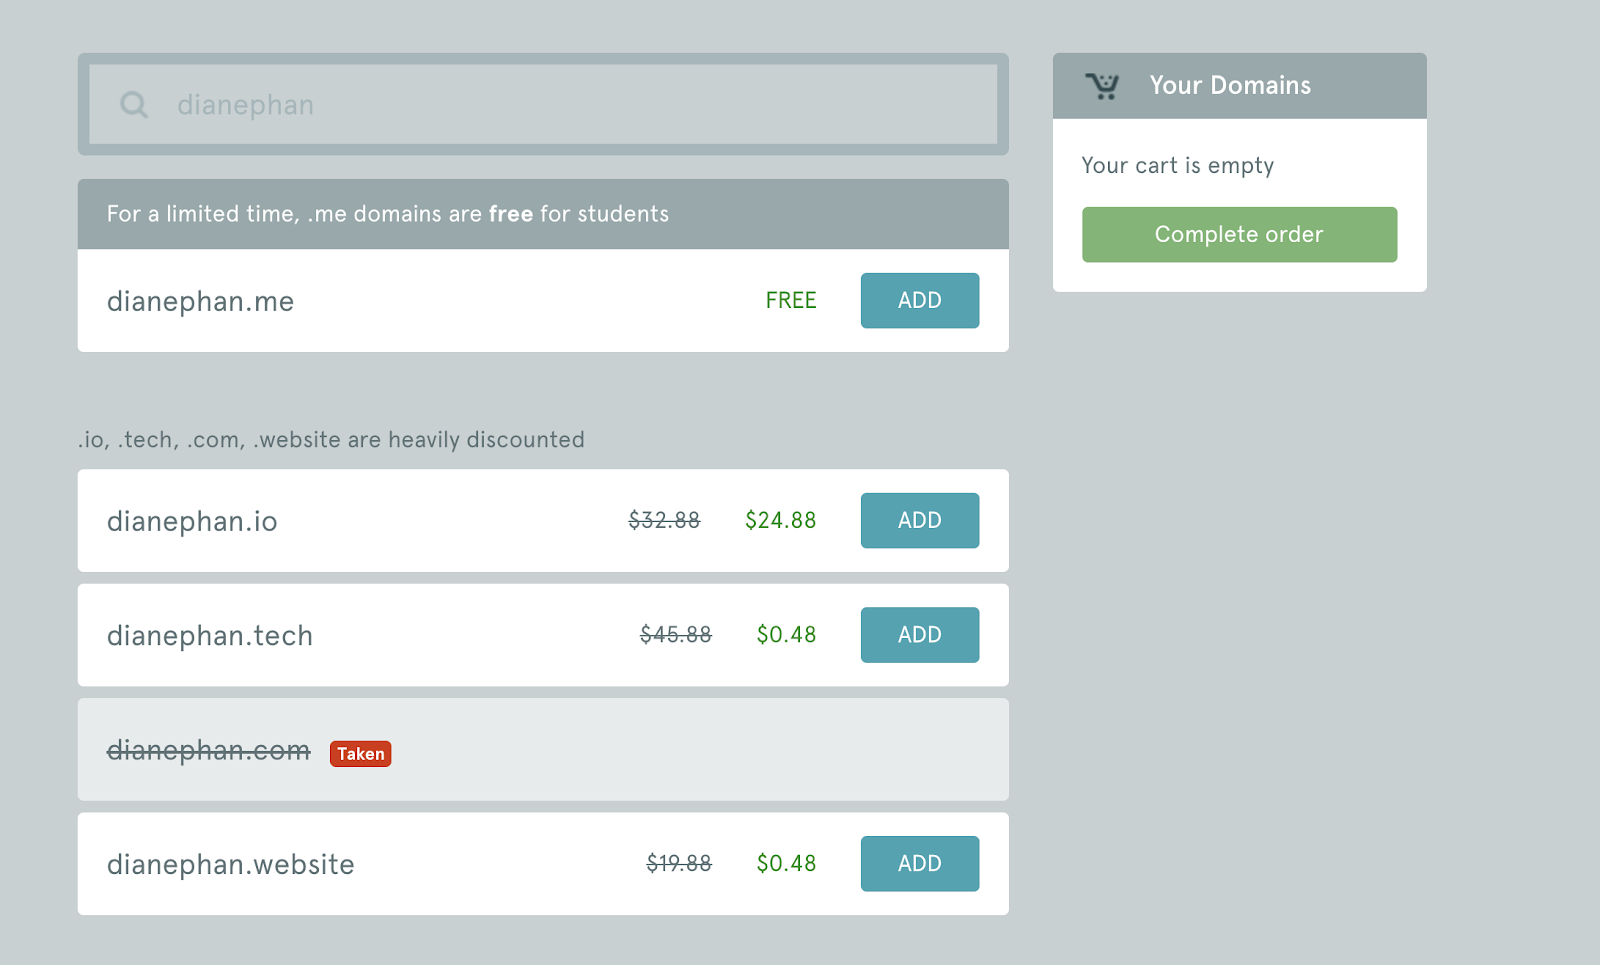
Depending on your profession and industry, you might want to do some research on the most suitable domain name. For instance, a .me is a lovely choice for personal portfolios to list their work and interests for a professional audience.
If you manage to snag a .com domain name, then that’s awesome as well! The .com domain is traditional and the most recognizable worldwide.
After choosing your domain name, you should be prompted with this page. If you haven’t authorized permissions for GitHub and Namecheap to connect, then you might be asked to do so as well.
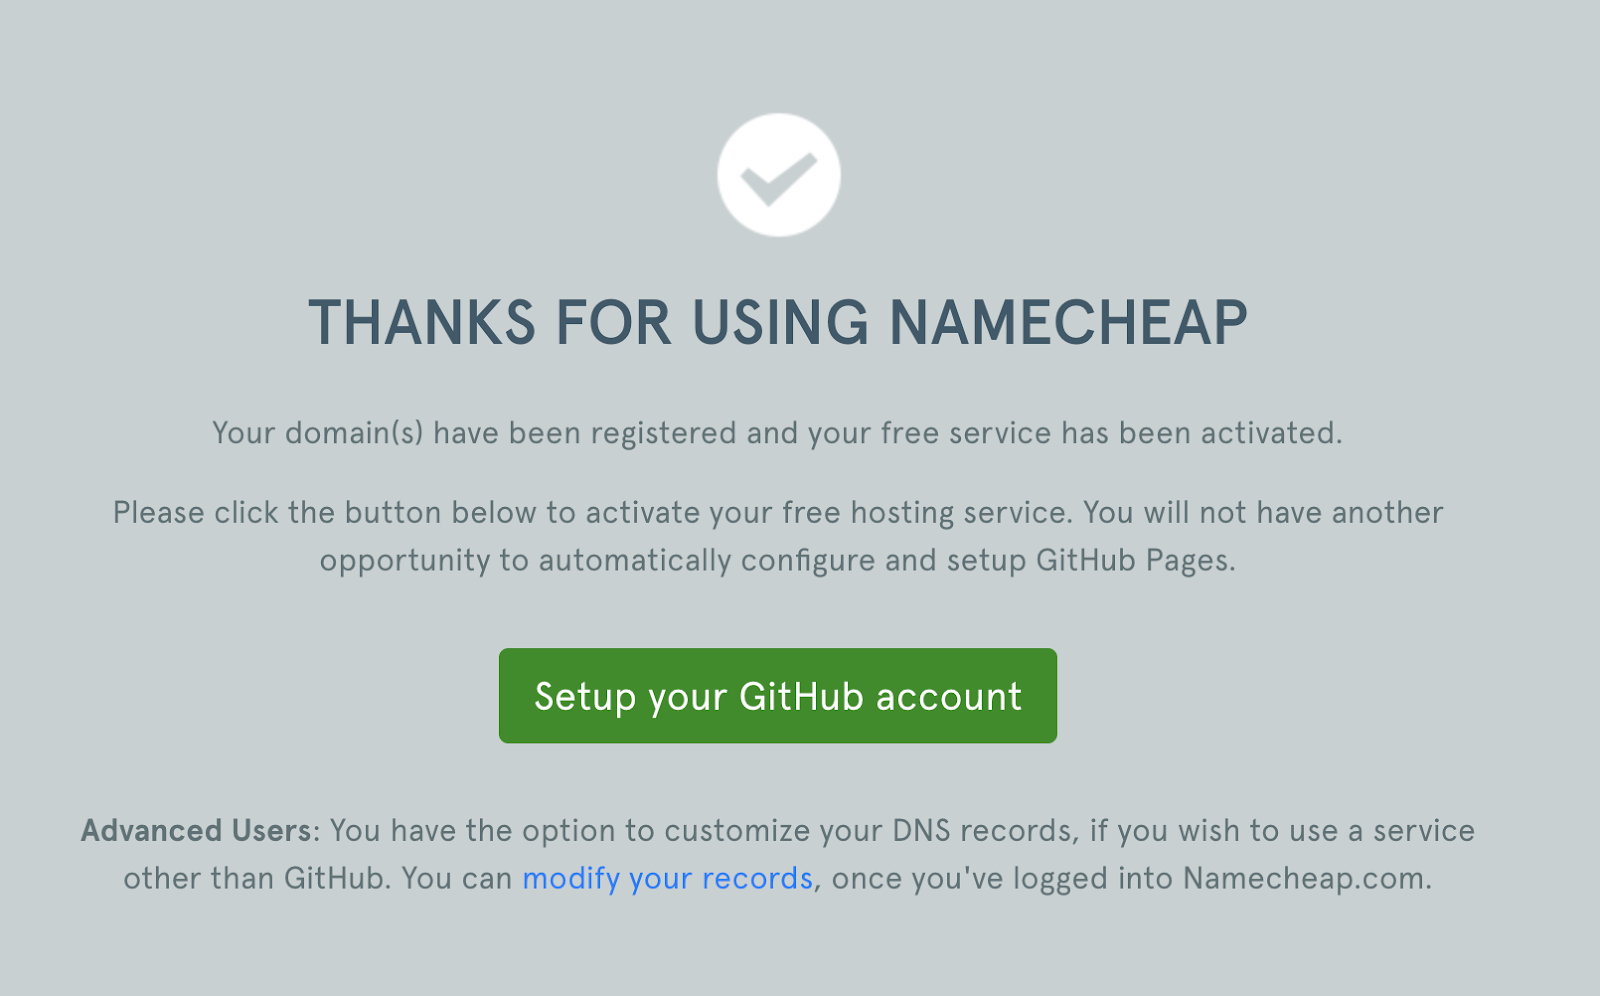
Looks like it’s time to head on over to GitHub!
Add to your GitHub Repository
We’re halfway through this adventure of changing your GitHub page URL to your custom domain name. Let’s move forward!
Open up your terminal and navigate to the directory where your website files live. If you do not have a copy of your repository on your local machine, take a moment to git clone into your repository.
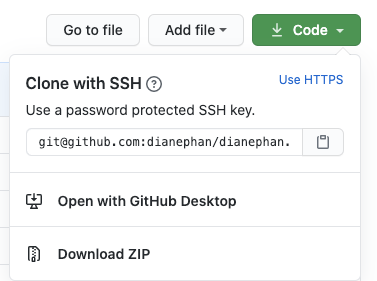
Enter the folder that you just cloned in your terminal. If you type the command:
You should be able to recognize the files in your repository.
Next, type the following command to create a new file named CNAME.
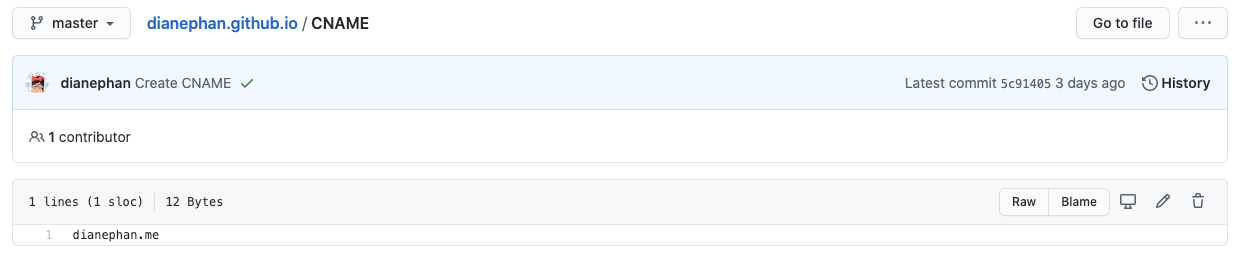
Open this file in your favorite code editor and type the domain name you reserved earlier. My domain is “dianephan.me” so I simply type that into the CNAME file and save. Push all these changes to your GitHub repository.
Add resource record to Namecheap Domain List
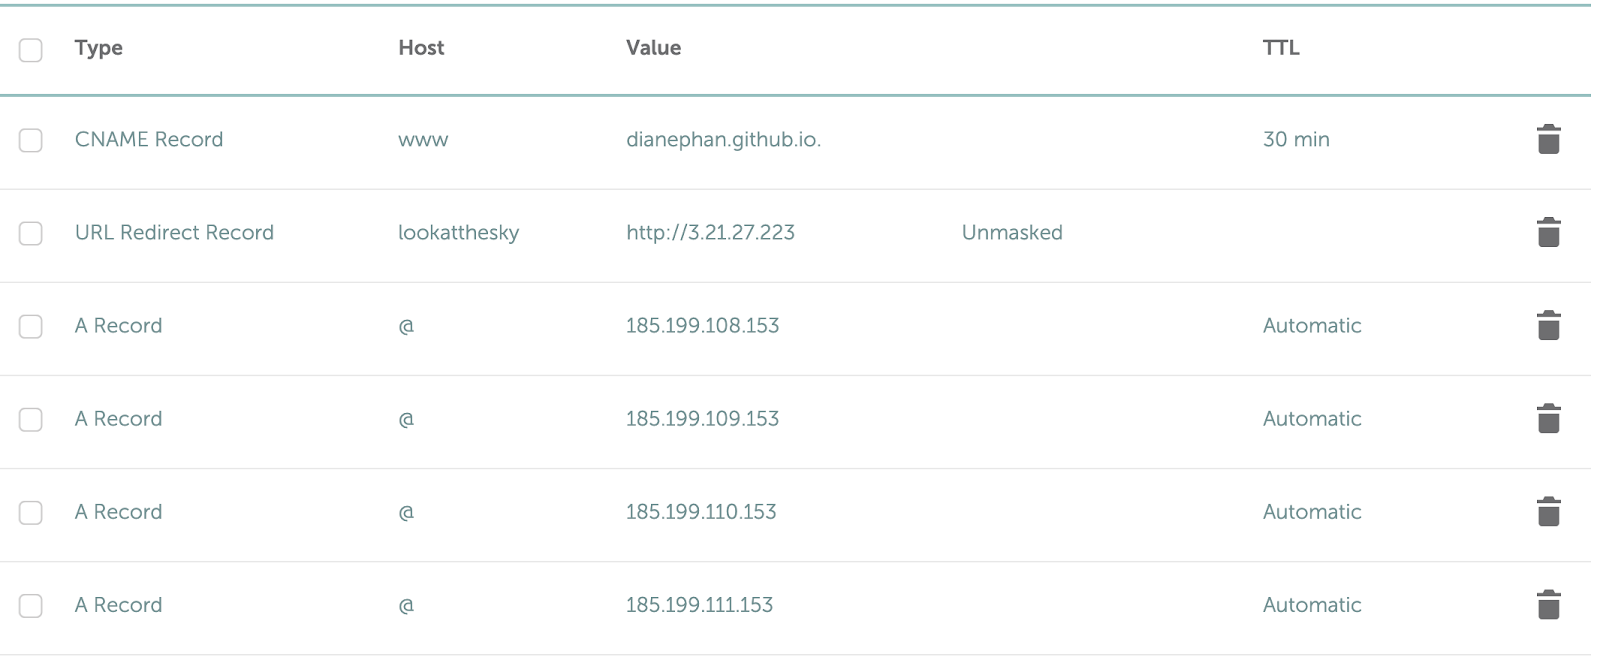
From the Namecheap Domain List in your account, click Manage followed by Advanced DNS. Click on Add New Record at the bottom of the Host Records list. Select the CNAME Record for the Type - you may have to scroll down a bit. Add www for the Host and your existing GitHub URL site as the Value. Append a “.” to the end of the URL as seen in the screenshot below.
For example, here is my website URL with the “.” at the end: “dianephan.github.io.” Lastly, set TTL to 30 min. Click on the green checkmark at the end of the line and you’re good to go!
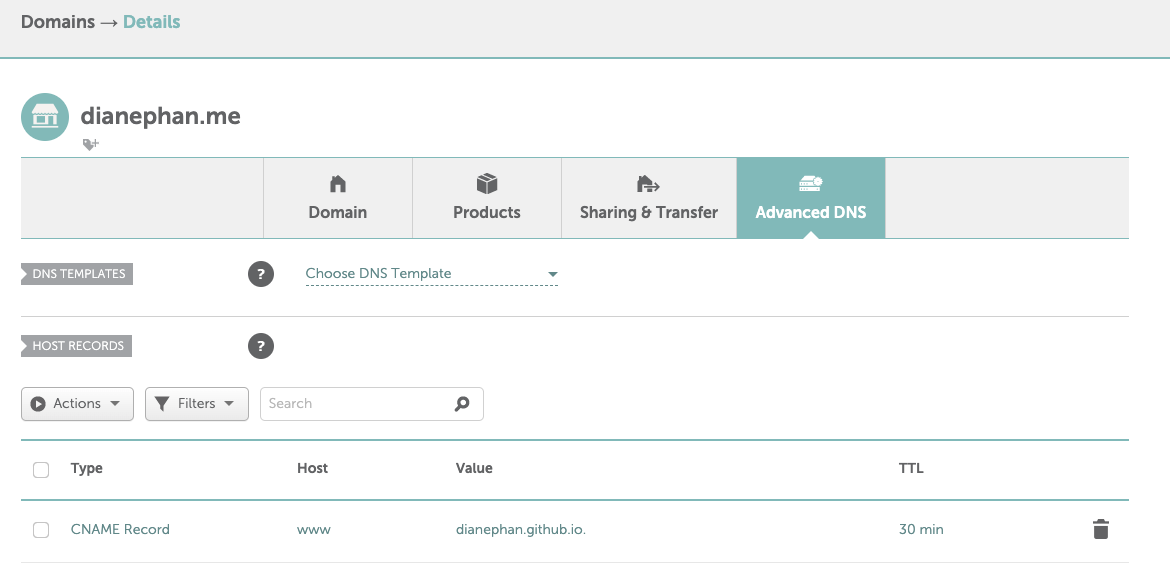
The record that was just added to the list of Host Records will redirect everyone who tries to go to your GitHub URL to your newly created custom domain name.
You will also need to create A Records to point the domain to the IP address of your GitHub’s hosting server. Add four more records by selecting the A Record type and inserting an “@” symbol under the Host. For each Value, add 185.199.108.153, 185.199.109.153, 185.199.110.153, and 185.199.111.153. Set the TTL for these four values to Automatic.
To check if the DNS records are configured correctly, type the following command in your terminal but replace “dianephan.me” with your domain name.
Your terminal output should look similar to the following text, replaced with your domain name.
Set up GitHub Pages
Head back to your GitHub repository. Check that your CNAME file has been added to your repository. This is a crucial step in the process and you will need to keep this file in your repo for as long as you want to redirect users to your custom domain site. Here’s my CNAME file on GitHub.
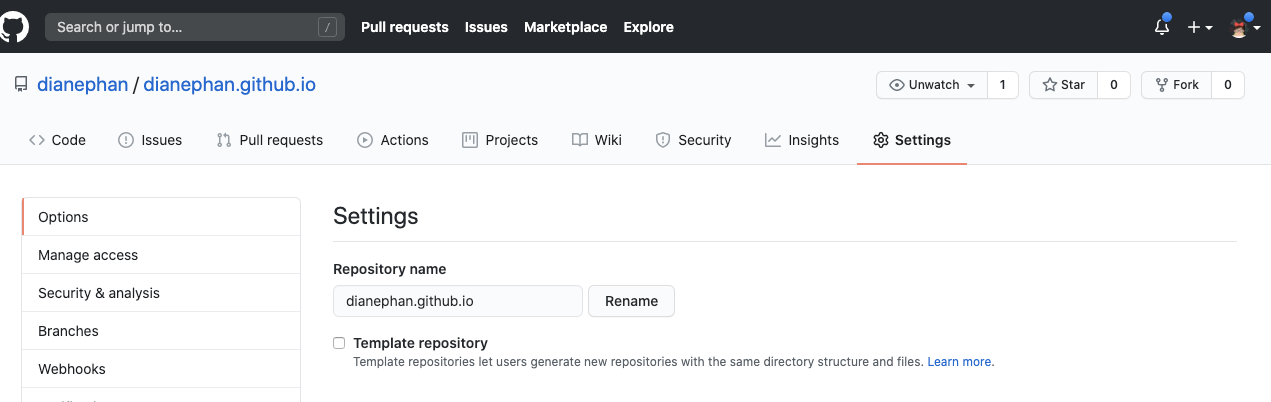
Once you have confirmed that your CNAME file is present, click on your repo’s settings.
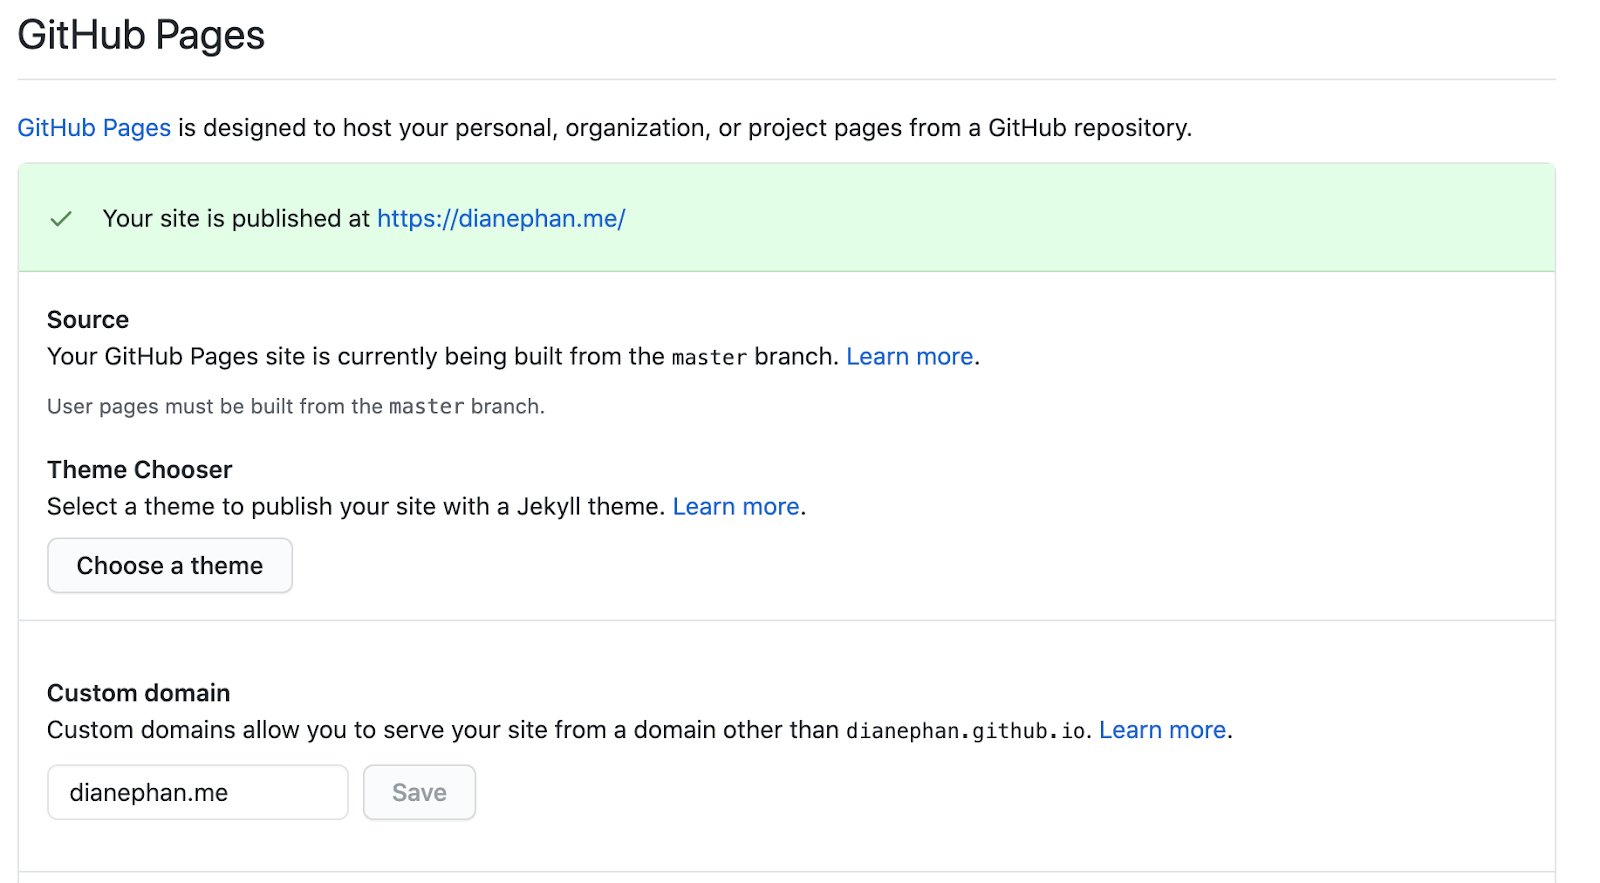
Scroll all the way down to the section titled GitHub Pages and you will see “Your site is published at https://<YOUR GITHUB URL HERE>.github.io/” as shown in the screenshot below:
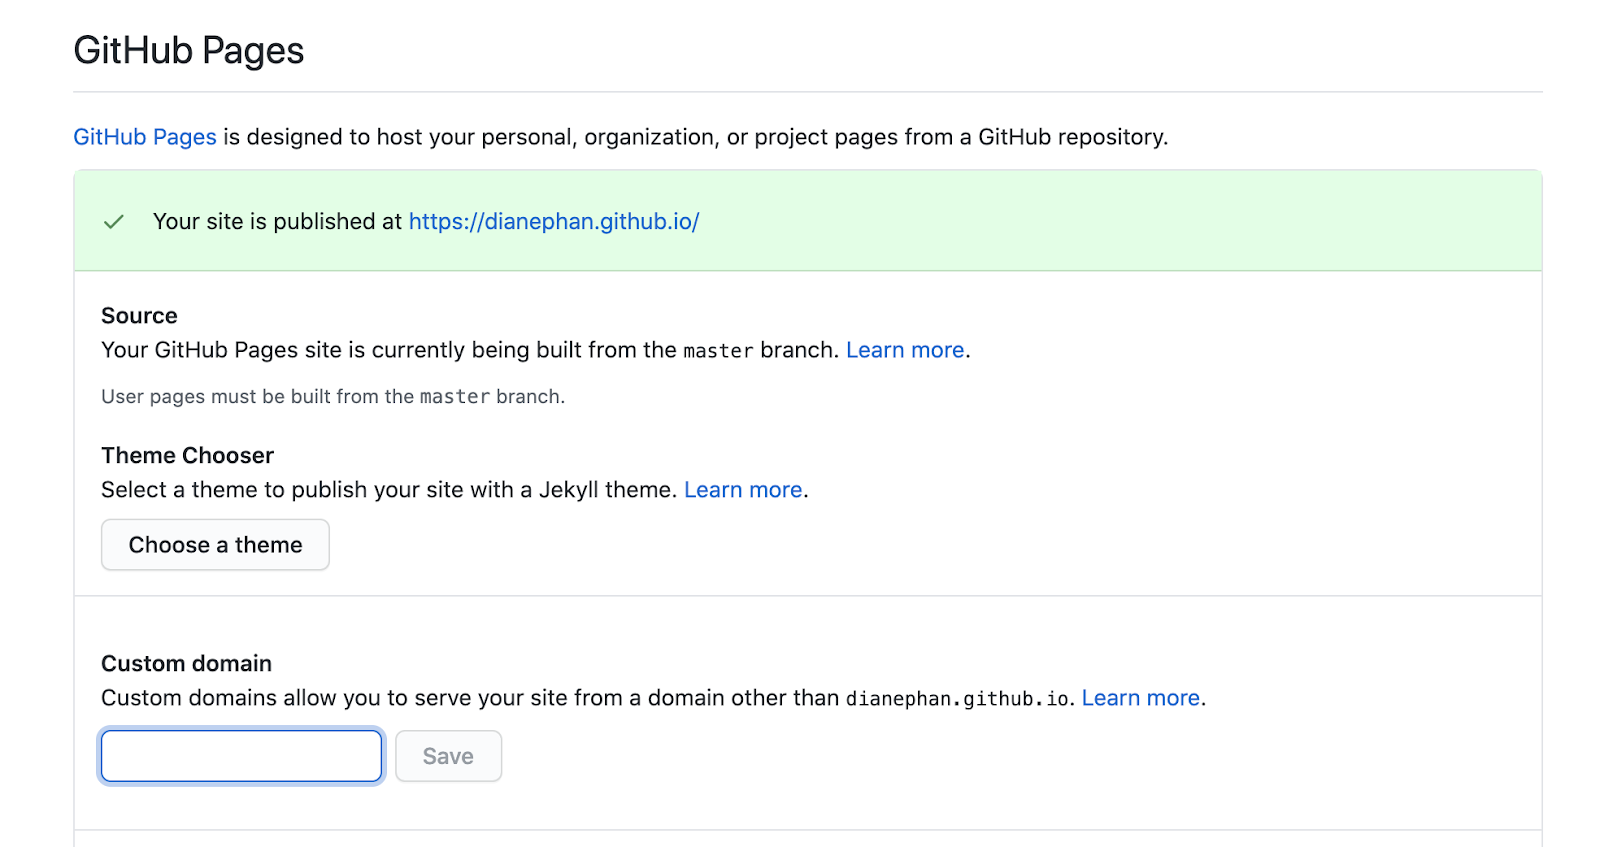
In the text field under Custom Domain, type in the custom domain name that you wrote in your CNAME file earlier. Click save.
If you refresh this page and you see the text “Your site is published at https://dianephan.me/” under GitHub Pages then congratulations! You have successfully redirected your GitHub website to your new custom domain name. Time to check it out and share your mark on the internet!
Do not fret if your new URL does not work yet. The published message indicates that you followed the steps correctly but it will take some time to update. You can also try clearing your cache or opening the site on a private incognito window.
If for some reason you did not receive the green highlighted text box under GitHub Pages, you might have had some trouble. Read on in the next section under (Optional) if that’s the case.
Add Extra Resource Records to Advanced DNS List
It is worth mentioning that the frustrating part about using domains is sometimes, people set up their Advanced DNS Settings differently, so do not be discouraged if you receive different errors. You might also have to add more A Records to the Advanced DNS page in your Namecheap Account Settings.
If it has been over 24 hours and your domain name isn’t redirecting you to your GitHub site, add variations of your GitHub link to the list of records. Create more URL Redirect Record types with the symbol “@” under Host. Add variations of the GitHub URL under Value such as “https://<YOUR GITHUB SITE>.github.io/” or “https:/www./<YOUR GITHUB SITE>.github.io/”, etc.

It’s Too Dangerous to Go Out There Alone! Take this.
The final step you must take as an owner of a custom domain name is to enable privacy protection for your domain by checking the box to Enforce HTTPS in GitHub pages.

Namecheap also provides WhoisGuard which is a free service to keep your sensitive data safe so that spammers and online fraudsters do not get a hold of your personal information. Might as well enable it to prevent more battles in the future!

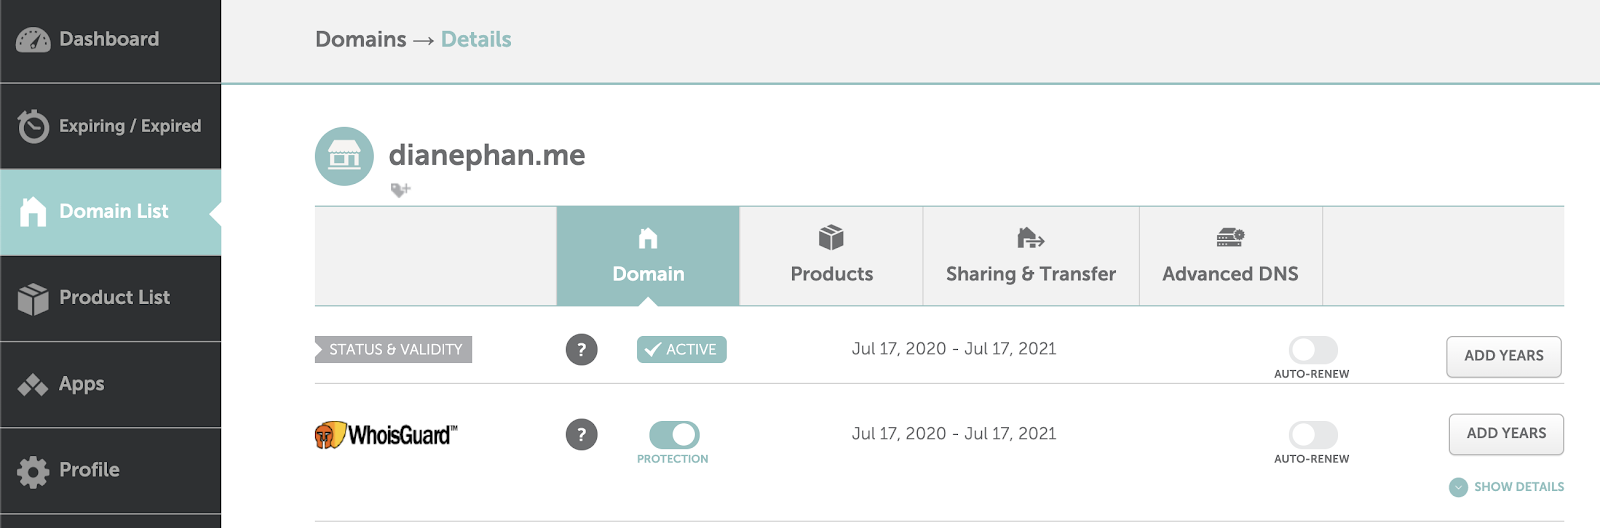
Go to your Namecheap account and click on the Domain List, followed by Manage your domain. Under the Domain tab, look for Status & Validity to find WhoisGuard. Toggle the button to ON to enable protection.
(Optional) The Worst Enemy
If you’re here, then it turns out that you might have done something wrong in the past if GitHub tells you that your CNAME is already taken.
If you see a yellow highlighted text box that says “The CNAME <YOUR DOMAIN NAME> is already taken”, it means that you tried to use a custom domain name in the years before.
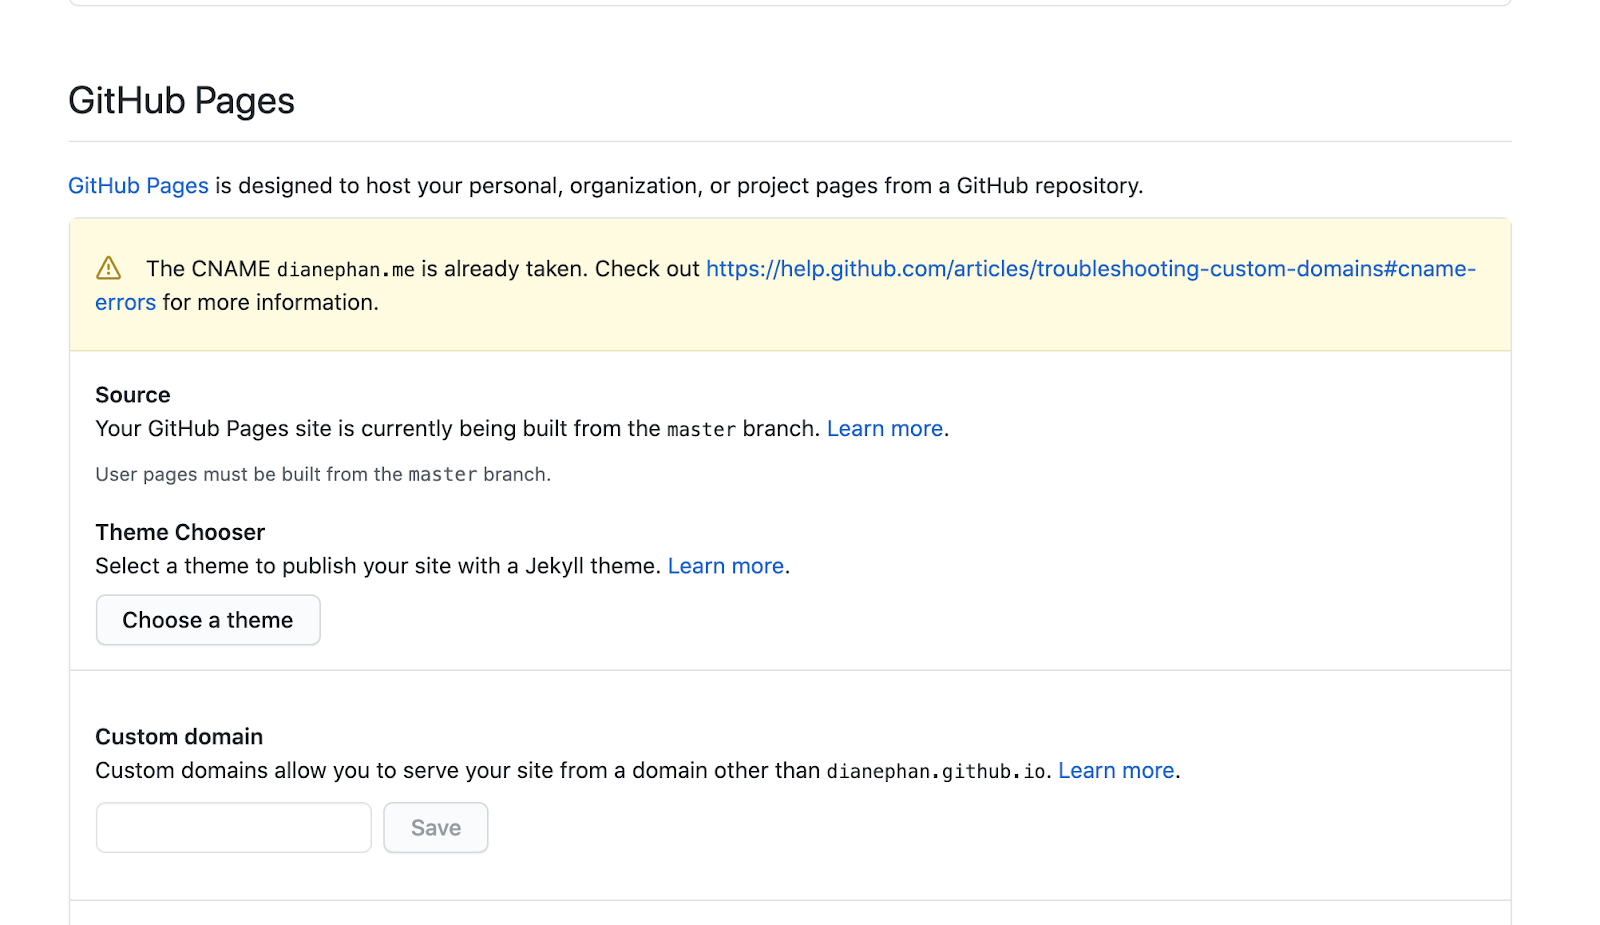
Look through your previous repos and find out if you created a CNAME file in another repo. Once you find it, delete it! Afterwards, redo the previous step and enter your new domain name under the Custom Domain field in Settings.
How do I know all of this? It happened to me, so I hope this saved you hours of figuring out what was going wrong.
Unfortunately, if you are unable to find a CNAME file in other repositories, there is a chance that the domain has been hijacked by someone else. It’s a very unfortunate circumstance that seems to be out of anyone’s control. This is a battle you might not want to get yourself into, as it might be easier to find a new custom URL that can be discounted or free. We wish you best of luck in your journey here.
(Optional): Create projects under your domain name
So what happens to all the other projects you’ve deployed in the past? You can show off your previous side projects by creating a new URL under your domain name.
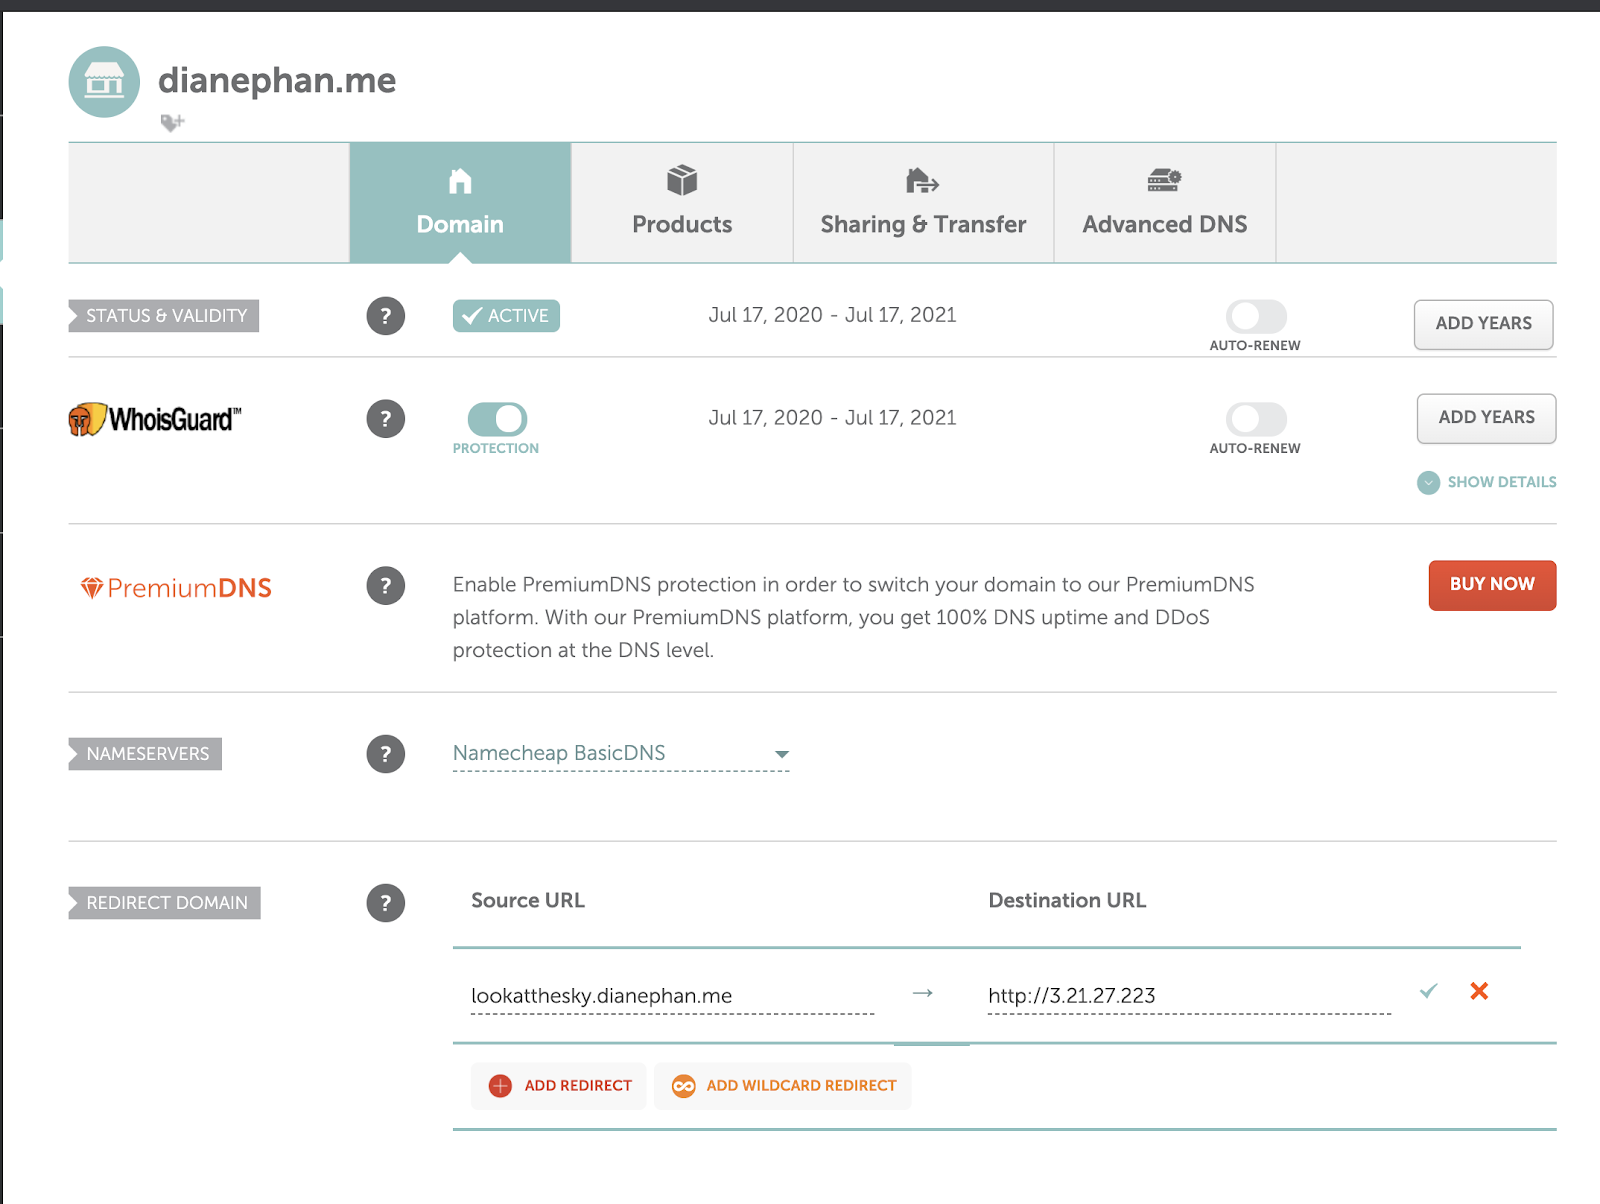
Head back to the Namecheap dashboard and click on the Domain List. Scroll down to see Redirect Domain and click Add Redirect. Enter the new Source URL that you want to use to share to people, and then add your project site under Destination URL.
In the screenshot below, I insert the IP address of a project I am running on AWS server under Destination URL. For the Source URL, I wanted people to find my project by typing in “lookatthesky.dianephan.me” in their URL to access my project.
Congratulations! You can now go wild and add new Source URLs to your domain name.
What’s next for domain names?
Now that we have a domain name running, why don’t we explore different options to use our domains to the fullest extent possible. Here are some ideas that you can look into:
- Redirect emails to your personal email to a custom email address
- Set up a blog on your site and get notified when someone posts an article from your domain using Node.js, Firebase and Twilio
- Send domain renewal and expiry notifications using Namecheap API, Twilio SMS, and PHP
Overall, having a personal domain name can help you stand out as a professional, help you establish your brand name, and showcase your projects with style on the web.

Keep in touch to let me know what project you’re working on and if you snagged your top choice domain name!
Diane Phan is a Developer Network Intern on the Developer Voices team. She loves to help beginner programmers get started on creative projects that involve fun pop culture references. She can be reached at dphan [at] twilio.com.


Related Resources
Twilio Docs
From APIs to SDKs to sample apps
API reference documentation, SDKs, helper libraries, quickstarts, and tutorials for your language and platform.
Resource Center
The latest ebooks, industry reports, and webinars
Learn from customer engagement experts to improve your own communication.
Ahoy
Twilio's developer community hub
Best practices, code samples, and inspiration to build communications and digital engagement experiences.