Send and Receive SMS Messages via Discord with Twilio and Node.js
Time to read:
August 11, 2022
Written by
Reviewed by

In recent years, Discord has become the central messaging platform for communities especially with the help of Discord bots. Through Discord’s extensive API, developers are able to build robust bots that are capable of various actions such as automating tasks and chatting with users.
With the gaining traction of Discord bots, I decided to think of ways that Twilio can be used alongside it. A fitting integration would be to use Twilio Programmable Messaging; you can communicate with those who don’t have Discord or SMS, or even be notified on important events such as if you’ve been mentioned or if members have left or joined your server.
In this article, you’ll learn how to build a Discord bot that’s able to notify you on important events on your server and allow you to send messages to your server all through SMS.
Prerequisites
Here’s what you’ll need for this tutorial:
- A Twilio account - Sign up for free using this link and receive $10 in credit when you upgrade your account!
- A Twilio phone number - Click here to see how to get your first Twilio number with your trial account.
- A Discord account.
- Node.js v16+ installed on your machine.
- The ngrok CLI - For testing purposes.
Set up Discord
Discord server
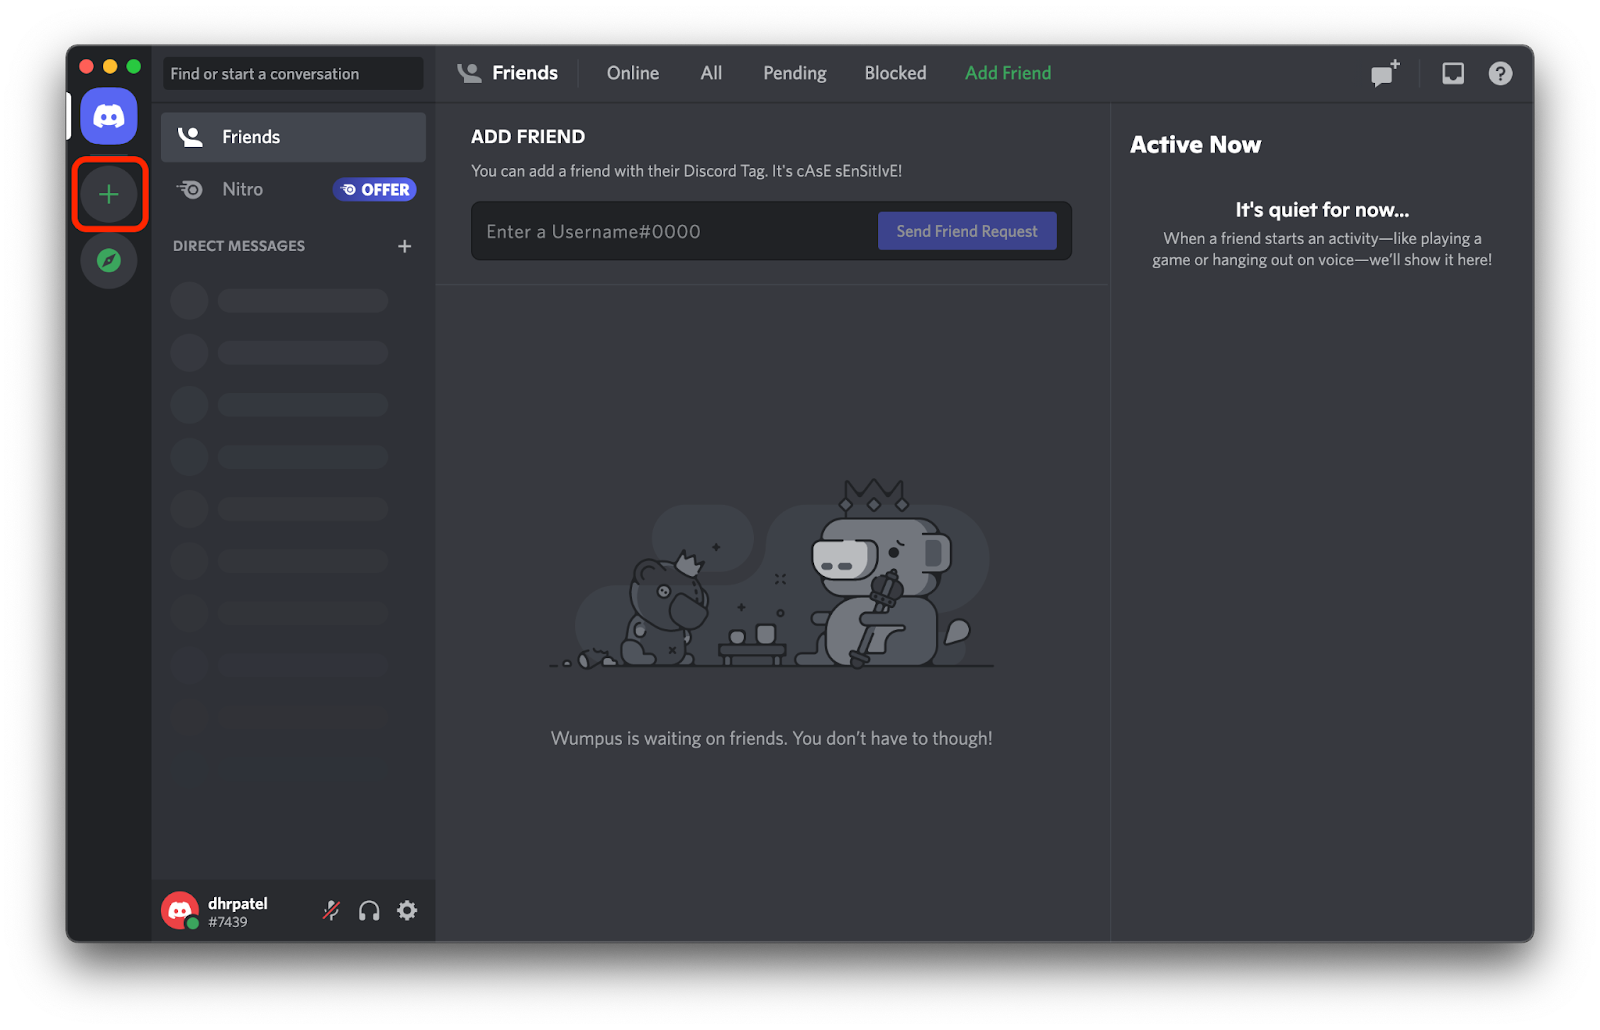
To get started, set up a Discord server by first downloading and opening the Discord client (or by heading to the web client) and clicking on the green + icon on the left tab. Finally, follow the instructions to create your server.
Two-way messaging to your phone number can be done in the default general channel but it can get spammy as you invite more people into your server. Because of this you’ll want to create a dedicated channel so only messages sent in that channel will be sent to your phone and any message sent to your Twilio number will be sent in that dedicated channel.
As an example for this tutorial, you’ll enable two-way SMS messaging to a private channel that your close friends will have access to so that you’ll never miss a message from them.
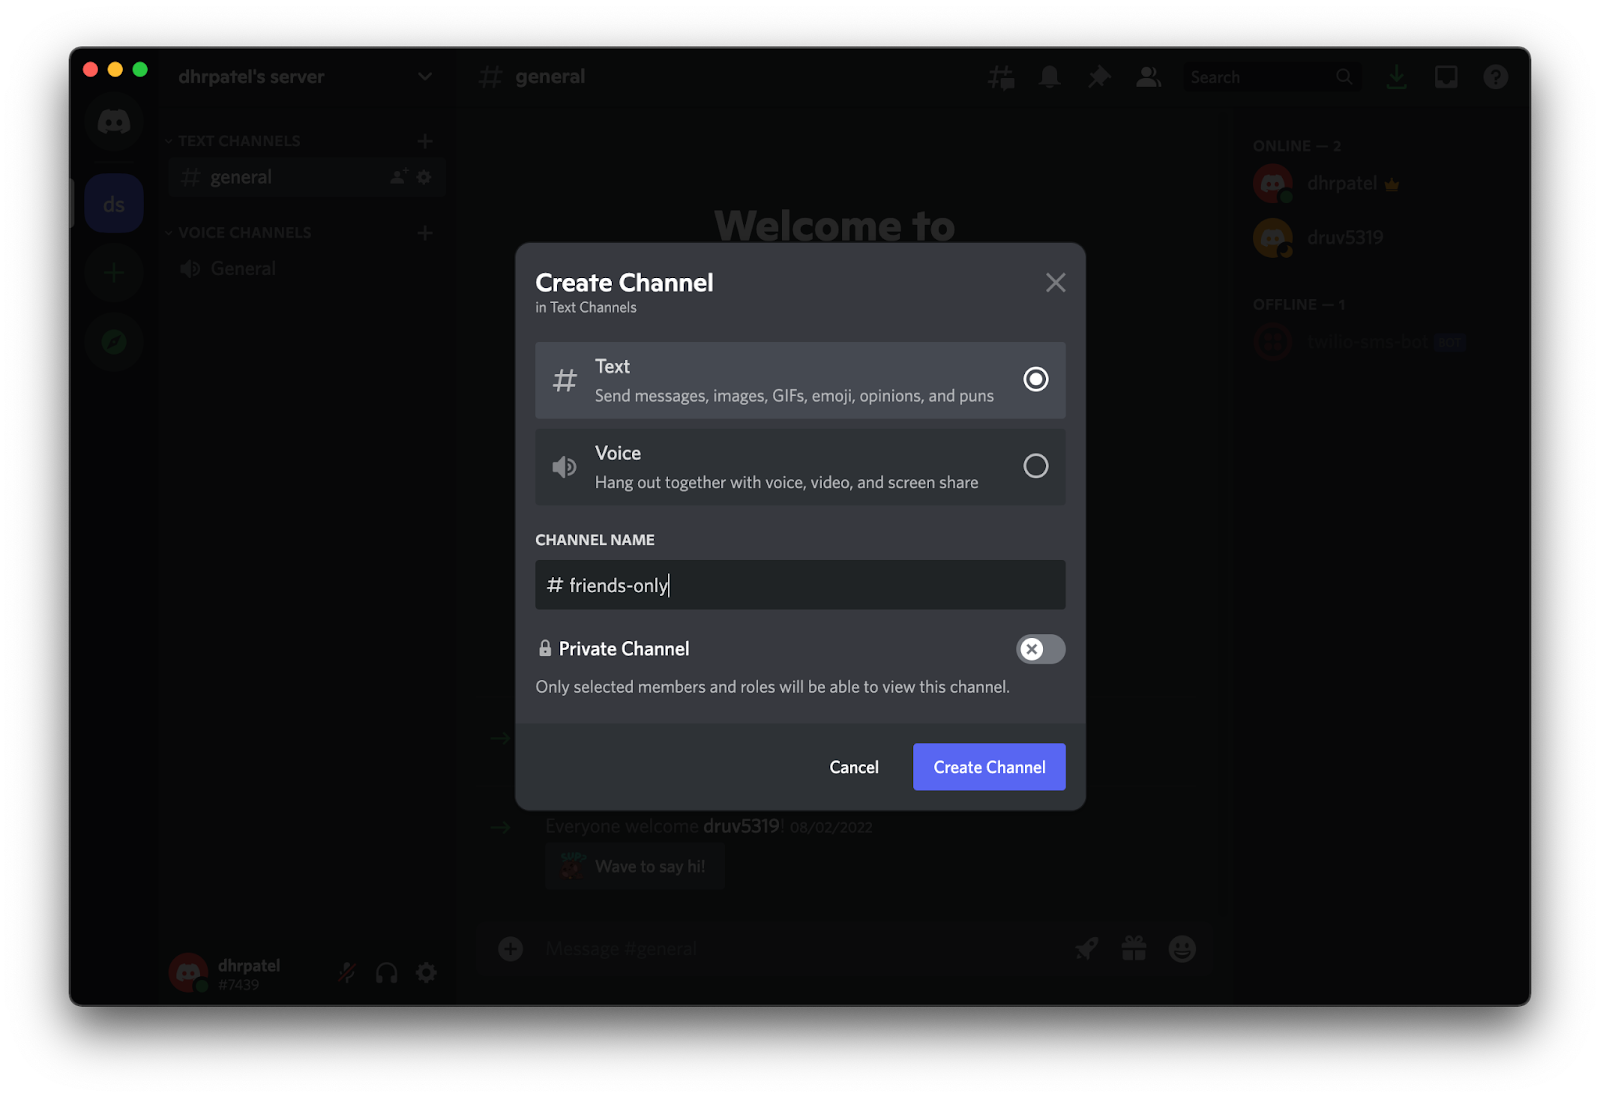
On the left tab of your server, click on the + icon next to TEXT CHANNELS and a modal to create a new channel will appear. Feel free to enter whatever channel name you’d like, select the Private Channel toggle and select Create Channel.
Now that you have your Discord server ready, it’s time to set up your Discord bot.
Discord bot
You’ll need to set up a Discord application for your bot through the Developer Portal. Once you’re signed in, you should be redirected to the applications page.
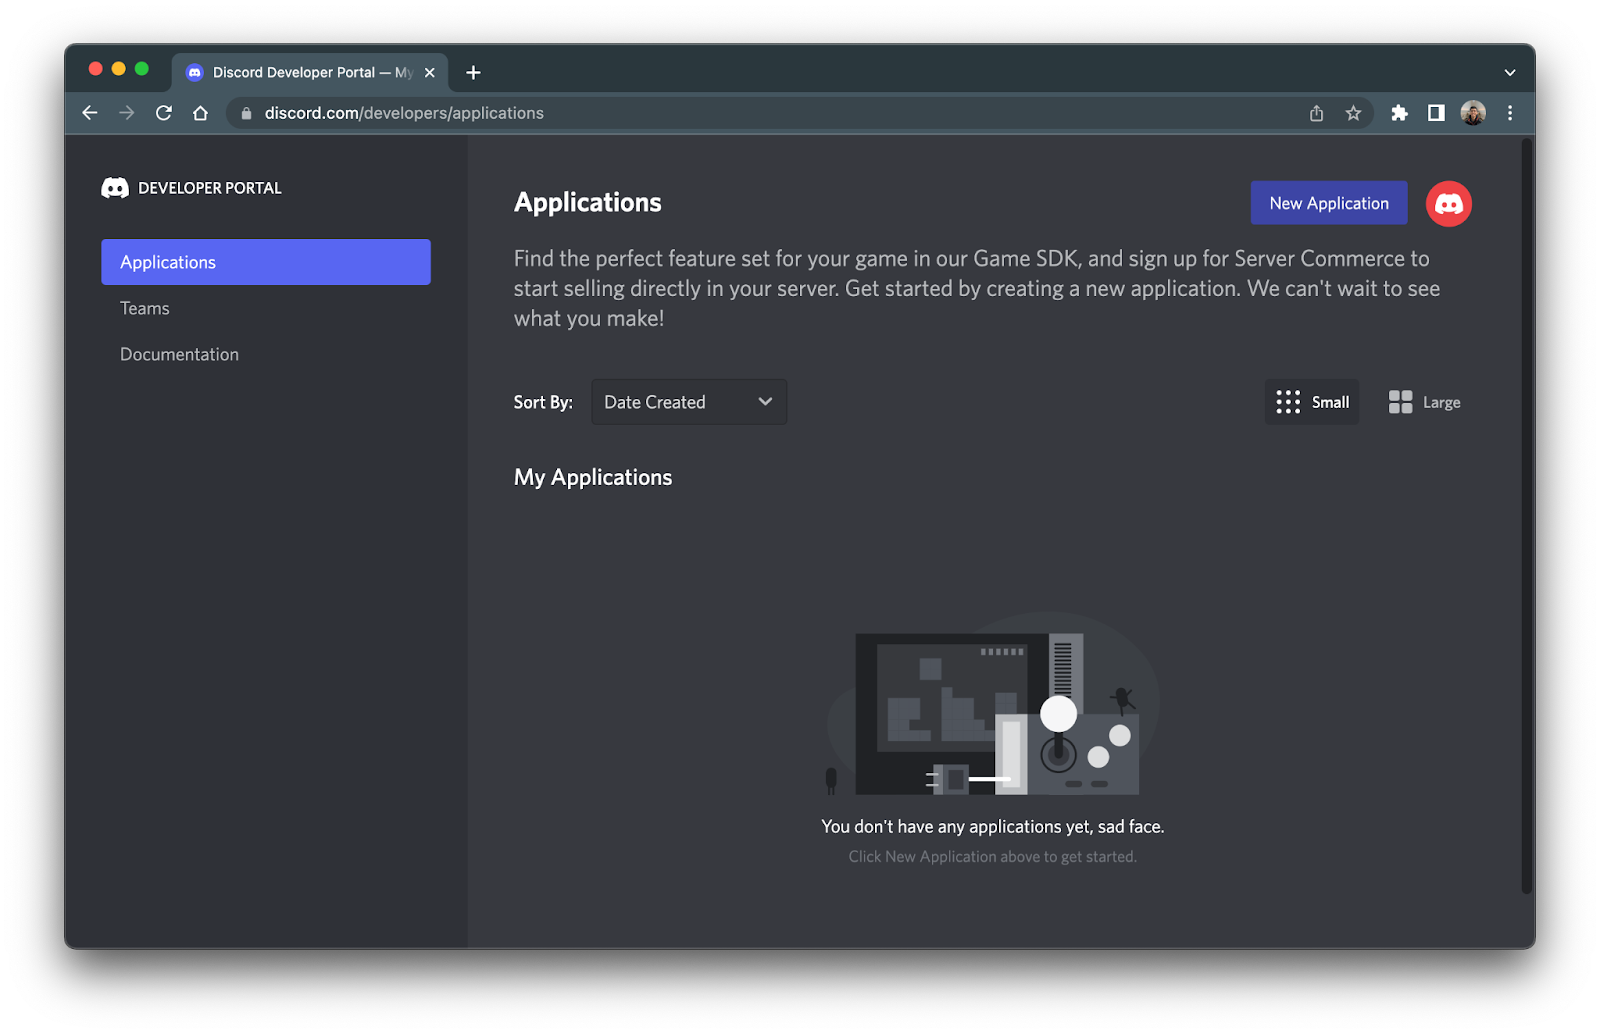
Click New Application on the top right. A box to create an application should pop up. Enter "twilio-sms" for your application name and then click Create. You will be redirected to your new application’s portal which should look like this:

In the panel on the left hand side, click Bot to be redirected to the Bot submenu. Click Add Bot in the top right corner and then click Yes, do it! to turn your newly created application into a bot. The Bot menu should populate with new settings and look like this:
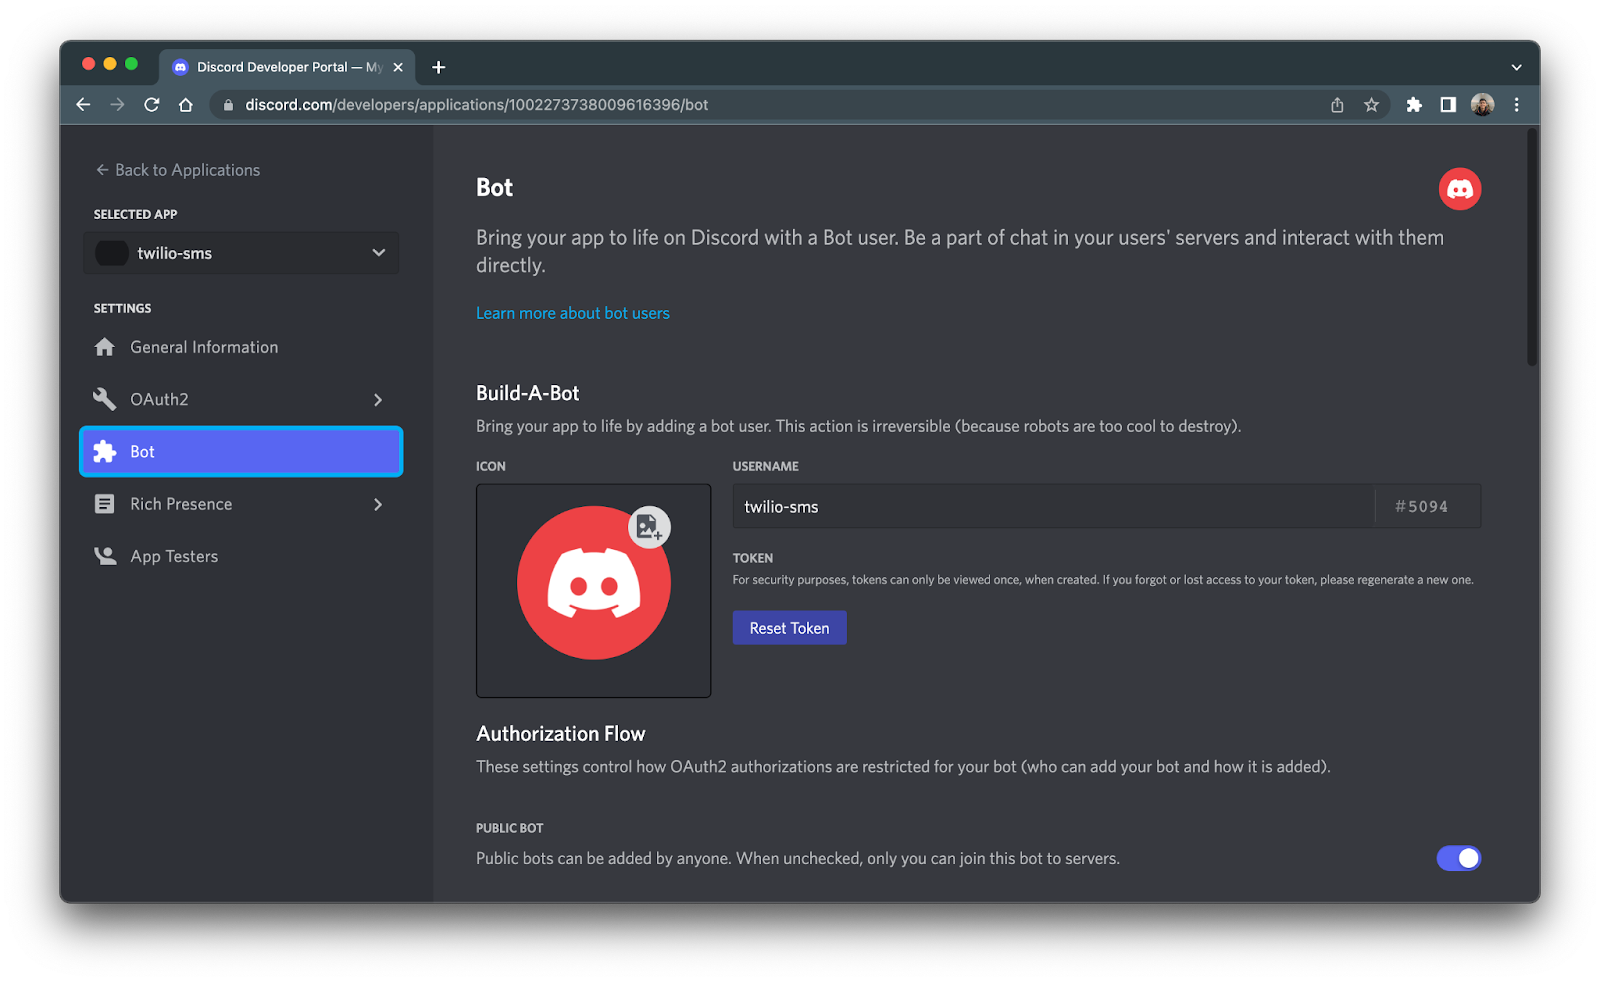
Under the Build-A-Bot section, you should see the option to reset your token. Click Reset Token to generate a new token and then click Yes, do it! to confirm. Click Copy to copy your token and then store it in a safe place - this token will be used in the next section.
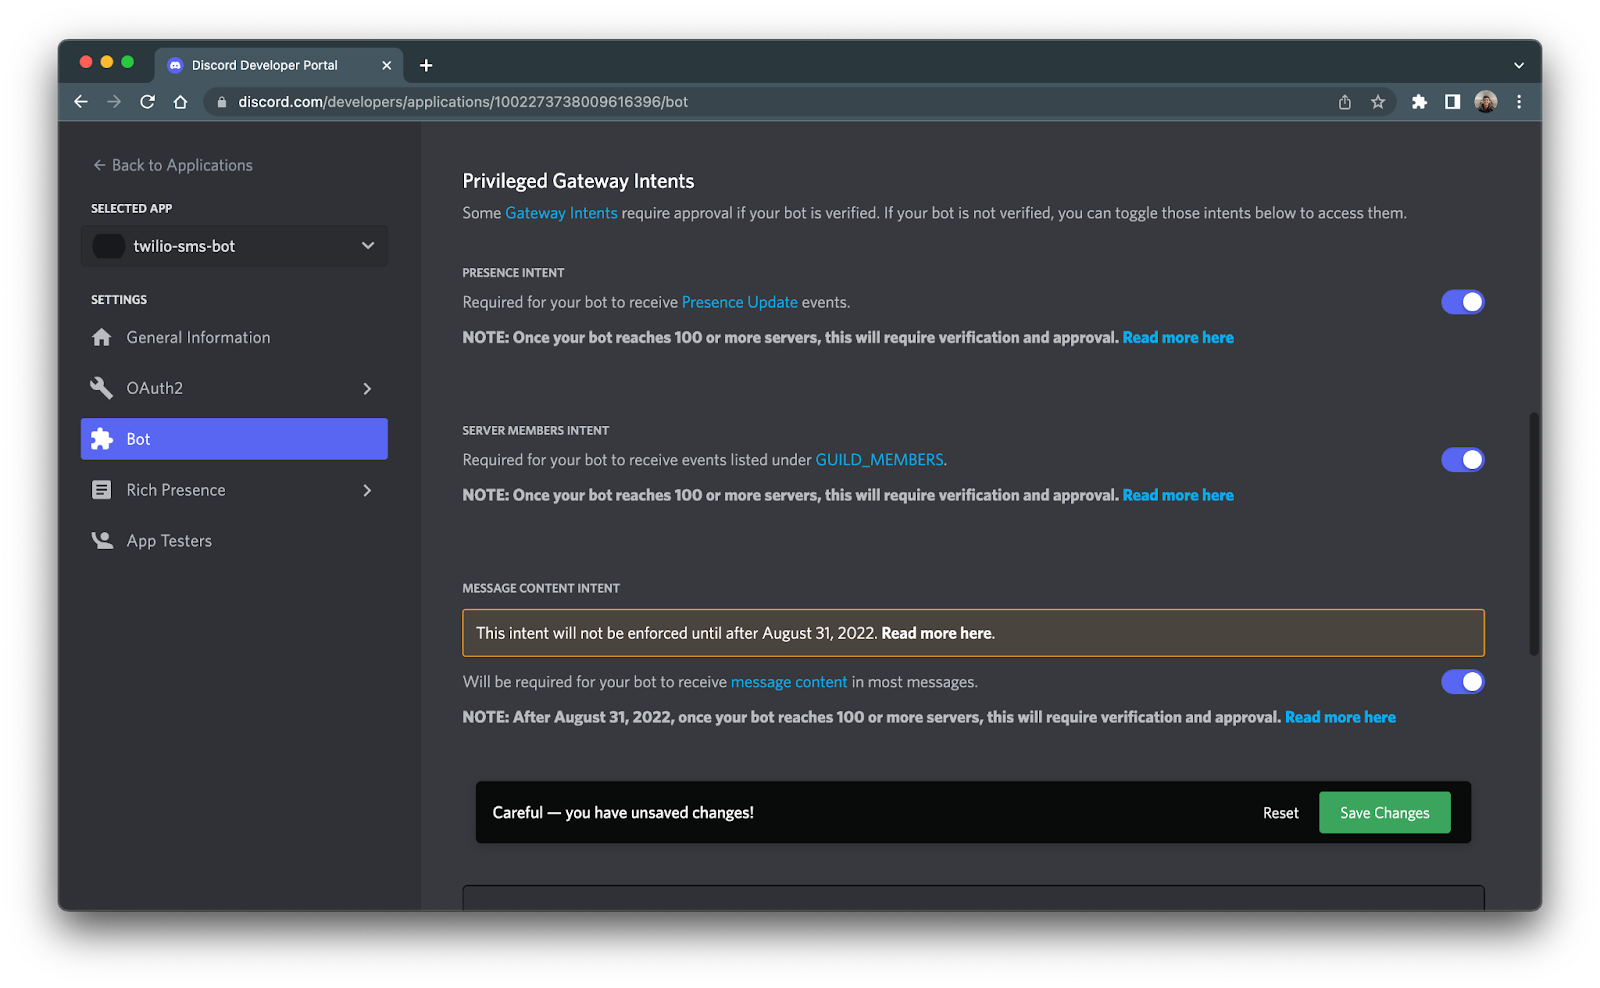
Now, scroll down to the Privileged Gateway Intents section and turn on all of the listed intents and click the green Save Changes button
Next, you’ll need to give your new bot permissions and add it to your server. On the left hand side, click OAuth2 and then URL Generator. Select the bot option in the SCOPES section.
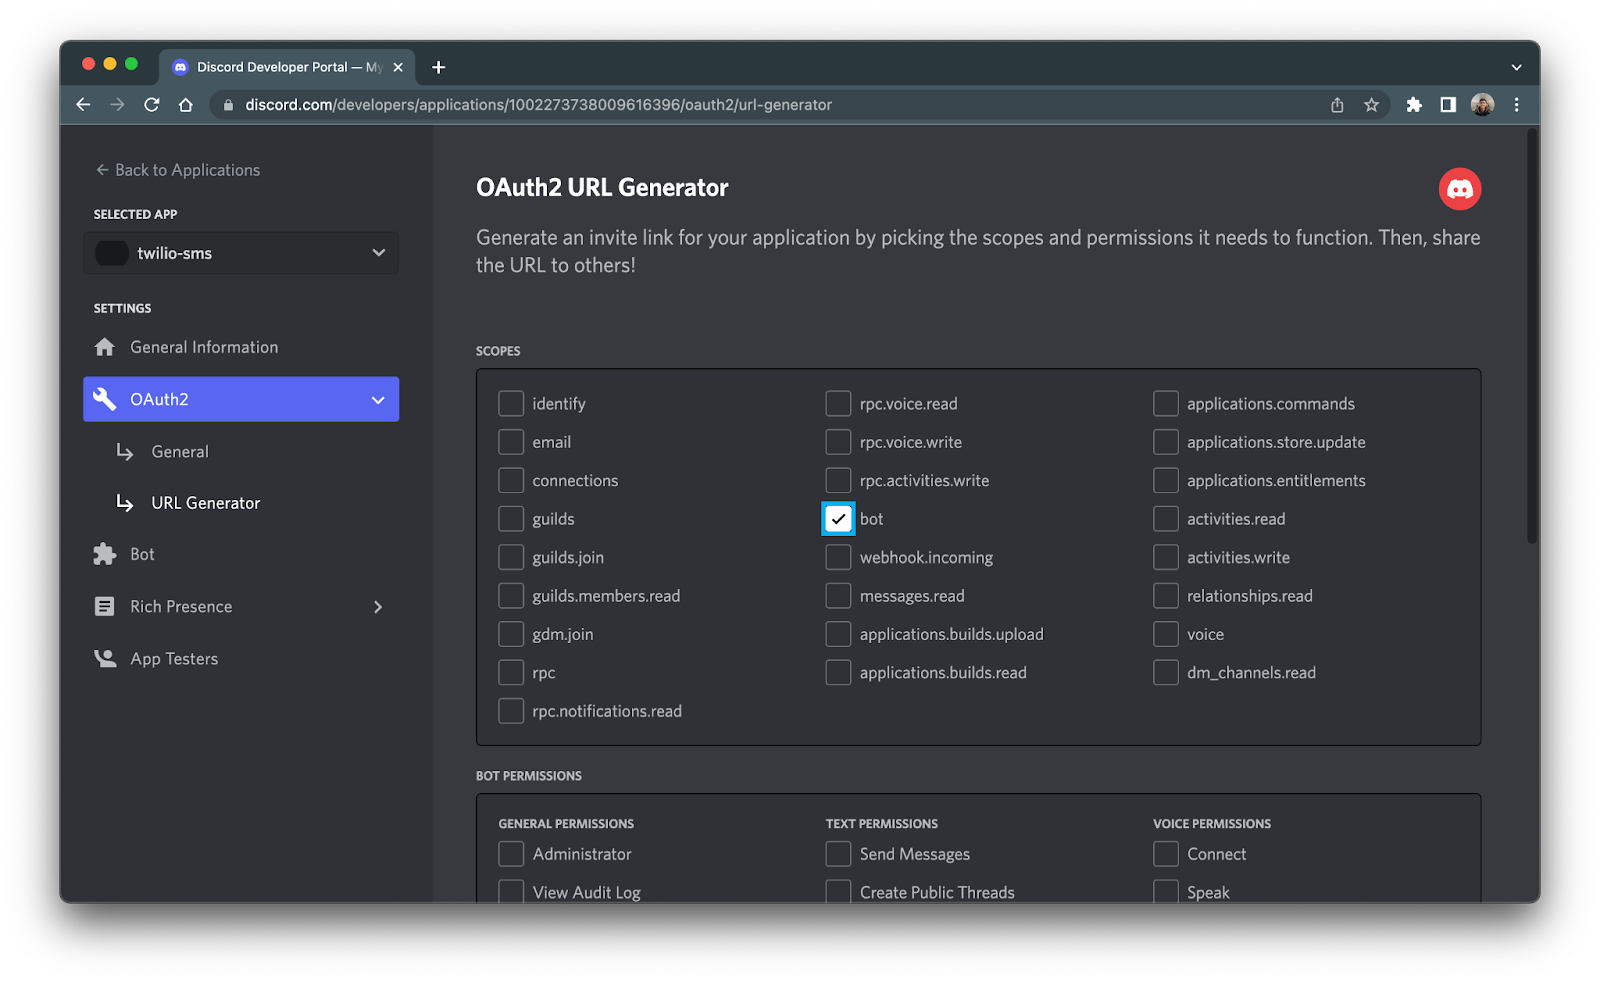
A new BOT PERMISSIONS section should show up after selecting the bot option. Scroll down there, select Administrator and copy the given link below.
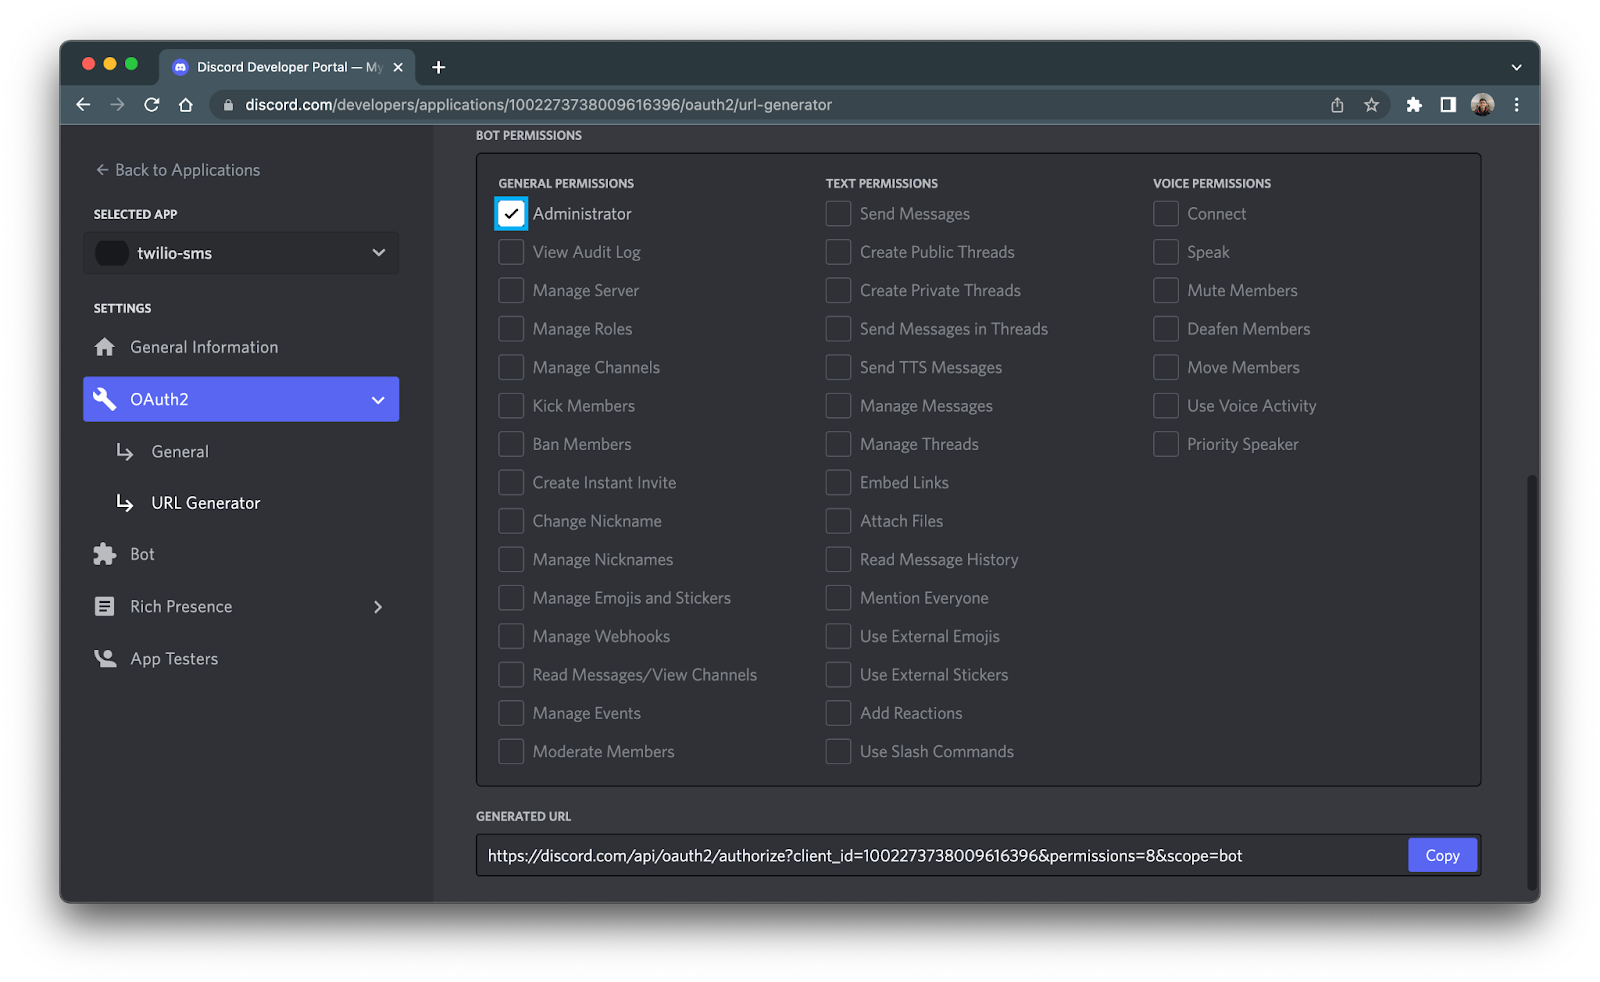
This link will take you to a dialog that will authorize your bot to a server of your choice. Paste the link into your URL, choose the server you’d like your bot to join, and then click Continue.
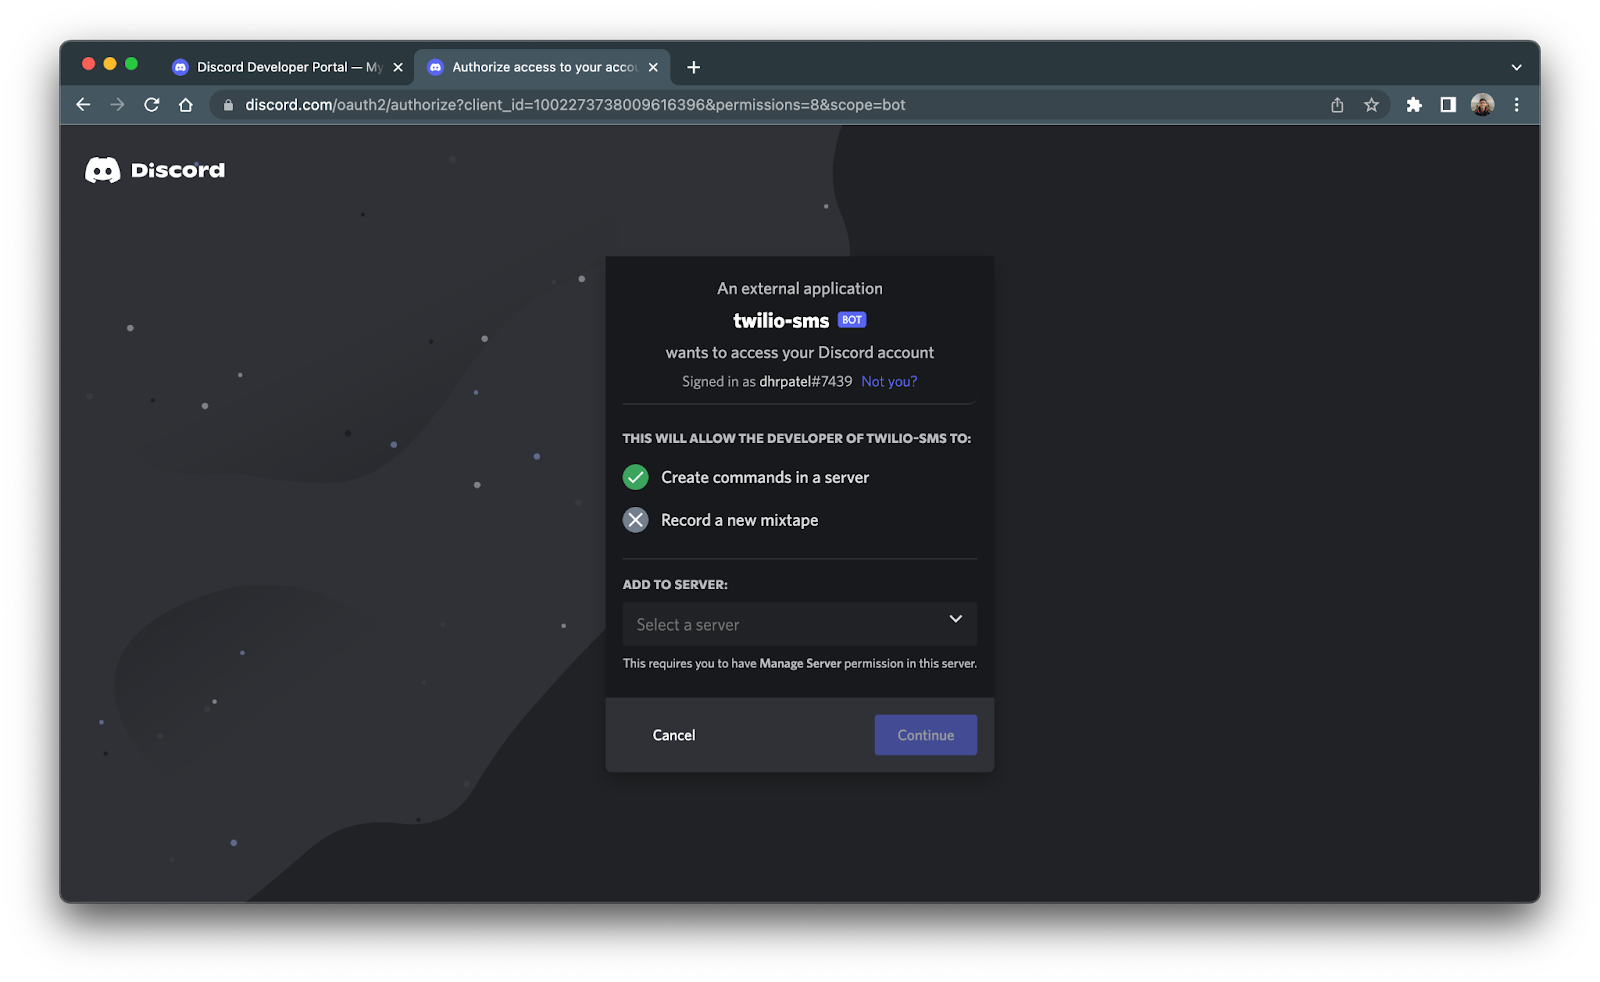
You might be presented with a CAPTCHA to complete before your application is authorized. Lastly, click Authorize to allow your bot to enter your server.
Now that your bot is connected to your server, it’s time to set up your Node.js application.
Set up your Node.js app
In this section, you are going to set up your Node.js application for your bot. To keep things organized, create a folder called discord-sms to store all of your application files. In your terminal or command prompt, navigate to your preferred directory and enter the following commands:
This command will create your project file and scaffold out your Node project by creating a package.json file that will contain your project's metadata and package dependencies.
Install dependencies
Your next step is to install all the dependencies needed for your project. You will need to install the following npm packages:
- discord.js - Discord’s official package to interact with the Discord API.
- Twilio - Twilio’s official package to interact with the Twilio API.
- dotenv - To store and access environment variables.
- Express - To route and handle incoming SMS messages from your Twilio number.
To install these dependencies, enter the following command in your terminal:
Now that the dependencies are installed, you will need to set up your environment variables.
Secure environment variables
The dotenv package is used to access environment variables required to interact with both the Discord and Twilio APIs.
Open up your discord-sms directory in your preferred IDE and create a file named .env. Open the file and place the following lines into the file:
Grab your bot token (generated earlier), Twilio phone number, personal phone number, Twilio account SID and Twilio auth token and replace all of the XXXXXX placeholders with their respective values.
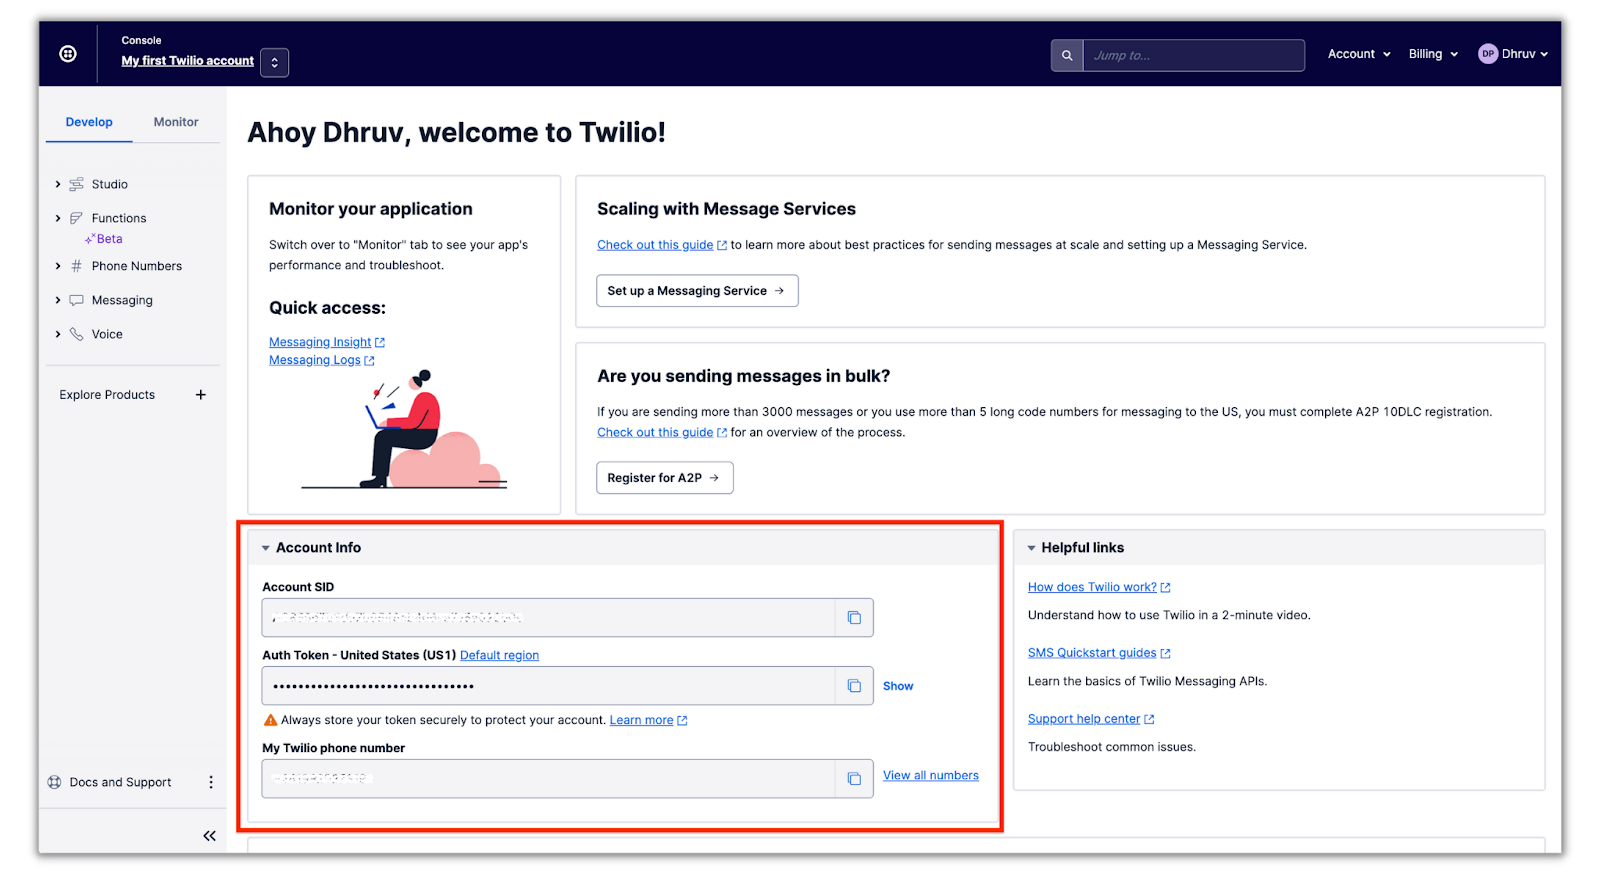
You can find your Twilio Account SID and Auth Token on your Twilio Console shown below:
Now that you’ve installed the necessary dependencies and configured your environment, it’s time to build out your bot!
Create an index.js file in the discord-sms directory and place the following code into the file:
Lines 1 to 4 and lines 8 to 12 initialize the discord.js, twilio and express packages you installed earlier. It also declares the necessary intents to the Discord Client constructor. These are the same intents you enabled for your Discord bot on your Discord Developer Dashboard.
Line 5 holds your user ID which is used to check if you’ve been mentioned in a message. Line 6 holds your channel ID (for two-way messaging) which is used to check if a message needs to be sent to your Twilio number.
To get these ID’s, you’ll first need to enable developer mode. You do this by heading to the Advanced section of the Discord app settings under the APP SETTINGS section on the left side of the screen and toggling Developer Mode.
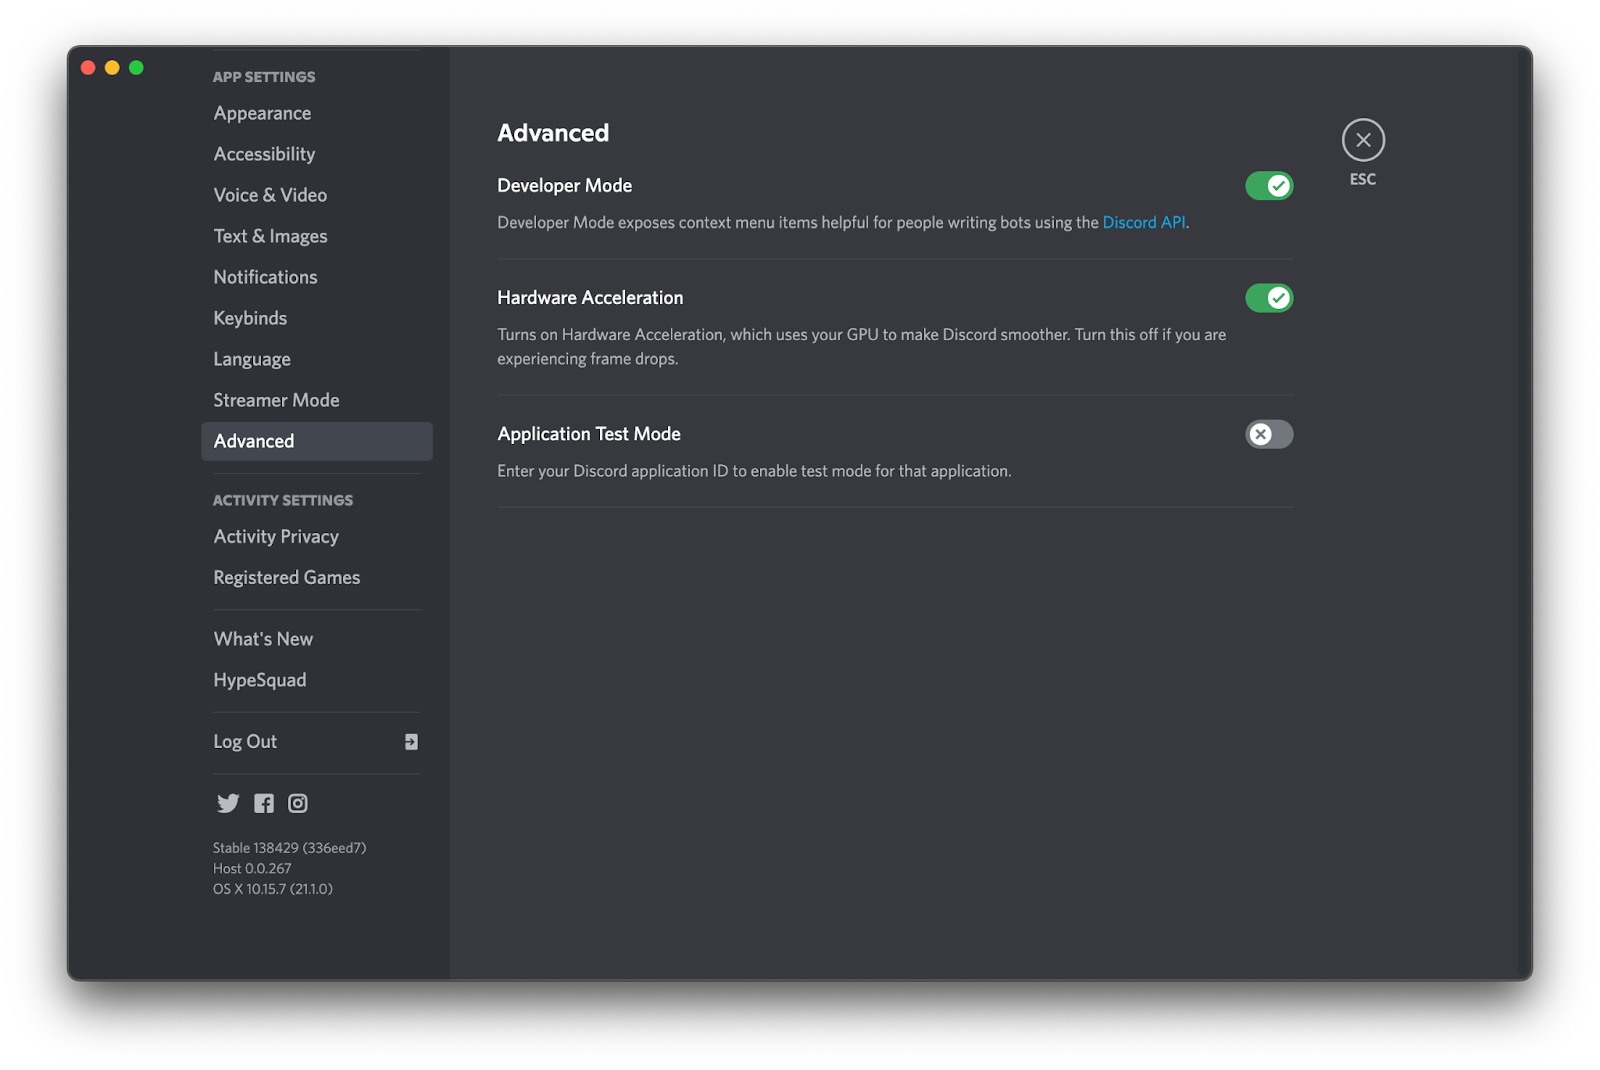
Now to get the channel and user IDs, hover over a channel or user within your server, right click, and then select Copy ID.

Once these values are copied, replace it with their respective XXXXXX placeholders within the index.js file.
Create the SMS function
Append the following code to your index.js file:
This code implements the sendSMS(sms) function which takes in an sms message as a parameter. The function will use the twilio client to send out the sms message to your personal phone number using your Twilio number stored in your .env file.
Mention notifier
The first SMS notifier we’ll build out is whenever you get mentioned in the server.
Append the following code to your index.js file:
This code implements an event listener that executes whenever the "messageCreate" event is triggered, which occurs whenever a message is sent in the channel. Line 2 checks to see if the author of a message is a bot and if it is, it'll stop the function. This is to ensure that the bot doesn't respond to itself.
Line 3 will then check if you've been mentioned within the message and will then trigger the sendSMS() function if true.
Joined and left members notifier
Discord also provides a gateway event that can listen for members that just joined and left your server. Below the "messageCreate" listener, add the following code:
The "guildMemberAdd" and "guildMemberRemove" listeners are executed whenever a member joins and leaves your server, respectively, and will run the sendSMS() function to notify you of the event.
Two-way SMS messaging
To allow messaging to your Discord from your phone number, you'll need to set up another event listener to listen for SMS messages to your Twilio number. This will be done by setting up a URL route on your Node.js server with Express.
Append the following code to your index.js file:
This code will listen to POST requests to the /sms route on your Node.js server and will send a message to your friends-only channel with the SMS message contained in the body of the request. The code will also ensure that the SMS message was sent from your personal phone number so that the bot won't send a message to your channel if anyone else texts your Twilio number.
This updated code adds lines 3 to 6 which sends any message sent to your dedicated two-way messaging channel, to your Twilio number. It also ensures that any message sent by you within the channel won't be sent to your number.
You'll also need to connect your Twilio number to the /sms route so that any SMS message sent to your Twilio number will be sent to the route; this will be completed in the deployment section.
Initialize server and bot
Lastly, your code will need to start up the Express server and have your bot login to your server. Append the following code to the bottom of the index.js file:
Deployment and Testing
In a production environment, it's recommended to run your Node.js application on a cloud server. However, to simplify the deployment for this tutorial, you'll be deploying your app on your computer. Ngrok will then be used to connect your Express server to the internet by generating a public URL that will tunnel all requests directly to your server. This public URL will be configured to your Twilio number on your Twilio Console so that all SMS messages will get sent to your bot application.
Run the bot application
Ensure the contents of the index.js file are saved. Navigate to your project directory on your terminal and execute the following command:
This command will run your Node.js app which will start up your Express server and have your bot login into your Discord server.
Now while your app is running, open up another terminal tab or window and execute the following command:
Your terminal will then look like this:
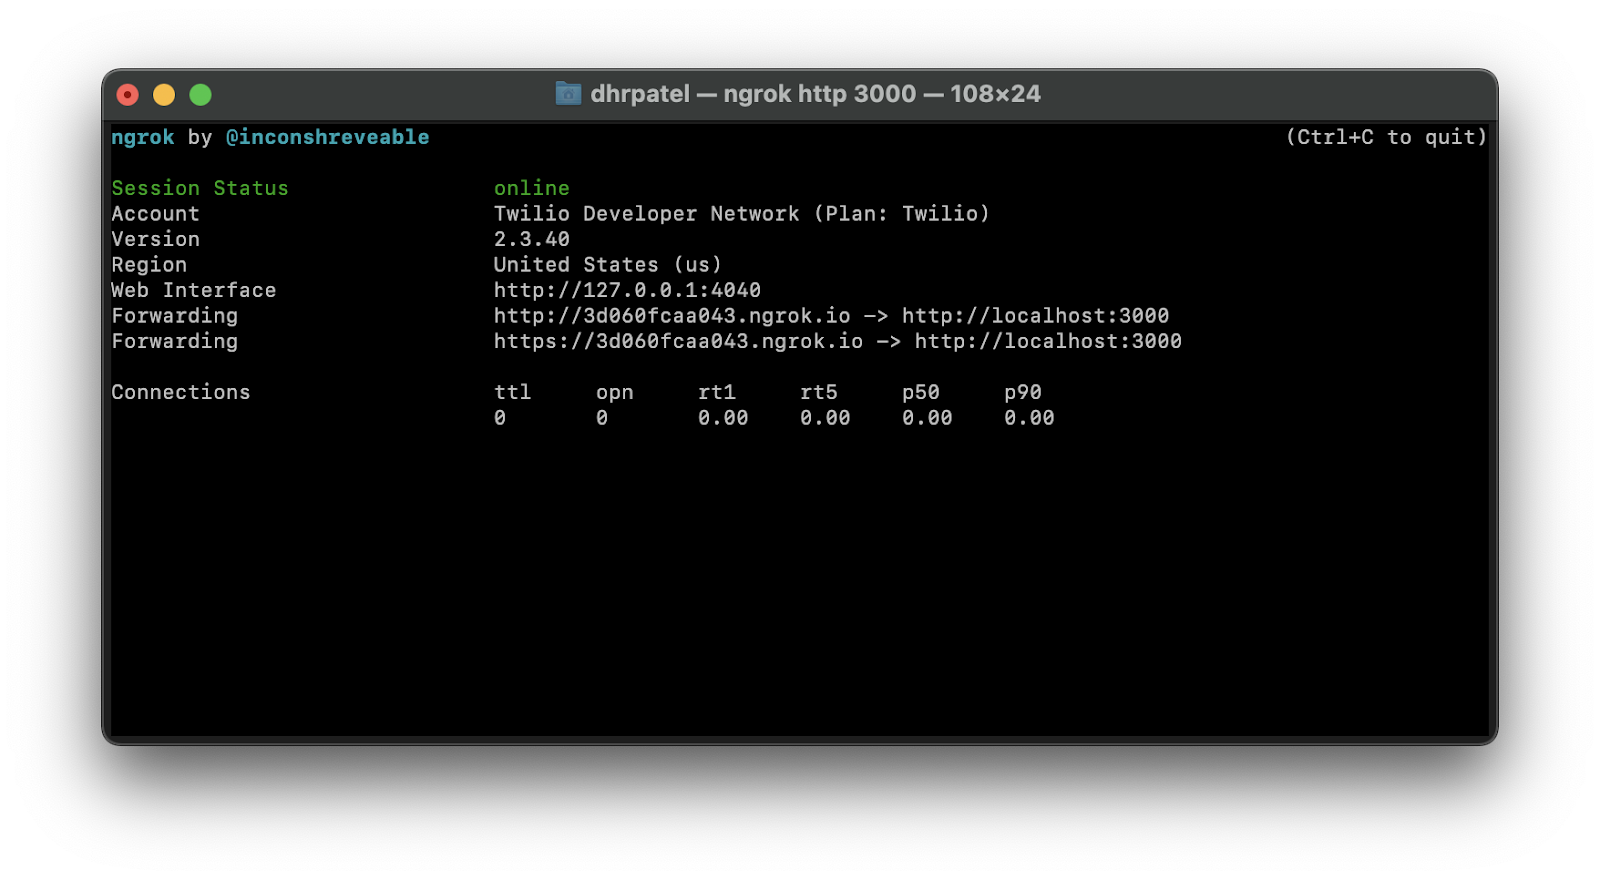
You’ll see that ngrok has generated Forwarding URLs to your local server on port 3000. Copy either of the URLs – the https URL is recommended as it’s encrypted – as one will be needed to be plugged into the messaging settings of your Twilio number.
Navigate to the Active Numbers section of your Twilio Console. You can head there by clicking Phone Numbers > Manage > Active numbers from the left tab on your Console.
Now click on the Twilio number you’d like to use for the SMS service and scroll down to the Messaging section. Beneath A MESSAGE COMES IN, select webhook for the first dropdown and then within the next textbox, enter your forwarding URL followed by /sms (see below how the URL should look like).
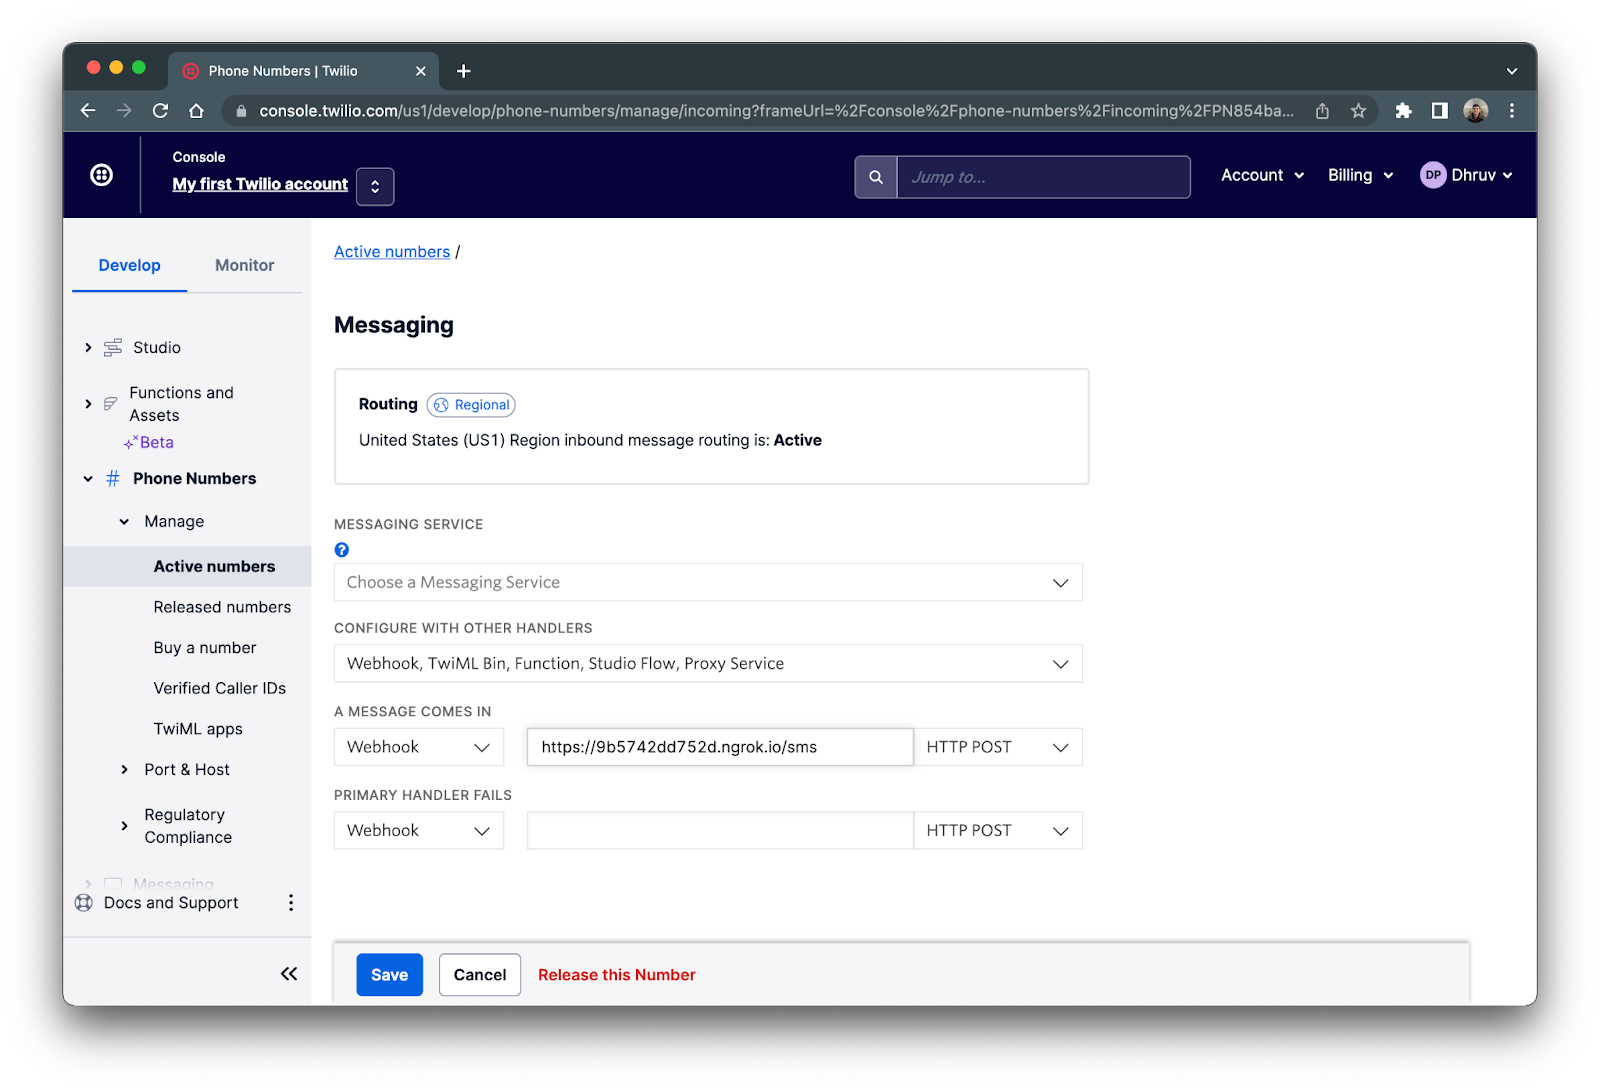
Once you’ve configured your Twilio number to your Express server, click the blue Save button.
Your twilio-sms bot is now finally ready to be used!
Testing
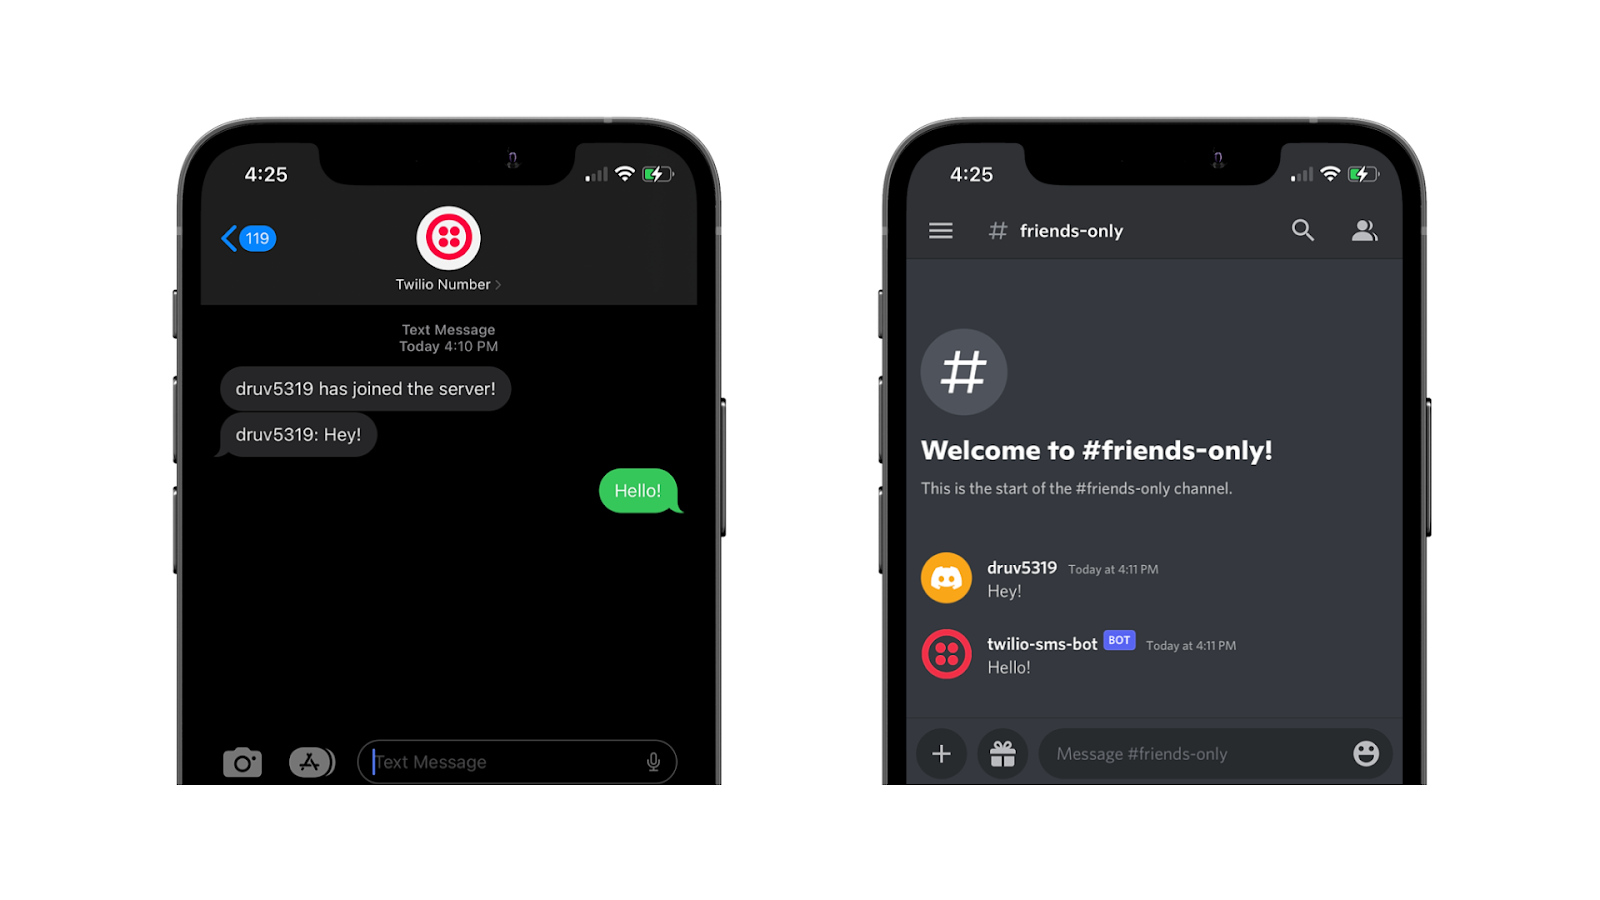
Now, try and test out two-way messaging to your Discord server. Text your Twilio number and see if it shows up on your server.


Looks like the message went through! Now try and send a message back in the two-way messaging channel with another account (since messages from your own account don’t get sent to your number) to see if you get a SMS message.
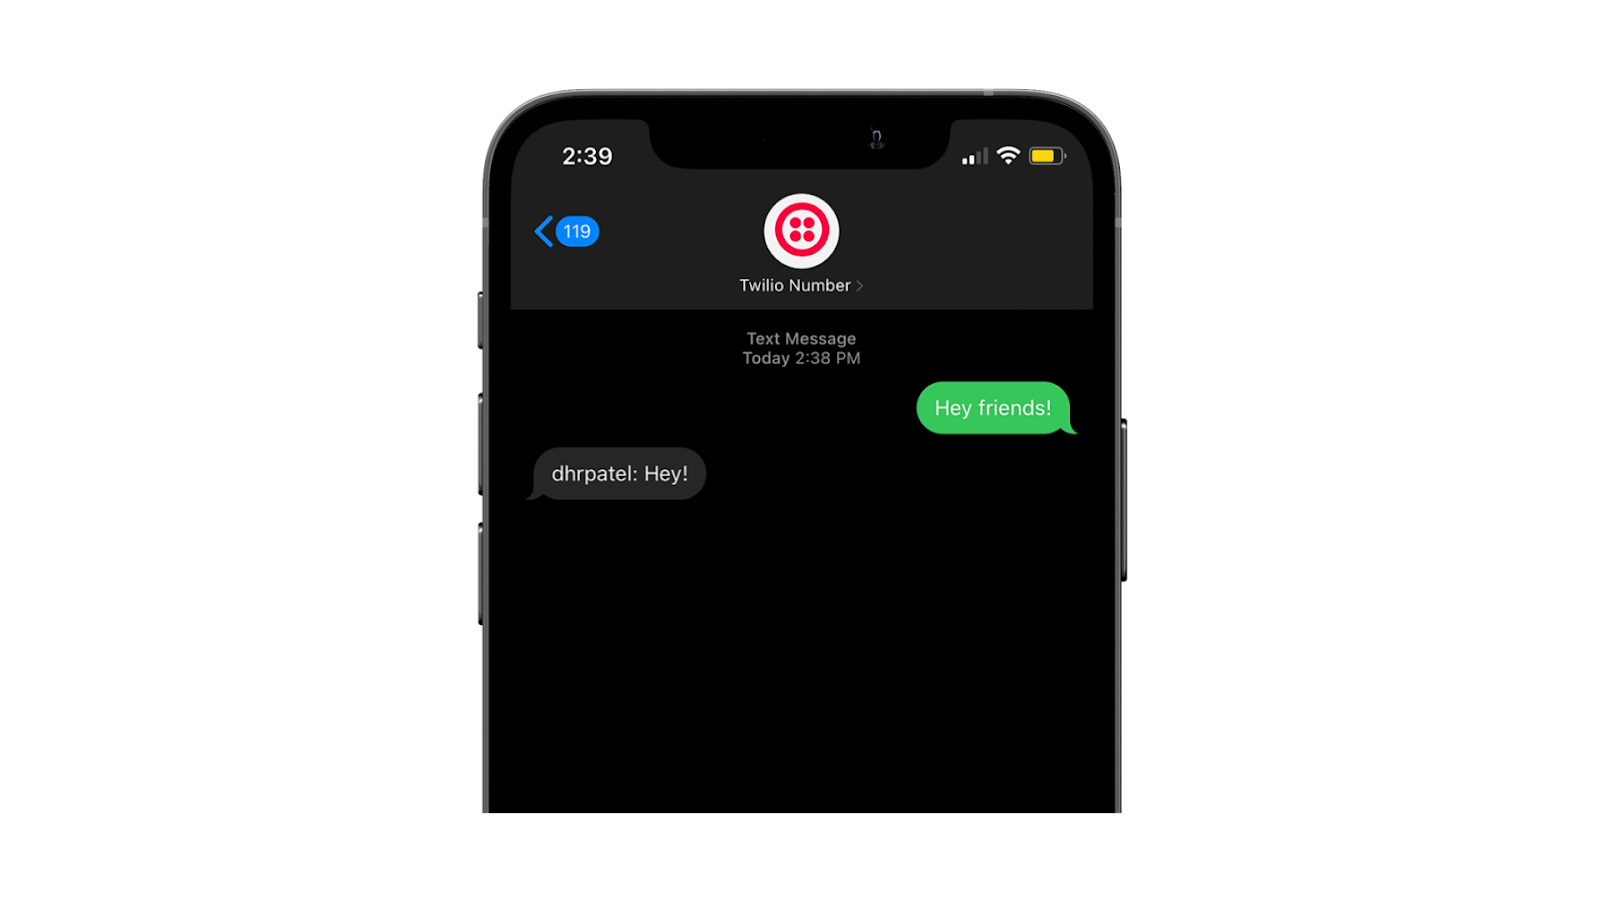
Awesome, it went through!
Conclusion
There you have it, you just built a Discord bot that can send and receive messages and important notifications to your phone number using Twilio Programmable SMS.
Looking to explore more on how you can use Discord bots to your advantage? Check out the following Twilio blogs:
Dhruv Patel is a Developer on Twilio’s Developer Voices team. You can find Dhruv working in a coffee shop with a glass of cold brew or he can either be reached at dhrpatel [at] twilio.com or LinkedIn.


Related Resources
Twilio Docs
From APIs to SDKs to sample apps
API reference documentation, SDKs, helper libraries, quickstarts, and tutorials for your language and platform.
Resource Center
The latest ebooks, industry reports, and webinars
Learn from customer engagement experts to improve your own communication.
Ahoy
Twilio's developer community hub
Best practices, code samples, and inspiration to build communications and digital engagement experiences.