Build a Song Identifier Phone Service with Twilio Voice and JavaScript
Time to read:
September 08, 2022
Written by
Reviewed by

We’ve all had moments where we’ve listened to a song, but just couldn’t remember the name of it or it was on the tip of our tongues. In times like these, Shazam is the way to go; open up the app, have it listen to some audio and it’ll immediately output the song title and artist.
When Shazam first launched, it was initially a phone service only in the UK where you dialed “2580” to identify a song. Once you called the number, you would hold your phone near the audio and it would then hang up after 30 seconds while sending you an SMS of the song title and artist.
After finding out about their “2580” service, the inner engineer in me came out. I was curious to see how this can be built with Twilio Programmable Voice and SMS so I challenged myself to create a clone of the service – with a few improvements!
For this tutorial, you will learn how to create a phone service to identify song’s using Twilio Programmable Voice and SMS using Node.js. The API that will be used to identify songs is the Shazam API by API Dojo.
Prerequisites
To follow this tutorial you need the following components:
- A free Twilio account - Sign up here
- A RapidAPI account
- A Twilio phone number
- Node.js installation
- ngrok installation
Overview
Before I dive into the tutorial, let me show you how the service will work.
The Twilio number that will be used for the service will route all incoming calls (through an HTTP request) to a Node.js application which will use Twilio's Markup Language (TwiML) to instruct and process the calls. TwiML provides a set of simple verbs and nouns which is used to tell Twilio what to do with your calls.
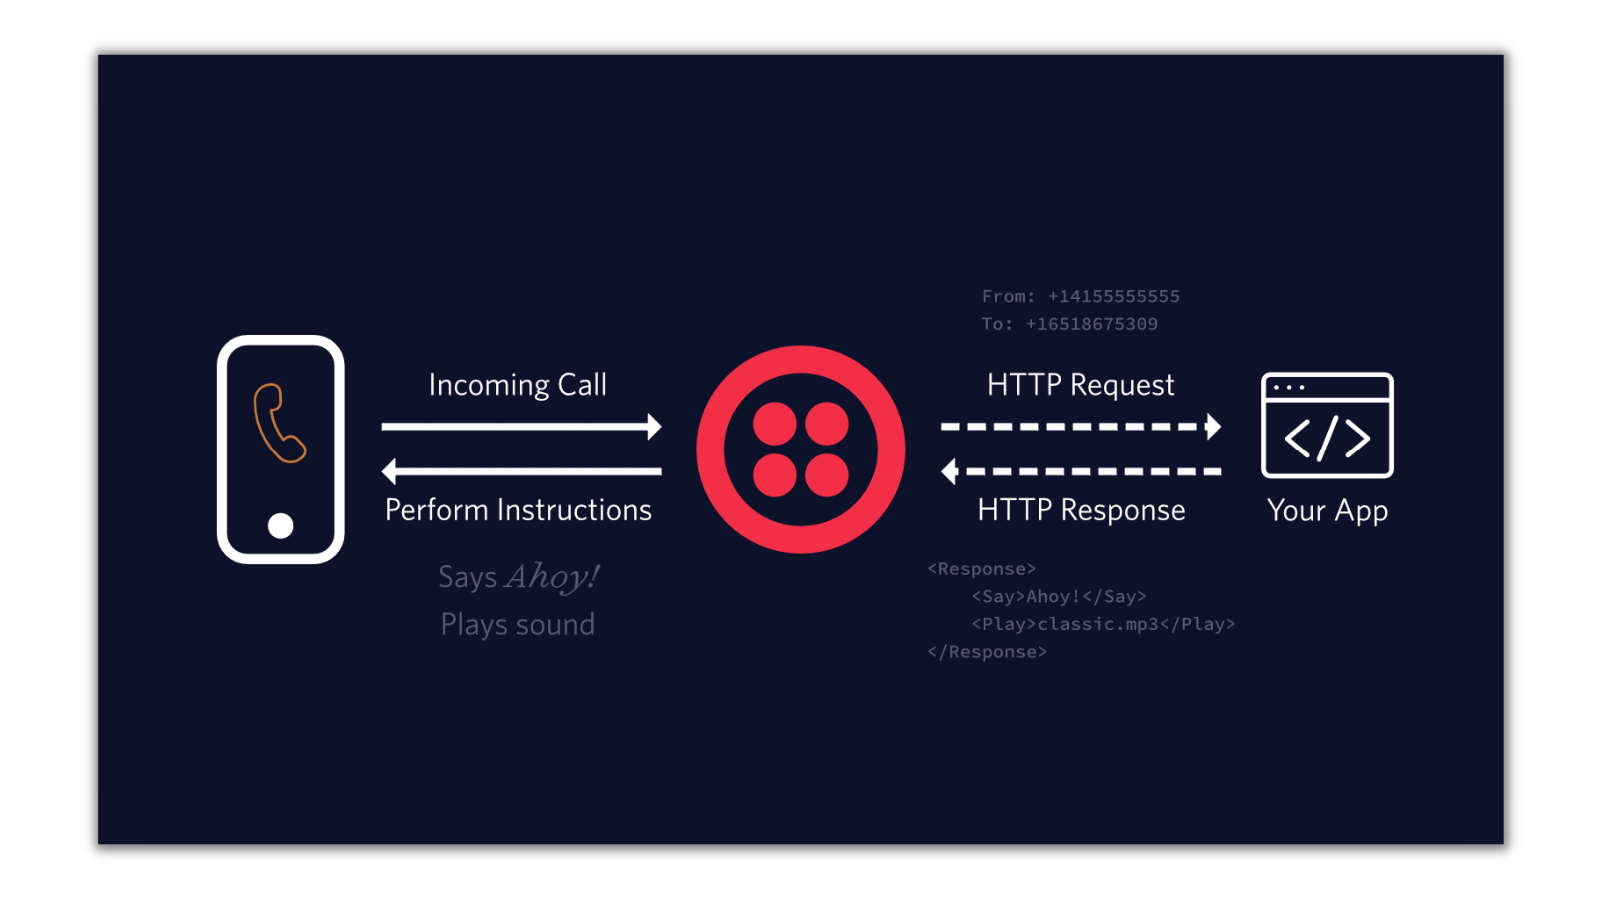
The first verb that will be used for an incoming call is <Record> which will record an incoming call for 5 seconds and then return a URL of a file containing the audio recording. This URL will then be passed to a function which will attempt to identify the song from the audio file.
The audio file will be downloaded and be properly formatted for the (unofficial) Shazam API. The audio file from Twilio will be a WAV file and the API requires it to be raw data sampled at 44100 Hz so a third-party package will be used to properly convert the file. The raw data will then be sent to the API as an Base64 encoded string from an array of bytes.
The Shazam API will then attempt to identify the song from the Base64 string and return the song info (song name, artist, album, cover art and more) if it was successful. The <Hangup> verb will hang up the phone call and the application will then send an SMS of the song info to the caller.
If the song was not detected, the <Redirect> verb will redirect the call back to the first function where the <Record> verb is used and will attempt to identify the next 5 seconds of the song. This cycle will repeat until the song is identified.
Now that you’ve gone over how the phone service will work, you can begin building it!
Setup your app
Create your project structure
Start off by building the scaffolding for the project in your preferred directory. Inside your terminal or command prompt, navigate to your preferred directory and run the following commands:
Install dependencies
The next step is to initiate a brand new Node.js project and to install the dependencies required for this project:
You will need:
- The
twiliopackage to use the Twilio Programmable Voice and SMS API’s to receive phone calls and send text messages dotenvto access environment variables, which is where you will store your Twilio credentials and RapidAPI key needed to interact with both API’s.- The
expresspackage to build your server: this is where you will write the code to capture and record all incoming phone calls. - For the Shazam API, you will need the
wavefilepackage to modify the sound data of the recording to the format the API requires; the API requires the sound data to be 44100Hz. - Lastly, the
axiospackage to send out requests to the Shazam API.
Next, open up your project directory with your preferred text editor and create two new files: index.js, and .env:
The index.js file is where you will code your phone service and the .env file will hold your Rapid API key and Twilio credentials.
Secure environment variables
Open up the .env file and place the following lines into the file:
You’ll need to replace the XXXXXXXXXX placeholders with their respective values.
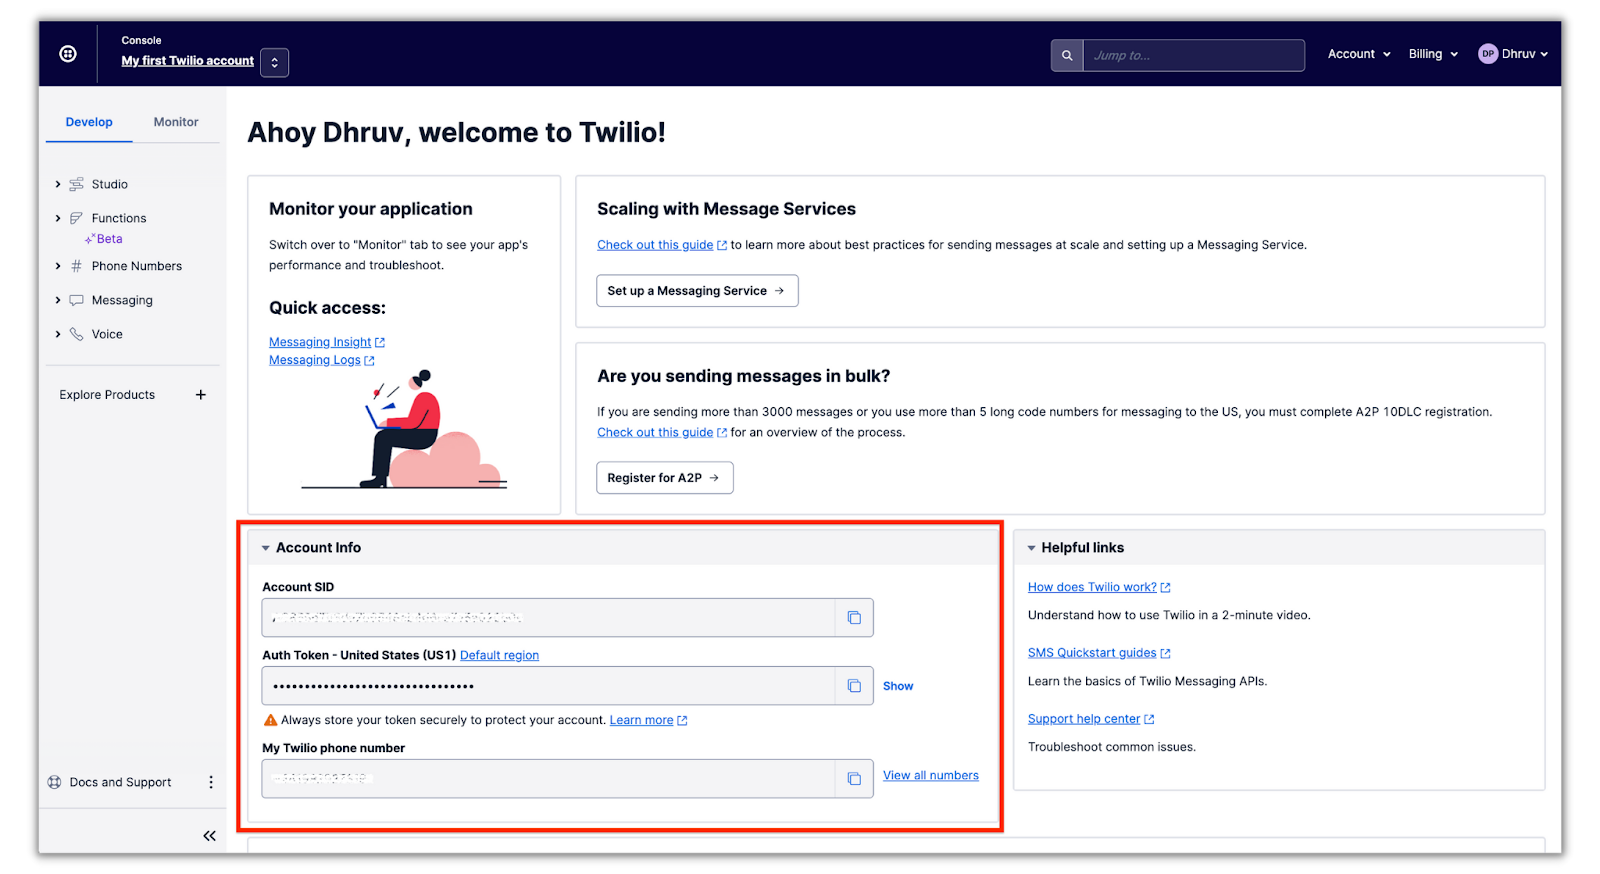
To get your Twilio number, Account SID, and Auth Token, log in to the Twilio Console and it will be on your dashboard:
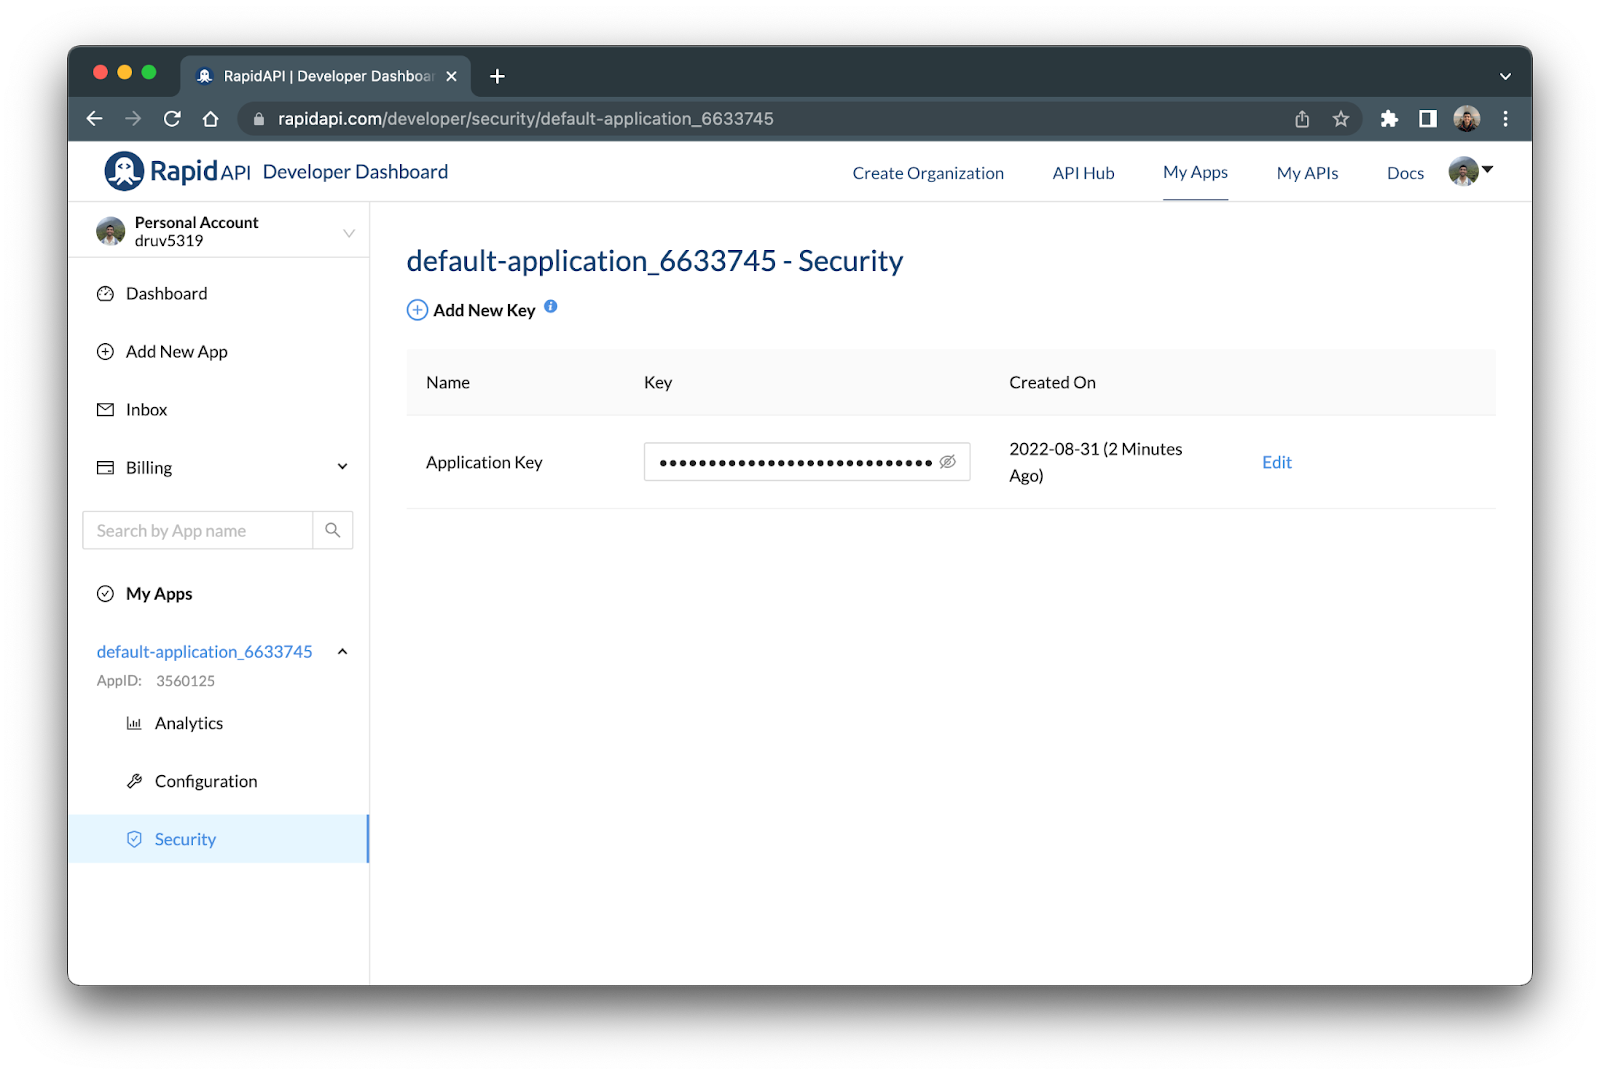
To get your RapidAPI key, sign in and head to the Developer Dashboard. Then, navigate to your default application (which should be automatically created for you) beneath the My Apps dropdown on the left tab. Your RapidAPI key should be shown and listed as the Application Key:
Once you’ve replaced all of the XXXXXXXXXX placeholders with their respective values, the next step is to build the phone service.
Create the phone service
In this section, you’ll code out the phone service in the index.js file where you’ll create two routes: /record and /identify.
The /record route will capture an incoming call, record a 5 second snippet of the call and then pass the URL of the file containing the recording to the /identify route. The /identify route will be the function that reformats the audio file and identifies it with the Shazam API.
Open up the index.js file and place the following code in the file:
This code will initialize the dotenv, twilio, wavefile, express, and axios packages you installed earlier.
Record the phone call
Below the initialized packages, copy and paste in the following code:
This code implements the /record route which will be called whenever a POST request is made to the endpoint on your server. This request will be made whenever a phone call is received from your Twilio number.
This code above creates a variable called twiml with TwiML’s Voice Response object. After creating this variable, TwiML is used to instruct Twilio to record the phone call through the <Record> verb. The maxLength attribute tells Twilio to record the call for 5 seconds and the action attribute tells Twilio to redirect the phone call to the /identify route after it’s recorded
The instructions are then sent back to Twilio through the HTTP response.
Identify the song from the recording
Below the /record route you just implemented, copy and paste in the following code:
The URL of the file containing the recording is passed in the body of the request sent to the /identify and is stored in the req.body.RecordingUrl variable. axios is then used to send out an HTTP GET request to grab the file.
The file is then resampled at 44,100 Hz and then converted to raw data which is then converted to a Base 64 string. This string (base64String) is then passed into the fetchTrack() function to identify the song using the Shazam API.
If the song was identified, the track will be returned and the sendSMS() function will be used to send the song info to the caller. If the song was not identified, the <Redirect> verb will be called to redirect the call back to /record to identify the next 5 seconds of the song.
Helper functions
Below the /identify route, place the the fetchTrack() function:
This function (used in the /identify route) will send out a POST request to the /songs/v2/detect endpoint of the Shazam API. The body of this request will contain the sampled raw data of the audio recording located within the base64String variable. If the API returns a match of the song, it will return the info of that song.
Next, append the final code chunk to the index.js file:
This code chunk includes the sendSMS() function (used in the /identify route) and takes in a song track from the Shazam API. The SMS will contain the song name, artist, cover art, and the Shazam URL of the song which will be sent to the caller.
The last bit of the code chunk will spin up the Express server and listen for requests on port 3000.
Deploy the phone service
In a production environment, it's recommended to run your Node.js application on a cloud server. However, to simplify the deployment for this tutorial, you'll be deploying your app on your own computer.
ngrok will then be used to connect your Express server to the internet by generating a public URL that will tunnel all requests directly to your computer. This public URL will be configured to your Twilio number on your Twilio Console so that all phone calls will be routed to your application.
Navigate back to your terminal run the following command:
This command will run the index.js file which will spin up a local Express server on port 3000 of your computer.
Open a new tab in the terminal, navigate to your project directory, and run the following command:
Your terminal will then look like the following:
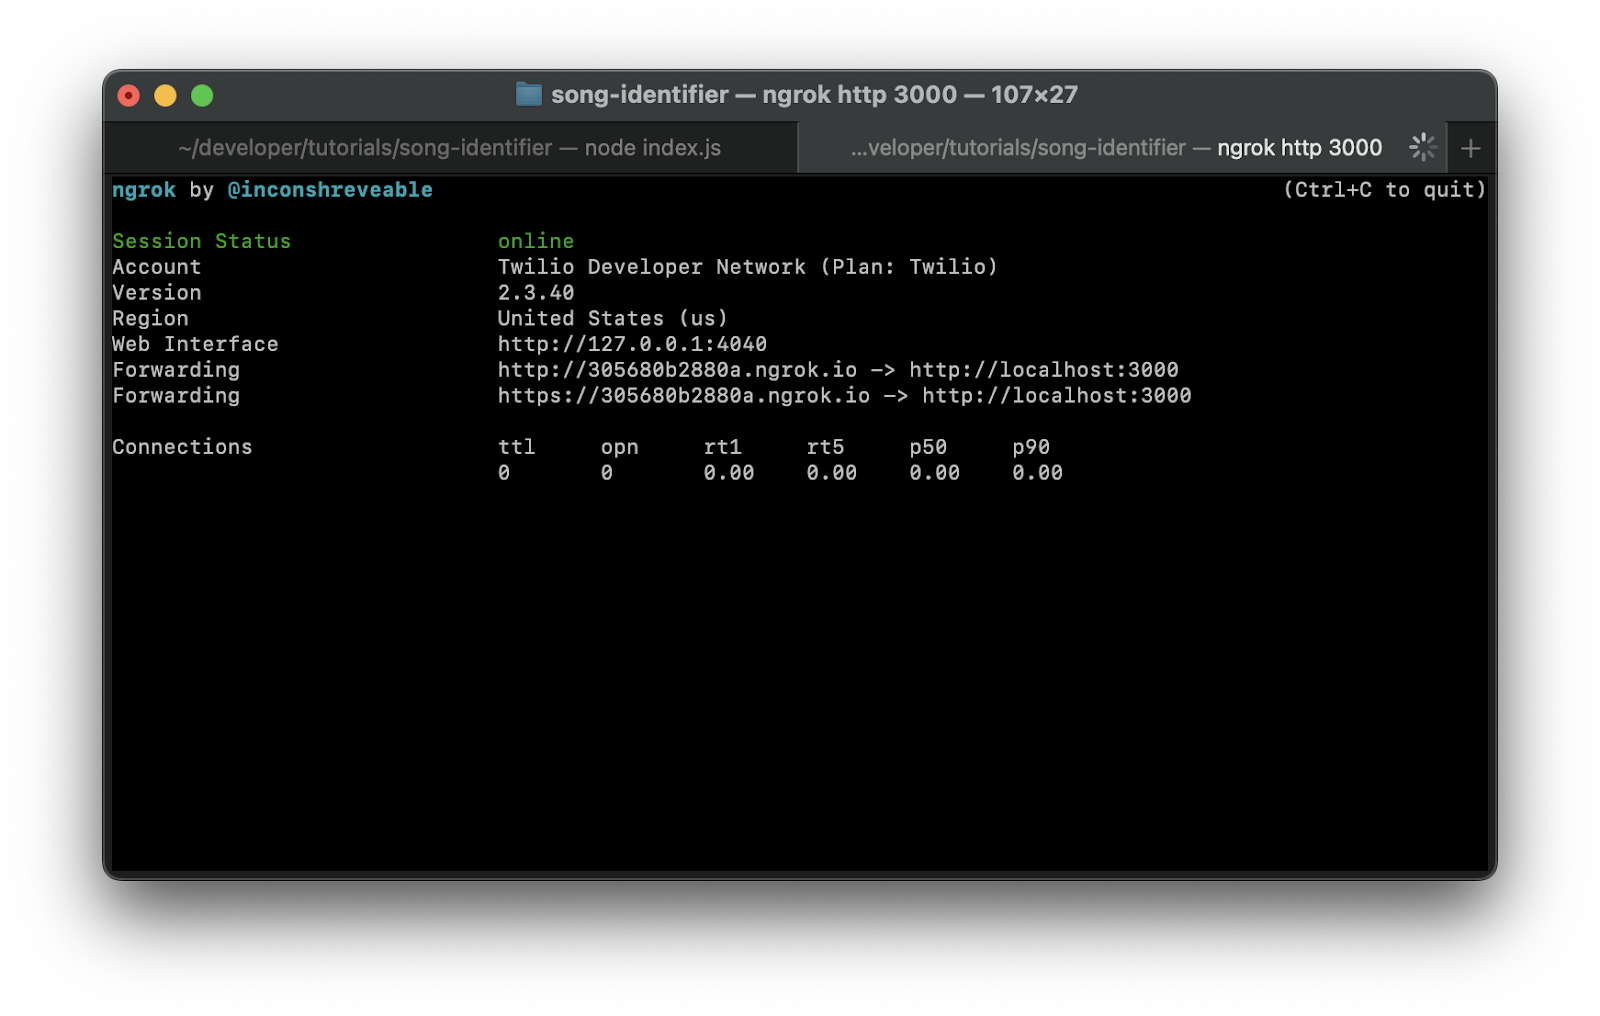
You’ll see that ngrok has generated two Forwarding URLs to your local server on port 3000 (in some cases only one URL may be shown). Copy either of the URLs – the https URL is recommended as it’s encrypted – as one will be needed to be plugged into the messaging settings of your Twilio number.
Navigate to the Active Numbers section of your Twilio Console. You can head there by clicking Phone Numbers > Manage > Active numbers from the left tab on your Console.
Now, click on the Twilio number you’d like to use for your phone service and scroll down to the Voice & Fax section. Beneath A CALL COMES IN, select Webhook for the first dropdown and then within the next textbox, enter your forwarding URL followed by "/record" (see below how the URL should look like).
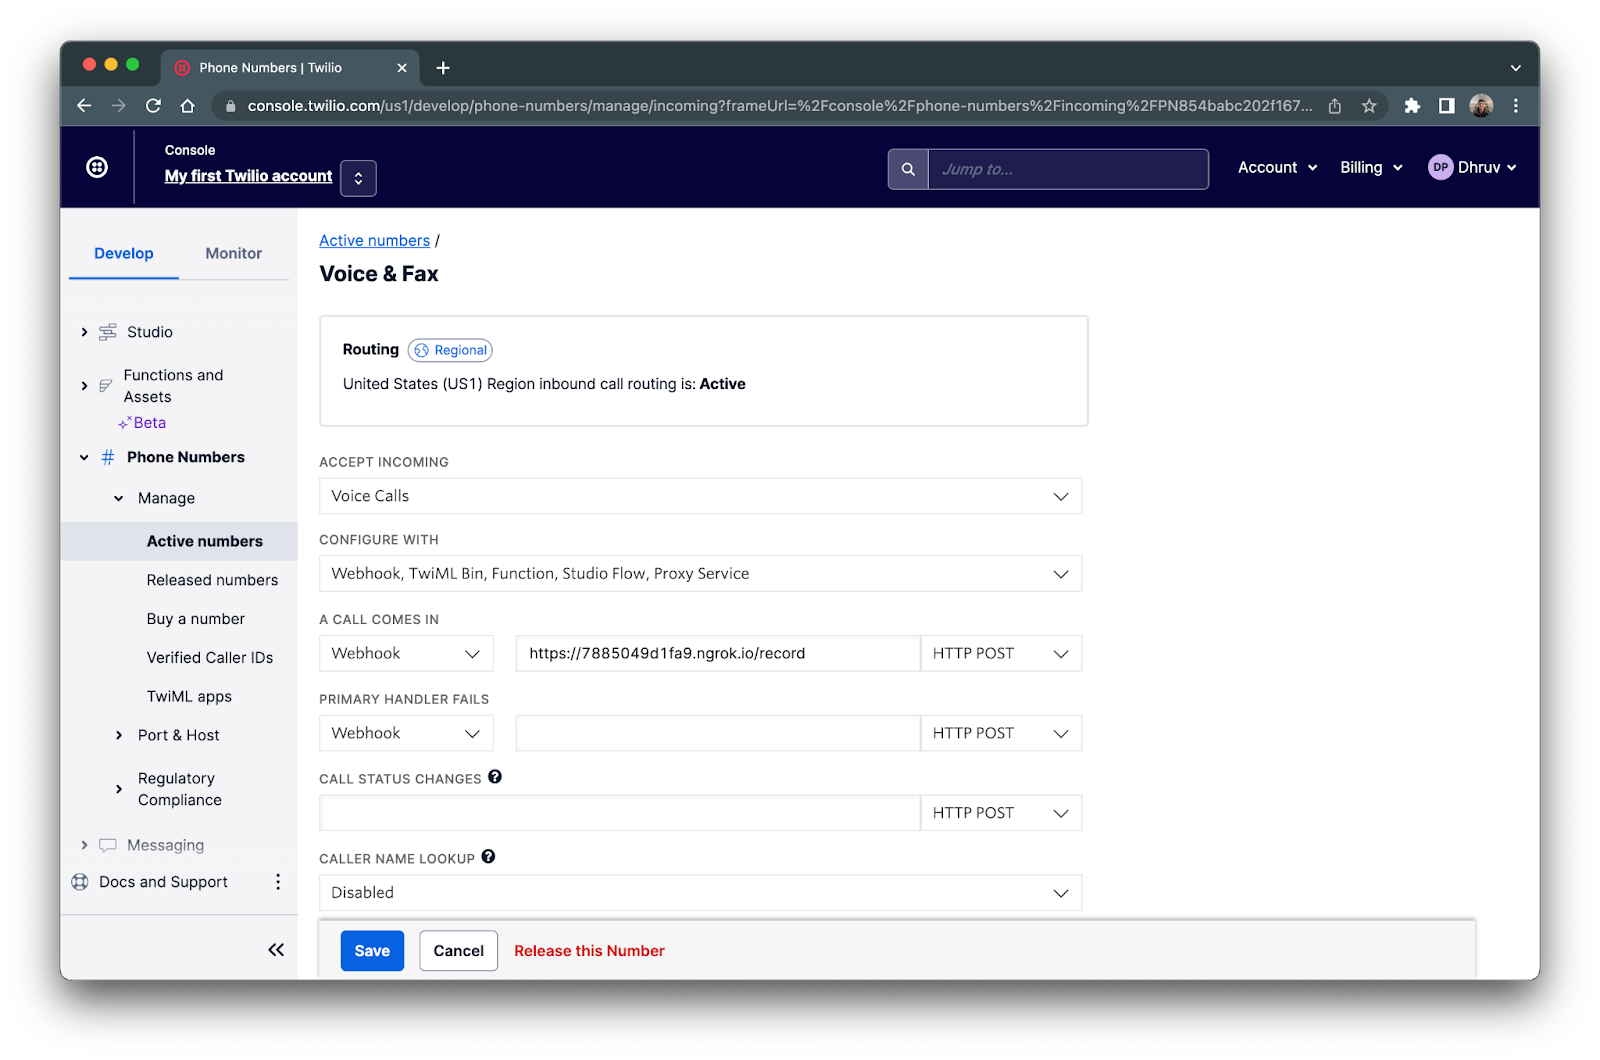
Once you’ve configured your Twilio number to refer to your Express server, click the blue Save button.
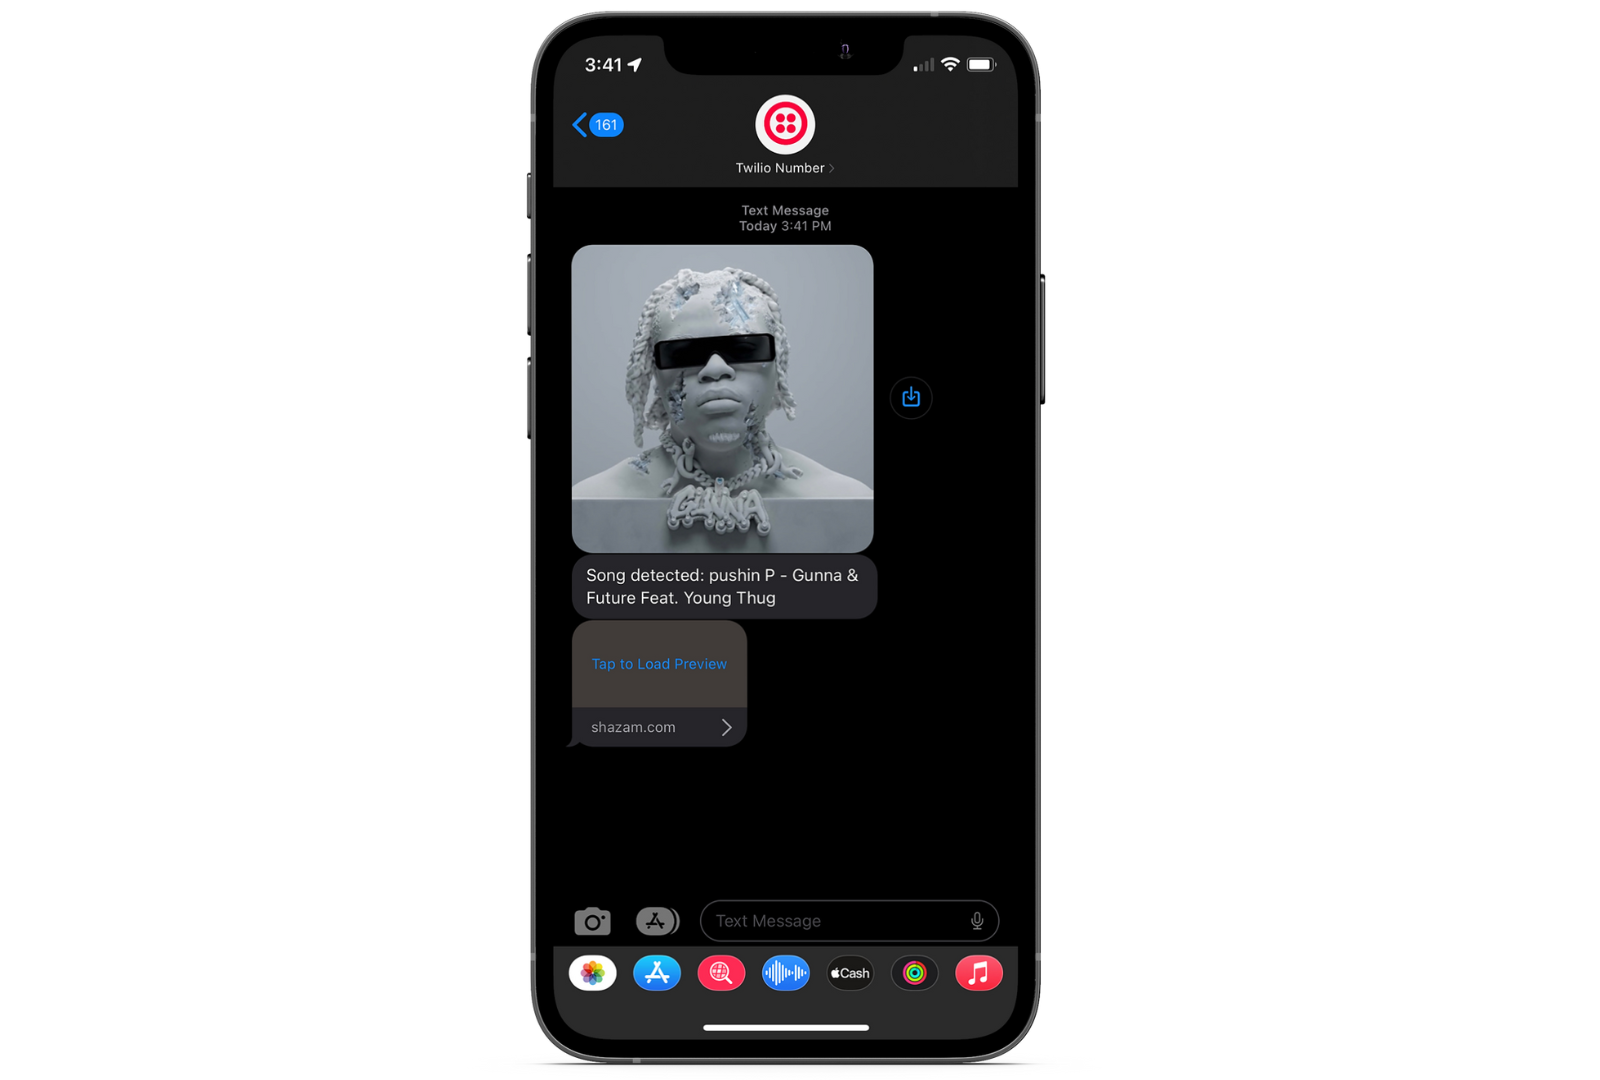
Once saved, your song identifier phone service is ready to be used! Start a song playing, then call your Twilio number and hold your phone near the speaker. Once the call hangs up, you’ll get an SMS response that looks something like this:
Further Improvements
Not only does this phone service replicate Shazam’s “2580” service, it also has a few upgrades. The phone call records the audio in 5 second increments and hangs up once a song is detected from one of those recordings, rather than just recording for 30 seconds and then hanging up. This service also outputs the cover art and Shazam link of the song rather than just the song title and name.
Although this phone service is a great start, there is still room for improvements. The telephony standard for audio transmission is fixed at 8-bit PCM with a sampling rate of 8000hz. The quality of this audio is very poor compared to using a voice recording from a voice memo app so in many cases the song will be poorly transmitted and not detected.
To improve the audio quality, the phone service can be converted to a WhatsApp service using the WhatsApp Business API with Twilio since voice memos can be recorded through WhatsApp. This voice memo can then be sent to your Twilio number on WhatsApp where it can be read by your Node.js app.
Another improvement is to remove the polling request to the recording URL when the recording is not ready. The request can actually fail for other reasons and infinitely loop which is not good.
To fix this, all calls can be cached with the recording URL and the status of it. The /record route can be modified so once it’s done recording it will keep on routing to itself by setting the action to blank. The recordingStatusCallback can be used to update the status in the cache so once the recording is processed, the action can then be changed to the /identify route.
Conclusion
Congrats! You just built a Shazam-like phone service all through Twilio! 🎉
Even though it’s much easier to just download and use the Shazam app, there’s really no fun in that with Twilio by your side. I hope you had some fun with this tutorial and learned a few things along the way!
If you’re looking to explore more interesting projects that use Twilio Programmable Voice, take a look at these tutorials:
- How to Send Voice-to-SMS Transcripts Using Twilio Voice and Programmable SMS
- How to Escape Pesky Situations using Twilio Functions and TwiML Bins
- How to Call an AI Friend using GPT-3 with Twilio Voice and Functions
Happy Building!
Dhruv Patel is a Developer on Twilio’s Developer Voices team. You can find Dhruv working in a coffee shop with a glass of cold brew or he can either be reached at dhrpatel [at] twilio.com or LinkedIn.


Related Resources
Twilio Docs
From APIs to SDKs to sample apps
API reference documentation, SDKs, helper libraries, quickstarts, and tutorials for your language and platform.
Resource Center
The latest ebooks, industry reports, and webinars
Learn from customer engagement experts to improve your own communication.
Ahoy
Twilio's developer community hub
Best practices, code samples, and inspiration to build communications and digital engagement experiences.