How to Send Voice-to-SMS Transcripts Using Twilio Voice and Programmable SMS
Time to read:
July 30, 2021
Written by
Reviewed by

Introduction
SMS and audio transcripts can be a great way to perpetuate communication without needing to pick up the phone unexpectedly. Twilio streamlines this process through the Voice API using Twilio’s Markup Language, TwiML, which processes incoming calls accordingly.
TwiML offers the <Record> verb, which records the caller's voice and can automatically generate text transcriptions sent right to your phone. For those that are always on the go or can’t be bothered to check their voicemail inbox, you’ll never miss a message again. In this tutorial, you will learn how to leverage Twilio’s Voice API and Programmable SMS to transcribe voice calls into text messages.
Prerequisites
- Node.js
- A free Twilio account (sign up for free using this link and receive $10 in credit when you upgrade your account!)
- A Twilio phone number
- A smartphone to test out your app
- The Twilio CLI
Project setup
In this section, you are going to set up a new Node.js application. To keep things organized, create a folder called voice-to-sms to store all of your application files. In your terminal or command prompt, navigate to your preferred directory and enter:
This command will create your project file and scaffold out your Node project by creating a package.json file that will contain your project's metadata and package dependencies.
Install dependencies
Your next step is to install all the dependencies needed for your project. You will need:
- Express to route and handle incoming requests
- Twilio’s Node Helper Library to interact with the Twilio API for receiving calls and sending SMS
- Dotenv to store and access environment variables
To install these dependencies, navigate back to your terminal and enter the following command:
Now that you have your dependencies installed, you will need to import and initialize them. Before you do that, create a new file called index.js in your current directory with the following command:
Now open up the index.js file using your preferred IDE and place the following code in the file:
This code will import and initialize the packages you previously installed. app.use(express.urlencoded({ extended: true })); is a middleware that is used to process and parse incoming request objects as strings to your application.
Environmental variables and Twilio account credentials
dotenv is used to access environment variables, which is where you will store the Twilio credentials needed to interact with the API. Navigate back to your terminal and create the .env file with the following command:
To connect to Twilio's API, you will need your Account SID, Auth Token, and your Twilio phone number. These values can be securely stored in the .env file. Open up your .env file and paste the following into the file:
Once copied, replace the XXXXXX placeholders with your actual account credentials which can be found in your Twilio Console. When entering your Twilio phone number, ensure it is in E.164 format.
Now that you have your environmental variables set up, you can import and initialize Twilio’s Node Library with your account credentials that have been loaded into the .env file. Return to index.js and place the following code right below where you initialized the rest of your packages:
The next step is to start coding out your app!
Create Express routes
You will need to create a way to handle and respond to incoming calls. Express will allow you to create routes to handle these requests.
The way your app will be set up is that once a call is received to your Twilio number, it will first route to the /transcribe endpoint. This endpoint will then process and transcribe the call, then send a callback with the transcription to the /sms endpoint, which will then send the transcription to your personal phone number.
Place the following scaffolding code in your index.js file:
/transcribe route
The /transcribe route will be called whenever a POST request is made to the endpoint on your server. Whenever your Twilio number receives a phone call, this code will attempt to transcribe the voice message left by the user. Insert the highlighted code below into your /transcribe route:
This code above creates a variable called twiml with TwiML’s Voice Response object. TwiML tells Twilio how to handle an incoming call or SMS. After creating this variable, TwiML will respond to the caller by saying, “Hello. Please leave a message after the beep.”
TwiML will then use the <Record> verb to create an audio recording of the caller's response and will end whenever the caller hangs up or when the recording reaches 120 seconds. TwiML’s verbs can also be modified with various attributes.
In this code, the transcribeCallback attribute is being used and will tell the <Record> verb to transcribe the audio recording and execute a callback of the text transcription (through a POST request) to the /sms route. If the audio recording is missing or absent, TwiML will not make the POST request to the given transcribeCallback URL.
Once the recording is finished, the code will tell TwiML to hang up the call and the /sms route should receive the callback once the text transcription is generated.
Before we continue, it’s important to mention that recording phone calls or voice messages has a variety of legal considerations and you must ensure that you’re adhering to local, state, and federal laws when recording anything.
/sms route
If and once the audio recording has been transcribed, it will then be sent to the /sms endpoint, which will send the text transcript as an SMS to your personal phone number. Insert the highlighted code below into your /sms route:
Replace <YOUR_PHONE_NUMBER> with your personal phone number and ensure it is in E.164 format.
In the code above, the transcribed audio recording and the phone number it was received from are parsed from the POST request body. The code then uses the twilio object that was initialized earlier to create and send an SMS message to your personal number. The message contains the text transcription and the phone number it was received from.
Now that your app is completed, save and close your index.js file.
Test your app
Finally, it's time to test out your app! Open your terminal, navigate to your project directory, and run the following command:
You should see a log statement in your terminal that says Express server listening on port 3000.
Now that your app is running on your local server (localhost:3000), you’ll need to tell Twilio where to send the POST requests from your Twilio number.
Configure the webhook with ngrok
Since your local server is only running inside your computer, Twilio cannot connect to it since it does not have access to the internet. To solve this, you’ll need to create an ngrok tunnel that will spin up a forwarding URL connecting the internet to localhost:3000. Open up a second terminal window and log in to the Twilio CLI:
This command will then prompt you for your Twilio Account SID and your Auth Token. Once logged in, use the following command to create a webhook, taking care to replace the placeholder with your actual Twilio phone number:
This command will spin up a tunnel that allows you to receive requests from the internet and send them to your server. Normally, in a production app, you would set up a webhook on a dedicated server that's hosted online, but for testing purposes here, you will use a local server. You may receive a warning that your computer will be exposed to the internet, if so, proceed. You should receive a response that looks like this:

Copy the Voice URL and navigate to the Twilio phone numbers section of the Twilio Console. Click on the Twilio number you have been using for this project and scroll down to the Voice & Fax section. Within the A CALL COMES IN section, you may see your forwarding URL that was generated, if not, paste the URL you just copied and ensure HTTP POST is selected in the dropdown to the right. Your Voice & Fax section should look this, but with your forwarding URL:
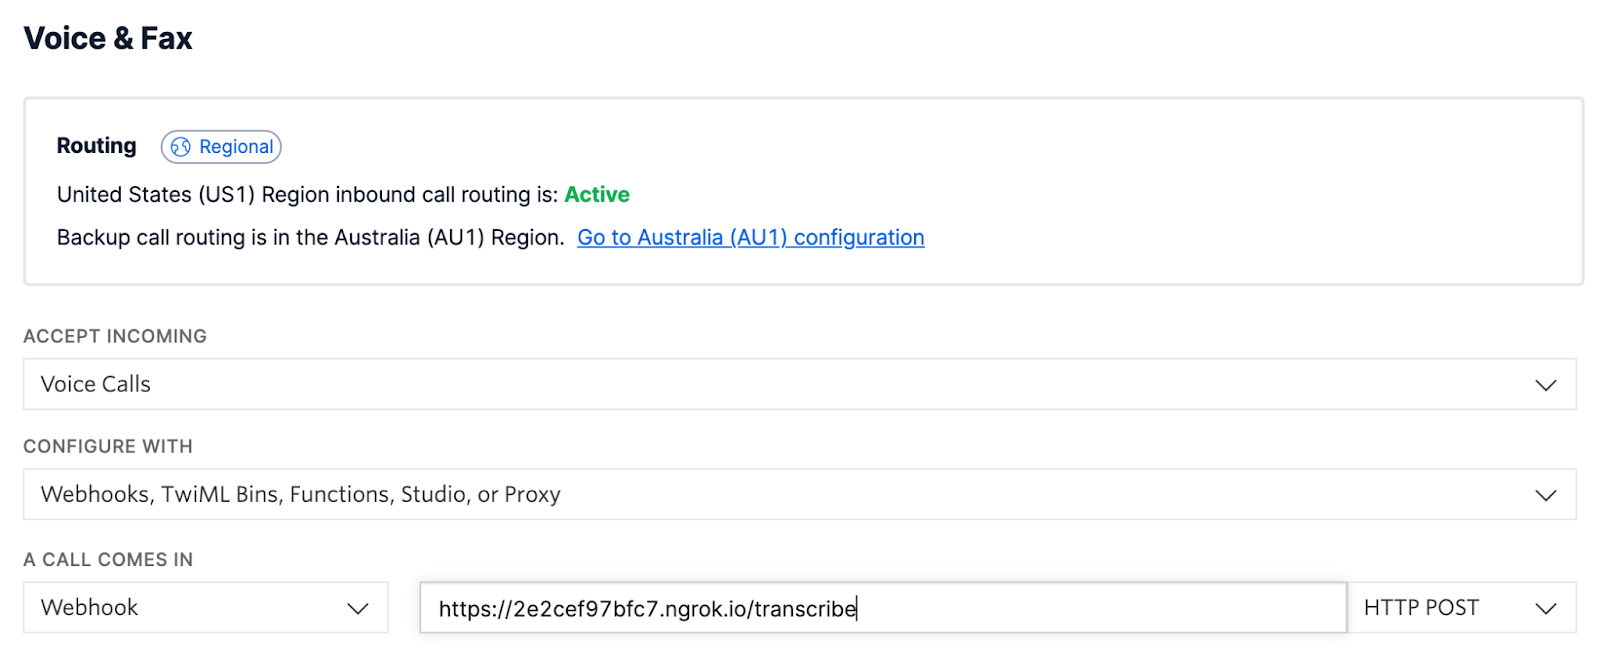
After making the changes, click the Save button.
Place a voice message to your Twilio number
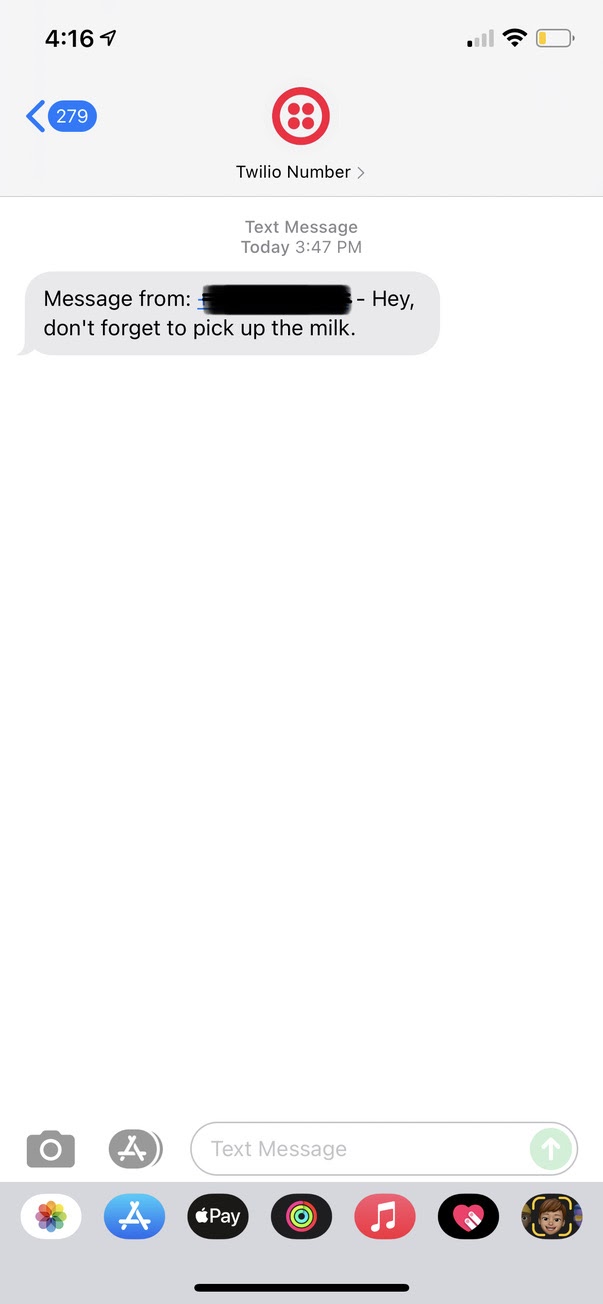
Now that your app is up and running, it's finally ready to be tested! Call your Twilio number, leave a message, and then hang up. Wait a few seconds for your voice message to be transcribed, and then you should receive an SMS to your phone number of the transcribed message as well as who sent the message!
It should look something like this:
What's next for voice-to-sms transcription
When a voice call is out of reach or you just prefer a text, the Twilio Voice API makes sure you stay connected. With this tutorial now in your Twilio toolbox, you can send transcriptions of your incoming calls right into your text messages. To keep up the functionality of this program, you can set up call forwarding to your Twilio number from your personal number. You can even use Twilio Functions to set up your serverless app without the need for running the Express server.
Happy Building!
Dhruv Patel is an Intern Developer on Twilio’s Developer Voices team. You can find Dhruv working in a coffee shop with a glass of cold brew or he can either be reached at dhrpatel [at] twilio.com

Related Resources
Twilio Docs
From APIs to SDKs to sample apps
API reference documentation, SDKs, helper libraries, quickstarts, and tutorials for your language and platform.
Resource Center
The latest ebooks, industry reports, and webinars
Learn from customer engagement experts to improve your own communication.
Ahoy
Twilio's developer community hub
Best practices, code samples, and inspiration to build communications and digital engagement experiences.