How to Escape Pesky Situations using Twilio Functions and TwiML Bins
Time to read:
August 20, 2021
Written by
Reviewed by

Have you ever needed an out in a sticky situation? Maybe it’s a bad date, an awkward run-in, or you simply just want to leave, we’ve all been there. Here’s a nifty solution you can build yourself! Whenever needed, you can use your Twilio number to bail you out with a faux phone call in a few steps.

In this tutorial, you will learn how to leverage Twilio Functions with TwiML Bins to set up a phone service that will call your personal phone number whenever you send an SMS message to your Twilio number. This phone service will utilize synthesized speech to act as your “friend”.
Prerequisites
- A Twilio account - Sign up for free using this link and receive $10 in credit when you upgrade your account!
- A Twilio phone number.
Using TwiML Bins
TwiML Bins are a serverless solution that allows you to provide Twilio-based instructions to your Twilio applications. They’re a useful way to prototype and explore Twilio’s capabilities without needing to set up your own web server to respond to requests.
TwiML Bins utilizes Twilio's Markup Language (TwiML), which is an XML based language that has a set of simple verbs and nouns that allows you tell Twilio what to do with incoming and outgoing calls, SMS and MMS messages.
For this project, you’ll be using and exploring TwiML’s <Say> verb. The <Say> verb is intended to be used with Twilio Programmable Voice and converts text to speech that is read back to the caller. It offers different attributes for voices, including different sets of languages, genders and also has support for Amazon Polly voices.
With Amazon Polly you can also use the <Say> verb to control the synthesized speech. Speech Synthesis Markup Language (SSML) is also supported by TwiML and can be used to control synthesized speech. For this project, you’ll also be focusing on the <prosody> tag which controls the volume, pitch and rate of the synthesized speech.
Create a new TwiML Bin
Start by creating a new TwiML Bin to store and control the speech that will help you make your escape.
Open up your Twilio Console and click on the (...) icon on the left tab to open up all of Twilio’s products and services. Scroll down and click on TwiML Bins under the RUNTIME section. Click on the blue (+) sign to create a new TwiML Bin.
Give your new TwiML Bin a friendly name such as “Best Friend”. The TwiML text box is where your script will be contained for the voice recording that you will hear when your “Best Friend” calls you.
Before you start writing to your TwiML Bin, let’s meet your new best friend Joanna. Joanna is one of the many voices you can use in Twilio’s Programmable Voice. Joanna is also an Amazon Polly Neural voice so Joanna will produce the most natural and human-like text-to-speech voice possible for you.
In the TwiML text box, replace the existing XML with the following:
These lines will have Joanna speak as if there is an emergency. To make the phone call realistic, the <Pause> verb is used to have Joanna wait after each of their prompts so that you’ll have time to respond back just like a normal conversation.
The TwiML above also uses the <prosody> verb which adjusts the pitch, volume and rate of the voice. To simulate a sense of urgency in the voice, the <prosody> verb is used to speed up Joanna’s voice.
Feel free to modify the above prompts in the TwiML to whatever you please. Once finished, click the Create button at the bottom of the page, and copy the TwiML Bin URL under the Properties section for later use.
Create a Twilio Function
For this project you will need to configure two webhooks to your Twilio phone number:
- one to handle incoming messages.
- one to make outgoing calls.
You will use Twilio Functions to create these webhooks, which offer a serverless way to build and run Twilio applications.
Click on the Functions tab on the left hand side of the Twilio Console. Once you’re on the Functions dashboard, click on Create Service and enter a service name such as "escape-call", and then click Next.
Configure the environment variables
Twilio Functions offers you to store environment variables like phone numbers, API keys and URLs rather than hardcoding them into your Functions code. Using Environment Variables ensures that your code is portable and that simple configuration changes can be made instantly.
Click on Environment Variables under Settings in your new Twilio Functions page. Here is where you will store your TwiML Bin URL and Twilio phone number.
Type TWIML_BIN_URL for the key and paste the TwiML Bin URL copied earlier as the value. Click Add. Add the Twilio phone number by setting TWILIO_NUMBER as the key and the Twilio phone number as the value. Click Add.
Your next step is to create two webhook functions: /sms and /voice.
Handle incoming SMS
The /sms function will handle all incoming SMS to your Twilio phone number (aka Joanna 😉). To make your Twilio application discreet, you’ll send a code phrase to Joanna whenever you need help getting out of a situation. Make sure you remember the code you’ve set for Joanna or may be left on read 😳.
Click on the blue Add + button and then click on Add Function. Rename your function to /sms.
In your function, replace the existing code with the following boilerplate code:
This code initializes and sets up Twilio's messaging client to read the incoming SMS. This incoming SMS is then divided into words and stored in the words array.
Let's have your code phrase be, “Hey Joanna”. Also, don't worry about your code phrase being code sensitive as the toLowerCase() function on line 3 will convert all letters in the SMS to lowercase letters. Right below line 3, copy and paste in the highlighted code:
The code above attempts to read the first two words and checks to see if they equal hey and joanna respectively. If it does not match, it will print Incorrect code phrase in the console and Joanna will not respond.
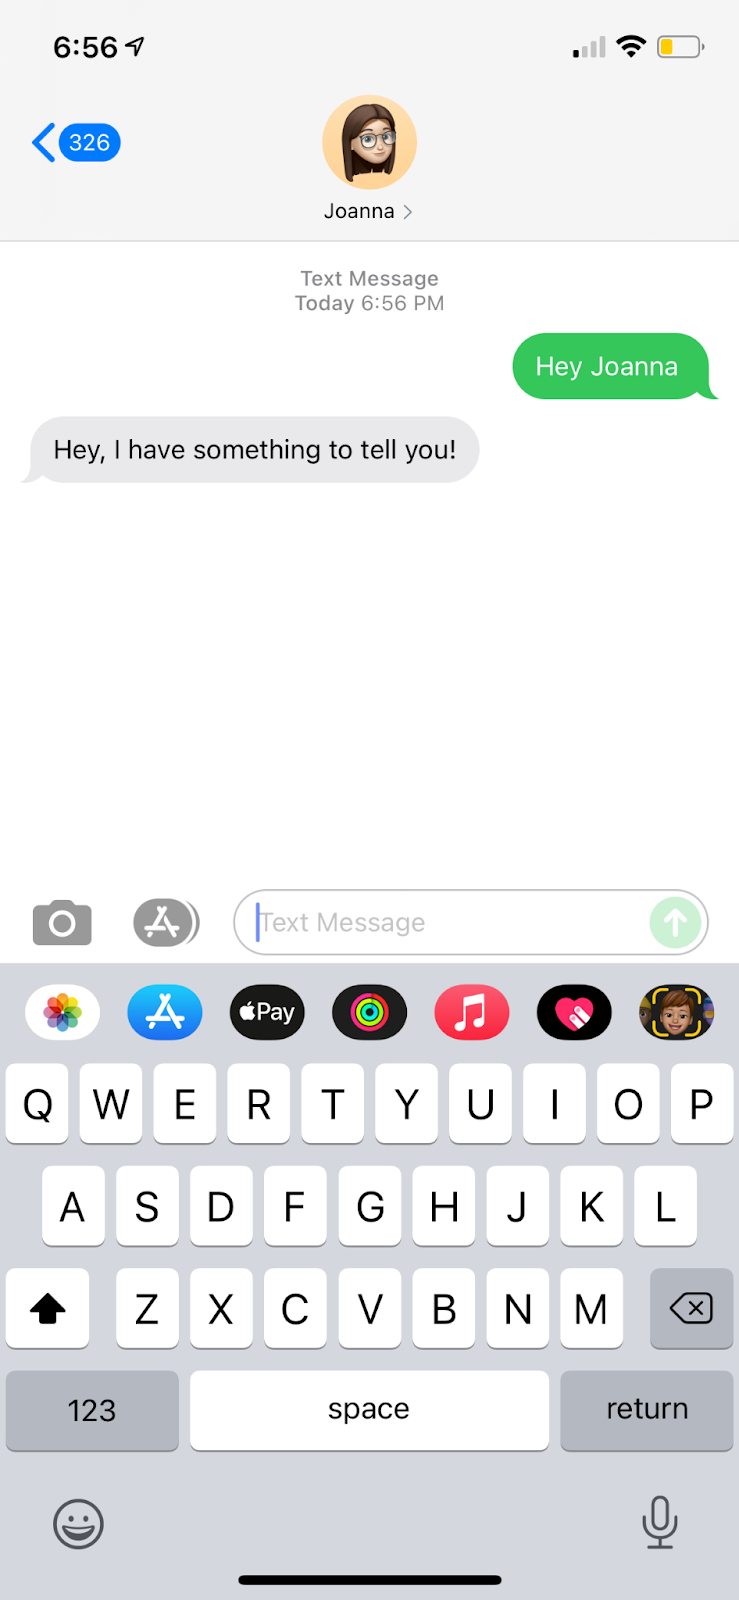
Otherwise, Joanna will respond back saying, “Hey, I have something to tell you!”. A request will be sent to the /voice function along with your personal phone number as a URL parameter.
Click Save beneath the functions code box.
Call a cell phone with Twilio phone number
The /voice function will be created to invoke a call from your Twilio phone number to your personal phone number using the TwiML Bin.
Click on the blue Add + button, then click on Add Function and then rename your function to /voice. In the function you just created, replace the existing code with the following:
This code initializes the Twilio client and sets up the necessary variables that were set up earlier to send out the escape call. The from variable signifies where the call should be coming from and the url variable represents the TwiML Bin URL. The to variable represents where the call should go to and is initialized through the request parameters sent by the /sms function.
This code also implements the call() function in the setTimeout(call, 10000); function and is executed after 10,000 milliseconds (10 seconds). The reason for this is so that you won't immediately get a call from Joanna as soon as you send the text.
Now within the call function enter the following highlighted lines:
The highlighted lines above use the Twilio client and the variables you initialized earlier to send out the call to your personal phone number. A confirmation should appear on the console upon success, otherwise you will receive an error in the console.
Once finished click Save beneath the functions code box. Now that you’re done with the code, click on the Deploy All button on the bottom left corner.
Configure the webhook
Before you test out your function, you will need to hook up your Functions service with your Twilio number.
Head over to the Active Numbers section of the Twilio console and click on your Twilio number. Scroll down to the Messaging section and under WHEN A MESSAGE COMES IN select Function. For SERVICE, select the Function service you just created which should be named escape-call. Then choose ui for ENVIRONMENT and lastly choose /sms for the FUNCTION PATH since this is where your webhook should route to first.
Your messaging configuration should look like the following image below:
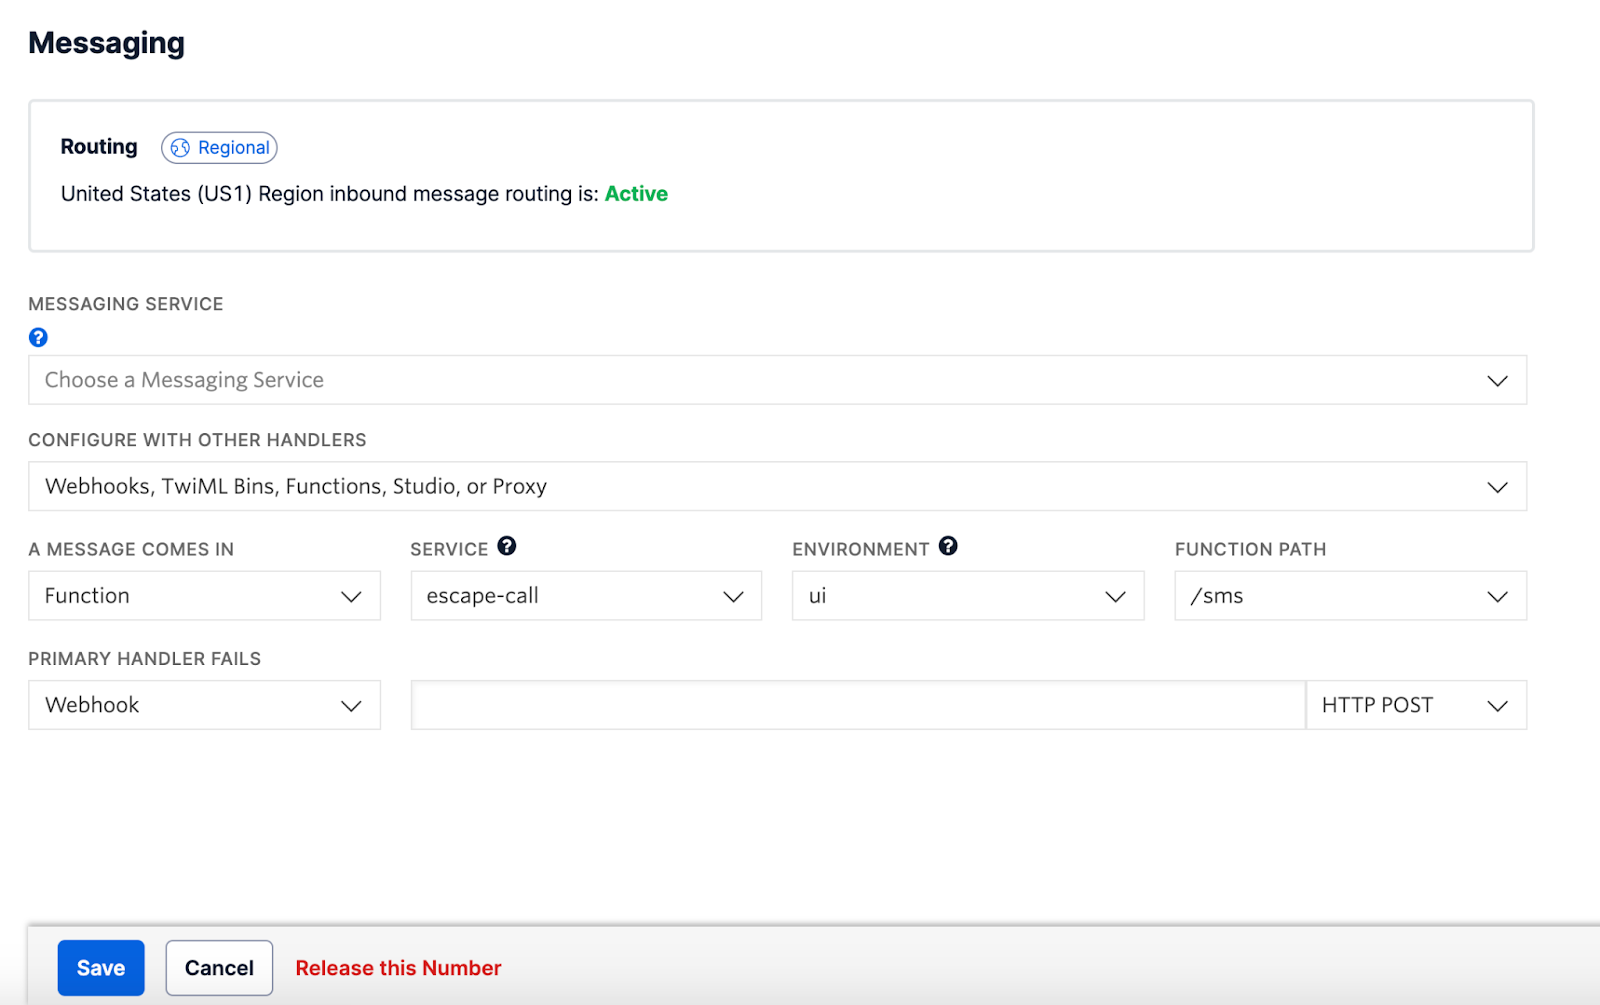
Click Save at the bottom and exit the console.
Test out the Twilio Function
Your escape call Function service is now finally ready to be used. Before you test it out, create Joanna as a contact on your phone and link your Twilio number to it. Now test your service out by sending Joanna your code phrase: Hey Joanna. You should receive a response that looks like this:
Now put your phone down and assume that you aren't expecting a phone call in about 10 seconds. You should receive an emergency phone call by Joanna and it should sound like this.
Now that the call is over, act as if you have an emergency and have to leave to help your friend! Taa-daa!! You’ve just got yourself out of an unwanted situation!
What's next for Twilio Functions and TwiML Bins?
Using Twilio Function and TwiML Bins allows you to explore the many opportunities of Twilio technology to your personal advantage. While it may seem like a minor inconvenience in the grand scheme of things, it can certainly be practical in your everyday life. Your new “best friend” Joanna will give you a call and it’s your job to make a seemingly swift exit.
There you have it, a sneaky but easy way out. Peace out to awkward situations!

Going forward, you can expand the app by adding more prompts. If you want to get a little more fun out of your code, you can even turn Joanna into an elusive prank caller. The world of Twilio is your oyster. Here are some other interesting projects you can explore:
- Send a Valentine's Day Gram with Twilio Functions
- Build a Fortune-Telling Bot for Lunar New Year with Twilio Functions
- Build a Pride Astrology SMS Bot with Twilio Studio and Functions
Happy Building!
Dhruv Patel is an Intern Developer on Twilio’s Developer Voices team. You can find Dhruv working in a coffee shop with a glass of cold brew or he can either be reached at dhrpatel [at] twilio.com


Related Resources
Twilio Docs
From APIs to SDKs to sample apps
API reference documentation, SDKs, helper libraries, quickstarts, and tutorials for your language and platform.
Resource Center
The latest ebooks, industry reports, and webinars
Learn from customer engagement experts to improve your own communication.
Ahoy
Twilio's developer community hub
Best practices, code samples, and inspiration to build communications and digital engagement experiences.