Build a Deep Learning Spam Detection System for SMS using Keras, Python and Twilio
Time to read:
September 24, 2020
Written by

In this tutorial, you’re going to build an SMS spam detection web application. This application will be built in Python using the Flask framework, and will include a deep learning model that you will train to detect SMS spam. We will work with the Twilio SMS API, so that you’ll be able to classify SMS messages sent to the phone number you have registered in your Twilio account.
One practical use of this application is to monitor and effectively classify SMS messages from your customers into spam or not-spam folders.
Below is the result of the final application you’ll build:
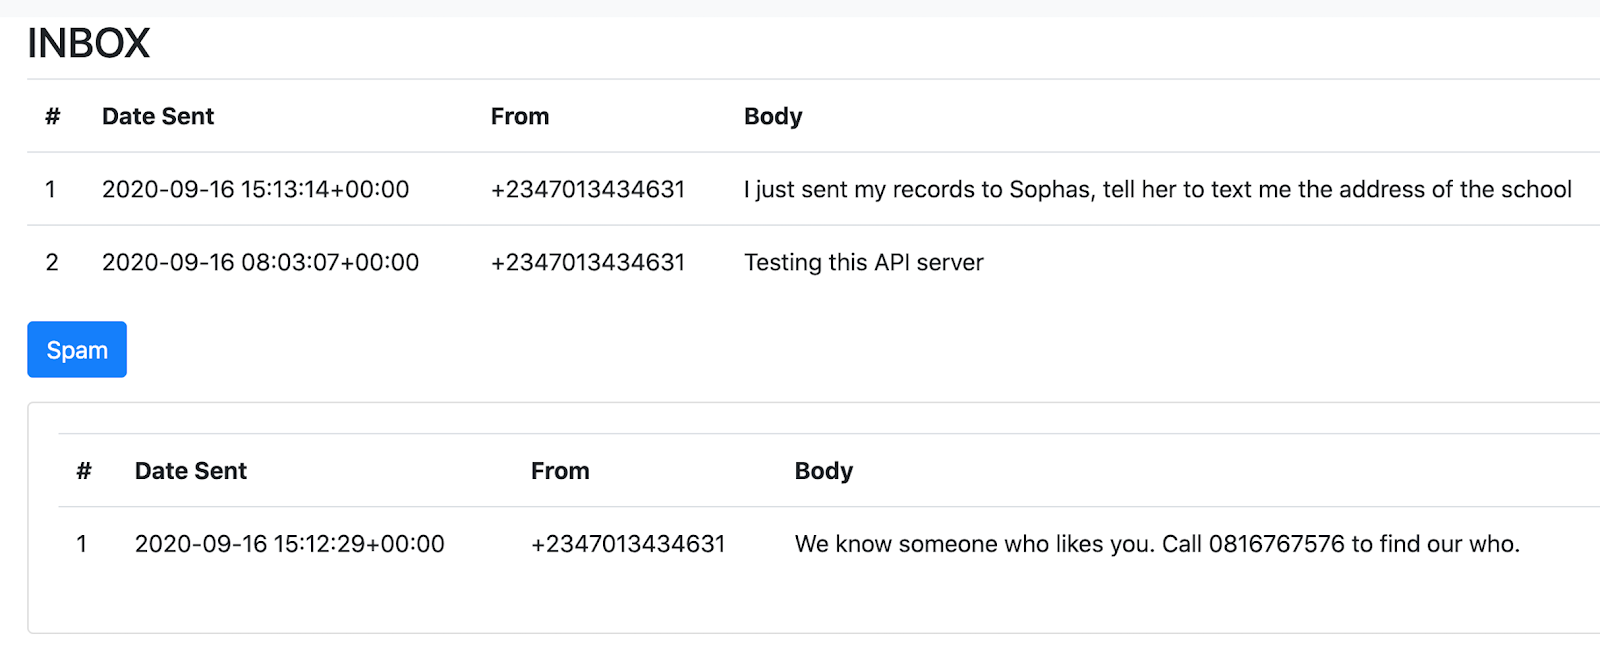
As you notice from the picture above, you have two sections, one representing non-spam messages and the other representing spam messages. These messages are all retrieved from your SMS inbox and classified by the trained model before they are displayed in the dashboard.
Prerequisites
In order to follow and fully understand this tutorial, you’ll need to:
- Have Python 3.6 or newer set up in your system. Go to https://python.org or https://www.anaconda.com/ to download an installer for your platform.
- Have basic knowledge of Flask.
- Have a basic understanding of building deep learning models.
- Have a mobile phone with SMS capability with which to test your application.
Getting started
Before you start building your application, you’ll need to set up an account on Twilio and get a Programmable SMS phone number. This number will be managed by Twilio and any SMS sent to it from a mobile phone will be stored in your account.
To set up and get a number follow the links below:
- Sign up for your free Twilio trial
- Verify your personal phone number
- Get your first Twilio phone number
Creating a Python virtual environment
After setting up your Twilio account, you’ll set up your development environment, and install the necessary Python libraries you’ll be using in this tutorial.
First, create a new development folder. In your terminal, run the command below:
Next, create a new Python virtual environment. If you are using Anaconda, you can run the following command:
Then you can activate the environment using:
If you are using a standard distribution of Python, then create a new virtual environment by running the command below:
To activate the new environment on a Mac or Linux computer, run:
If you are using a Windows computer, activate the environment as follows:
Regardless of the method you used to create and activate the virtual environment, your prompt should have been modified to look like the following:
Installing the required packages
Next, you’ll install all the packages needed for this tutorial. In your new environment, install the following packages:
Here are some details about these packages:
- flask is used to create your application server and pages.
- jupyterlab is for model building and data exploration.
- tensorflow is our deep learning framework for building our model
- twilio is a Python library for interacting with your Twilio account
- python-dotenv is a package for managing environment variables such as API keys and other configuration values.
- pandas is used to manipulate structured data.
- seaborn and matplotlib are used for plotting charts
- wordcloud is used to create word cloud images from text
- scikit-learn is a machine learning toolkit
After installation, start your Jupyter lab by running:
This opens the popular Jupyter lab interface in your web browser, where you are going to carry out some interactive data exploration and model building.
Building and training SMS detection model
Now that your environment is ready, you’re going to download the SMS training data, and then build a simple deep learning model to classify SMS messages.
Head over here to download the SMS spam dataset. The dataset is a collection of messages that are useful for SMS spam research. It contains 5,574 messages tagged according to being ham (legitimate) or spam. Using this data, you’ll train a deep learning model that can correctly classify SMS as ham or spam. Check out this page to learn more about this dataset.
Analyzing the spam dataset
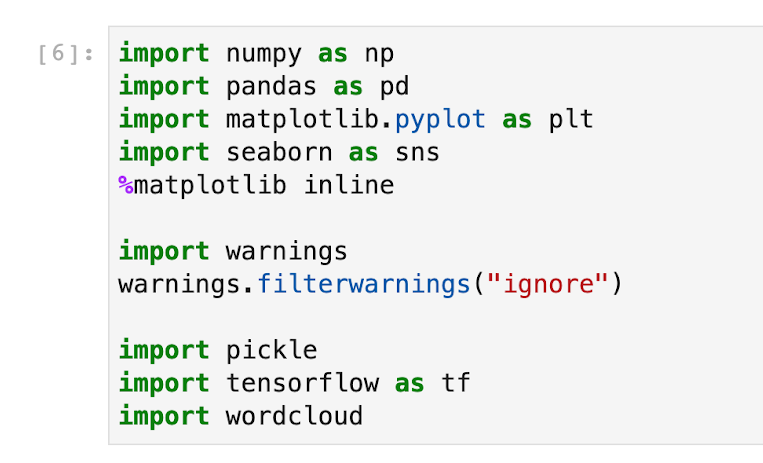
In your Jupyter environment, create a new Python 3 notebook called spam-detection-explore, and then import the following packages in the first cell:
To execute the code you added to the cell press Shift-Enter.
Next, you’ll read in the dataset with pandas and do some exploratory data analysis (EDA) to understand it.
After you’ve downloaded the spam dataset, rename it to spam.csv, and then move it to the same folder as your notebook. Now you can read it with pandas by running the following code in the next cell of your notebook:
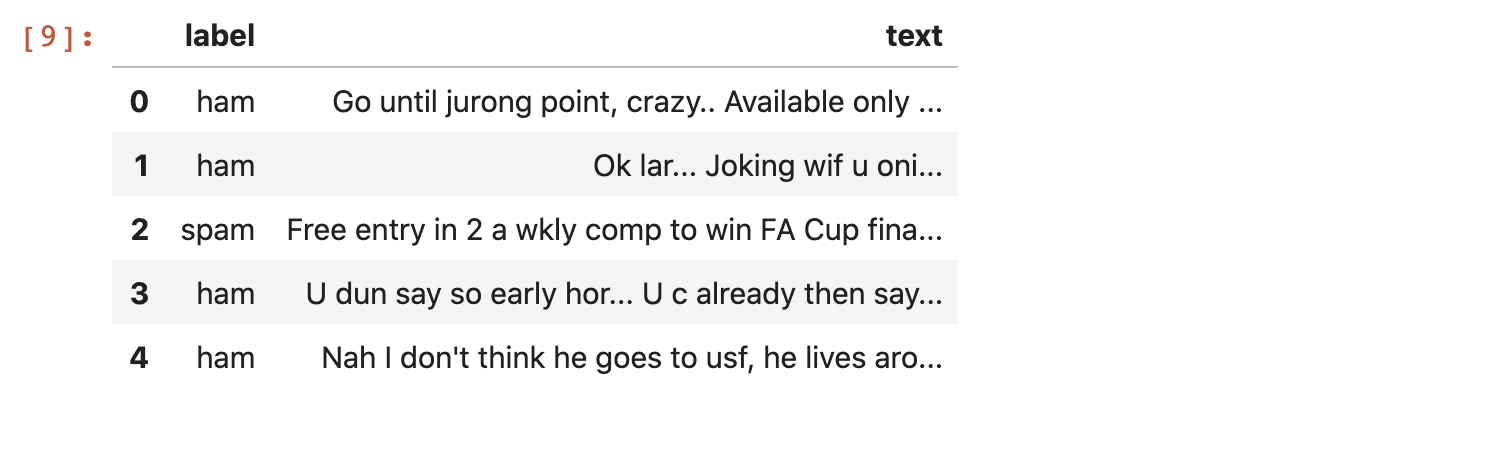
The result should look like this:
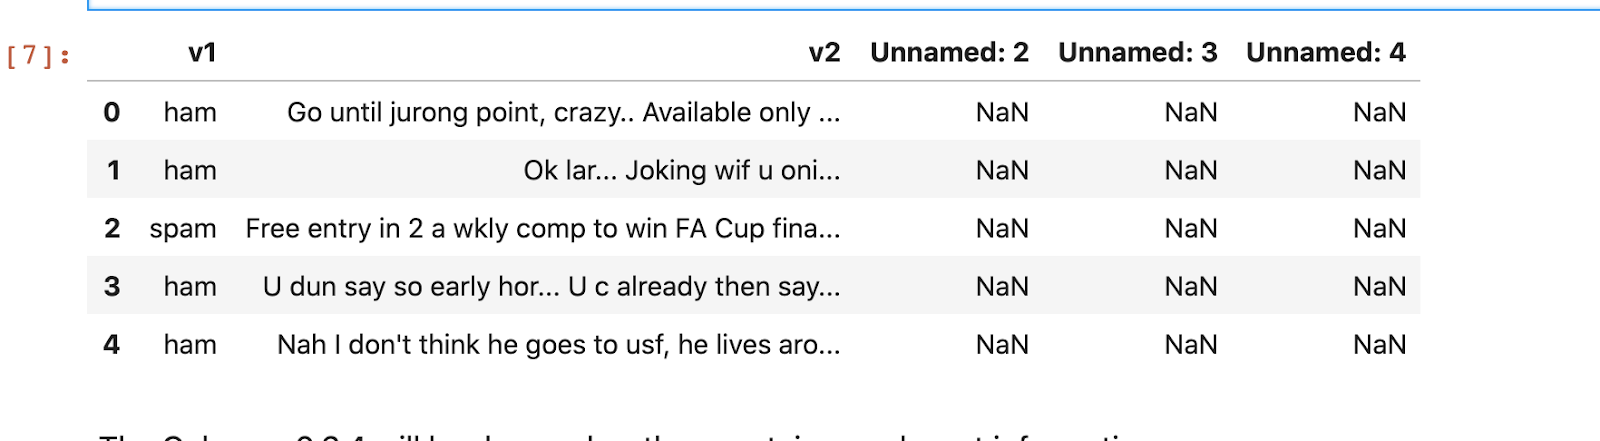
The dataset contains 5 columns. Column v1 is the label “ham” or “spam” and column v2 contains the text of the SMS message. Columns “Unnamed: 2”, “Unnamed: 3”, “Unnamed: 4” are not needed so they can be dropped as they are not going to be useful in building the model. Paste the following code in the next cell to rename the first two columns and remove the rest:
The table should now look as follows:
Next, you’ll look at the distribution of the label as shown below:
This should give you the following output:
This shows that there are 747 spam messages in the dataset and 4825 ham (legitimate) messages. You can also visualize this using seaborn:
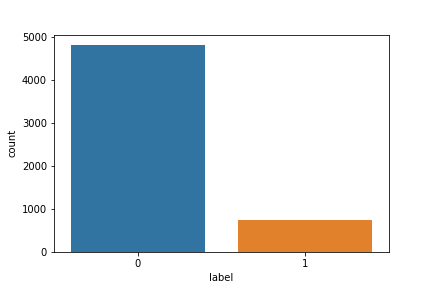
The result of the plot informs you that the training dataset is imbalanced. You should have this at the back of your mind when doing extensive feature engineering.
Next, you’ll convert the label to numeric form. This is essential before model training, as deep learning models need data in numeric form.
Now messages that are legitimate have a value of 0 in the label column, while spam messages have a 1.
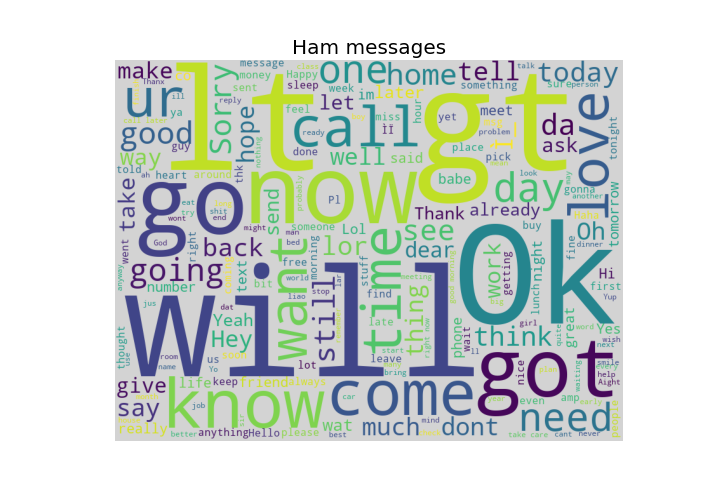
You can make a word cloud of common words used in spam or ham SMS. This can give you an idea of what kind of words are dominant in each class.
To make a word cloud, first separate the classes into two pandas data frames as shown below:
Next, add a simple word cloud function as shown below:
In the word cloud function, you convert the texts in a pandas data frame to a long list of words separated by whitespace, and then remove common words, which are called stop words. Then you use the wordcloud package to create the plot before displaying it with matplotlib.
Below is the code that displays a word cloud for spam SMS:

You’ll notice that spam messages contain words like free, call, claim, now and so on in very high numbers. This can give you an insight into what spam messages look like.
You can display the word cloud for ham (legitimate) SMS as well:
Preparing the dataset for training
Now that you have a basic understanding of what the dataset looks like, you’re going to split the dataset into train and test sets and then process the text column before model training.
Splitting your data into train and test sets is important because it let’s you effectively measure model performance on data that has not been seen before. This can inform you if your model is accurate or not.
In a new cell of your notebook, import the following packages:
The first two imports (pad_sequences and Tokenizer) are used to preprocess the SMS text column before feeding it to our model. You’ll learn more about these two later. The next block of code imports the classes for building your deep learning model. Finally, the train_test_split from sklearn is imported as well.
Next, you’ll split the dataset as shown below:
Here, you split the data into 80% for training and 20% for testing, with X_train and X_test being the messages in the training and testing sets, and y_train and y_test being the corresponding ham or spam numeric labels. By default, splitting is performed randomly on each run of the script. The last parameter random_state makes the splitting consistent and reproducible.
Next, you’ll preprocess the text data using tf.keras built-in text functions. The first function you’ll use is the tokenizer, which provides a convenient API that vectorizes a text corpus by turning each text into either a sequence of integers or into a vector where the coefficient for each token could be binary, based on word count or tf-idf.
By default, all punctuation is removed, turning the texts into space-separated sequences. These sequences are then split into lists of tokens.
To use the tokenizer, first, instantiate an object from it, and then call fit_on_texts on the training text as shown below:
Note: You should not apply fit_on_texts to your test data.
Next, you can call texts_to_sequences on any specific text, and have it automatically encoded as integers based on the learned vocabulary.
In the code block above, you called texts_to_sequences on both the training and testing data. This will convert each to integer sequences as you can see in the output.
The print statement in the last line prints the first two encoded messages, which should be:
Next, you’ll do something called padding. Deep learning models expect your input data to come in the same shape. Because you’re working with text data, some texts will be longer than others. This means that you need to pad each text so that they all have the same length.
You’ll use the pad_sequences function as follows:
The print statement at the bottom should give you the following output:
In the code block above, you specified the number of words to take before each SMS is truncated. This number is a hyper-parameter and can be changed. I’ve found that 8 words works quite well, you may try other values.
Next, in the pad_sequences function, you specified that you want to truncate from after the maximum length.
Now that your text data is in numeric form, you can feed it into a model and start training. In the next section, you’re going to create a simple Keras model to train on the encoded text data.
Building your deep learning model
You are going to use a very simple architecture for your deep learning model. The input will comprise an Embedding layer. Embedding layers are an efficient type of layer for text data. It helps to map high dimension text data to low dimension features that can be easily trained.
You can learn more about Embedding layers from this link: How to Use Word Embedding Layers for Deep Learning with Keras - Machine Learning Mastery.
In a new cell, copy and paste the model code below:
This should give you the following output:
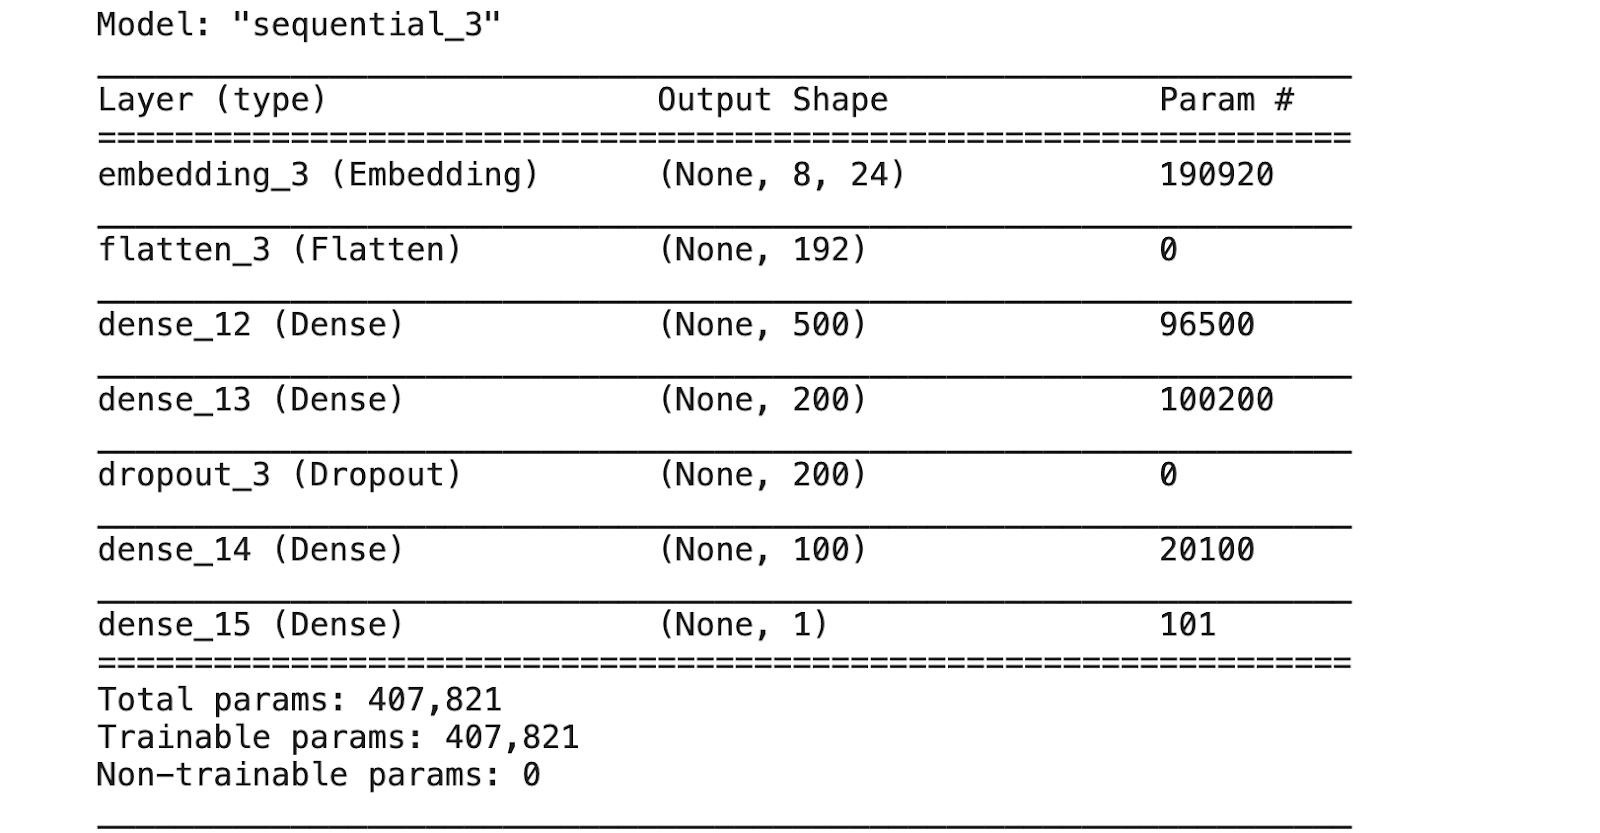
In the first line, you get the vocabulary size. The vocabulary size can be obtained from the tokenizer’s word_index property. This will serve as the row dimension of your embedding layer.
Next, you define a sequential model and add the embedding layer as the input. The embedding layer takes the vocabulary size as the first dimension and a user-specified value as the column dimension (I chose 24 in my training, you can use a different value here as well).
Next, you add a flatten layer, and then add a couple of dense layers before the final sigmoid layer, since this is a binary classification problem.
And lastly, you compile the model by specifying a loss and metric.
Now that you have created the model, you can call the fit method to start training as shown below:
The output should look as follows:
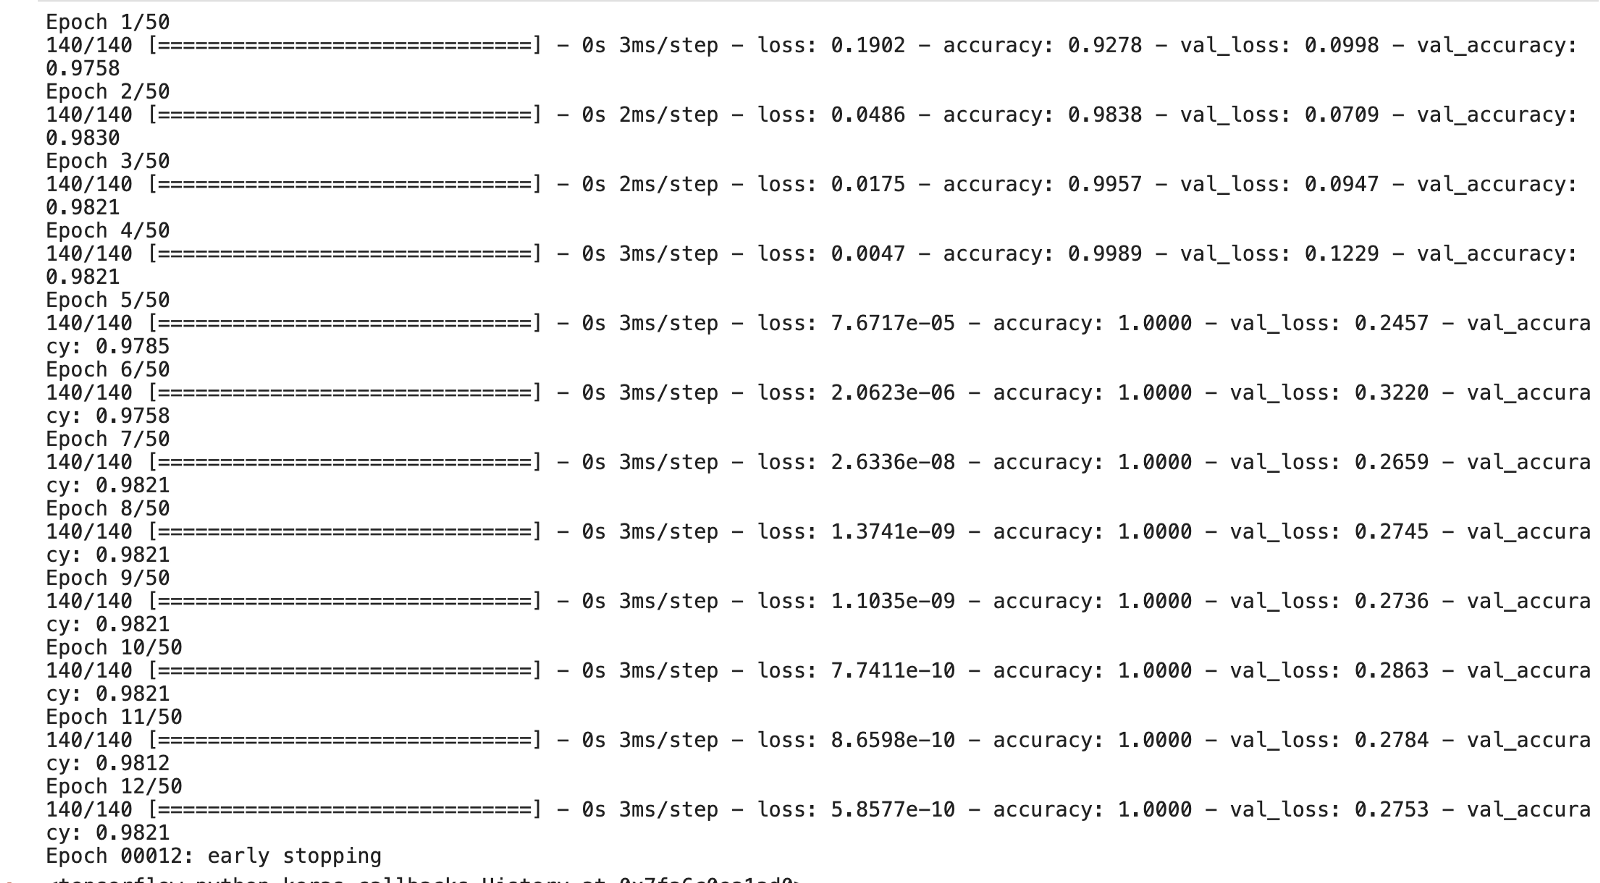
The model trains for a number of epochs and stops once it is not improving anymore. This is made possible by the early stopping callback. Your model training might run for about 11 or 12 epochs. This varies because of the stochastic nature of the model and even data splitting.
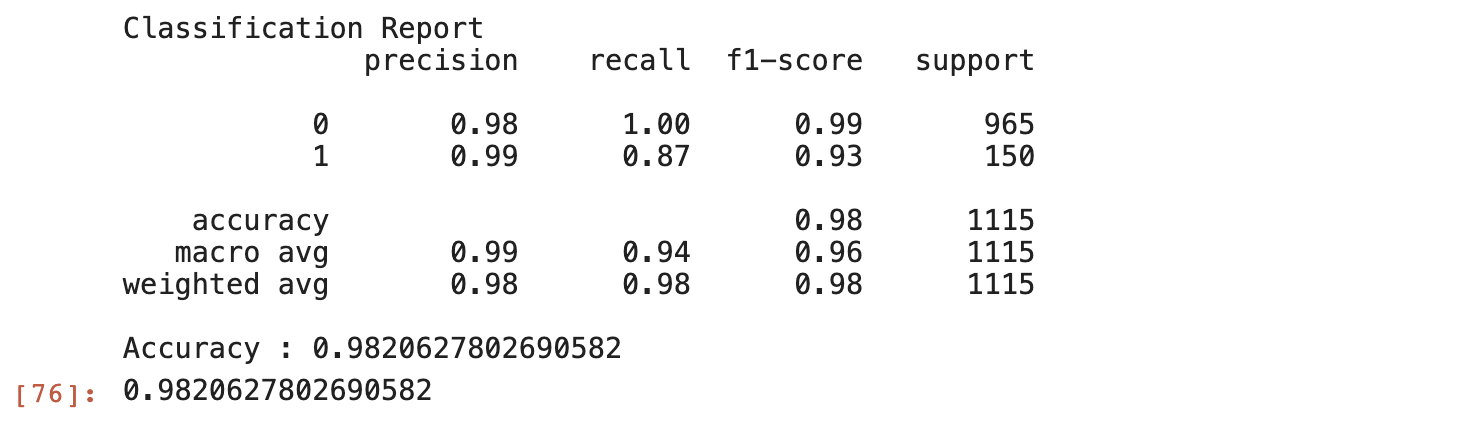
The final accuracy for the validation set is around 98% (0.9821) as seen in the training logs. This is a good accuracy score. You can also calculate and display more metrics as you will see below.
The two helper functions above will help you calculate and display a classification report and a confusion matrix for your model. To use this, first, make a prediction on the test dataset:
The model.predict returns predicted probabilities, and you can get the specific class by comparing it with a threshold. Here you use a threshold of 0.5. This means that any predicted probability greater than 0.5 makes the prediction 1, which is our label for spam.
Now to show the reports, pass in the array of predictions preds and the known labels y_test to the helper functions:
The output should look like this:
To show the confusion matrix, use the following code:
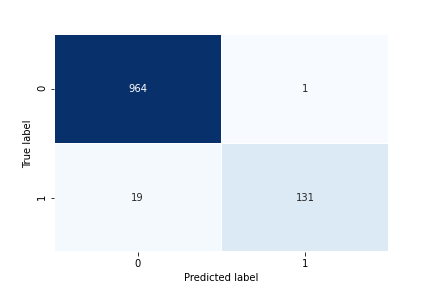
Your model performance looks good, so as a final step of your model building, you’re going to save the trained model as well as the tokenizer. Saving the tokenizer ensures that you can process new datasets in the same way as you processed them during training.
To save your model, run the code below:
And to save your tokenizer, you can use the Python pickle library as shown below:
Now you should have a folder called spam-model, where you can see your saved model and the tokenizer.
Making predictions
Before moving to the next section, I’m going to show you how to load the saved model and the tokenizer, and use it to make predictions for new messages.
In a new cell, add the following lines of code:
Here the input message passes through the same processing applied to the dataset before the model is invoked to make a prediction. In this case the predicted value is 1, which corresponds to the spam label.
In the next section, you’ll learn how to embed this saved model in a web application
Embedding the trained model in a Flask application
Now that you have your trained model and the tokenizer for preprocessing new text data, you are going to create a Flask application that will read SMS messages sent to your Twilio phone number and classify them into spam or ham. The final result will be displayed in an SMS dashboard you’re also going to define in this section.
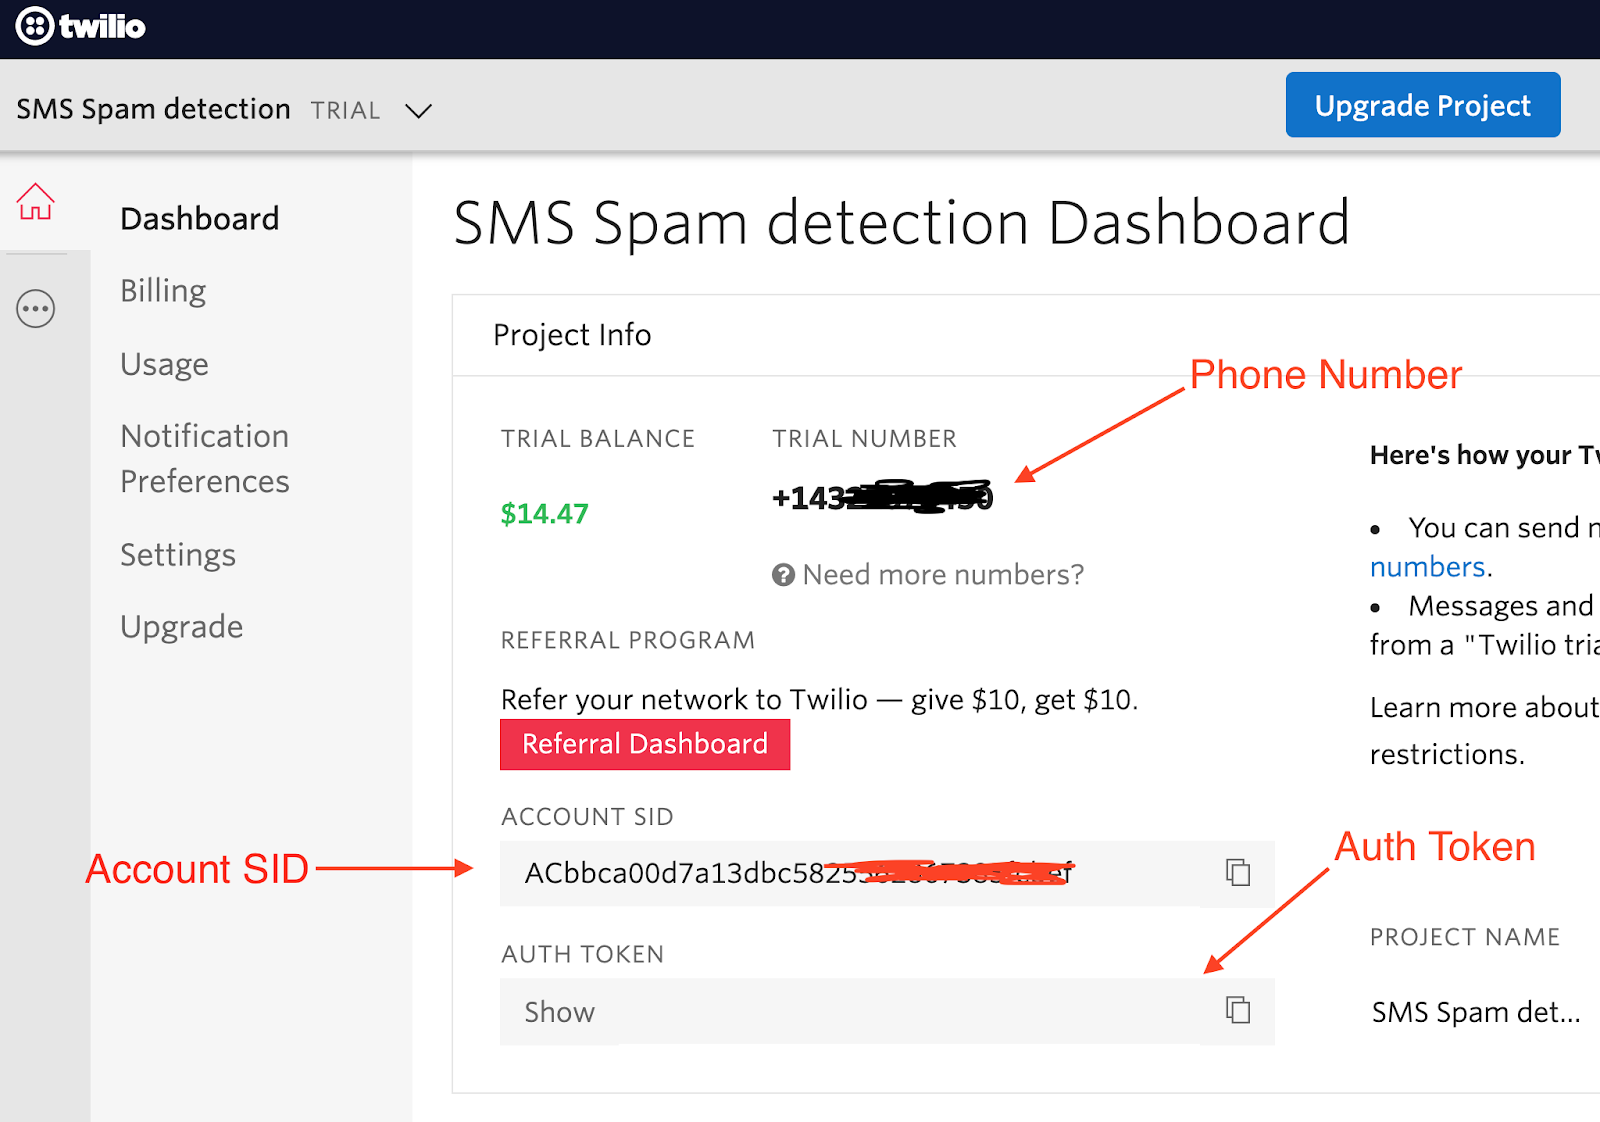
In your code editor, open a new the file named .env (note the leading dot) and add the following contents:
You can find your “Account SID” and “Auth Token” values in the Twilio Console.
Next, open a new file named app.py and add the following lines of code to it:
First, you import some important packages you’ll be using.
Next, you call the load_dotenv function. This function will load your Twilio Account SID and Auth Token from the .env file into environment variables. This is important for security purposes, as you should never hardcode your secrets into your application. The Twilio SID and Auth Token are used to initialize the Twilio API client.
At the bottom of app.py, initialize the Flask application:
After the Flask application instance, add a function that loads the model, retrieves the SMS from your Twilio account, and returns predictions on a specified range of messages.
The get_sms_and_predict function accepts two parameters -- start and end. These parameters will be used to slice the messages retrieved from Twilio into subsets, so that at any given time, you can control the number of SMS that are processed and predicted on. This is important when you have a large number of SMS and want to display a subset at a time.
In order to load the SMS from Twilio, you call the twilio_api.messages.stream() function. This returns a Python generator which you converted to list, before slicing.
After slicing a subset based on the specified start and end indexes, you loop through each SMS, process the SMS, and then make a prediction using the saved model. The code for the process_sms and load_model functions will be added next.
Finally, you append each predicted class to a list which is returned by the function.
Now that the SMS processing function is ready, you’ll add an index route. This is the home route and will be loaded when you open the application in the browser. Here you will display all SMS which have been classified by your trained model.
Add the code below to your app.py file:
In the index route above, you retrieve the first five SMS from your Twilio account. This number is hardcoded here for testing purposes. In a real world application, these numbers will probably be based on pages selected by the user.
The spam_msg and non_spam_msg are passed to the render_template function. This function is used to create the HTML response that will be displayed in the browser. You’ll create this HTML page shortly.
Next, add the code to start the local server as shown below:
This starts your server on port 4000.
Next you'll create a new script to handle model loading and message preprocessing.
Create a new file called model.py and add the following code to it:
This imports pickle for loading our tokenizer, tensorflow for loading our saved model, and lastly pad_sequences for processing text.
Next, add the code to load the tokenizer and the saved model:
To load the tokenizer, you use a Python context manager and the open function, and pass the file path to it. Remember it is saved in the spam_model folder.
To load the model, you can use the tf.keras load_model function. You have to specify the name of the folder where the model was saved to.
Next, you will create the process_sms function. Add the following lines of code at the end of model.py:
In the process_sms function above, you accept an SMS, apply the tokenizer’s texts_to_sequences function which encodes the words as integers based on the learned vocabulary during training, then you pad with the same max_lentgh of 8 used during training.
You will now add one last file before testing the application. This file is an HTML template that will be used to display the classified SMS.
Create a templates folder, and then add a file called index.html in it. Add the following lines of code:
This HTML file usesBootstrap to add styling to the components on the page.
In the main section of the code which is the body, you created two tables. One to display each not-spam message saved in the variable not_spam_msg, and the other to display spam SMS saved in the variable spam_msg. Each message has different properties that can be retrieved, here you simply retrieve the date the SMS was sent, the number of the sender and the body of the message.
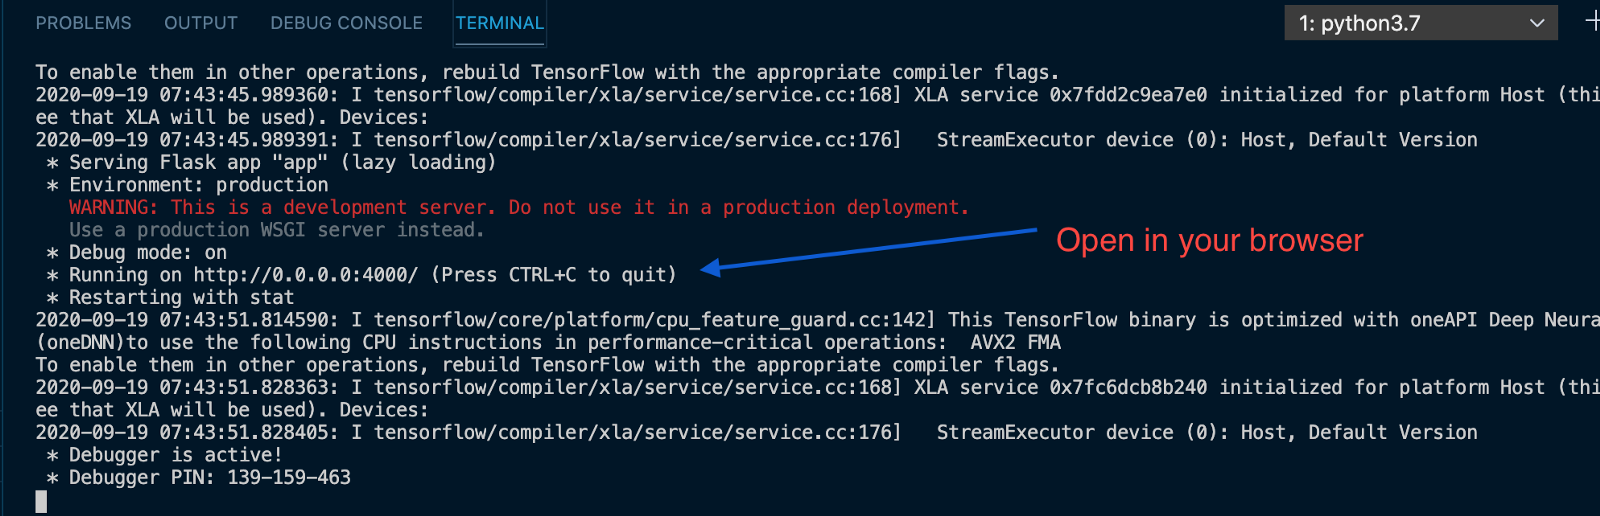
Now, you can test your application. To start your server, open your root folder in a terminal, and then run: python app.py
If you’ve followed all the steps above, then you should see your server running as shown below.
Open your browser and enter http://localhost:4000/ in the address bar to connect to the application.
This will open an empty page as shown below:
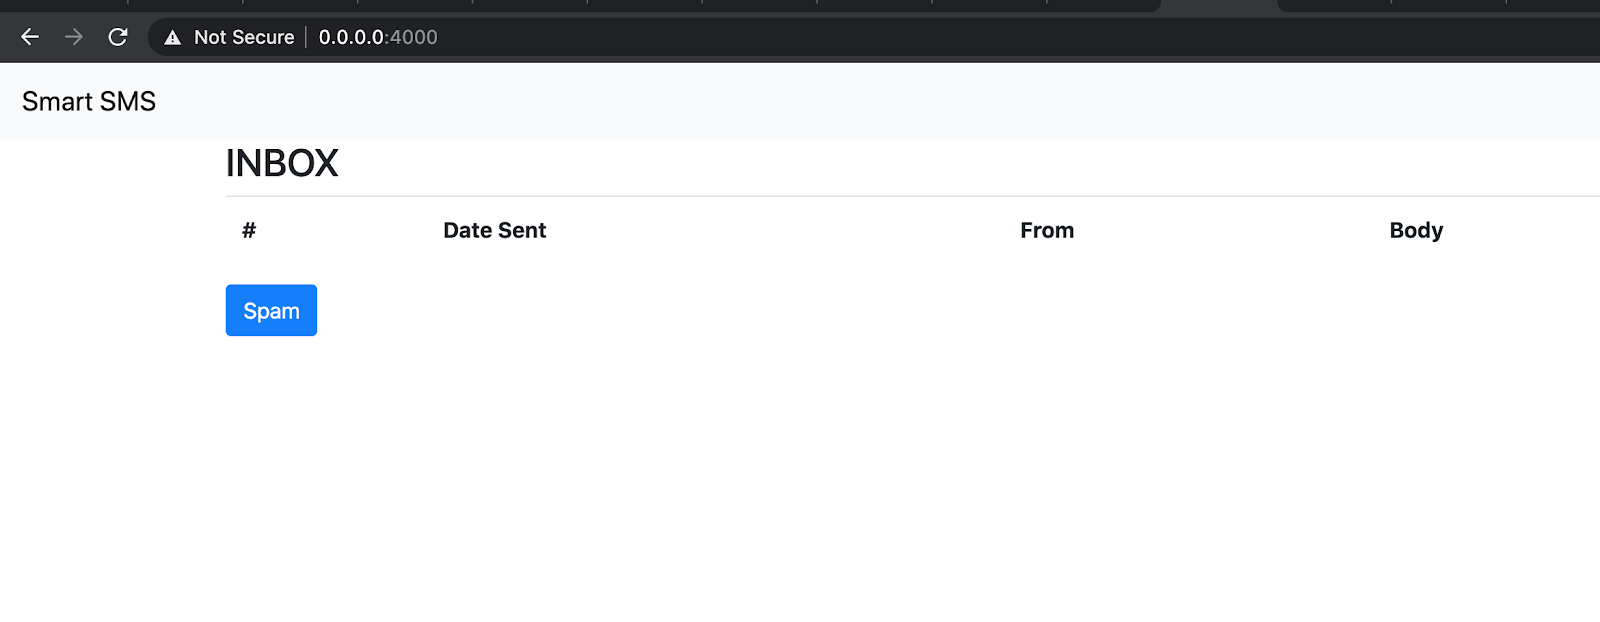
The page is empty because no SMS has been sent to your Twilio phone number. In order to test this, you can send SMS to your Twilio phone number from your mobile phone.
Here are a couple of SMS I sent when testing this application:
For Non-Spam:
- I just sent my records to Sophia, tell her to text me the address of the school
- Testing this API server
For Spam:
- We know someone who likes you. Call 0816767576 to find out who.
After sending these SMS, you can refresh the page in the browser to see how they are classified.
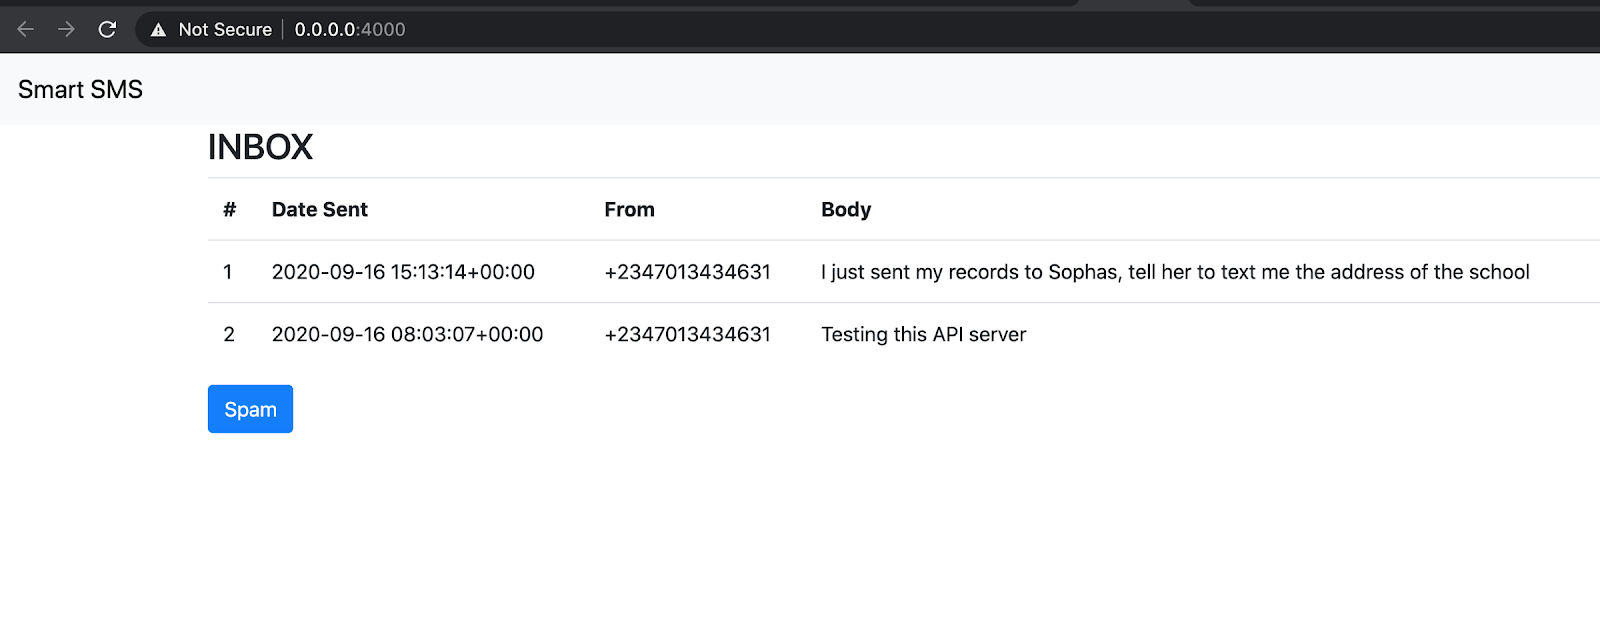
Spam SMS is automatically hidden and can be revealed by clicking the Spam button.

You should, however, note that your model will misclassify SMS messages that are very different from the training data. This is common in deep learning models whereby the new data changes and model performance depreciates. This simply means that you have to constantly collect new data and retrain your model.
Conclusion
And with that, we come to the end of this tutorial. I’m sure you can already think of all the amazing possibilities and use cases of this new knowledge. You can integrate this application in HR software, chatbots, and more. The possibilities are endless.
The full code for this tutorial can be found here. Thanks for taking the time to read this article!
Happy Learning!
Rising Odegua is a Software and ML Engineer. He combines his knowledge of software with data science to build data-driven applications. You can find more and connect with him here (https://risenw.github.io/risingodegua/).


Related Resources
Twilio Docs
From APIs to SDKs to sample apps
API reference documentation, SDKs, helper libraries, quickstarts, and tutorials for your language and platform.
Resource Center
The latest ebooks, industry reports, and webinars
Learn from customer engagement experts to improve your own communication.
Ahoy
Twilio's developer community hub
Best practices, code samples, and inspiration to build communications and digital engagement experiences.