Get started with writing TypeScript today!
Time to read:
August 12, 2016
Written by

Tabs vs. spaces isn’t the only big discussion point in the world of programming. Another point of contention lies in statically-typed vs. dynamically-typed languages. TypeScript is Microsoft’s attempt to add a stronger type system to JavaScript while making both camps happy. Instead of wading into the debate, let’s look at three aspects of TypeScript:
- How to add TypeScript to an existing JavaScript project
- Improving your development experience and tooling
- Down-transpiling TypeScript and modern JavaScript to older standards
Why TypeScript?

Here are some reasons you might want to write TypeScript:
- TypeScript is a superset of JavaScript, so the learning curve is not that steep.
- It’s ES2015 compliant and can transpile it down to ES3 or ES5. No more need for Babel in most cases.
- Types are optional, so you can gradually introduce them.
- A richer development experience including better auto-complete and project wide refactoring
You can find great list of reasons here: When should I use TypeScript?
Setup your environment
There are plenty of Getting Started with TypeScript guides that focus on how to start from scratch. We will instead add TypeScript to an existing Node.js project.
Before we get started make sure you have Node.js installed and that the version is newer than 6.0. You can check this by running:
Then clone the project that we will be working on:
Install all the necessary dependencies and start the server to test if it works:

Navigate in your browser to http://localhost:3000/api/gifs. If you see a bunch of Silicon Valley gifs, your Node.js project works correctly.
Next you need the TypeScript compiler. It’s recommended you install it locally to the project:
For the best TypeScript experience, you should either use Visual Studio Code, Visual Studio or a plug-in for your favorite text editor. I’ll be using Visual Studio Code which is available for free for Mac, Windows and Linux.
Once you have your IDE set up you are all set to dive into the world of TypeScript.
Configuring the TypeScript project
A TypeScript project is typically described by a tsconfig.json file that is located in the root directory of your project. It defines various properties for the compiler such as which files to compile or ignore, which ECMAScript version it should compile to, how to treat modules and other options. It even provides support for handling JSX files named TSX and can compile them directly to React statements.
Add the following tsconfig.json file to your project:
Alternatively you can use the TypeScript compiler (tsc) to create the tsconfig.json for you with all available settings. Just make sure you change the settings to have the same values as the ones above. Simply run:
Definitions first
TypeScript is all about types. Most libraries, however, are not written in TypeScript. So how do we get type-information on all the libraries we want to use?
The answer is definition files which provide interfaces and type information for existing libraries. Since TypeScript version 2.0 the solution to manage these definition files is to install them using npm and the @types namespace.
We need the definition files for node, express and body-parser. To install them run:
Now that we have both the compiler and the definitions we need to modify our npm scripts entries to use the compiler. To do so, modify the package.json file in the root of the project:
Our first TypeScript file
You might have noticed a TypeScript file called mockdb.ts in the api/ folder of the project you cloned. Create a file named api/users.ts. This file will consume mockdb.ts and implement a set of REST endpoints for users.
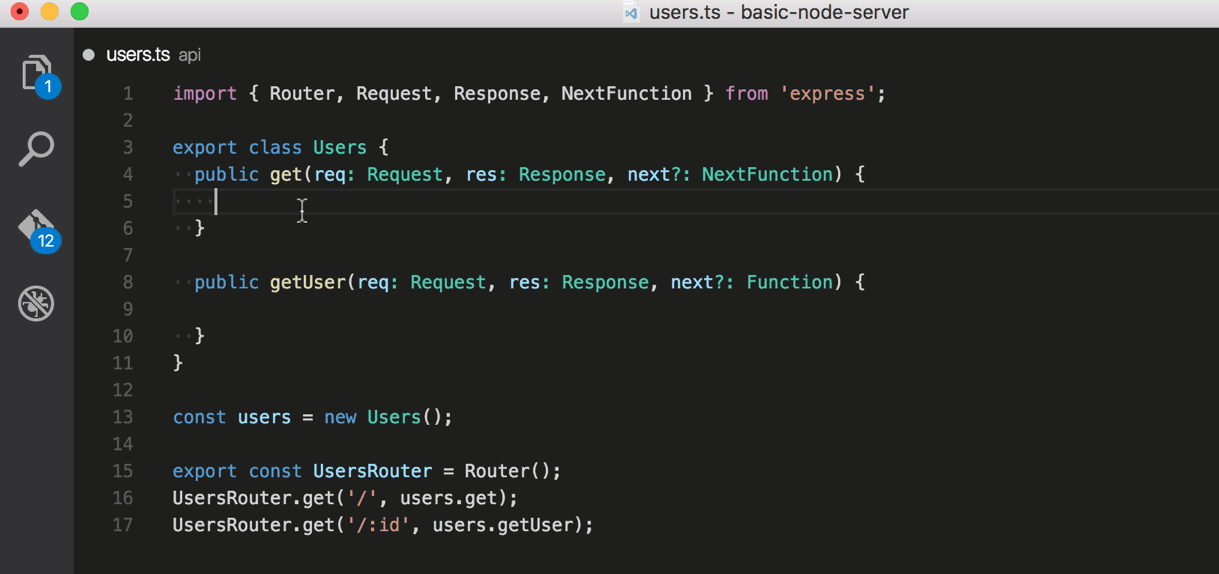
Import the Router from the express library, create a new class Users with two public methods get() and getUser(), and export a new router:
If you compare this file to the structure of the existing gifs.js you will notice three slight differences.
- We don’t use the
module.exports. Instead we use the new ES2015exportkeyword. - We replace
require(...)with the new ES2015import ... from ...syntax - We declare methods as public or private.
So far we don’t have any type annotations and that’s fine. The type annotation in TypeScript is optional. But we want to learn how to do it! So let’s adjust the function signature of the two methods. They are both express request handlers.
We need to import the interfaces for Request, Response and NextFunction since they are the three arguments that get passed. Afterwards we can annotate the three arguments in each method with the types and declare next as optional by appending a ? to the argument name:
We now have typed arguments and a much better autocomplete in our IDE. For example, now you don’t have to look up the available methods on a response object on the project website.
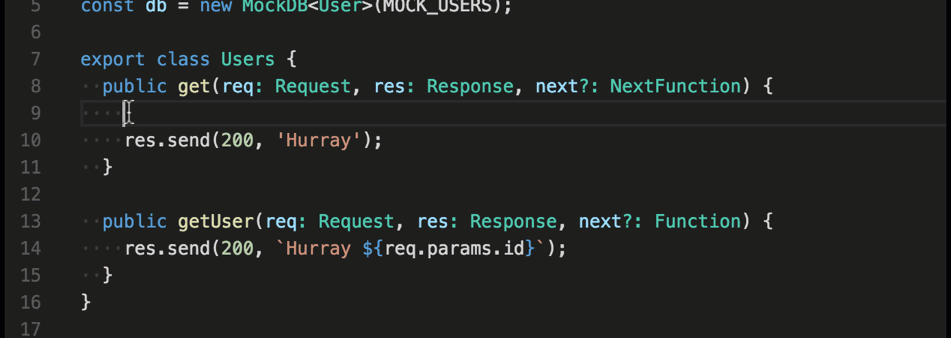
Our routes don’t yet return anything. Let’s send Hurray! on the routes and include the :id passed to the URL:
We also need to consume our new file. Modify api/index.js to require the file:

Re-run npm start and navigate to http://localhost:3000/api/users and you will see Hurray! on the screen.
We just wrote our first TypeScript and consumed it straight from our existing JavaScript. This is that easy because by default the compiled JavaScript is put in the same place as the TypeScript file. This means we actually execute the JavaScript but develop in the TypeScript file.
Advanced TypeScript features
Now that we wrote some basic TypeScript let’s explore a couple of more features by looking more into the existing mockdb.ts.
Import the necessary components from mockdb.ts inside our users.ts file and instantiate a database instance:
You may notice that we pass
<User> to our constructor. This is TypeScript’s support for generics. MockDB uses them to determine which type of data is stored. In our case these are entries of the type User. The argument itself is the mock data we want to populate the database with.
Now when we try to use the database in the request handlers we get more information about the types that are returned by the calls:
Modify the get() and getUser() methods now to consume the database:
We are now consuming another TypeScript file and made use of the power of generics.
To see more features of TypeScript you can check out the mockdb.ts file. You’ll find how to define and extend interfaces, how to create optional properties, and that specific values can be types, too.
From ES2015 to ES5
Right now our codebase is a mixture of TypeScript and ES2015 JavaScript. This works well together because the TypeScript is compiled in place, so we are executing normal JavaScript.
By adding three lines in our tsconfig.json we can not only output the result of our TypeScript into a different folder but also convert our ES2015 JavaScript to be ES5 compliant:
Re-run npm run tsc. We have now a new folder out that contains our compiled TypeScript but also our ES2015 JavaScript converted to ES5. And we did all of that without the usage of Babel! If you run node out/index.js you will be running an ES5 version of the program. So now you can run this also with older versions of Node.
Conclusion
As we’ve seen it’s super easy to move your JavaScript project to TypeScript since any JavaScript is valid TypeScript. In most cases we don’t even need a transpiler like Babel anymore. If we add type annotations we get type-safety during compile time and better tooling for our code editor.
We just looked at a small set of things TypeScript is useful for. You can find more features on the project page.

You are now well prepared to move your projects to TypeScript or even start your next project in TypeScript.
I personally love TypeScript but I’d love to hear how your experience will be. Please reach out and let me know. We can’t wait to see what you build!
- Email: dkundel@twilio.com
- Twitter: @dkundel
- GitHub: dkundel
- Twitch (streaming live code): dkundel
Related Resources
Twilio Docs
From APIs to SDKs to sample apps
API reference documentation, SDKs, helper libraries, quickstarts, and tutorials for your language and platform.
Resource Center
The latest ebooks, industry reports, and webinars
Learn from customer engagement experts to improve your own communication.
Ahoy
Twilio's developer community hub
Best practices, code samples, and inspiration to build communications and digital engagement experiences.