Synchronized State Variables for React using Twilio Sync
Time to read:
April 26, 2022
Written by
Reviewed by

State variables are one of the most important building blocks in front end applications developed with the React library. When a state variable is updated, React automatically re-renders any application components that depend on it, ensuring that the application always displays updated information to the user.
The automatic state update mechanisms in React are fantastic, but they are limited to a single instance of the application. Sometimes, however, an application needs state variables that are automatically synchronized across all running instances of the application. In this tutorial you are going to learn how to create a custom React hook that implements synchronized state variables using Twilio Sync as a cloud storage back end.
Requirements
To work on this tutorial you will need the following items:
- A Twilio account. If you are new to Twilio click here to create a free account now and receive $10 credit when you upgrade to a paid account. You can review the features and limitations of a free Twilio account.
- Node.js installed on your computer. You can download a Node.js installer from the Node.js website.
Create a new React application
To learn how to implement synchronized state variables, we are first going to create a test application.
Create a starter React application using Create React App as follows:
Start the development web server for the application by running this command:
After a few seconds a new tab in your browser will show the React starter application:
The application you’re going to build as you follow along with this tutorial will have a form that accepts a name. The currently set name will be displayed below the form. The Name component below implements this functionality. Add this code in a file named src/Name.js.
To include the Name component in the application, replace the contents of file src/App.js with the following code:
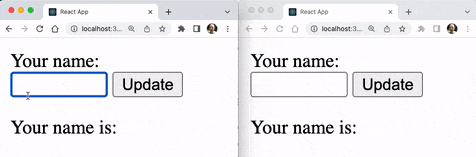
To test the application out, open two or more instances of the application by navigating to http://localhost:3000. Type random names in each of them and observe how the name state variable defined in the Name component is independently managed by React in each application instance.
In the next few sections you are going to create a useSyncState() hook that mostly works like useState from React, but adds transparent synchronization across all running instances of the application.
Add a Twilio Sync back end
The first step is to create a small back end server that can generate access tokens for clients to connect to the Twilio Sync service. Open a new terminal window, find a parent directory outside of the React project and run the following command to create an Express server.
Then add the Twilio helper library for Node.js and a few other required dependencies to the project.
Next implement a route that returns Twilio Access Tokens in a new file called routes/tokens.js.
Note that this route returns an access token to any client that requests one. In a real world application this endpoint will be accessible only to authenticated users. For an application that has access to user details, the accessToken.identity attribute can be used to store a user identifier or name.
Add the following imports in the app.js file found in the top-level directory of the Express project:
In the section where routers are initialized, add the “tokens” router:
Right after the application instance is created, enable cross-origin requests (CORS) with the following line:
Finally, in the section where routers are registered with the application, add the tokens router:
In case you are having trouble making the above changes, below you can find the complete app.js file with the changes highlighted, but note that due to changes in the Express project you may not have exactly the same code.
The dotenv package was added to the project, to import configuration variables from a .env file. Create this file in the root directory of the Express project, and add the following variables to it:
Now you need to obtain the values for these variables that apply to your Twilio account.
You can obtain the “Account SID” value for your account in the “Account Info” box in the main dashboard of the Twilio Console. Use the “Copy” button to transfer it to the .env file via the clipboard.
For the API key values, open the “Account” dropdown and select “API keys & tokens”. Then click the “Create API Key” button and provide a friendly name for your API key. Once the key is created, you will have access to the “API Key SID” and “API Key SECRET” values that you can paste in the .env file.
For the last configuration variable, click on “Explore Products” and find “Sync”. Once in the Sync dashboard, click on “View Sync Services”. You should expect to see a “Default Service” and next to it its “SID” value. You can use that one, or if you prefer, create a new Sync service specifically for this project. Either way, paste the SID of your Sync service in the last .env variable.
The back end is now complete. If you are working on a UNIX or Mac computer, start the back end as follows:
If you are using Microsoft Windows, run the back end with these commands:
The commands above start the back end on port 3001 in your computer. Leave it running for the rest of the tutorial. The React application will be making requests to it soon.
Twilio Sync integration with React
Go back to the terminal in which you worked on the React application. Here run the following command to install the Twilio Sync client library:
Copy the following code in a file named src/SyncProvider.js. This code provides the base Twilio Sync integration with your React application.
With this code a new SyncProvider component is available to your application. This is a wrapper component that provides access to Twilio Sync to all of its children components. The implementation is somewhat tricky, with most of the complexity dedicated to keeping the Twilio Sync client instance authenticated by calling the tokenFunc function provided by the caller to obtain access tokens.
The following listing has the implementation of useSyncState(), a custom hook that uses SyncProvider and is similar to React’s useState(). Add this code at the bottom of src/SyncProvider.js.
Unlike React’s useState(), this useSyncState() hook function has a required name first argument, which is used to link all references to a state variable together, across all running instances of the application.
You will modify the Name component a little later, but for now take a look at how the name state variable can be defined using the custom hook:
The hook also supports providing an initial value for the state variable, which will only be used when the state variable has never been used in Twilio Sync before:
Synchronized state example
What remains is to update the example React application shown earlier in this article to use synchronized state.
The only change required in the Name component is to import the new hook, and use it instead of useState() to define the state variable. Here is the updated code for this component, in file src/Name.js.
The App component needs to be updated to make the Name component a child of SyncProvider. It also needs to provide a function that makes requests to the Express back end and returns valid tokens for the Sync service.
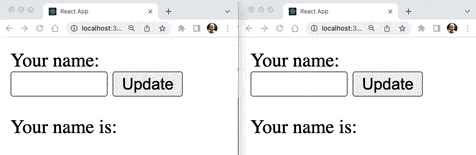
And with these changes, the state variable automatically updates in all instances of the application.

Conclusion
I hope you’ve found this implementation of synchronized state variables useful and can take advantage of it in your own projects.
If you would like to study this implementation in detail, you may want to access the following documentation links:
I can’t wait to see what you build!
Miguel Grinberg is a Principal Software Engineer for Technical Content at Twilio. Reach out to him at mgrinberg [at] twilio [dot] com if you have a cool project you’d like to share on this blog!


Related Resources
Twilio Docs
From APIs to SDKs to sample apps
API reference documentation, SDKs, helper libraries, quickstarts, and tutorials for your language and platform.
Resource Center
The latest ebooks, industry reports, and webinars
Learn from customer engagement experts to improve your own communication.
Ahoy
Twilio's developer community hub
Best practices, code samples, and inspiration to build communications and digital engagement experiences.