How Texas is Using Twilio Flex with Direct Inward Dialing to Distribute Vaccines
Time to read:
January 20, 2021
Written by
This post is part of Twilio’s archive and may contain outdated information. We’re always building something new, so be sure to check out our latest posts for the most up-to-date insights.

Most Twilio.org customers use Flex as a call center. We see all sorts of use-cases, from food-banks, to crisis lines, to disaster response. In late December, a joint team from the Southwest Texas Regional Advisory Council and the Texas Division of Emergency Management were tasked with assisting COVID-19 vaccine distribution and needed a hybrid of a hotline and phone system.
After vaccines became available in the United States, state and local agencies across the country needed to act fast to ensure that supply chain partners and medical providers had accurate, up to date information. Texas needed to coordinate information like when shipments would arrive, how to request new shipments, and how to safely store vaccines for use are critical pieces of information to ensure that vaccines are distributed effectively.
Within one day we deployed a solution that has since handled several thousand calls about vaccine distribution logistics. In this blog post I’d like to share with you what we built.
We had two main requirements:
- Provide a 24 hour hotline for inbound calls about vaccination logistics.
- The second: allow emergency responders to coordinate with health providers on a personal number for both inbound and outbound calls. This setup is known as “direct inward dial” or DID for short.
We’ve covered inbound hotlines previously, so in this post we’re going to focus on how to build DID in Flex. Let’s get DID done!
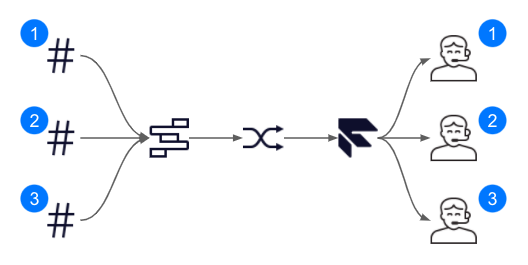
What Is DID Anyway?
Let’s start with the challenge: each emergency responder had a list of healthcare providers that they needed to call and coordinate with. The Flex Dialer supports outbound calls out of the box. But what if we're receiving a call-back from a pharmacy? We wanted the callback from the pharmacy to go to the emergency responder who initially made the outbound call.
With DID, we give each agent their own personal phone number. Think of it as a desk phone, but with all the added functionality of Flex. For example, calls can failover to other agents if we’re busy. For outbound calls, the call comes from the agent’s assigned phone number. That way, call-backs go straight to the right person.
When is DID useful? Whenever workers have a case load or assigned list of contacts. Social workers, sales executives, paralegals (to name a few) can all use a DID setup.
Prerequisites
Before we get started, you’ll need the following:
- Create a Twilio Account with a Flex Project
- Install the Twilio CLI
We’re also going to be using code samples from the Flex DID Github Repo. Run these commands in your terminal to get set up:
git clone https://github.com/cweems/flex-did.git
cd flex-did
npm install
cp .env.example .env
Lastly, add the API key and secret from your Twilio account to the .env file. If you want to run all of the setup steps in this post, do npm run flex-did-setup-all then install plugin-flex-did in your Flex instance.
Buying Twilio Numbers
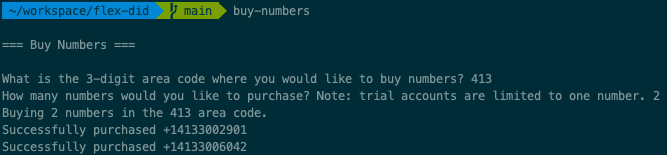
The first step to building DID with Flex is to get an inbound number for each agent. You can do this one-by-one in the Twilio console. But, buying 60 numbers manually could take a while. Instead, we used a script that uses the Twilio Node.js client to bulk buy phone numbers. If you’re in the root directory of the Flex DID repository, you can run buy-numbers.
Enter the area code where you’d like to buy phone numbers as well as the quantity.
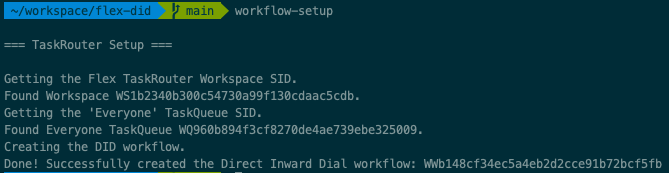
Configuring the TaskRouter Workflow
Next up, we’re going to define our DID routing logic by configuring a TaskRouter Workflow. This Workflow will be what tells Flex to match an incoming call to a worker based on the worker’s phone number (we’ll give the agent a phone number later on).
Run workflow-setup in your terminal to do this step automatically:
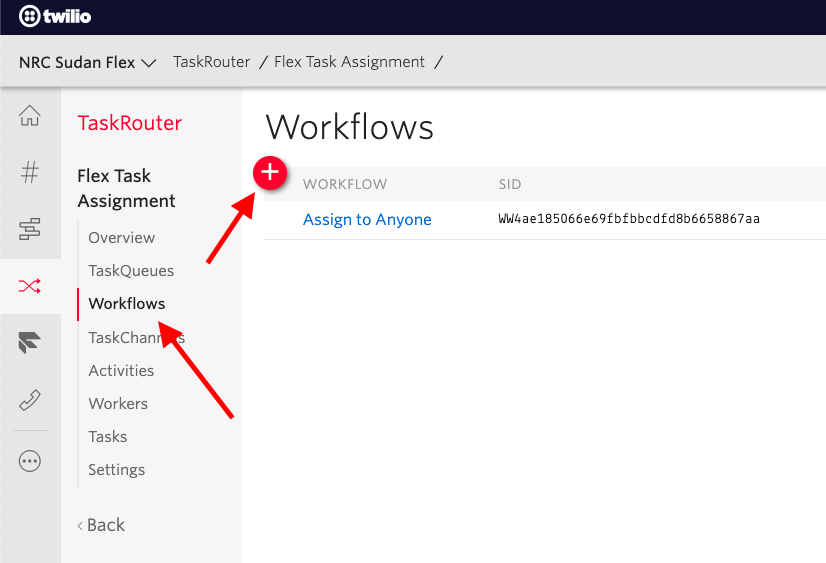
Manual setup:
- Go to the TaskRouter workspaces page in the console and click on Flex Task Assignment
- In the side-nav, click on Workflows and then click on the red “+” button to create a new workflow:
- Give your new workflow the name “Direct Inward Dial” and then click on “Add a Filter”:
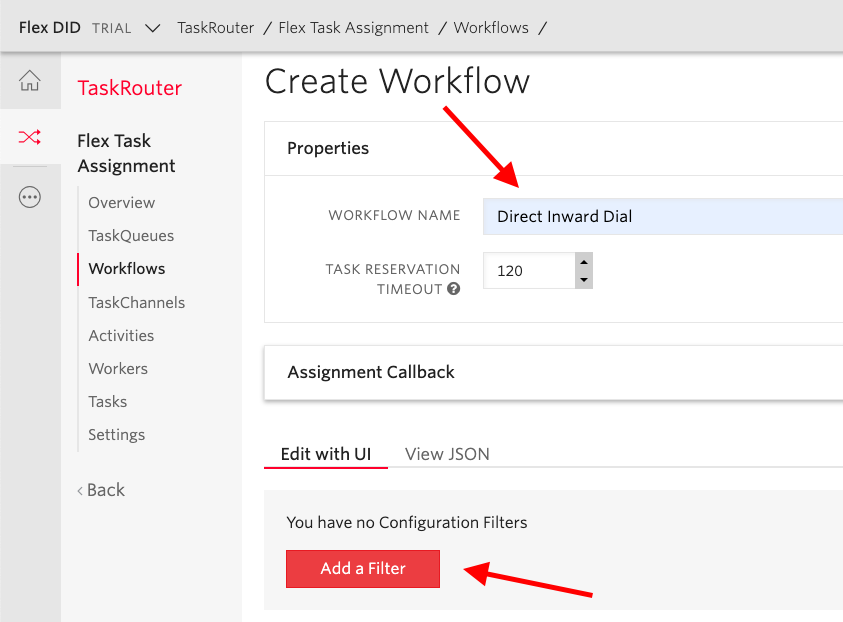
The logic we define in the filter will match the right worker to calls that have dialed that worker's DID number. Here's the filter expression that does this:
task.phone_number CONTAINS worker.phone_number
If a task's phone_number attribute matches a worker's phone number, that worker gets the task. Why CONTAINS instead of a strict equals? This gives us more flexibility in case the agent’s phone number isn’t exactly formatted as e.164 (e.g. if the +1 is missing).
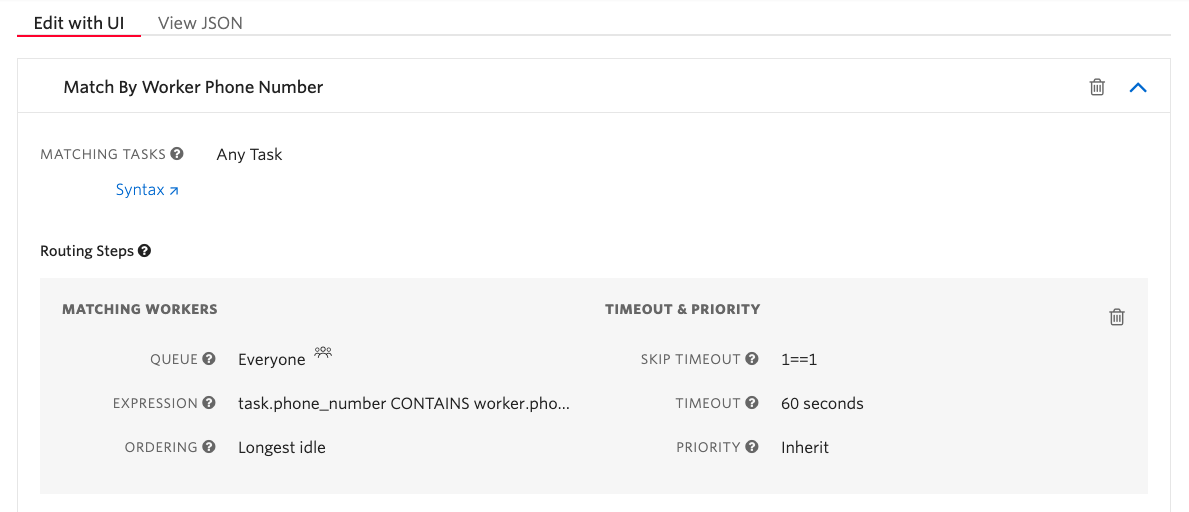
Besides the filter expression, there are a few other settings we need to configure. TaskRouter has a bit of a learning curve, so I’ve spelled out each of the settings and what they do below:
|
Setting |
Value |
What it does |
|
Filter friendly name |
Match By Worker Phone Number |
Indicates the purpose of the filter |
|
Matching Tasks |
1==1 (Any Task) |
This workflow will only be initiated by a Studio flow connected to a personal number, so every task it handles should be treated as a DID call. |
|
Queue |
Everyone |
We’re going to query across all of our agents to find the one that has the matching inbound number. |
|
Expression |
task.phone_number CONTAINS worker.phone_number |
Matches calls to the correct agent by phone_number. |
|
Skip Timeout |
1==1 |
Skip timeout is an expression that is checked if no available worker matches the filter. We don’t want our caller waiting on hold if the agent isn’t online. 1==1 is always true, and will advance the call to the next routing step immediately. |
|
Timeout |
60 |
Timeout is the amount of time our agent will have to pick up the call if they are online. Flex will ring them for 60 seconds, and then go to the next filter step if they do not pick up. |
Once you have everything set up, your filter should look like this:
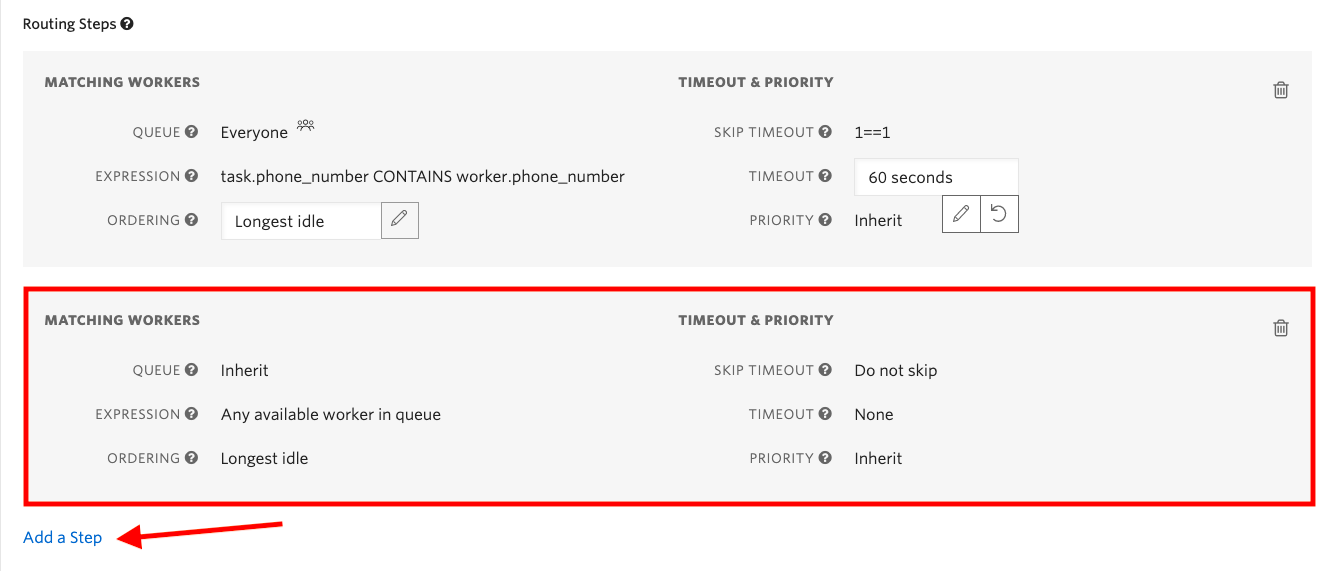
We also need to create a fallback step for if the agent isn’t online. This will send the call to the “Everyone” queue and allow any agent to pick up the call.
If you click “Add Step” beneath the step we just created, you’ll see a new step created with a default setup. The default is exactly what we need, so you can leave this as-is:
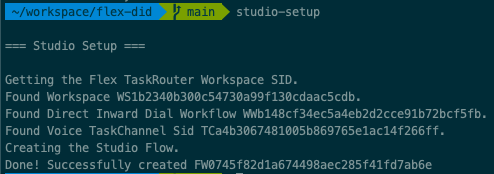
Creating the Studio Flow for DID
In this step, we’re going to create a Twilio Studio Flow that only handles calls from our DID phone numbers.
You can run studio-setup in your terminal, and you should see this output:
If you’d prefer to create your Studio Flow in the Twilio Console, follow these steps:
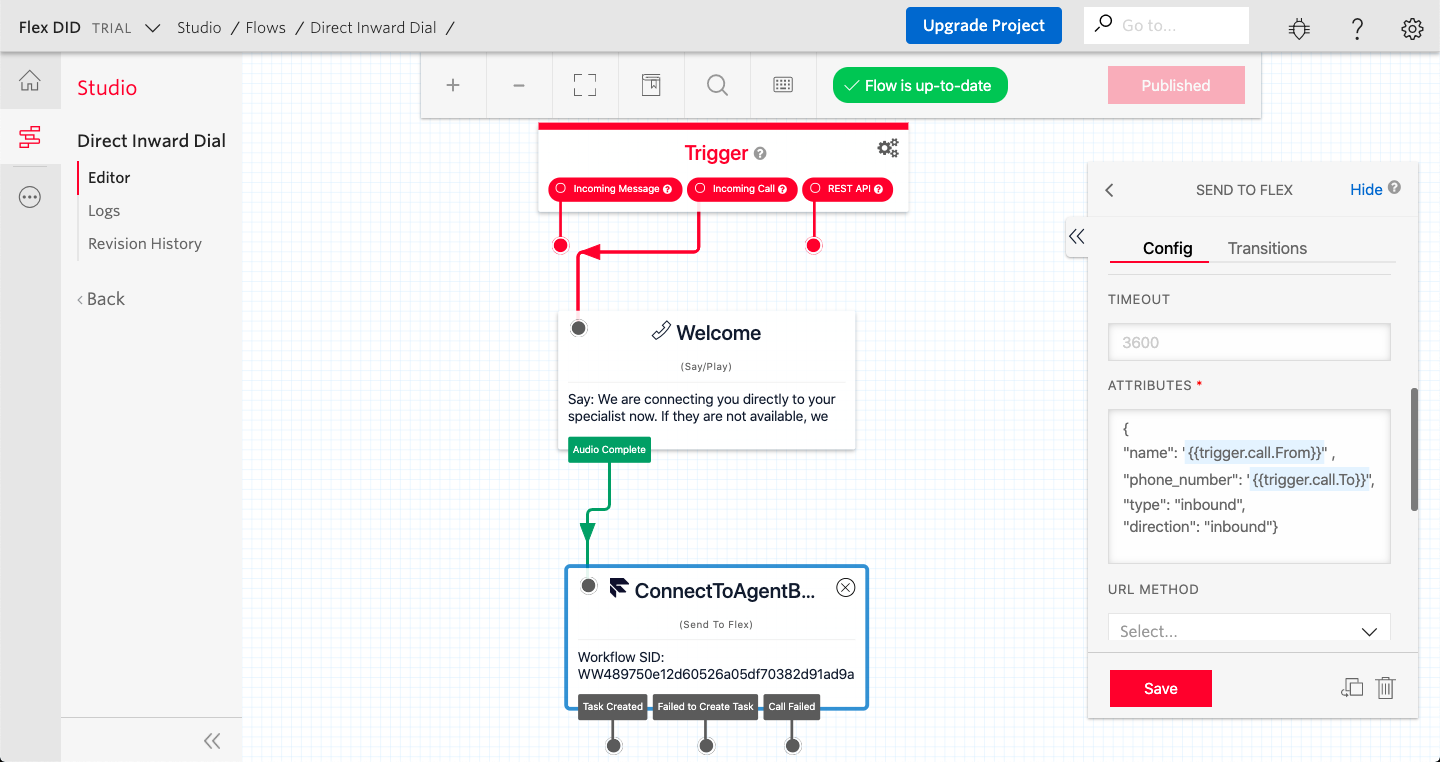
- Drag a Say/Play widget to the Studio canvas and connect it to the “Incoming Call” trigger.
- Add a welcome message to the widget that says, “We are connecting you to your specialist now. If they are not available, we will connect you with the next available specialist.”
- Drag the “Send to Flex” widget onto the canvas and connect the Say/Play widget to it.
- Configure the “Send to Flex” widget with the following settings:
|
Setting |
Value |
What it does |
|
Widget Name |
ConnectToAgentByDID |
Indicates the purpose of the widget |
|
Workflow |
Direct Inward Dial |
Sends all calls processed by this flow to our Direct Inward Dial TaskRouter workflow so that they can be matched to a specific agent. |
|
Channel |
Voice |
Tells Flex the type of communication channel that is being used. |
|
Attributes |
{"name": "{{trigger.call.From}}" , "phone_number": "{{trigger.call.To}}", "type": "inbound", "direction": "inbound"} |
The “phone_number” attribute is used by TaskRouter to identify which DID was called, and match the corresponding worker. |
Once complete, your Studio Flow will look something like this:
Connecting DID Numbers to the Studio Flow
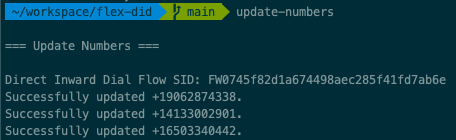
Now that we have a flow created for DID calls, we can update all of our DID numbers to send inbound calls to the Direct Inward Dial Studio Flow. Once again, there’s a script for that:
update-numbers
This will update the voice configuration for all numbers in our account to point to our Direct Inbound Dial Studio Flow.
Note: if you want to maintain one number as the main line this script will switch that number’s configuration too, so remember to set it back to the “Voice IVR” studio flow.
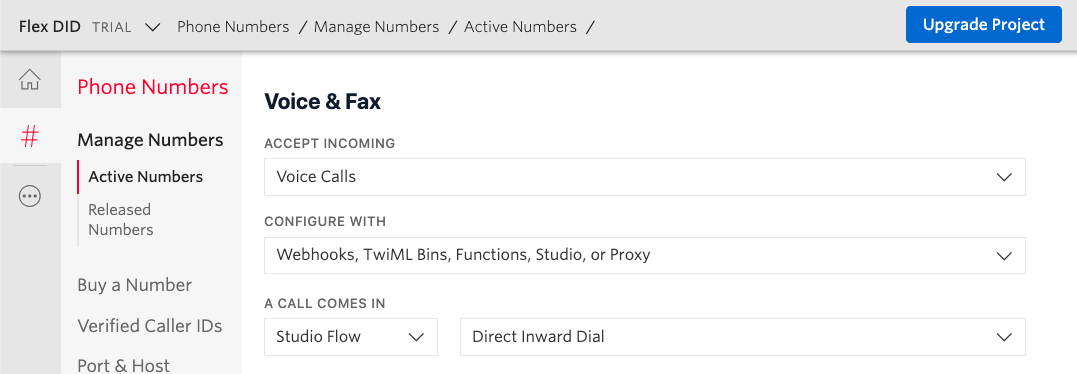
If you’d rather configure your numbers numbers in the Twilio console, follow these steps:
- Go to your list of incoming phone numbers: https://www.twilio.com/console/phone-numbers/incoming
- Click on the number that you want to update.
- In the Voice configuration section under “A Call Comes In” select Studio, and then select the Direct Inward Dial Studio flow:
Call one of your DID numbers. You should hear the message that we configured in the Direct Inbound Dial Studio Flow.
Assigning Phone Numbers to TaskRouter Workers
To match DID calls to the right agent we need to assign numbers to agents. We can do this by adding a worker.phone_number attribute in TaskRouter. In our workflow setup, we created an expression that queries agents by this attribute:
task.phone_number CONTAINS worker.phone_number
For testing purposes, you can modify your TaskRouter worker directly in the Twilio Console like this:
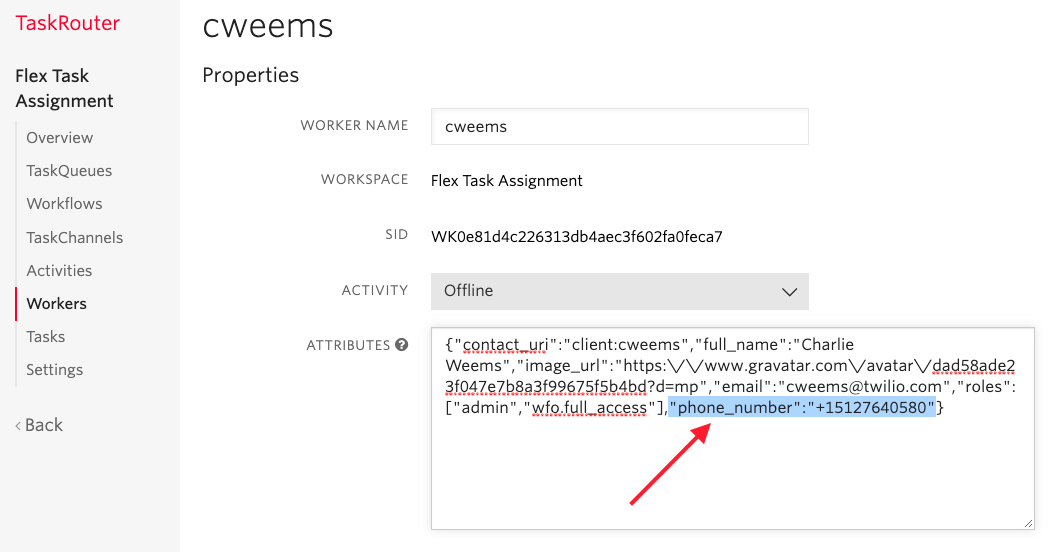
Here’s an example of what the JSON looks like:
{
    "contact_uri":"client:username",
    "full_name":"FirstName LastName",
    "image_url":"url",
    "email":"email@twilio.com",
    "roles":["admin","wfo.full_access"]
    "phone_number":"+15127640580"
}
Now we can do a quick test to see if your DID setup works by placing an inbound call. Add another Flex user without the “phone_number” attribute and place a few calls. The inbound call should route to your user every time, as long as you are online.
Syncing DID Number Assignments with SSO
Adding one phone number to a TaskRouter worker is fine for testing, but what if we have many users? The answer is to pull in the phone_number from your SSO system. If you haven’t yet set up SSO with Flex, check out one of our guides here.
The following screenshots are from Okta. But, any authentication provider that supports SAML should support passing user attributes.
A SAML attributes (or "claims") a key-value data. If you’ve already set up Flex with SSO, you’ve already seen some examples:
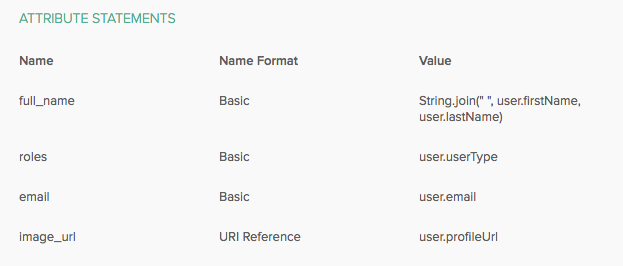
Whenever an agent logs into Flex, TaskRouter adds the data returned from our SSO system as attributes on the TaskRouter worker. All we need to do to include our DID phone number is add an additional attribute statement:
|
Name |
Name Format |
Value |
|
phone_number |
Basic |
|
In Okta, we used the Primary Phone user profile attribute, which determined the value that we set in the SAML claim:

Which translates to user.primaryPhone using Okta’s SAML assertion language:
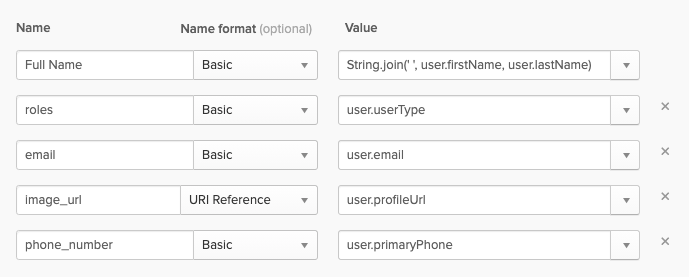
Now, any user logging in to Flex will have the phone_number attribute automatically synced with their TaskRouter worker.
Want to build even further automation? You can use the Phone Numbers API to buy or update numbers for new users. You can also leverage TaskRouter events to run code when a user gets added or removed.
Make Outbound Calls from Your DIDs
Now that we have our inbound call flow working, each agent needs to be able to outbound from their own DID. Why? If everyone makes calls from a single number, callbacks are going to go into the main queue for anyone to answer.
We can do this with a Flex Plugin. To spin up the prebuilt plugin for development, follow these steps:
cd plugin-flex-did
npm install
twilio flex:plugins:start
The twilio-cli should open a browser window that shows your local flex environment.
Let’s take a look at how we can customize the Caller ID for outbound calls in FlexPluginDid.js:
init(flex, manager) {
   this.registerReducers(manager);

   flex.Actions.replaceAction("StartOutboundCall", (payload, original) => {
         let newPayload = payload

         if (manager.workerClient.attributes.hasOwnProperty('phone_number') &&
             manager.workerClient.attributes.phone_number !== "") {

                 newPayload.callerId = manager.workerClient.attributes.phone_number
         }

         original(newPayload)
   });
}
Here we’re using the Flex Actions Framework to override the “StartOutbountCall” action that gets fired by the Flex Dial Pad.
We can get our TaskRouter worker’s phone_number value by checking manager.workerClient.attributes. We also check that the worker making the call has a phone_number attribute set and then override the default callerId attribute in the action payload.
To test, do the following:
- Enable the Flex Dialpad in the Twilio Console
- Go online as a flex user and open the dialpad
- Call a phone number, you should see the phone number arrive with the same CallerId as your worker’s phone_number
Showing Agents their Number
There’s another feature you might have noticed in the flex-did plugin: agents can see their own number. Emergency responders needed to be able to say “call me back at (123) 546-7890.” Here’s how we display that in the Flex interface:
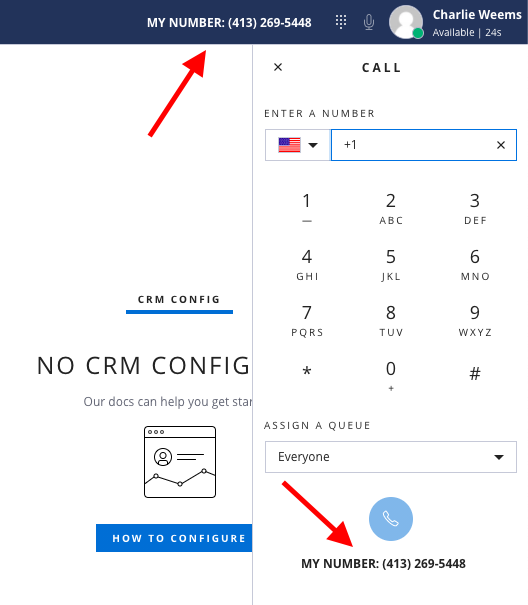
If you look in FlexDidPlugin.js, you can see how we’re adding the AgentNumber component to the top MainHeader and passing in the agent’s phone number:
flex.MainHeader.Content.add(
     <AgentNumber
       key="navbar-agent-number"
       phoneNumber={manager.workerClient.attributes.phone_number}
     />, {
       sortOrder: -1,
       align: "end"
     }
 );
Inside the AgentNumber component, we format the phone number and render it to be used in both the MainHeader and Dialpad.
Next, to deploy the flex-did plugin to production, run:
twilio flex:plugins:deploy --changelog "Deploying flex-did"
twilio flex:plugins:release --plugin plugin-flex-did@0.0.1 --name "First release" --description "First release of the flex-did plugin"
And your plugin should appear live when you go to flex.twilio.com!
Wrap Up
Now that you've implemented DID for your Flex instance, workers in your call center can make and receive phone calls as if they have their own desk phone. This opens up a wide range of use-cases for Twilio Flex that go beyond triaging inbound calls. Have ideas for additional features? Feel free to create an issue or fork the plugin respository here.


Related Resources
Twilio Docs
From APIs to SDKs to sample apps
API reference documentation, SDKs, helper libraries, quickstarts, and tutorials for your language and platform.
Resource Center
The latest ebooks, industry reports, and webinars
Learn from customer engagement experts to improve your own communication.
Ahoy
Twilio's developer community hub
Best practices, code samples, and inspiration to build communications and digital engagement experiences.