Use Twilio Video to Create a Dog Camera

January 25, 2022
Written by
Naomi Pentrel
Contributor
Opinions expressed by Twilio contributors are their own

Dog Cam

This article is for reference only. We're not onboarding new customers to Programmable Video. Existing customers can continue to use the product until December 5, 2024.


We recommend migrating your application to the API provided by our preferred video partner, Zoom. We've prepared this migration guide to assist you in minimizing any service disruption.

There are multiple apps and services out there that you can use as a dog cam. However, most of these apps and services require you to pay for new devices or a subscription (or both!). When I recently adopted a puppy, I used Twilio Video and an old phone to create my own free dog cam.

In this blog post, I’ll show you how to build your own dog cam using:

  1. a Twilio account – sign up for free
  2. Python 3.x
  3. the micro web framework Flask
  4. the Twilio Python helper library
  5. ngrok - sign up for free
  6. An old phone or tablet

Features

For the Dog Cam, there were a few features I wanted:

Free or low cost solution

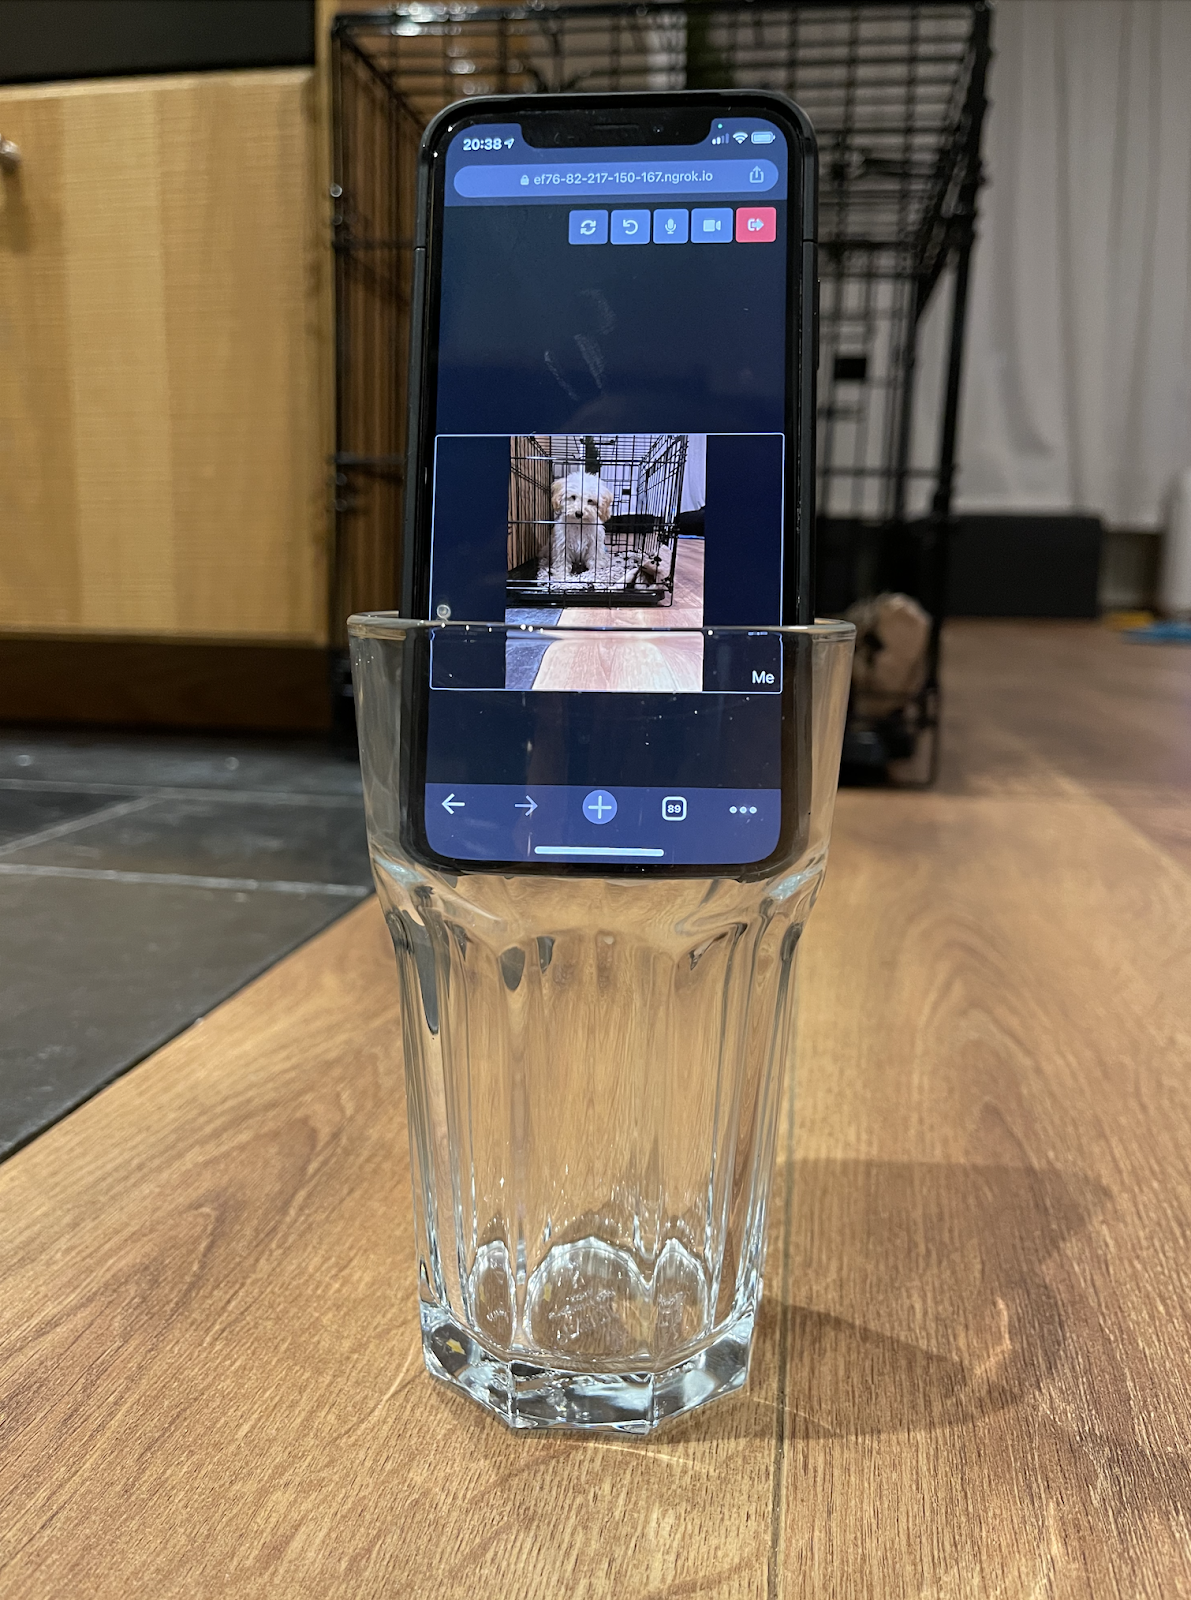
Existing dog cameras mostly require you to spend money on a subscription or new hardware. What I wanted was a free or low cost solution that can run on any internet-connected device with a display, a camera, and a web browser (for example on an older iPhone that I can conveniently place anywhere with the help of a “phone holder”).

Phone held in a glass showing the dog cam app
A web app using Twilio Video fit this spec. And with Twilio Video we don’t have to build the Video communication from scratch since it provides a convenient wrapper around WebRTC.


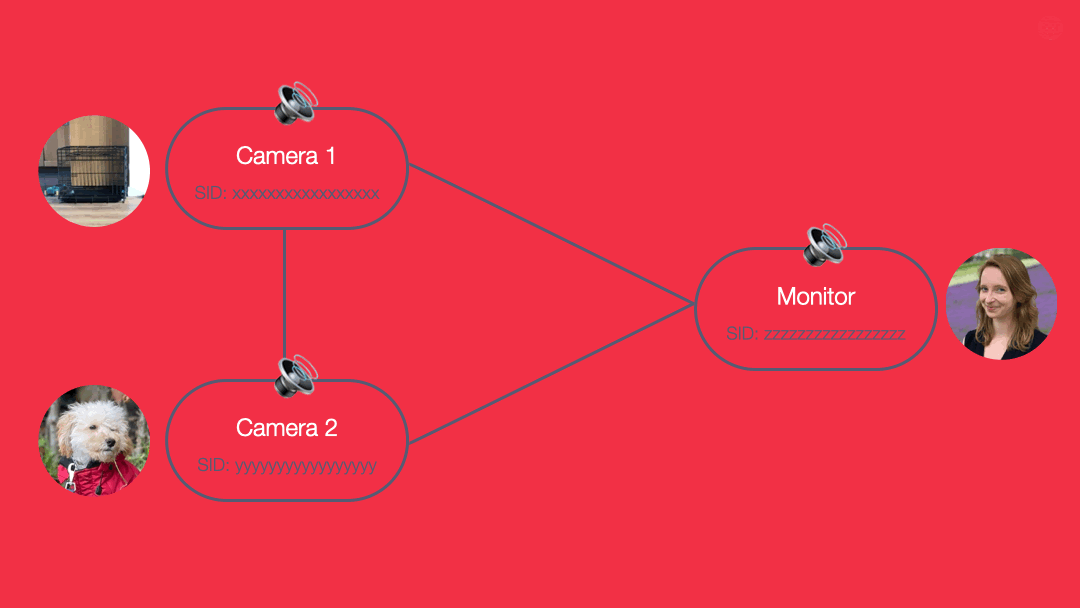
The way Twilio Video works is by creating Video Rooms. Participants (the dog camera(s) pointed at my dog and devices used for monitoring the dog cameras) can then join these rooms and publish and subscribe to video, audio, and data tracks. There are multiple different types of Video Rooms. The simplest Room type is a free WebRTC Go Room which is limited to two participants. This is enough for a setup with one camera and one device to monitor the camera. However, when I want to add more participants, I can also do that by using one of the paid Room types: P2P or Group.

Responsive UI with optimal screen real estate usage

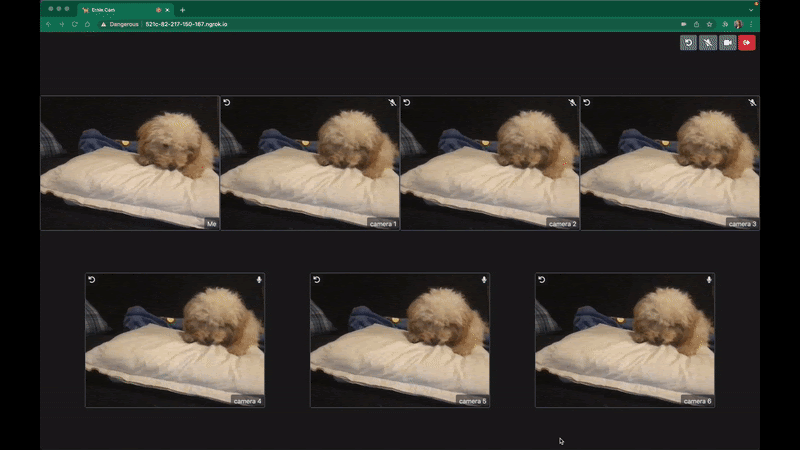
To be able to use one or more old devices as dog cams and then monitor all feeds on another device - maybe a phone, tablet, or laptop - the UI for the web app needs to be responsive. And I wanted all feeds to be visible without scrolling while sharing the space optimally. I solved this with a combination of CSS Flexbox and brute-force maths. If you're interested you can check out the css or the resize.js file, but we won’t go into this further in this blog post.

Dogcam with multiple participants

Changing the camera input

Choosing between multiple camera inputs on a single device is something most video applications have built in. If they do not, you can sometimes get away with setting the camera using the browser - but you cannot do that on a mobile phone. Since I want this web app to work on mobile devices, this is something the web app needs to include functionality for. The way we implement this is with a button to change the camera input.

Change camera button in the dog cam app

When a participant clicks on this button, we then need to deregister the video track from the Video Room and then register a new video track with the new camera source. We'll cover the code for this later in this blog post.

Muting and unmuting

Muting and unmuting yourself or turning your video on and off are straightforward to implement with Twilio Video. Muting and unmuting other participants’ audio is less straightforward. Twilio Video does not provide a method you can call to mute or unmute other participants. As a workaround, we can send participants a request to mute or unmute themselves. In the client-side JavaScript code, we can then write a function that receives the requests and acts on them. Please note that we cannot force participants to act on these requests - since the code for what to do when receiving a request is implemented in the application’s client-side JavaScript code, a participant could overwrite what happens when a request is received. This means you cannot use this trick to moderate Twilio Video calls.

The easiest way to send participants these requests to mute or unmute themselves is to use the DataTrack API. A DataTrack allows a client to send unidirectional messages to all subscribers - in our case to all other participants in the call. Let's say we have two cameras, Camera 1 and Camera 2, and one device we are using to monitor the cameras. If the monitor notices sound on Camera 1 and they would like to mute that participant, they can send a message with the identifier for that camera to all subscribers. The participant that is producing noise, upon receiving the message with its own identifier, then mutes itself. To unmute the camera, we can send another message to subscribers.

Architecture flow for muting and unmuting participants

Getting started

In the rest of the blog post, we will step-by step create the dog cam application. If you would prefer to see the finished code for the dog cam right away, you can find it at https://github.com/npentrel/dogcam.

To follow along with this tutorial, create a directory for your project with the name dogcam. Before we start, please ensure you have Python 3 and ngrok installed. To be able to use ngrok to build your dog or security cam, you have to also sign up for a free ngrok account. We will set up everything else as we go.


Set up environment variables

In your project directory, create a file with the name .env to store your environment variables. Copy the following code and fill in the respective variables:

TWILIO_ACCOUNT_SID=
TWILIO_API_KEY_SID=
TWILIO_API_KEY_SECRET=

You can obtain your TWILIO_ACCOUNT_SID in the Twilio Console. To get the TWILIO_API_KEY_SID and TWILIO_API_KEY_SECRET, generate a standard API Key.

Install & configure virtualenv

We are going to use Virtualenv to set up a virtual environment for this project, in order to isolate the dependencies of this project from other projects. Please create a file in your project directory named requirements.txt, with the following as its contents:

certifi==2020.4.5.1
chardet==3.0.4
click==7.1.1
Flask==1.1.2
idna==2.9
itsdangerous==1.1.0
Jinja2==2.11.2
MarkupSafe==1.1.1
PyJWT==1.7.1
pyngrok==4.1.5
python-dotenv==0.12.0
pytz==2019.3
requests==2.23.0
six==1.14.0
twilio==6.38.1
urllib3==1.25.8
Werkzeug==1.0.1

These are the dependencies we need for this project. Next we will install virtualenv to create and activate your virtual environment. Once this is done we will install the dependencies from the dependencies file you created above into your virtual environment. Run the following commands in your command-line:

# installs virtualenv
python3 -m pip install --user virtualenv
# sets up the environment
python3 -m venv env
# activates the environment
source env/bin/activate

# installs our dependencies
pip3 install -r requirements.txt

Run ngrok

In a different terminal window, let’s start ngrok. Ngrok will allow you to expose your localhost at port 8080 to incoming requests. We will be using this to allow Twilio to communicate with our local python server. It is important that you do not close this terminal window, so please have two terminal windows open – one for python and the other for ngrok.

ngrok http 8080

The output should be similar to this:

ngrok by @inconshreveable                                       (Ctrl+C to quit)

Session Status                online
Account                       Naomi Pentrel (Plan: Free)
Version                       2.3.40
Region                        United States (us)
Web Interface                 http://127.0.0.1:4040
Forwarding                    http://cffb-82-217-150-167.ngrok.io -> http://loca
Forwarding                    https://cffb-82-217-150-167.ngrok.io -> http://loc

Connections                   ttl     opn     rt1     rt5     p50     p90
                              0       0       0.00    0.00    0.00    0.00

In this case, the forwarding address we would use would be https://cffb-82-217-150-167.ngrok.io. Yours will be different! Please ensure you use the address that uses https.

Create app.py

Next, we will create the Python Flask server that will host this web application. By default the code for this application creates a free WebRTC Go Room which is limited to two participants. If you would like to use this with more participants, please change the Room type in the function find_or_create_room to one of the paid Room types (peer-to-peer or group).

In your project directory, create a file with the name app.py with these contents:

import os
import twilio.rest

from dotenv import load_dotenv
from flask import Flask, render_template, request, abort
from twilio.jwt.access_token import AccessToken
from twilio.jwt.access_token.grants import VideoGrant

load_dotenv()
twilio_account_sid = os.environ.get('TWILIO_ACCOUNT_SID')
twilio_api_key_sid = os.environ.get('TWILIO_API_KEY_SID')
twilio_api_key_secret = os.environ.get('TWILIO_API_KEY_SECRET')
twilio_client = twilio.rest.Client(
    twilio_api_key_sid,
    twilio_api_key_secret,
    twilio_account_sid)

app = Flask(__name__)
room_name = 'Dog Cam'


# if you would like to add more than 2 participants/cameras set the room type
# to "peer-to-peer" or "group"

def find_or_create_room(room_name):
    try:
        # try to fetch an in-progress room with room_name
        twilio_client.video.rooms(room_name).fetch()
    except twilio.base.exceptions.TwilioRestException:
        # a room with room_name does not exist, so we create it
        twilio_client.video.rooms.create(unique_name=room_name, type="go")


@app.route('/')
def index():
    return render_template('index.html')


@app.route('/login', methods=['POST'])
def login():
    camera_name = request.get_json(force=True).get('camera_name')
    if not camera_name:
        abort(401)

    find_or_create_room(room_name)

    token = AccessToken(
        twilio_account_sid,
        twilio_api_key_sid,
        twilio_api_key_secret,
        identity=camera_name)
    token.add_grant(VideoGrant(room=room_name))

    return {'token': token.to_jwt().decode()}


if __name__ == '__main__':
    app.run(host='0.0.0.0', port=8080)

Create templates/index.html

In your project directory, create a folder with the name templates. Inside the templates folder create a file with the name index.html with the following contents:

<!doctype html>
<html>
    <head>
      <link href="https://cdn.jsdelivr.net/npm/bootstrap@5.0.2/dist/css/bootstrap.min.css" rel="stylesheet"
        integrity="sha384-EVSTQN3/azprG1Anm3QDgpJLIm9Nao0Yz1ztcQTwFspd3yD65VohhpuuCOmLASjC" crossorigin="anonymous">
      <link rel="stylesheet" href="https://use.fontawesome.com/releases/v5.12.1/css/all.css" crossorigin="anonymous">
      <link rel="stylesheet" type="text/css" href="{{ url_for('static', filename='styles.css') }}">
      <meta name="viewport" content="width=device-width, initial-scale=1">
      <title> Dog Cam</title>
    </head>
    <body>
        <div class="navbar navbar-expand-md" id="navbar">
          <div class="container-fluid">
            <form class="d-flex">
              <input class="form-control me-2" type="text" id="camera_name" placeholder="Camera Name" aria-label="Camera Name">
              <button class="btn btn-outline-primary" id="join" type="submit"><i class="fas fa-sign-in-alt"></i></button>
            </form>
            <div class="justify-content-end">
              <button id="changeCamera" class="btn btn-secondary" hidden><i class="fas fa-sync-alt"></i></button>
              <button id="rotateVideo" class="btn btn-secondary"><i class="fas fa-undo"></i></button>
              <button id="mute_audio" class="btn btn-secondary" hidden><i class="fas fa-microphone"></i></button>
              <button id="mute_video" class="btn btn-secondary" hidden><i class="fas fa-video"></i></button>
              <button id="leave" class="btn btn-danger" hidden><i class="fas fa-sign-out-alt"></i></button>
            </div>
          </div>
        </div>
        <div id="participant-container">
          <div id="local" class="participant"><div class="video-container"></div><div class="label participantLabel">Me</div></div>
          <!-- more participants will be added dynamically here -->
        </div>
        <script src="https://media.twiliocdn.com/sdk/js/video/releases/2.18.1/twilio-video.min.js"></script>
        <script type="module" src="{{ url_for('static', filename='app.js') }}"></script>
    </body>
</html>

Create static resources

In your project directory, create a folder with the name static. Inside the static folder:

  • Create a file with the name styles.css with these contents. We won't make any changes to this file in this tutorial.
  • Create a file with the name resize.js with these contents. This file contains some functions used to calculate the optimal size for the displayed videos. We won't make any changes to this file in this tutorial.
  • Create an empty file with the name app.js. We will add the application logic inside this file next.

Write the application logic

Now we're ready to write the application logic:

Set up variables and helper functions

Open the app.js file. At the top of the file, insert these lines:

import { resizeVideos, zoomTrack, rotateVideo } from "./resize.js";

const camera_name_input = document.getElementById("camera_name");
const join_button = document.getElementById("join");
const leave_button = document.getElementById("leave");
const audio_mute_button = document.getElementById("mute_audio");
const video_mute_button = document.getElementById("mute_video");
const change_camera_button = document.getElementById("changeCamera");
const rotate_video_button = document.getElementById("rotateVideo");
const container = document.getElementById("participant-container");
const count = document.getElementById("count");
const style = document.createElement("style");
document.head.appendChild(style);

const app = {
    connected: false,
    muted: false,
    room: null,
    video_track: null,
    audio_track: null,
    data_track: null,
    current_camera: null,
    video: null
}

function resizeVideosHelper() {
    resizeVideos(document, container, style);
}

function rotateLocalVideo(v) {
    rotateVideo(document.getElementById("local").firstElementChild.getElementsByTagName("video")[0]);
}

// THE CODE TO CONNECT TO TWILIO VIDEO WILL GO HERE!

join_button.addEventListener("click", connectButtonHandler);
leave_button.addEventListener("click", connectButtonHandler);
audio_mute_button.addEventListener("click", audioButtonHandler);
video_mute_button.addEventListener("click", videoButtonHandler);
change_camera_button.addEventListener("click", changeCameraHandler);
rotate_video_button.addEventListener("click", rotateLocalVideo);
window.addEventListener("resize", resizeVideosHelper, true);

This code does multiple things:

  • The first set of variables make it easier for you to access DOM elements in the rest of the code.
  • The second set of variables store the state of the application, such as whether your audio is muted.
  • The resizeVideosHelper function will be used to resize videos whenever cameras get added or removed from the call or when the window size changes.
  • The rotateLocalVideo function will enable you to rotate the video elements you are seeing on your screen. Note that these do not rotate the video elements for other participants in the Twilio Video call.
  • The last set of function calls sets up the event listeners for the buttons and for window resize events.

Connect to Twilio Video

Inside the Python code, you added server-side code to create a Twilio Video Room. Now we will add the client-side code that allows participants to join the Room. A participant represents a client (an end-user) that is connected to a Room and can use the Room’s communication capabilities. For our dog camera, that means each device pointed at our dog and each device we use to monitor the other camera(s) is a participant.

Twilio Rooms are based on a publish/subscribe model. This means that a participant can publish media tracks to the Room. A Track is a stream of bytes that contain the data generated by a multimedia source such as a microphone or a camera.

Next, we will add code to publish a participant's local audio and video, as well as a data track. The audio and video is necessary so that you can see and hear what happens. We will use the data track later to allow participants to mute and unmute participants.

Add this code where the template comment indicates we will connect to Twilio Video:

function addLocalAudioTrack() {
    Twilio.Video.createLocalAudioTrack().then(track => {
        app.audio_track = track;
    });
};

function addLocalDataTrack() {
    app.data_track = Twilio.Video.LocalDataTrack();
};

async function addLocalVideo() {
    app.video = document.getElementById("local").firstChild;
    await Twilio.Video.createLocalVideoTrack().then(track => {
        let trackElement = track.attach();
        trackElement.addEventListener("click", () => { zoomTrack(trackElement, document, container, style); });
        if (app.video.hasChildNodes()) {
            app.video.removeChild(app.video.firstChild);
        }
        trackElement.className = "deg0";
        app.video.appendChild(trackElement);
        app.video_track = track;
    });
    return app.video_track;
};

// connect to Twilio Video

function connect(camera_name) {
    let promise = new Promise((resolve, reject) => {
        // get a token from the back end
        let data;
        fetch("/login", {
            method: "POST",
            body: JSON.stringify({"camera_name": camera_name})
        }).then(res => res.json()).then(_data => {
            // join video call
            data = _data;
            return Twilio.Video.connect(data.token, {tracks: [app.video_track, app.audio_track, app.data_track]});
        }).then(_room => {
            app.room = _room;
            app.room.participants.forEach(participantConnected);
            app.room.on("participantConnected", participantConnected);
            app.room.on("participantDisconnected", participantDisconnected);
            app.connected = true;
            resolve();
        }).catch(e => {
            console.log(e);
            reject();
        });
    });
    return promise;
};


function participantConnected(participant) {
    let participantDiv = document.createElement("div");
    participantDiv.setAttribute("id", participant.sid);
    participantDiv.setAttribute("class", "participant");

    let tracksDiv = document.createElement("div");
    tracksDiv.setAttribute("class", "video-container");
    participantDiv.appendChild(tracksDiv);

    let labelDiv = document.createElement("div");
    labelDiv.setAttribute("class", "label participantLabel");
    labelDiv.innerHTML = participant.identity;
    participantDiv.appendChild(labelDiv);

    let rotateButton = document.createElement("button");
    rotateButton.setAttribute("class", "rotateVideo label");
    rotateButton.innerHTML = "<i class='fas fa-undo'></i>";
    rotateButton.addEventListener("click", () => {
        let v = participantDiv.firstElementChild.getElementsByTagName("video")[0];
        rotateVideo(v);
    });
    participantDiv.appendChild(rotateButton);

    let muteAudioButton = document.createElement("button");
    muteAudioButton.setAttribute("class", "muteParticipantAudio label");
    muteAudioButton.innerHTML = "<i class='fas fa-microphone'></i>";
    // THE CODE FOR THE MUTE AUDIO BUTTON GOES HERE
    participantDiv.appendChild(muteAudioButton);

    container.appendChild(participantDiv);

    participant.tracks.forEach(publication => {
        if (publication.isSubscribed) {
            trackSubscribed(tracksDiv, publication.track, participantDiv);
        }
        publication.on("subscribed", track => handleTrackDisabled(track, participantDiv));
    });
    participant.on("trackSubscribed", track => trackSubscribed(tracksDiv, track, participantDiv));
    participant.on("trackUnsubscribed", track => trackUnsubscribed(track, participantDiv));

    resizeVideosHelper();
};

function participantDisconnected(participant) {
    let p = document.getElementById(participant.sid);
    if (p.classList.contains("participantZoomed")) {
        zoomOut(document, container, style)
    }
    p.remove();
    resizeVideosHelper();
};

function trackSubscribed(div, track, participantDiv) {
    let trackElement = track.attach();
    if (track.kind === "video") {
        trackElement.className = "deg0";
    }
    trackElement.addEventListener("click", () => { zoomTrack(trackElement, document, container, style); });
    div.appendChild(trackElement);
    handleTrackDisabled(track, participantDiv);
};

function trackUnsubscribed(track, participantDiv) {
    if (track.kind == "video") {
        if (participantDiv.classList.contains("participantZoomed")) {
            zoomOut(document, container, style);
        }
        track.detach().forEach(element => {
            element.remove()
        });
    }
};

function disconnect() {
    app.room.disconnect();
    while (container.lastChild.id != "local")
        container.removeChild(container.lastChild);
    // in case the participant was hidden this resets it.
    container.lastChild.className = "participant";
    app.connected = false;
    resizeVideosHelper();
};

// button handlers

function connectButtonHandler(event) {
    event.preventDefault();
    if (!app.connected) {
        let camera_name = camera_name_input.value;
        if (!camera_name) {
            alert("Enter a camera name before connecting");
            return;
        }

        // add spinner
        join_button.children[0].className = "spinner-border spinner-border-sm"
        join_button.disabled = true;

        connect(camera_name).then(() => {
            // change navbar to joined view
            camera_name_input.hidden = true;
            join_button.children[0].className = "fas fa-sign-in-alt";
            join_button.hidden = true;
            leave_button.hidden = false;
            leave_button.disabled = false;
            audio_mute_button.hidden = false;
            video_mute_button.hidden = false;
        }).catch(() => {
            alert("Connection failed. Is the backend running?");
            // reset navbar
            join_button.disabled = false;
            join_button.hidden = false;
            join_button.children[0].className = "fas fa-sign-in-alt";
        });
    } else {
        disconnect();
        camera_name_input.hidden = false;
        join_button.disabled = false;
        join_button.hidden = false;
        leave_button.hidden = true;
        leave_button.disabled = true;
        audio_mute_button.hidden = true;
        video_mute_button.hidden = true;
        app.connected = false;
    }
};

function handleTrackDisabled(track, participantDiv) {
    track.on("disabled", () => {
        /* Hide the associated <video> element. */
        if (track.kind == "video") {
            participantDiv.hidden = true;
            resizeVideosHelper();
        }
    });
    track.on("enabled", () => {
        /* Hide the associated <video> element. */
        if (track.kind == "video") {
            participantDiv.hidden = false;
            resizeVideosHelper();
        }
    });
}

// THE CODE TO CHANGE THE CAMERA INPUT WILL GO HERE
function changeCameraHandler(event) { }

// THE CODE TO MUTE AND UNMUTE YOURSELF AND OTHERS WILL GO HERE
function audioButtonHandler(event) { }
function videoButtonHandler(event) { }

addLocalVideo();
addLocalAudioTrack();
addLocalDataTrack();

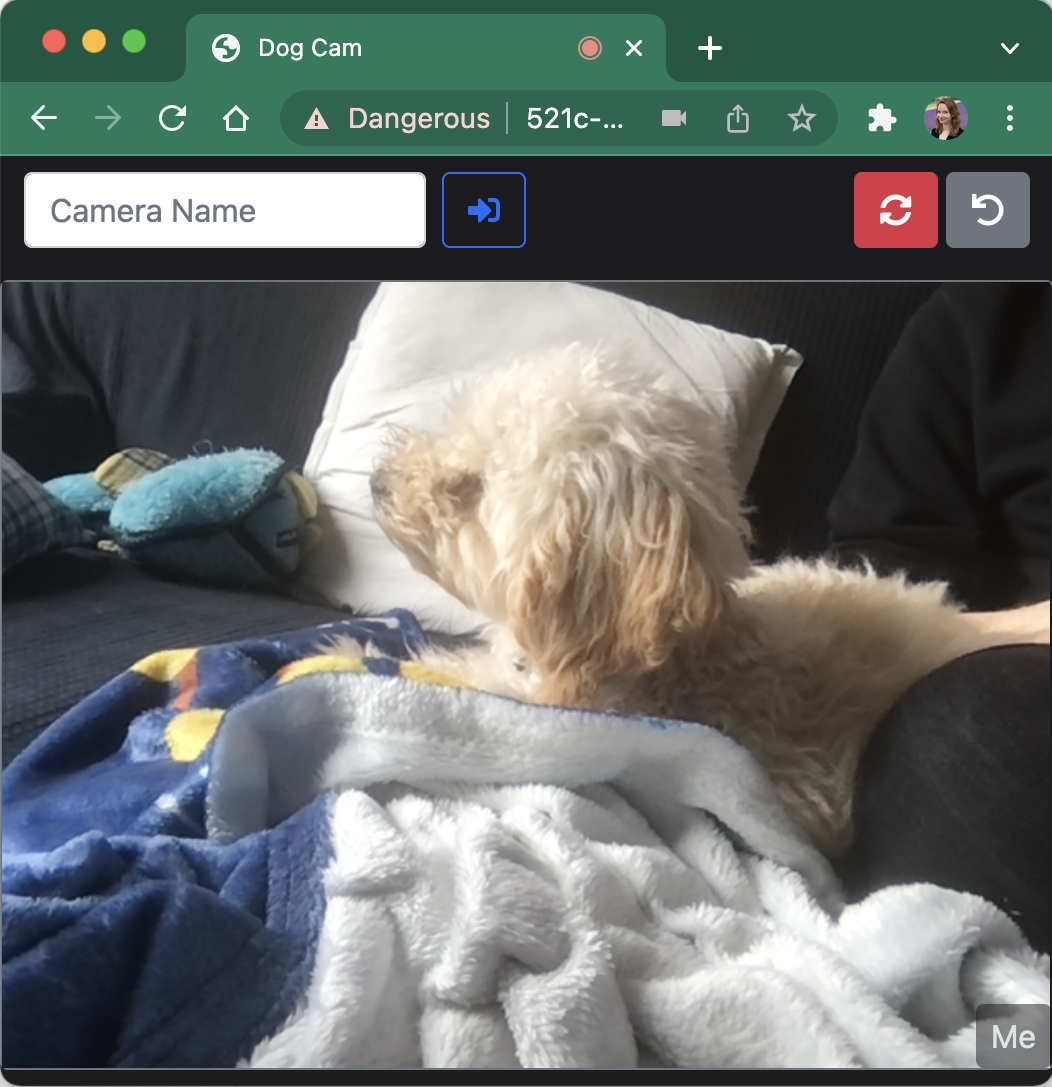
If you want to, you can test the app now! Run python app.py in your terminal and go to the ngrok forwarding address that uses https. Your browser may show you a warning that the page you are trying to go to is unsafe. Since this is your own page you can safely navigate to the page (on Chrome, click Details and then visit this unsafe site). You can now enter a camera name and join the room.

Changing the camera input on a device

If you run the application as-is you are most of the way there. However, if you try to use it on a mobile device you may notice that you can't change the camera. So let's change that.

To be able to change the camera input on a mobile device you need to make some changes to the code we just added. The first thing we need to change is to pass a specific deviceId to the addLocalVideo  function. The deviceId identifies which camera the application should use.

Replace the addLocalVideo function with the following code:

async function addLocalVideo(id) {
    let options = {}
    if(id){
        options = { deviceId: id };
    }
    app.video = document.getElementById("local").firstChild;
    await Twilio.Video.createLocalVideoTrack(options).then(track => {
        let trackElement = track.attach();
        trackElement.addEventListener("click", () => { zoomTrack(trackElement, document, container, style); });
        if (app.video.hasChildNodes()) {
            app.video.removeChild(app.video.firstChild);
        }
        trackElement.className = "deg0";
        app.video.appendChild(trackElement);
        app.video_track = track;

        // enable change camera button if there are multiple video devices
        let video_devices = navigator.mediaDevices.enumerateDevices().then(devices => {
            video_devices = devices.filter(d => d.kind == "videoinput");
            if (video_devices.length > 1) {
                change_camera_button.hidden = false;
            }
        });
    });
    return app.video_track;
};

The other change we need to make is to replace the changeCameraHandler function with the following code:

async function changeCameraHandler(event) {
    event.preventDefault();

    if (app.current_camera == null) {
        app.current_camera = app.video_track.mediaStreamTrack.label;
    }

    let video_devices = await navigator.mediaDevices.enumerateDevices();
    video_devices = video_devices.filter(d => d.kind == "videoinput");

    let new_video_device = null;
    for (let i = 0; i < video_devices.length; i++) {
        if (video_devices[i].label == app.current_camera) {
            new_video_device = video_devices[(i+1)%video_devices.length];
        }
    }
    if (app.room) {
        app.room.localParticipant.unpublishTrack(app.video_track);
    }
    app.video_track = await addLocalVideo(new_video_device.deviceId);
    if (app.room) {
        app.room.localParticipant.publishTrack(app.video_track);
    }

    app.current_camera = new_video_device.label;
}

When you click on the change camera button the changeCameraHandler selects the next camera that is available. Next, the function calls the addLocalVideo function with the deviceId of the new camera. If the participant has already joined a room, the changeCameraHandler unpublishes the old video_track before creating and publishing the new video_track.

Mute and unmute yourself or your security cameras

The last feature we will implement is the ability to turn off your video and to mute and unmute yourself or other participants.

Let's start by adding the ability to enable and disable your camera. To do that replace the empty videoButtonHandler function with the below code which disables and enables the video track when you click on the button and changes the symbol displayed on the button respectively. When a participant’s track is disabled the existing handleTrackDisabled function gets called which will hide the div containing the participant’s video and then call a helper function to resize the remaining videos.

function videoButtonHandler(event) {
    event.preventDefault();

    app.room.localParticipant.videoTracks.forEach(publication => {
        if (publication.isTrackEnabled) {
            publication.track.disable();
            video_mute_button.firstChild.className = "fas fa-video-slash";
            document.getElementById("local").hidden = true;
        } else {
            publication.track.enable()
            video_mute_button.firstChild.className = "fas fa-video";
            document.getElementById("local").hidden = false;
        }
    });
    resizeVideosHelper();
}

Next, let's make the audio_mute_button work by implementing the audioButtonHandler.

function audioButtonHandler(event) {
    if (event) {
       event.preventDefault();
    }

    app.room.localParticipant.audioTracks.forEach(publication => {
        if (publication.isTrackEnabled) {
            publication.track.disable()
            audio_mute_button.firstChild.className = "fas fa-microphone-slash";
            app.muted = true;
        } else {
            publication.track.enable()
            audio_mute_button.firstChild.className = "fas fa-microphone";
            app.muted = false;
        }
    });
}

Muting and unmuting yourself works similarly to turning your video on and off. But Twilio Video does not provide a function to mute or unmute other participants. Therefore we are going to use the DataTrack API to send participants a *request* to mute or unmute themselves. As a reminder, this only works as expected as long as no one messes with the application’s JavaScript code in the browser, but be aware that participants could do this.

A DataTrack allows the local participant to send unidirectional messages to all remote participants. Let’s briefly talk about participants. There are two types of participants: local participants and remote participants. On the client side, the local participant is the participant who is in front of the device, the remote participant(s) are the other participants on the call.

For example, let's say we have two devices we use as dog cameras, Camera 1 and Camera 2, and one device we use to monitor the cameras. If you are monitoring both cameras and notice one of the cameras is picking up noise you are not interested in, you can send a message with the identifier (SID) for that participant to all subscribers. All other participants on the call will receive this message. Upon receiving the message, each participant should then check if the participant SID in the message matches their own SID and if so, mute themself. To unmute the participant, we can send another message to subscribers.

Application Architecture Diagram

Let’s write the code for this. Right now participants aren't listening to messages sent on the data_track. To enable participants to react to incoming mute instructions we need to define a function that can then be called whenever we receive a message. We’ll call this function receiveMuteInstructions. If we just sent the participant SID as the message we could end up in a situation where the displayed button state does not match the actual participant state. To avoid this, we also need to send along the requested action (mute or unmute) and each new participant needs to check the state of all participants when they first join the call (by sending a message with the word  sendState).

The receiveMuteInstructions function splits the incoming message into the action word (mute, unmute, or sendState) and the participant sid. If the action is sendState the participant will send whether it is currently muted or unmuted. Otherwise the receiveMuteInstructions function checks whether the sid matches the local participant’s sid. If it matches, this is the participant that should be muted and the function calls the audioButtonHandler. This is the same audioButtonHandler that we call whenever a participant clicks on their own mute/unmute button. If the sid does not match the local participant’s sid, then all the client needs to do is update the UI to reflect the new muted/unmuted state for the given participant.

Add the following code below the audioButtonHandler:

const receiveMuteInstructions = (data) => {
    let action;
    let sid;
    [action, sid] = data.split(" ");

    if (action == "sendState") {
        if (app.muted) {
            app.data_track.send("mute " + app.room.localParticipant.sid);
        }
    } else {
        if (sid == app.room.localParticipant.sid) {
            audioButtonHandler();
        } else {
            let participant = document.getElementById(sid);
            if (action == "mute") {
                participant.lastChild.innerHTML = "<i class='fas fa-microphone-slash'></i>";
            } else {
                participant.lastChild.innerHTML = "<i class='fas fa-microphone'></i>";
            }
        }
    }

}

Currently the receiveMuteInstructions function is not called anywhere. To call it whenever a participant receives a message we need to attach an event handler to the data track when it is first registered. To do that, replace the trackSubscribed function in your code with the following function:

function trackSubscribed(div, track, participantDiv) {
    if (track.kind === "data") {
        track.on("message", data => receiveMuteInstructions(data));
        app.data_track.send("sendState");
    } else {
        let trackElement = track.attach();
        if (track.kind === "video") {
            trackElement.className = "deg0";
        }
        trackElement.addEventListener("click", () => { zoomTrack(trackElement, document, container, style); });
        div.appendChild(trackElement);
    }
    handleTrackDisabled(track, participantDiv);
};

There are two more things we need to do to make the mute buttons work! For the mute buttons on each participant’s video, look for the line that defines the muteAudioButton. Before the muteAudioButton gets added to the participantDiv, insert the following code that will send the mute or unmute messages to the data_track:

    muteAudioButton.addEventListener("click", () => {
        if (muteAudioButton.innerHTML == "<i class='fas fa-microphone'></i>") {
            app.data_track.send("mute " + participant.sid);
        } else {
            app.data_track.send("unmute " + participant.sid);
        }
    });

Lastly, we need to add some more code to the audioButtonHandler to ensure that when a participant mutes themselves, other participants will accurately update their button symbols to reflect the participant’s state. Replace the function with the following code:

function audioButtonHandler(event) {
    if (event) {
       event.preventDefault();
    }

    app.room.localParticipant.audioTracks.forEach(publication => {
        if (publication.isTrackEnabled) {
            publication.track.disable()
            audio_mute_button.firstChild.className = "fas fa-microphone-slash";
            app.muted = true;
        } else {
            publication.track.enable()
            audio_mute_button.firstChild.className = "fas fa-microphone";
            app.muted = false;
        }
    });

    // send sid and action to listeners so they know our audio state
    if (app.muted) {
        app.data_track.send("mute " + app.room.localParticipant.sid);
    } else {
        app.data_track.send("unmute " + app.room.localParticipant.sid);
    }

}

Run the application

That’s it - you have set up your own dog cam with Twilio Video! If you haven’t already, go to your terminal and run python app.py. From your other terminal window, copy the ngrok address that uses https and open the URL in your browser. Your browser may show you a warning that the page you are trying to go to is unsafe. Since this is your own page you can safely navigate to the page (on Chrome, click Details and then visit this unsafe site). You can now enter a camera name and join the call. Join the call from two two different devices to test your app!

I hope this will keep your dog, other pet, or whatever you are watching safer. Don’t be a stranger - if you end up using this, let me know on Twitter @naomi_pen!