Continuous Delivery with Jenkins and GitHub
Time to read:
June 11, 2018
Written by
This post is part of Twilio’s archive and may contain outdated information. We’re always building something new, so be sure to check out our latest posts for the most up-to-date insights.

If you can set up a project server once, you can set up Jenkins to deploy that project again and again as you develop, maintain, and expand it.
In this post we will set up a multi-stage deploy server and the Jenkins jobs we need for continuous delivery. By the end you will know how to set up a server and Jenkins jobs to automatically deploy successfully built branches into each environment.
In a previous post we set up a dedicated Jenkins Server and gave it access to our projects’ GitHub account with an SSH key.
We will use a PHP project as an example, but we’ll also talk about how these same steps can be used to deploy most web projects regardless of language, framework, or other considerations.
Tools
In order to follow along with this post, you will need the following:
- A PHP project with a repository on GitHub.
- A DigitalOcean account. You can create one here.
- You have some familiarity with command line linux.
- Jenkins initial server and GitHub account SSH setup are complete.
This same process can be used with non-PHP projects, but our example assumes PHP. You can also use servers hosted anywhere, but we’re using DigitalOcean for our example as their great documentation is a nice resource if you get stuck.
This setup uses two servers. The Jenkins Server which was created previously, and the Deploy Server which we’re creating here.
Overview
Moving forward we will walk through these steps:
- The Deploy Server: We will create a single server set up to serve Test, Staging, and Production branches independently. You may want to set up each release phase on its own server, or pre-production release phases on one server and production on another, but in this example we will assume we want all of the release phases on a single server.
- The Deploy Server’s jenkins User: We’ll create a user on our deploy server for our Jenkins Server to access via SSH and run our deploy commands.
- SSH Setup in Jenkins: We’ll install and configure a plugin on our Jenkins Server so it knows how to access our deploy server.
- Creating a Jenkins Deploy Job: We’ll walk through all the steps to configure a new Jenkins job to be triggered by a commit to our repo, build and test our branch on the Jenkins Server, package and transmit that build to our Deploy Server, and setup the new build there.
- Testing Your Build: Finally, we’ll talk about how to keep an eye on in-progress build jobs and where to find logs to investigate failed builds.
The Deploy Server
First, create a new DigitalOcean Ubuntu droplet and go through the initial installations necessary to make it a LEMP stack.
Once that’s complete, go to your webroot and create directories named “test”, “staging”, and “production”. Inside each of these directories, create “releases” and “deploy” directories. Depending on your directory ownership, you may need to prefix these commands with sudo.
The “releases” directory will hold our project builds, so that we can update which build is being served by changing a “current” symlink. The “deploy” directory is where we will keep data which needs to be consistent between builds, but which are specific to the release phase such as user uploaded media or files storing environment variables.
Create a server block file for each of these so you can access them on the web.
The root in each file will begin with the webroot path followed by the phase name followed by a “current” directory (created later) followed by whatever path is needed by your project structure. For example: /var/www/test/current/public/index.php.
We recommend that credentials for applications be stored in environment variables so at this stage you will need to set up those environment variables for each release phase. If you are using a tool like dotenv, for example, now is the time to create a .env file in each deploy directory.
Notes: although it is outside the scope of this walkthrough, if your project uses a database you will need to create a database for each release phase, and store the corresponding database name in each release phase’s .env or equivalent file. I recommend also creating a different database user for each release phase to further guard against mishap. The credentials for each phase’s database user should also be stored in the corresponding .env or equivalent file.
The Deploy Server’s jenkins User
Next, create a new sudo user named jenkins, become that user, and open up their authorized_keys file:
Copy and paste the SSH public key we created for the jenkins user on our Jenkins Server into the authorized_keys file (which won’t exist until we save it) on our new Deploy Server, then save and exit (ctrl-o then ctrl-x).
Next, we’ll make a few specific commands executable by the new jenkins user using sudo *without* a password. Jenkins will run commands, but not interact with prompts, so it cannot enter the jenkins user’s password when prompted. We will create this exception on as few commands as possible, although which commands require this exception will depend on your project.
For our example project, add the following lines to the jenkins user’s sudoers file (pico /etc/sudoers.d/jenkins):
Then save and exit (ctrl-o then ctrl-x).
SSH Setup in Jenkins
Now the jenkins user on our Deploy Server has the correct permissions we need to setup the Jenkins Server to use that account over SSH. Open your Jenkins admin UI in your browser by putting the Jenkins Server ip address followed by :8080 as the url.
Click “Manage Jenkins” and then “Manage Plugins”. Select the “Available” tab and then search for “Publish Over SSH”. Select and install the plugin.

Choose the option to restart Jenkins when the install is complete. You’ll need to wait a moment after the install is complete to allow the restart to process. Then reload and log back in.
Click “Manage Jenkins” and then “Configure System”. Find the SSH section. In the Path to key field type “/home/jenkins/.ssh/id_rsa” if you followed the steps in this post; otherwise, be sure you’ve created an ssh key on your Jenkins Server and use the path where it is stored.
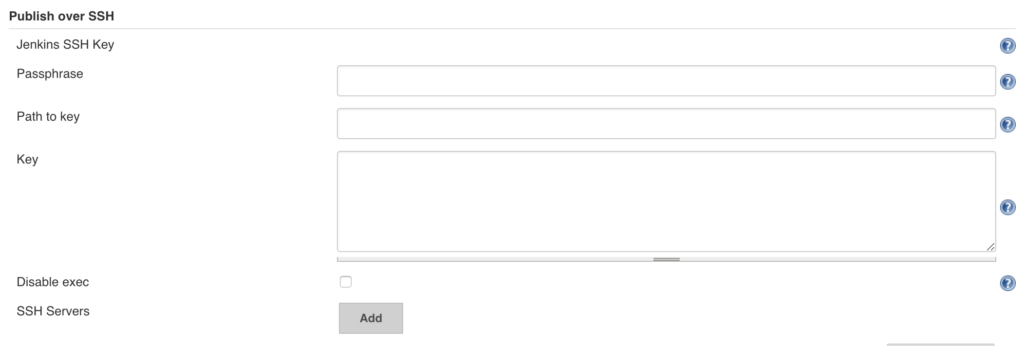
Then click the “Add” button labeled “SSH Servers”.
In the form that appears, enter the following information:
- Name: [pick_a_descriptive_name_for_your_deploy_server]
- Hostname: [ip_address_of_deploy_server]
- Username: jenkins
- Remote directory: [your_webroot_directory]
Then you have the option to “Test Configuration” and then “Save”. Testing the configuration is not required before saving, but is a good idea to catch stray type-os and avoid future headaches.
Creating a Jenkins Deploy Job
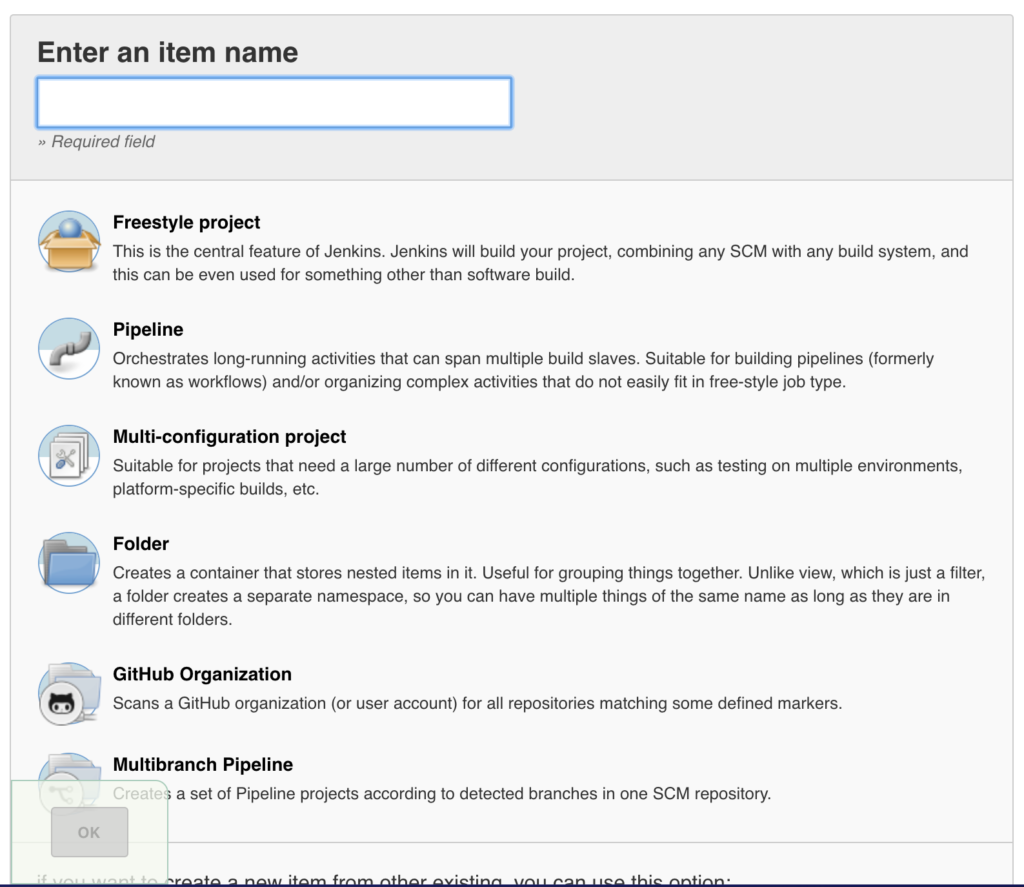
Next click “Jenkins” then “New Item”. Name the new item for your project and the first deploy phase. So if your project’s name is “homepage”, name the new item “test.homepage”. Select “Freestyle” and click “OK”.
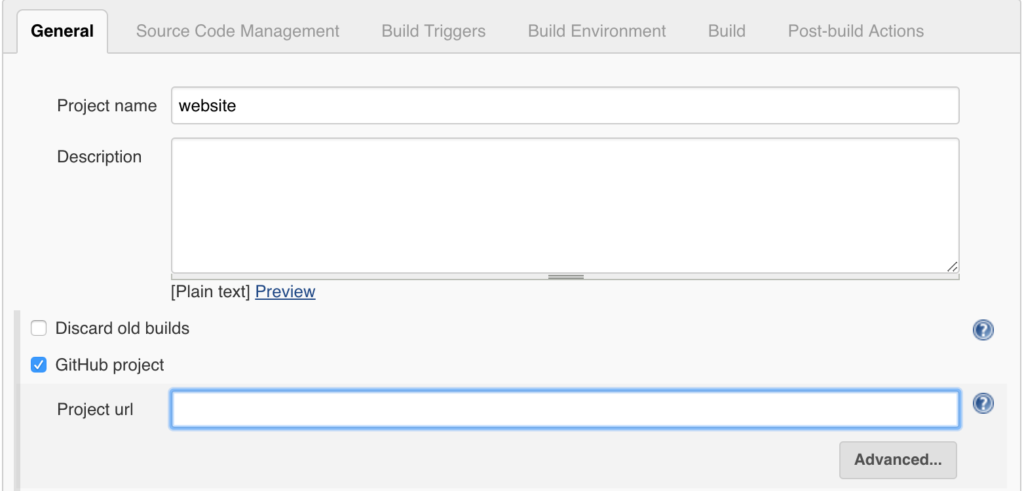
General
On the configuration page which comes up, In the “General” section find and select the checkbox labeled “GitHub project”. For the “project url” field, enter the GitHub project url (https://github.com/your_username/your_project_name.git).
Source Code Management
In the “Source Code Management” section select the “Git” radio and enter the same GitHub project url in the “Repository URL” field. Click the “Add” button next to the “Credentials” drop down.
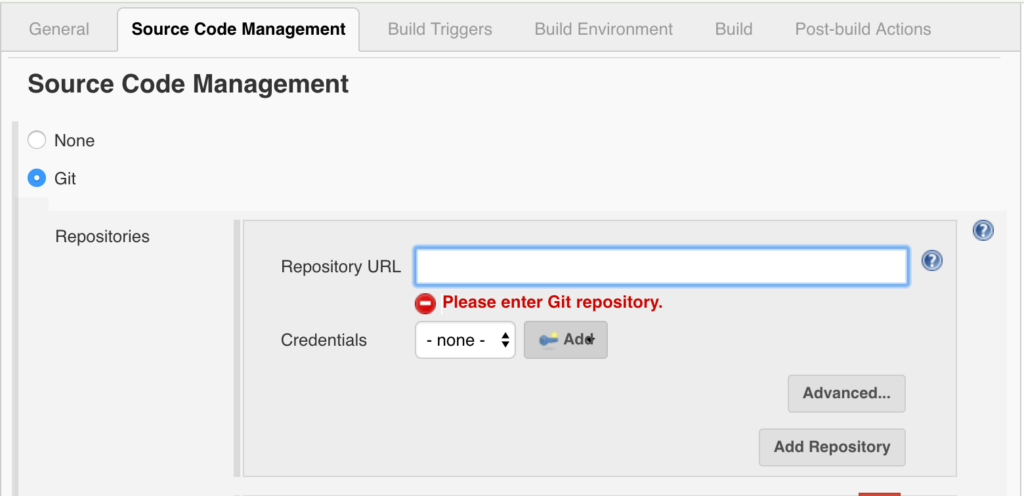
In the form that comes up, select “SSH Username with private key” from the “Type” dropdown. The “Username” should be the username for the GitHub account which hosts the project. Select the “From the Jenkins master ~/.ssh” radio option. Then click “Add”.

Now select the newly created option from the “Credentials” dropdown. For the “Branch Specifier” put “*/” followed by the name of your testing branch (for example: */test). When you create jobs for your other stages, you will be able to select these credentials from the dropdown without going through the Add form first.
Build Triggers
In the “Build Triggers” section select the “GitHub hook trigger for GITscm polling” checkbox.
Build Environment
In the “Build Environment” section select the “Add timestamps to the Console Output” option.
Build
In the “Build” section select “Add Build Step Execute Shell” from the “Add Build Step” drop down. In this example we will use two “Execute Shell” build steps so as to keep each one short enough to read easily. These steps will build, test, and package the targeted branch locally on the Jenkins Server.
In the first “Execute Shell” text field add:
Add or substitute your relevant startup commands, but continue to include the rm *.gz line and a command to truncate your log file. Creating the .env from .env.example here will be used for testing locally on the Jenkins server, but will not cause issues on the deploy server as we will copy over the .env stored in the “deploy” directory there.
Add a second “Execute Shell” step and add the following to its text field:
When creating your builds, “test” above will need to reflect whatever phase you are creating the build to deploy, and “homepage” above will need to be replaced with a project specific name.
Post Build Actions
In the “Post Build Actions” section we’re going to “Send build artifacts over SSH”. Setting this up will transmit the newly packaged build to the deploy server and then run commands on the deploy server as necessary to unpack and setup the new build there.
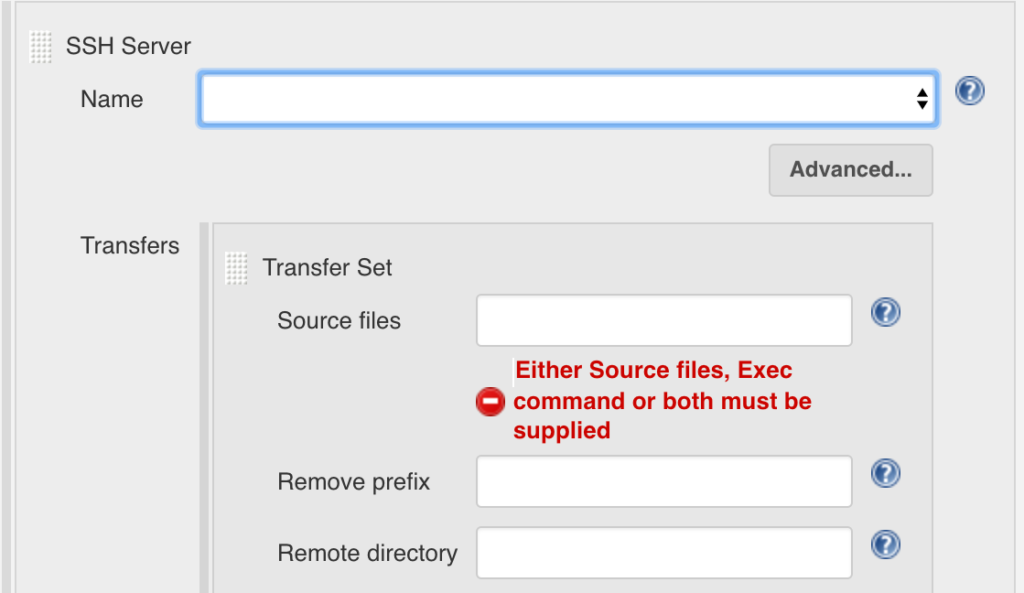
Select the Deploy Server from the “Name” dropdown.
In the Transfers’ Source Files feid add the name of the tarball we just created (“test.homepage-build.tar.gz”). The “Transfers’ Remote Directory” field needs the full path of your deploy server’s web root followed by the phase name and releases directories that we created earlier (example: /var/www/test/releases).
Notes: In this example we will put all of the remaining commands needed for this deploy line by line into the Transfers’ Exec command text field, but you may wish to create a bash script or other command script which takes the build generated $BUILD_NUMBER value and contains all of these sequential steps, and then only execute that script here.
In the Transfers’ Exec command text field add the following, replacing “test” and “homepage” as needed and replacing “php7.2” with your current version:
Then click the “Save” button.
Testing Your Build
Click Build Now on your new job. When the newly triggered build appears under “Build History”, select it and then select the “Console Output” option.
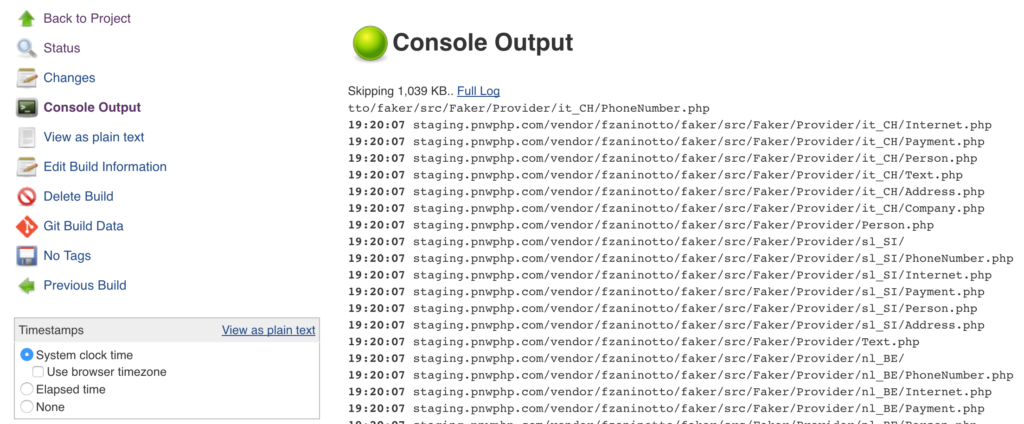
Watch your build process and make adjustments to your job configuration if you encounter errors.
Once this job runs smoothly, celebrate! You have successfully created a continuous delivery process for one of your development branches!
Next, create two new Jenkins build jobs for your staging and production deploy phases. They will be nearly identical to this first phase. Replace each instance of the “test” phase name with the phase name you are creating the new job for (example: “production”), and update the name of the specific branch the job will build from (example: “*/master”).
Success!
Now each time you make a commit to your “test” branch, the “test” job will run, building your project from that branch on your Jenkins server, running tests, and move the new build to the “test” directory on your deploy server. If the automated tests do not pass, the build will fail without deploying and you can look at the console log for that build to find out why. The same is true for each time you merge to your “staging” and “production” branches.
While it is still up to you (and your development team) to use release phase branches with care (example: commits to the earliest phase, pull requests and merges on later phases and only after they’ve passed each previous one), this automated deploy process removes a lot of potential headaches from the development process.
Once you’re comfortable with the concepts and process of using Jenkins, you may want to look at Jenkins Pipelines to automate more complex project builds.


Related Resources
Twilio Docs
From APIs to SDKs to sample apps
API reference documentation, SDKs, helper libraries, quickstarts, and tutorials for your language and platform.
Resource Center
The latest ebooks, industry reports, and webinars
Learn from customer engagement experts to improve your own communication.
Ahoy
Twilio's developer community hub
Best practices, code samples, and inspiration to build communications and digital engagement experiences.