Creating a Smart Assistant using Twilio Voice, Amazon Alexa, and Laravel

March 28, 2019
Written by
Jake Casto
Contributor
Opinions expressed by Twilio contributors are their own

alex-twilio-personal-assistant-laravel-cover-photo.png

As a small business owner, I am always trying to increase my productivity and grow my business. Why have a meeting for what can be said in an email? Unfortunately, many of my clients don’t check their email regularly, so I have to call them. There’s no better way to decrease your productivity than a million simple phone calls every day. If you’re in the same boat as I am, Amazon Alexa + Twilio Voice is the perfect solution.

Technical Requirements

For this tutorial, we'll assume the following:

  • You have PHP 7.2 installed
  • You are familiar with Laravel
  • You have Composer globally installed.
  • You have an Amazon Developer account.

Let's get started!

Create a Laravel Project and Install the Twilio SDK

The first thing we need to do is create a fresh Laravel project. The simplest way to do this is by using Composer.

$ composer create-project --prefer-dist laravel/laravel alexa-twilio-voice

Once your project has been created cd into the newly created alexa-twilio-voice directory and install the Twilio PHP SDK.

$ cd alexa-twilio-voice && composer require twilio/sdk

Now that Twilio's fabulous PHP SDK has been installed, we need to set up your Twilio authentication credentials.

Set your Authentication Credentials

Open your project in a file browser and navigate to the root directory. Once in the directory, open .env in your favorite text editor and add the following variables to it.

TWILIO_ACCOUNT_SID="INSERT ACCOUNT SID"
TWILIO_AUTH_TOKEN="INSERT AUTH TOKEN"
TWILIO_NUMBER="INSERT TWILIO VOICE NUMBER"

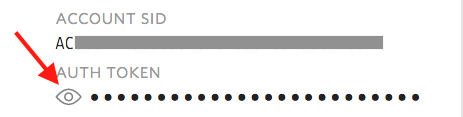
The values for your account SID and Auth Token come from the Twilio console:

If you already have a Twilio Programmable Voice Number, you can add it to your environment file. If not you can create one on the Twilio Voice console:

Create Amazon Alexa Skill

Using the Amazon Developer portal is the quickest way to create an Alexa Skill. If you don't already have an Amazon Developer account, you can create one for free at developer.amazon.com. Once logged in navigate to the Alexa Console.

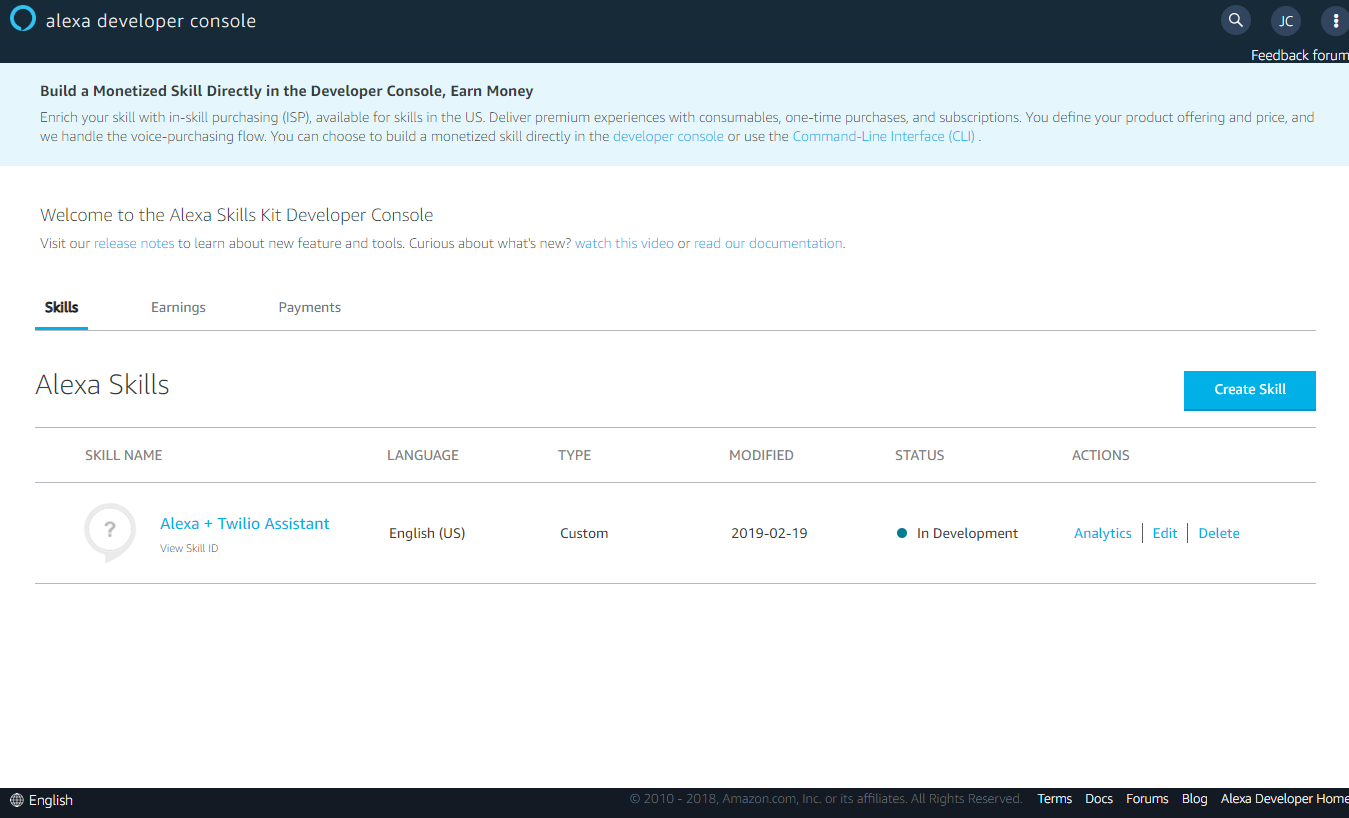
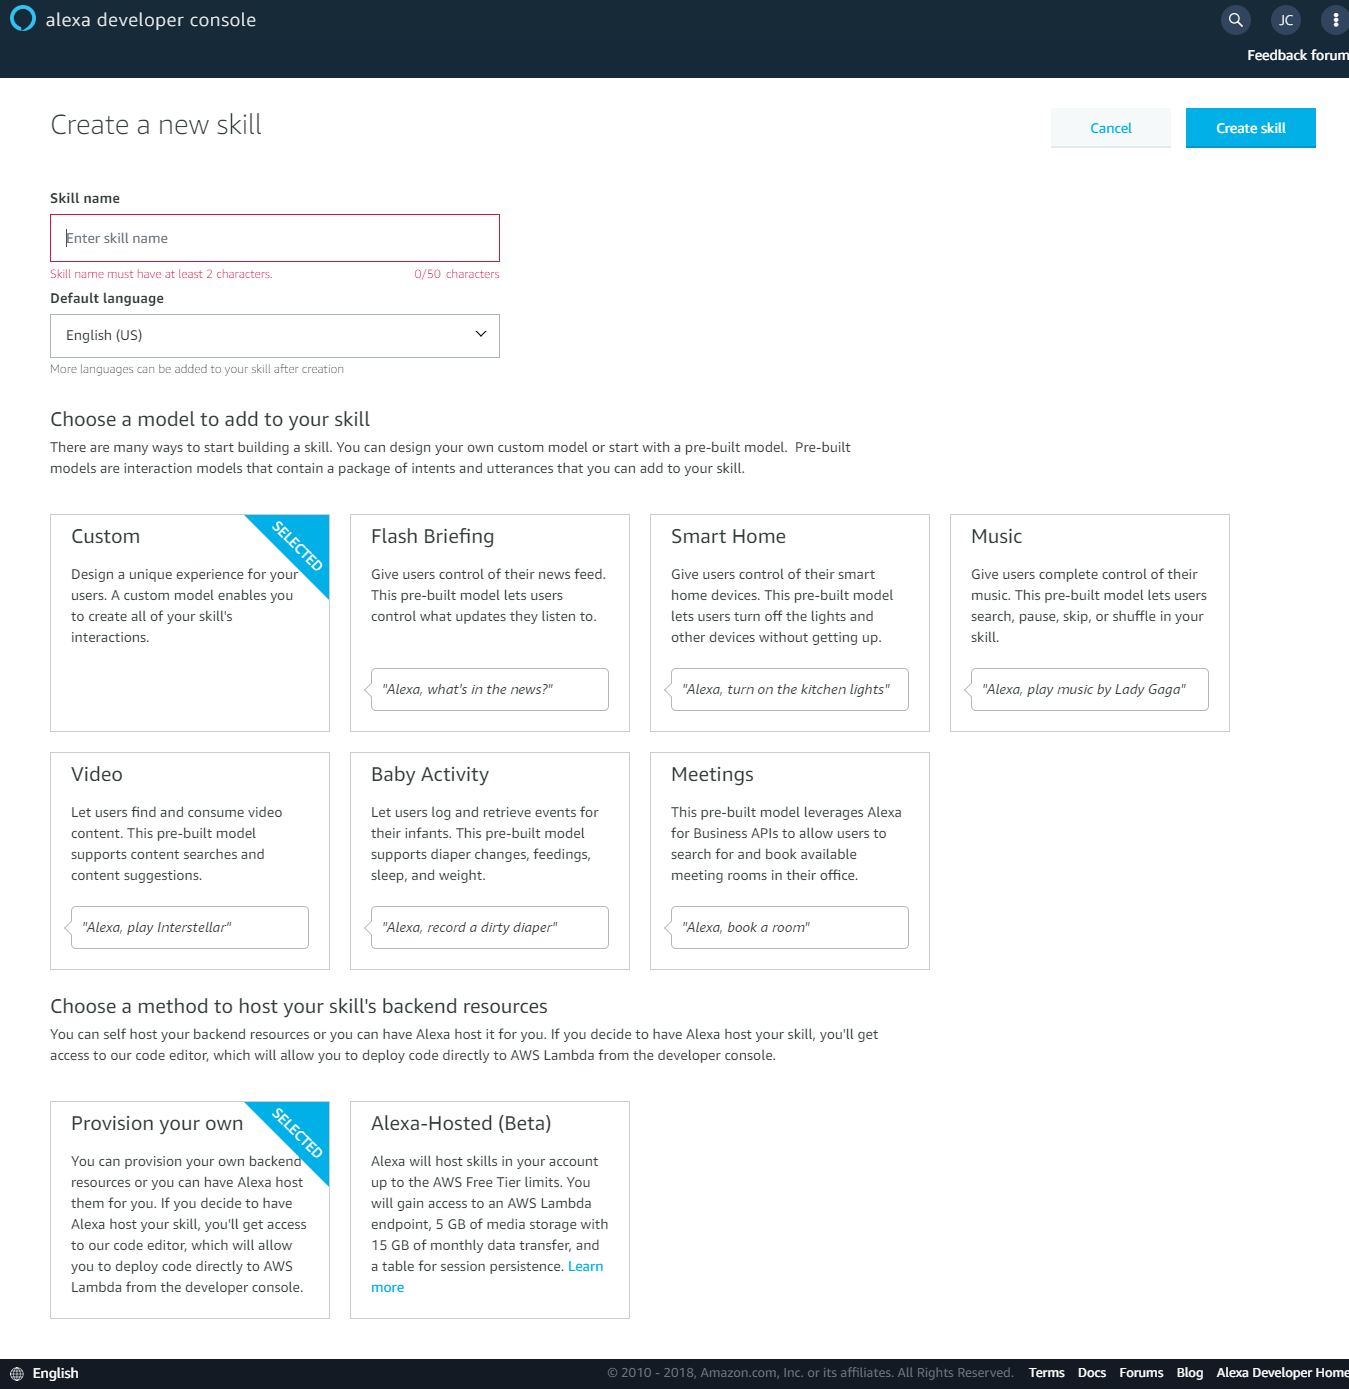
Click "Create Skill". We'll name this skill "Alexa + Twilio Assistant". Because our skill is going to be interactive, select the "Custom" skill model and "Provision your own” for backend resources and click "Create Skill." Now you should see a screen that looks similar to the image below.

I've already created an Intent JSON that you can copy and paste into Alexa’s Intent Editor. Click on the “JSON Editor” link underneath the “Intents” menu to access it. Once you have pasted the JSON, click on “Save Model” to save your updates.

{
    "interactionModel": {
        "languageModel": {
            "invocationName": "personal assistant",
            "intents": [
                {
                    "name": "AMAZON.CancelIntent",
                    "samples": []
                },
                {
                    "name": "AMAZON.HelpIntent",
                    "samples": []
                },
                {
                    "name": "AMAZON.StopIntent",
                    "samples": []
                },
                {
                    "name": "AMAZON.FallbackIntent",
                    "samples": []
                },
                {
                    "name": "SelectIntent",
                    "slots": [
                        {
                            "name": "PHONE",
                            "type": "AMAZON.PhoneNumber",
                            "samples": [
                                "Send it to {PHONE}",
                                "I want to send it to {PHONE}",
                                "I'd like to send it to {PHONE}"
                            ]
                        }
                    ],
                    "samples": [
                        "Can you send a message to {PHONE}",
                        "I want to send a voice message to {PHONE}",
                        "Send voice message to {PHONE}",
                        "Send a voice message to {PHONE}",
                        "I'd like to send a voice message {PHONE}"
                    ]
                },
                {
                    "name": "MessageIntent",
                    "slots": [
                        {
                            "name": "MESSAGE",
                            "type": "AMAZON.SearchQuery",
                            "samples": [
                                "I want to say {MESSAGE}"
                            ]
                        }
                    ],
                    "samples": [
                        "Say {MESSAGE}",
                        "Send {MESSAGE}",
                        "I want to say {MESSAGE}"
                    ]
                },
                {
                    "name": "AMAZON.NavigateHomeIntent",
                    "samples": []
                }
            ],
            "types": []
        },
        "dialog": {
            "intents": [
                {
                    "name": "SelectIntent",
                    "confirmationRequired": false,
                    "prompts": {},
                    "slots": [
                        {
                            "name": "PHONE",
                            "type": "AMAZON.PhoneNumber",
                            "confirmationRequired": false,
                            "elicitationRequired": true,
                            "prompts": {
                                "elicitation": "Elicit.Slot.1367559622889.1254282115325"
                            }
                        }
                    ]
                },
                {
                    "name": "MessageIntent",
                    "confirmationRequired": false,
                    "prompts": {},
                    "slots": [
                        {
                            "name": "MESSAGE",
                            "type": "AMAZON.SearchQuery",
                            "confirmationRequired": false,
                            "elicitationRequired": true,
                            "prompts": {
                                "elicitation": "Elicit.Slot.970494754980.1515686938645"
                            }
                        }
                    ]
                }
            ],
            "delegationStrategy": "ALWAYS"
        },
        "prompts": [
            {
                "id": "Elicit.Slot.1367559622889.1254282115325",
                "variations": [
                    {
                        "type": "PlainText",
                        "value": "Who would you like to send it to?"
                    }
                ]
            },
            {
                "id": "Confirm.Slot.1367559622889.1254282115325",
                "variations": [
                    {
                        "type": "PlainText",
                        "value": "Are you sure you'd like to send it to {PHONE} ?"
                    }
                ]
            },
            {
                "id": "Elicit.Slot.970494754980.1515686938645",
                "variations": [
                    {
                        "type": "PlainText",
                        "value": "What message would you like to send?"
                    }
                ]
            }
        ]
    }
}

Building REST Endpoints for Alexa

Open your terminal again and cd into your projects directory. Using Laravel's Artisan commands create a new controller.

$ php artisan make:controller IntentController --a

Navigate to the app/Http/Controllers directory and you should see your controller IntentController.php. Open it in your favorite IDE. Copy and paste the following code into IntentController.php.

<?php
namespace App\Http\Controllers;

use Illuminate\Http\Request;
use Illuminate\Support\Facades\Response;

use Twilio\Rest\Client;
use Twilio\Twiml;

use Illuminate\Support\Facades\Cache;

use Illuminate\Support\Facades\Log;

class IntentController extends Controller
{
    public function processIntent(Request $request)
    {
            // If it's a `LaunchRequest` set the name to `LaunchRequest` else, pull the intent name from the request data
            $intent_name = $request->input('request.type') === 'LaunchRequest' ? 'LaunchRequest' : $request->input('request.intent.name');

            switch($intent_name)
            {
                    case 'LaunchRequest':
                            // Saying "Alexa, open twilio assistant" will trigger this
                            return response()->json([
                                    'version' => '1.0',
                                    'response' => [
                                            'outputSpeech' => [
                                                    'type' => 'PlainText',
                                                    'text' => 'Welcome to the Twilio Alexa assistant.',
                                            ],
                                            // We want to start a session so our intents will work
                                            'shouldEndSession' => false,
                                    ],
                            ]);
                    break;
                    case 'SelectIntent':
                            // we pull the phone number from the slot alexa sends us
                            $phone_number = $request->input('request.intent.slots.PHONE.value');

                            // return the phone number in the session data & ask what message to send, this will trigger the MessageIntent
                            return response()->json([
                                    'version' => '1.0',
                                    'response' => [
                                            'outputSpeech' => [
                                                    'type' => 'PlainText',
                                                    'text' => 'What message would you like to send?',
                                            ],
                                            'shouldEndSession' => false,
                                    ],
                                    // Alexa stores session data and sends it with each request, typical sessions will not work
                                    'sessionAttributes' => [
                                            'phoneNumber' => $phone_number,
                                    ],
                            ]);
                    break;
                    case 'MessageIntent':
                            // we grab the auth info from the environment file
                            $account_sid = env('TWILIO_ACCOUNT_SID');
                            $auth_token = env('TWILIO_AUTH_TOKEN');
                            $from_number = env('TWILIO_NUMBER');

                            // we grab to `To` number from the session data Alexa sends us
                            $to_number = $request->input('session.attributes.phoneNumber');

                            // message
                            $message = $request->input('request.intent.slots.MESSAGE.value');

                            // Create the Twilio call and route it to our callback
                                   $client = new Client($account_sid, $auth_token);
                                $call = $client->account->calls->create(  
                                    $to_number,
                                    $from_number,
                                    [
                                            'url' => route('twilio.callback'),
                                    ]
                                );

                                // now cache the call sid and message
                                Cache::put($call->sid, $message, 5 * 60);

                                // Let the user know the call was successful
                            return response()->json([
                                    'version' => '1.0',
                                    'response' => [
                                            'outputSpeech' => [
                                                    'type' => 'PlainText',
                                                    'text' => 'Sending ' . $message . ' to ' . $to_number,
                                            ],
                                            'shouldEndSession' => false,
                                    ],
                            ]);
                        break;
            }
    }

    public function processCall(Request $request)
    {
            // get twilio call sid
            $id = $_REQUEST['CallSid'];

            // fetch message from cache
            $message = Cache::get($id);

            // generate twiml with response
            $twiml = new Twiml();
            $twiml->say($message, [
                    'voice' => 'alice',
            ]);

            // return twiml
            $response = Response::make($twiml, 200);
            $response->header('Content-Type', 'text/xml');
            return $response;
    }
}

Let's look at our controller functions — the function processIntent processes Intents from your Alexa Skill. It fetches the phone number from the SelectIntent and the message from the MessageIntent. Once the MessageIntent has been called, it calls the Twilio API to create a call. Our other function, processCall is our Twilio callback. It fetches the message from our cache and returns TwiML that Twilio Voice reads on our call.

Now we need to create our routes to direct requests to our IntentController. Paste the following code into routes/web.php.

<?php

Route::post('/alexa/intent', 'IntentController@processIntent');

Route::post('/twilio/callback', 'IntentController@processCall')->name('twilio.callback');

Lastly we need to declare our routes exempt from Laravel’s CSRF Protection, this will allow Alexa to access our routes. Paste the following into app/Http/Middleware/VerifyCsrfToken.php.

<?php

namespace App\Http\Middleware;

use Illuminate\Foundation\Http\Middleware\VerifyCsrfToken as Middleware;

class VerifyCsrfToken extends Middleware
{
    /**
     * Indicates whether the XSRF-TOKEN cookie should be set on the response.
     *
     * @var bool
     */
    protected $addHttpCookie = true;

    /**
     * The URIs that should be excluded from CSRF verification.
     *
     * @var array
     */
    protected $except = [
        '*'
    ];
}

SSL Certificates

You can install your Laravel project on a web server. I suggest using Laravel Forge for one-click deployments. Unfortunately, Amazon doesn't recognize any CA approved SSL certificate providers other than their own. You'll have to generate a self-signed certificate, luckily Amazon has a guide for that here.

Because you're using a self-signed certificate, you'll need to disable SSL verification in your Twilio console. Navigate to your Twilio Project Settings. Scroll down to SSL Certificate Validation. Change the validation option from Enabled to Disabled and save your project settings.

Lastly let’s set up our endpoint on the Alexa Console. Within your skill, scroll down to Endpoint. Select "HTTPS" as your endpoint type. Upload your certificate we generated in the previous step and set the default region to https://your.url.here/alexa/intent. Then save your endpoints and build your skill.

Testing

Connect your Alexa powered device to your Amazon Developer account. Below is a sample conversation with our skill.

  • User: Alexa, open personal assistant
  • Alexa: Welcome to the Twilio Alexa assistant
  • User: I’d like to send a voice message to +11111111111
  • Alexa: What message would you like to say?
  • User: Say Hey jake are we still on for lunch tomorrow?
  • Alexa: Sending "hey jake are we still on for lunch tomorrow" to +11111111111

Conclusion

Now that you've completed this tutorial you know how to:

  • Make calls using the Twilio PHP SDK
  • Create Amazon Alexa Skill Intents
  • Integrate Twilio Voice with a Smart Assistant

Next, you should try building custom interactions into your Twilio Voice assistant.

You can find me on Github, Twitter, or reach me via email at jake@lynndigital.com.