Forecast the Weather With PHP and OpenWeatherMap

March 08, 2024
Written by
Reviewed by

Forecast the Weather With PHP and OpenWeatherMap

No matter what we do, weather is all around us and forms an intimate part of our lives. Whether you live in a colder climate, such as Canada, where it can get as low as -63C/-81.4F, or a warmer climate, such as 50C/122F in Australia, it's important to stay abreast of what's coming by forecasting the weather.

And what better way to do that, than by making your own weather app!

Okay, you could just download any one of the myriad apps available for iOS and Android. Alternatively, you could use sites such as the Australian Bureau of Meteorology, WeatherCAN, or the Meteorological Service Singapore.

But, why do that when you can build your own? Especially since — as developers — we love to learn, explore, grow, and build.

So, in this tutorial, you're going to learn how to do just that, by building a simplistic weather forecast website using PHP and the OpenWeatherMap API.

What you'll need

To follow along with this tutorial, you will need the following:

How does the app work?

Before diving in too deeply, let's look at how the application will work. Built around the Slim Framework, it lets a user search for the current weather in any city or town around the world and, if found, displays:

  • A general description of the weather for the day, such as "overcast clouds"
  • The current temperature in either Celsius or Fahrenheit
  • The current wind speed in kilometres or miles per/hour
  • The humidity, UV index, and time of sunrise and sunset

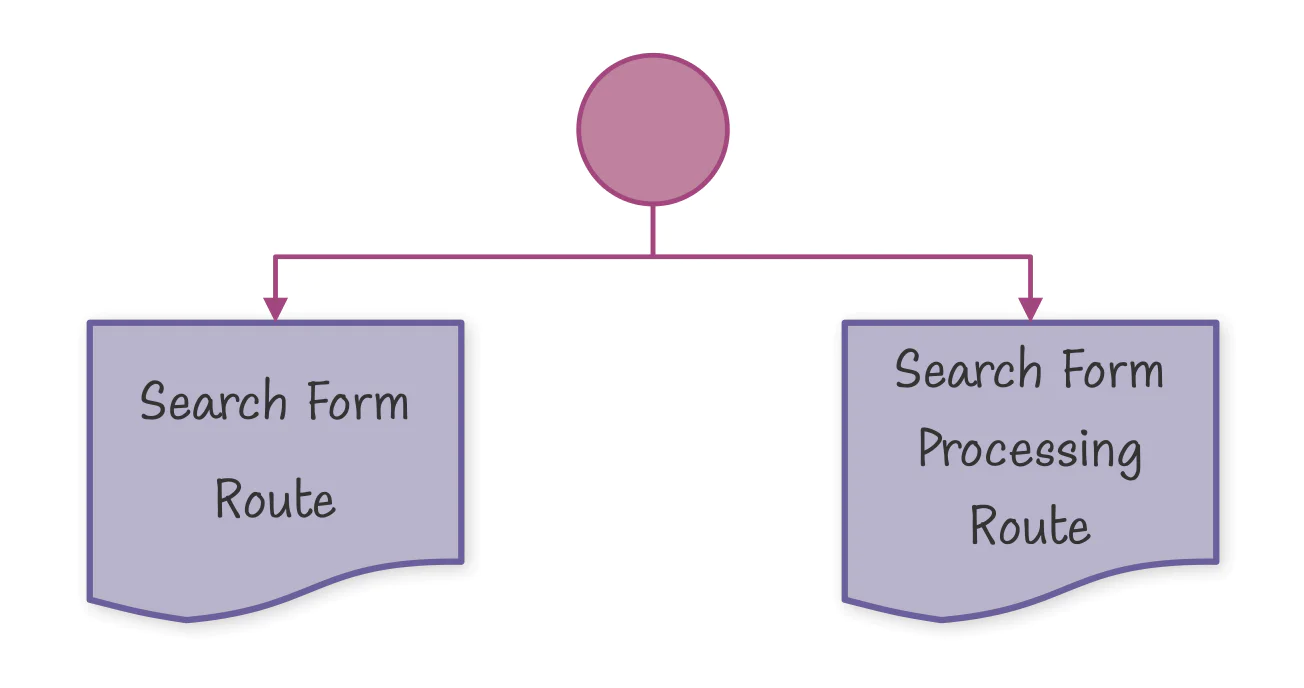
The app will have two routes, as you can see in the sitemap above, a route to render the search form with the desired city or town name, and a route to process a submitted search form.

The Search Form route will render the search form along with any form errors if there are any. The Search Form Processing route will process form submissions. If there are errors, it will redirect the user back to the search form. If there are none, it will retrieve the weather data for the given location and render it (rather stylishly, I think).

Let's begin!

Create the project's structure

We'll start by creating the project's directory structure and changing into the project's top-level directory, by running the commands below:

mkdir php-weather-app
cd php-weather-app
mkdir -p public/css public/img src/Error src/Twig/Extension templates

If you're using Microsoft Windows, don't use the -p flag, as it's not necessary.

The commands will create a directory structure that looks like this:

.
├── public
│   ├── css
│   └── img
├── src
│   ├── Error
│   └── Twig
│   	└── Extension
└── templates

Install the required dependencies

With the directory structure in place, the next step is to install the required dependencies. There aren't many, just the following:

To install them, run the following command:

composer require cmfcmf/openweathermap-php-api guzzlehttp/guzzle guzzlehttp/psr7 php-di/slim-bridge slim/flash slim/psr7 slim/slim slim/twig-view vlucas/phpdotenv

Set the required environment variables

You only need one environment variable for this app, your OpenWeatherMap API key. First, though, create a new file named .env in the project's top-level directory, and in that file paste the code below:

OPENWEATHERMAP_APIKEY=<<OPENWEATHERMAP_APIKEY>>

Then, if you already have an OpenWeatherMap API key, after logging into your OpenWeatherMap account, retrieve it from the My API keys section. If you don't have one, from My API keys, in the Create key section enter a name for the key and click Generate. Then, copy the key and paste it in .env in place of <<OPENWEATHERMAP_APIKEY>>.

The API keys section of the OpenWeatherMap dashboard showing two redacted API keys on the left and a form to create a new API key on the right.

Download the static assets

Now, download the static assets, starting with the application's stylesheet, styles.css. Store it in the public/css directory as styles.css. Then, download a zip archive containing the application's images, and extract its contents in the public/img directory.

Create the search form route

This route will render a small page containing just a search form where the user can input the city that they want the weather forecast for. To do that, create a new file in the public directory named index.php. In that file, past the code below:

<?php

declare(strict_types=1);

session_start();

use Cmfcmf\OpenWeatherMap\Exception as OWMException;
use Cmfcmf\OpenWeatherMap;
use DI\Container;
use Psr\Http\Message\ResponseInterface as Response;
use Psr\Http\Message\ServerRequestInterface as Request;
use Slim\Factory\AppFactory;
use Slim\Flash\Messages;
use Slim\Psr7\Factory\RequestFactory;
use Slim\Views\Twig;
use Slim\Views\TwigMiddleware;

require __DIR__ . '/../vendor/autoload.php';

$dotenv = Dotenv\Dotenv::createImmutable(__DIR__ . "/../");
$dotenv->load();
$dotenv->required('OPENWEATHERMAP_APIKEY');

$container = new Container();
$container->set('view', function(): Twig {
	$twig = Twig::create(__DIR__ . '/../templates', []);
	return $twig;
});
$container->set('flash', function () {
    return new Messages();
});

AppFactory::setContainer($container);

$app = AppFactory::create();
$app->add(TwigMiddleware::createFromContainer($app));
$app->get('/', function (Request $request, Response $response, array $args) {
    /** @var Messages $flash */
    $flash = $this->get('flash');

    return $this->get('view')
        ->render(
            $response, 
            'home.html.twig', 
            ['error' => $flash->getMessage('error')]
        );
});

$app->run();

The code starts by using PHP Dotenv to load the OpenWeatherMap API key from .env in the project's top-level directory. Then, it initialises a DI container ($container) with two services: view and flash.

The view service returns a Twig instance which retrieves its templates from the templates directory in the project's top-level directory. The flash service returns a new Slim\Flash\Messages object which can store messages between requests, allowing for messages to be passed from one request to another, such as error messages.

The code finishes up by registering the search form route (/) along with an anonymous function to handle requests to the route. The function renders the search form ( /templates/home.html.twig). If any form errors are set in a flash message they are retrieved and rendered in the template as well.

Create the base template

Each of the application's two routes have a template that renders its specific content. However, the elements common to both templates, such as the header and footer, will be stored in a separate base template, which the route-specific templates will extend.

So, in the templates directory, create a new file named base.html.twig, and in that file paste the code below:

<!doctype html>
<html lang="en">
<head>
    <meta charset="UTF-8">
    <meta name="viewport" content="width=device-width, initial-scale=1.0">
    <link href="/css/styles.css" rel="stylesheet">
    <title>{% block title %}{% endblock %}</title>
</head>
<body class="bg-slate-50">
<div class="relative z-0">
    <img class="absolute top-2 -right-24 opacity-10 grayscale" src="/img/weather-icons/rain.png" alt="Rainy weather icon">
</div>
<div class="w-fit m-auto p-4 z-40">
    <h1 class="text-4xl font-bold mb-2">{% block h1 %}{% endblock %}</h1>
    {% block content %}{% endblock %}
    <footer class="border-t-2 border-slate-200 drop-shadow-sm text-center mt-5 pt-4">
        <p class="lowercase text-slate-300">built by Matthew Setter. Powered by Twilio.</p>
    </footer>
</div>
<div class="sticky z-0">
    <img class="-ml-20 opacity-10 grayscale" src="/img/weather-icons/rain.png" alt="Rainy weather icon">
</div>
</body>
</html>

Most of the code should be pretty self-explanatory. It's a minimalist HTML file with a small head and body. The block directives are what is most important, though. These allow for the route-specific templates to set the content in these sections, when they extend it.

Create the route's template

With the base template in place, let's create the search form route's template. In the templates directory, create a new file named home.html.twig. Then, in that file, add the code below:

{% extends "base.html.twig" %}

{% block title %}Find the Weather with PHP{% endblock %}
{% block h1 %}Find the Weather with PHP{% endblock %}

{% block content %}
    {% if error is not empty  %}
        <div class="p-2 pl-4 mb-2 flex flex-row bg-red-100 text-red-900 rounded-full">
            <img src="/img/form-icons/warning-32.png"
                 alt="warning icon"
                 class="mr-3">
            <span class="pt-1">{{ error|first }}</span>
        </div>
    {% endif %}
    <div class="px-5 pb-1">
        {% include 'search-form.html.twig' %}
    </div>
{% endblock %}

The template starts by extending templates/base.html.twig. Then, it sets the content of the title and h1 tags, along with the page's core content. The core content is composed of two parts:

  • Firstly, a div that renders an error message, should there be a form error after submission.
  • Secondly, the embedded search form. It's included from a separate template as it's part of the templates for both routes, plus the error page. There's no sense in duplicating the code needlessly.

Create the form template

Next, create a new file in the templates directory named search-form.html.twig. In the file, paste the code below:

<form enctype="multipart/form-data"
    method="post">
    <div class="flex flex-row gap-1">
        <input type="text"
            name="city"
            placeholder="What city are you in?"
            tabindex="1">
        <input type="submit"
            name="submit"
            value="Search"
            tabindex="2"
            class="p-2 px-6 text-center border-4 border-purple-950 bg-purple-900 rounded-md text-white hover:cursor-pointer transition ease-in-out delay-100 hover:bg-purple-800 duration-150">
    </div>
    <fieldset class="border-slate-150 border-2 mt-2 rounded-md pb-1 px-2">
    <legend class="mt-3 mx-2 px-2 text-gray-800 font-medium dark:text-gray-300">What format do you want the weather displayed in?</legend>
    <div class="grid grid-cols-2 gap-1">
        <label class="hover:cursor-pointer hover:bg-white p-3 pl-4 rounded-md border-2 border-slate-50 hover:border-slate-100 transition ease-in-out delay-50 duration-100 hover:ring-2 hover:ring-slate-200 hover:ring-inset">
            <input type="radio" name="unit" value="imperial"
                   class="hover:cursor-pointer pt-2 w-5 h-5 bg-gray-100 border-gray-300 focus:ring-blue-500 dark:focus:ring-blue-600 dark:ring-offset-gray-800 focus:ring-2 dark:bg-gray-700 dark:border-gray-600">
            <span class="font-medium">Imperial</span>
            <p id="helper-radio-text"
               class="text-xs font-normal text-gray-500 dark:text-gray-300 ml-6">
                Use miles and degrees fahrenheit.
            </p>
        </label>
        <label class="hover:cursor-pointer hover:bg-white p-3 pl-4 rounded-md border-2 border-slate-50 hover:border-slate-100 transition ease-in-out delay-50 duration-100 hover:ring-2 hover:ring-slate-200 hover:ring-inset">
            <input type="radio" name="unit" value="metric"
                   class="hover:cursor-pointer w-5 h-5 text-blue-600 bg-gray-100 border-gray-300 focus:ring-blue-500 dark:focus:ring-blue-600 dark:ring-offset-gray-800 focus:ring-2 dark:bg-gray-700 dark:border-gray-600">
            <span class="font-medium">Metric</span>
            <p id="helper-radio-text"
               class="text-xs font-normal text-gray-500 dark:text-gray-300 ml-6">
                Use kilometres and degrees celsius.
            </p>
        </label>
    </div>
    </fieldset>
</form>

The form contains a text box for the desired city, two radio buttons to set the desired unit of measurement (imperial or metric), and a button to submit the form.

If you choose Imperial as the unit of measure, the weather data will use degrees Fahrenheit and miles per/hour. Otherwise, by choosing Metric it will use degrees Celsius and kilometres per/hour.

Did you know that the first country to adopt the metric system was France in 1795? And, did you know that the meter was developed by measuring one-ten-millionth of the quadrant of Earth’s circumference running from the North Pole to the equator, through Paris?

Create the form processing route

Now, it's time to create the route that processes form submissions. To do that, in public/index.php, add the following code after the call to $app->get():

$app->post('/', function (Request $request, Response $response, array $args) {
    $city = $request->getParsedBody()['city'] ?? '';
    if ($city === '') {
        $flash = $this->get('flash');
        $flash->addMessage('error', 'Please provide a city');
        return $response
            ->withHeader('Location', '/')
            ->withStatus(302);
    }

    $owm = new OpenWeatherMap(
        $_ENV["OPENWEATHERMAP_APIKEY"],
        new GuzzleHttp\Client(),
        new RequestFactory()
    );

    $data = ['city' => $city];

    try {
        $unit = $request->getParsedBody()['unit'] ?? 'metric';
        $weather = $owm->getWeather($city, $unit, 'en');
        $data['weather'] = $weather;
        $uv = $owm->getCurrentUVIndex($weather->city->lat, $weather->city->lon);
        $data['uv'] = $uv;
    } catch(OWMException $e) {
        throw new HttpNotFoundException(
            $request,
            'OpenWeatherMap exception: ' . $e->getMessage() . ' (Code ' . $e->getCode() . ').',
            $e
        );
    } catch(\Exception $e) {
        throw new HttpNotFoundException(
            $request,
            'General exception: ' . $e->getMessage() . ' (Code ' . $e->getCode() . ').',
            $e
        );
    }

    return $this->get('view')
        ->render(
            $response,
            'weather-report.html.twig',
            ['data' => $data]
        );
});

Then, update the use statements at the top of the file to match the following code:

use Cmfcmf\OpenWeatherMap\Exception as OWMException;
use Cmfcmf\OpenWeatherMap;
use DI\Container;
use Psr\Http\Message\ResponseInterface as Response;
use Psr\Http\Message\ServerRequestInterface as Request;
use Slim\Exception\HttpNotFoundException;
use Slim\Factory\AppFactory;
use Slim\Flash\Messages;
use Slim\Psr7\Factory\RequestFactory;
use Slim\Views\{Twig,TwigMiddleware};
use Weather\Twig\Extension\WeatherIconExtension;

The code adds a route that accepts POST requests to /. The form's handler function checks if the POST data in the request's body contains a valid city parameter. If not, it sets an error message in the flash message and redirects the user to the search form. Otherwise, it uses OpenWeatherMap, with the help of Guzzle, to retrieve the weather and UV index data.

If exceptions are thrown during the request, an HttpNotFoundException is thrown. This short-circuits execution, rendering an error template, which you'll also see later.

If there were no exceptions, templates/weather-report.html.twig is rendered with the retrieved weather data. Finally, the application's default error handler is set. This is a new class, HtmlErrorRenderer, which I'll cover in just a moment.

Create the route's template

Before diving into HtmlErrorRenderer, let's first create the route's template. Create a new file named weather-report.html.twig in the templates directory. In that file, post the code below:

{% extends "base.html.twig" %}

{% block title %}Find the Weather with PHP{% endblock %}
{% block h1 %}Find the Weather with PHP{% endblock %}

{% block content %}
    {% if error is not empty  %}
        <div class="p-2 pl-4 mb-2 flex flex-row bg-red-100 text-red-900 rounded-full">
            <img src="/img/form-icons/warning-32.png"
                alt="warning icon"
                class="mr-3">
            <span class="pt-1">{{ error|first }}</span>
        </div>
    {% endif %}
    {% include 'search-form.html.twig' %}
    <hr class="w-48 h-1 mx-auto my-4 bg-gray-200 border-0 rounded md:my-5 md:mb-5 dark:bg-gray-700">
    <div id="weather-report"
         class="mt-5 py-5 p-4 bg-white border-2 border-slate-200 drop-shadow-md shadow-md rounded-md">
        <div class="flex flex-row gap-28 ml-2">
            <div class="grow justify-end">
                <h2 class="text-5xl font-bold mb-0 tracking-normal">
                    <span>{{ data.weather.city.name }}</span><br>
                    <div class="text-sm font-normal -mt-1 text-slate-400">
                        {{ data.weather.city.country }}
                        ({{ data.weather.city.timezone.getName() }})
                    </div>
                </h2>
                <div class="flex flex-row gap-5">
                    <h3 class="text-9xl font-bold flex flex-row mb-2">
                        <span title="{{ data.weather.temperature.getValue() }}">
                            {{ data.weather.temperature.getValue() | round }}
                        </span>
                        <span id="temp-measurement" class="-ml-1 pb-3">
                            {{ data.weather.temperature.getUnit() }}
                        </span>
                    </h3>
                </div>
                <div class="text-3xl ml-1 -mt-8 italic text-slate-700">
                    {{ data.weather.weather.description }}
                </div>
            </div>
            <div id="weather-icon" class="p-4 pt-0 min-w-fit">
                <picture>
                    <source srcset="/img/weather-icons/{{ getWeatherIcon(data.weather.weather.id) }}.avif" type="image/avif" />
                       <img src="/img/weather-icons/{{ getWeatherIcon(data.weather.weather.id) }}.png"
                            alt="{{ getWeatherIcon(data.weather.weather.id) }} icon"
                            class="w-52">
                   </picture>
               </div>
           </div>
           <div id="data-display" class="mt-2">
               <div class="grid grid-cols-2 text-slate-700">
                   <div id="wind-speed"
                        class="p-2 border-2 border-slate-200 rounded-lg bg-slate-50 m-2 shadow-sm drop-shadow-sm">
                       <div class="w-full text-center text-slate-300">wind speed</div>
                       <div class="text-center text-4xl h-44 flex justify-center flex-col align-middle data-item-text"
                            style="background: center no-repeat url('/img/data-display-icons/wind-o5.png');"
                    >
                           <span class="inline-block w-full">
                               {{ data.weather.wind.speed.value }}
                               {{ data.weather.wind.speed.unit }}<br>
                               {{ data.weather.wind.direction.unit }}
                        </span>
                    </div>
                </div>
                <div id="humidity"
                     class="p-2 border-2 border-slate-200 rounded-lg bg-slate-50 m-2 shadow-sm drop-shadow-sm">
                    <div class="w-full text-center text-slate-300">humidity</div>
                    <div class="text-center text-4xl h-44 flex justify-center flex-col align-middle data-item-text"
                        style="background: center no-repeat url('/img/data-display-icons/cloud-o5.png');"
                    >
                        {{ data.weather.humidity.value }}{{ data.weather.humidity.unit }}
                    </div>
                </div>
                <div id="uv-index"
                     class="p-2 border-2 border-slate-200 rounded-lg bg-slate-50 m-2 shadow-sm drop-shadow-sm">
                    <div class="w-full text-center text-slate-300">UV index</div>
                    <div class="text-center text-4xl h-44 flex justify-center flex-col align-middle data-item-text"
                         style="background: center no-repeat url('/img/data-display-icons/sun-o5.png');"
                    >{{ data.uv.uvIndex }}</div>
                </div>
                <div id="sunrise-sunset"
                     class="grid grid-cols-2 gap-4 p-2 py-3 border-2 border-slate-200 rounded-lg bg-slate-50 m-2 shadow-sm drop-shadow-sm">
                    <div class="text-slate-300 m-2 flex flex-col text-lg justify-center align-middle text-center p-4">sunrise</div>
                    <div class="text-2xl h-12 m-2 flex flex-col justify-center align-middle text-center p-4"
                         style="background: center no-repeat url('/img/data-display-icons/sunrise-w64-o15.png');"
                    >{{ data.weather.sun.set.format('H:i') }}</div>
                    <div class="text-2xl h-12 m-2 flex flex-col justify-center align-middle text-center p-4"
                         style="background: center no-repeat url('/img/data-display-icons/sunset-w64-o15.png');"
                    >{{ data.weather.sun.rise.format('H:i') }}</div>
                    <div class="text-slate-300 m-2 flex flex-col text-lg justify-center align-middle text-center p-4">sunset</div>
                </div>
            </div>
        </div>
    </div>
{% endblock %}

The template starts by rendering the search form, making it simple for the user to get a forecast for a different location. Then, it renders the various pieces of the retrieved weather forecast, using various Twig functions and filters to massage the data so that it renders as desired.

It also uses a custom Twig function, getWeatherIcon(), to render a weather icon indicative of the overall forecast. To create the function, in src/Twig/Extension, create a new file named WeatherIconExtension.php. Then, paste the code below into the file:

<?php

namespace Weather\Twig\Extension;

use Twig\Extension\AbstractExtension;
use Twig\TwigFunction;

final class WeatherIconExtension extends AbstractExtension
{
    public function getFunctions(): array
    {
        return [
            new TwigFunction('getWeatherIcon', [$this, 'getIcon'])
        ];
    }

    public function getIcon(?int $weatherCode = null): string
    {
        return match($weatherCode) {
            200, 201, 202, 210, 211, 212, 221, 230, 231, 232 => 'thunderstorm',
            300, 301, 302, 310, 311, 312, 313, 314, 321 => 'drizzle',
            500, 501, 502, 503, 504, 511, 520, 521, 522, 531 => 'rain',
            600, 601, 602, 611, 612, 613, 615, 616, 620, 621, 622 => 'snow',
            701 => 'mist',
            711 => 'smoke',
            721 => 'haze',
            731, 761 => 'dust',
            741 => 'fog',
            781 => 'tornado',
            800 => 'clear',
            801, 802, 803, 804 => 'clouds',
            default => 'unknown'
        };
    }
}

The class defines two functions:

FunctionDescription
getFunctions()This defines the Twig function names that this extension provides, along with the class method to call, when the function is used in a Twig template.
getIcon()This function is what is called when the function is used in a Twig template. The function takes a weather condition code, returned in the weather.id element of the response from OpenWeatherMap. It then maps the code to a human-readable string. This string is the weather icon name, minus the file extension. You can see some examples below.

Now, you have to register the new extension with the Twig instance. To do that, update the view container service definition, in public/index.php, so that it matches the code below:

$container->set('view', function(): Twig {
	$twig = Twig::create(__DIR__ . '/../templates', []);
	$twig->addExtension(new WeatherIconExtension());
	return $twig;
});

Finally, you have to update Composer's autoloader to load the extension. To do that, add the following to composer.json:

"autoload": {
    "psr-4": {
        "Weather\\": "src/"
    }
}

Then, run the following command to have Composer regenerate its autoload files:

composer dump-autoload

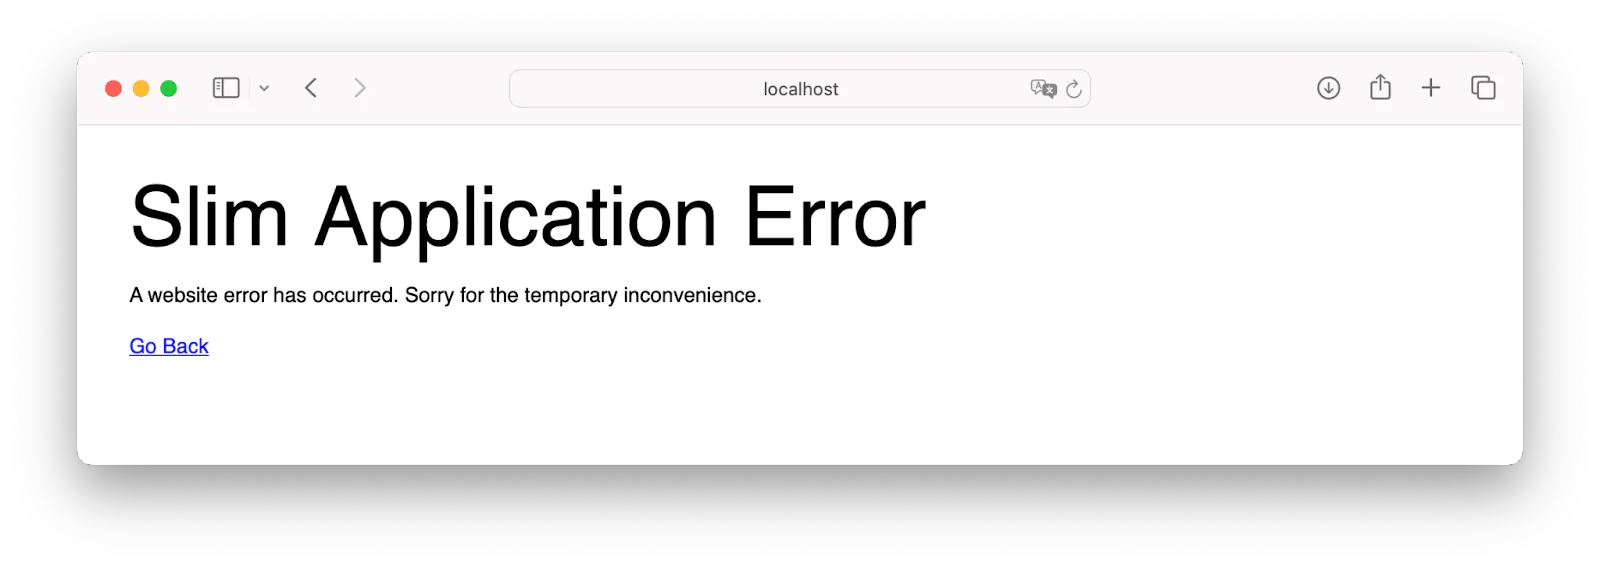
There's one final thing to do, and that's to customise the error page. You can see an example of Slim's default error page above. There's nothing wrong with it. But let's style it so that it's consistent with the look and feel of the rest of the application.

To do this you're going to create two Twig templates and a custom class, HtmlErrorRenderer, which were mentioned earlier. In the templates directory, create a new file named 404.html.twig. In the file, paste the code below:

{% extends "base.html.twig" %}

{% block title %}Sorry. We could not find that city{% endblock %}
{% block h1 %}{{ title }}{% endblock %}

{% block content %}
    <h2 class="text-2xl font-bold mb-3">Sorry. We could not find that city.</h2>
    {% include 'search-form.html.twig' %}
{% endblock %}

This template will be rendered if there is an issue retrieving weather data from the OpenWeatherMap API. As with the other templates, it extends templates/base.html.twig. It sets the title, and the h2 tag in the body, saying that the city could not be found. It then renders the search form in the body so that the user can quickly search for a different city.

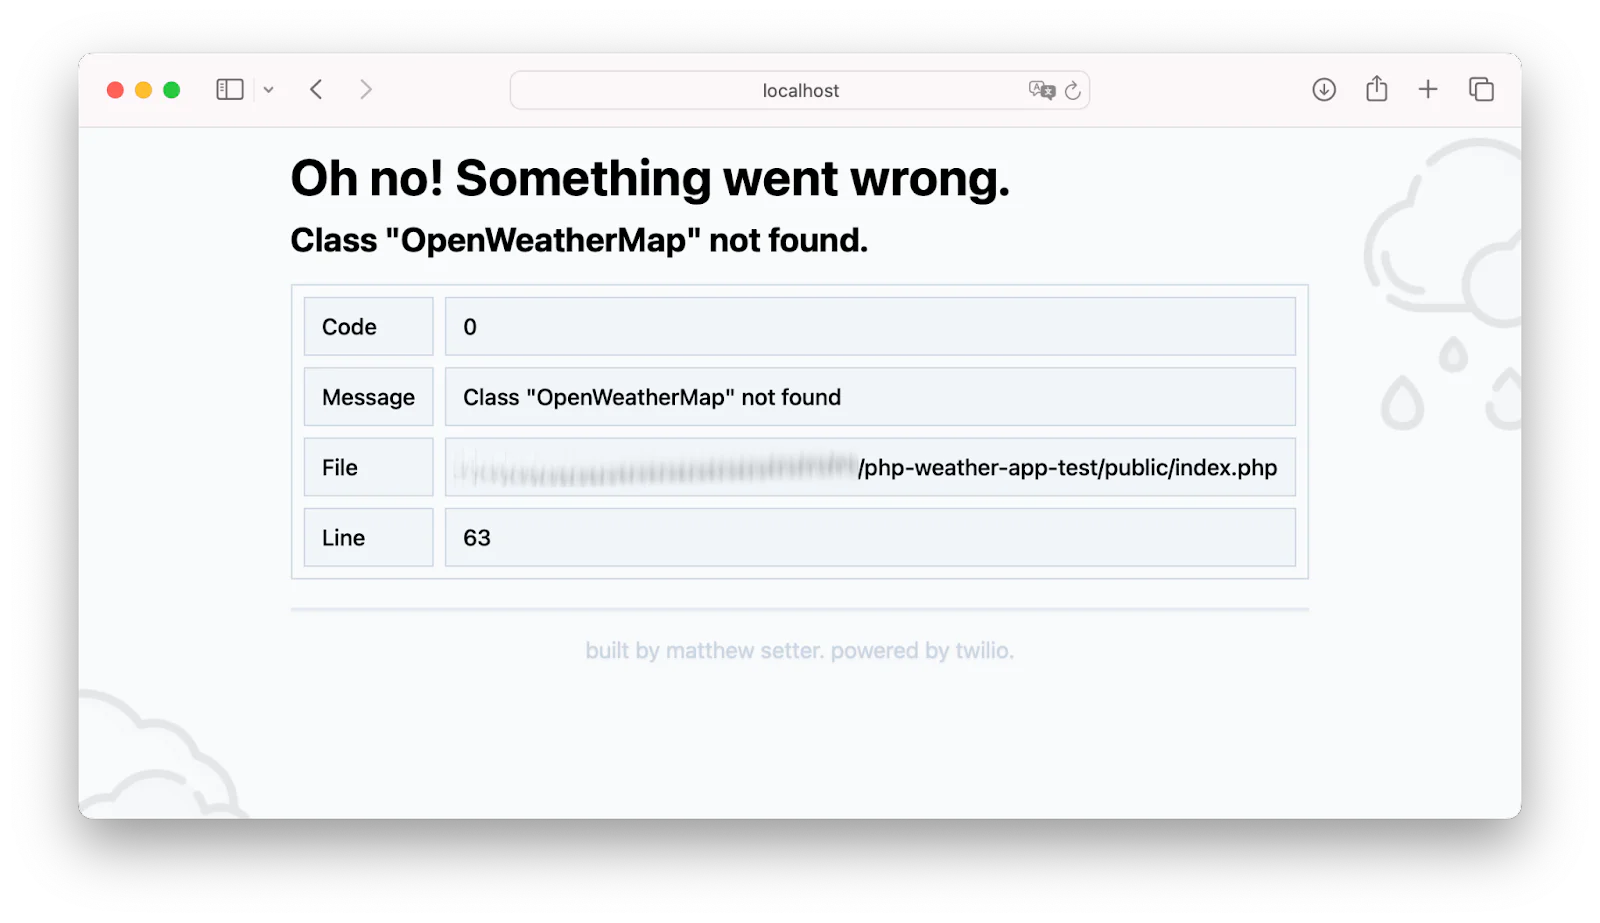
Next, in templates, create a second template, named error.html.twig, and in that file paste the following code:

{% extends "base.html.twig" %}

{% block title %}{{ title }}{% endblock %}
{% block h1 %}{{ title }}{% endblock %}

{% block content %}
    <h2 class="text-2xl font-bold mb-3 mb-4">{{ message | raw }}</h2>
    <table class="border border-slate-300 bg-slate-50 border-separate border-spacing-2">
        <tr>
            <td class="border border-slate-300 font-medium bg-slate-100 px-3 py-2">Code</td>
            <td class="border border-slate-300 font-medium bg-slate-100 px-3 py-2">{{ exception.getCode }}</td>
        </tr>
        <tr>
            <td class="border border-slate-300 font-medium bg-slate-100 px-3 py-2">Message</td>
            <td class="border border-slate-300 font-medium bg-slate-100 px-3 py-2">{{ exception.getMessage }}</td>
        </tr>
        <tr>
            <td class="border border-slate-300 font-medium bg-slate-100 px-3 py-2">File</td>
            <td class="border border-slate-300 font-medium bg-slate-100 px-3 py-2">{{ exception.getFile }}</td>
        </tr>
        <tr>
            <td class="border border-slate-300 font-medium bg-slate-100 px-3 py-2">Line</td>
            <td class="border border-slate-300 font-medium bg-slate-100 px-3 py-2">{{ exception.getLine }}</td>
        </tr>
    </table>
{% endblock %}

This template will be rendered for any other exception or error within the application, such as a missing class. If that happens, the details of the exception, including the message, title, line, and code will be rendered in the template, such as in the screenshot below:

Then, in src/Error, create a new file named HtmlErrorRenderer.php. In the file, paste the code below:

<?php

declare(strict_types=1);

namespace Weather\Error;

use Slim\Exception\HttpNotFoundException;
use Slim\Interfaces\ErrorRendererInterface;
use Slim\Views\Twig;
use Throwable;

final readonly class HtmlErrorRenderer implements ErrorRendererInterface
{
    public function __construct(private readonly Twig $twig) 
    { }

    public function __invoke(
        Throwable $exception,
        bool $displayErrorDetails,
    ): string
    {
        if ($exception instanceof HttpNotFoundException) {
            $title = $exception->getTitle();
            $message = $exception->getMessage();
            $template = '404.html.twig';
        } else {
            $title = 'Oh no! Something went wrong.';
            $message = sprintf(
                "%s.",
                htmlentities($exception->getMessage(), ENT_COMPAT|ENT_HTML5, 'utf-8')
            );
            $template = 'error.html.twig';
        }

        return $this->twig
            ->fetch(
                $template,
                [
                    'title' => $title,
                    'message' => $message,
                    'exception' => $exception,
                ]
            );
    }
}

The class is initialised with a Twig object, so that it can access and render the applicable error template. Then, based on the exception type, it sets the template to render, and renders it with the appropriate template variables.

Finally, at the end of public/index.php, add the following before $app->run();:

$errorMiddleware = $app->addErrorMiddleware(true, true, true);
$errorHandler = $errorMiddleware->getDefaultErrorHandler();
$errorHandler->registerErrorRenderer(
    'text/html', 
    new HtmlErrorRenderer($container->get('view'), $app)
);

Then, add the following to the use statements at the top of the file:

use Weather\Error\HtmlErrorRenderer;

These lines add Slim's built-in error middleware to the application's middleware stack, and set our new class, HtmlErrorRenderer, as the application's error handler.

Feel free to enable error logging, by passing a LoggerInterface instance to the call to addErrorMiddleware() if you like.

Test that the application works

Before we can test that the app works, start it using PHP's built-in webserver, by running the following command:

php -S 0.0.0.0:8080 -t public

Then, in your browser of choice open http://localhost:8080. It should look like the screenshot below:

The default page of the PHP weather application rendered in the Safari web browser. It has a field to enter a city name to find the weather for at the top of the page, and a radio button for choosing either imperial or metric as the unit of measurement for the weather data.

Enter the name of a city such as Dubbo (in New South Wales, Australia), choose Metric as the weather display format, and click Search. You should see it render the weather information, as in the screenshot below:

The PHP weather application, rendered in the Safari web browser, with weather data for Dubbo, NSW, Australia. It has a field to enter a city name to find the weather for at the top of the page, and a radio button for choosing either imperial or metric as the unit of measurement for the weather data. Under that, it displays the weather data, including the temperature in degrees Celsius and wind speed.

If you normally use Fahrenheit, enter another city, such as Raleigh (in North Carolina, USA), choose Imperial for the weather display format, and click Search.

The PHP weather application, rendered in the Safari web browser, with weather data for Raleigh, North Carolina, USA. It has a field to enter a city name to find the weather for at the top of the page, and a radio button for choosing either imperial or metric as the unit of measurement for the weather data. Under that, it displays the weather data, including the temperature in degrees Fahrenheit and wind speed.

Now, let's check that the errors work. So, without entering a city name click Search. You'll see it render an error message, via flash messages, as in the screenshot below:

The PHP weather application, rendered in the Safari web browser, showing an error message because no city was provided.

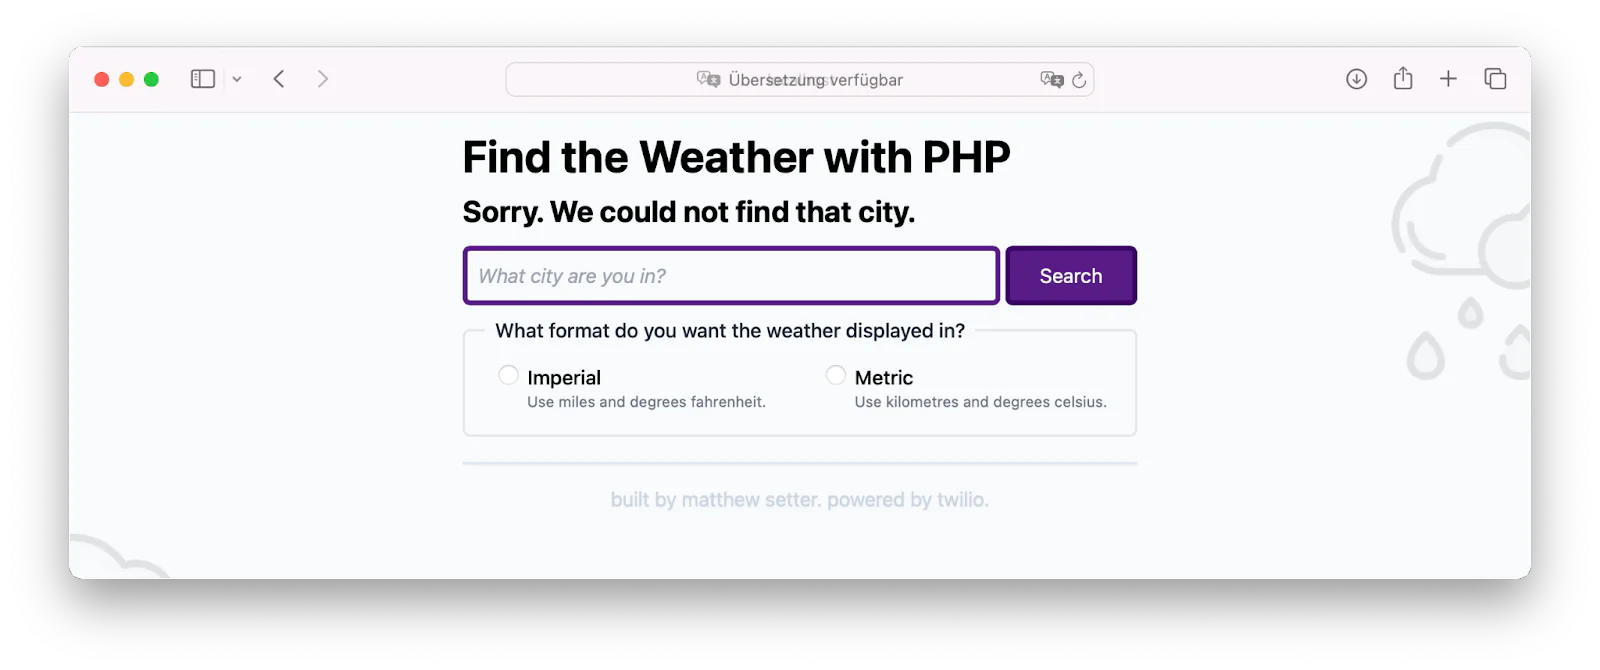
Now, for one final test. Let's see how it handles non-existent locations. Enter a string of random letters, or a non-existent city name. You should then see it display the error page, as below, indicating that the city could not be found:

That's how to create a simple weather app with PHP

While there was a bit to do to build the application, it wasn't all that complicated. Now, you can find the weather where you are, where your friends and family are, all powered by open source.

If you'd like to go further, check out the paid plans that OpenWeatherMap offers. There's loads more functionality available then.

Otherwise, what would you do to extend the application? I'd love to hear your ideas.

Lastly, the application's weather icons are available on FlatIcon. Credits provided below.

Matthew Setter is the PHP Editor in the Twilio Voices team (plus Go and Rust) and a PHP and Go developer. He’s also the author of Deploy With Docker Compose. You can find him at msetter[at]twilio.com, on LinkedIn and GitHub.