Integrate Twilio Monitor with HipChat
Time to read:
October 27, 2015
Written by
This post is part of Twilio’s archive and may contain outdated information. We’re always building something new, so be sure to check out our latest posts for the most up-to-date insights.

Think about your last incident. It was in the middle of the night (it’s always in the middle of the night). Someone called you at 2AM. Still half asleep, you did your best to register the bad news.
After a quick chat your ops and engineering teams decide to work through the problem via HipChat. For those of you that live in HipChat you know that life at 2AM is much better when your IT tools are integrated there. Having critical information at your fingertips can mean the difference between closing out an issue in 5 minutes or 5 hours.
Today, I’m going to show you how to make that happen in HipChat with Twilio. To help you debug problems associated with your Twilio application, we built Monitor. Monitor gives you access to error and event logs that help you understand what’s going on. Furthermore, with Monitor Alerts you can ask Twilio to ping an endpoint of your choice when Twilio encounters an error. In this example, we’re going to use Twilio Alerts to send updates to a HipChat room.
Follow the steps below, and you should have a working Twilio Monitor and HipChat integration in 20 min. As a bonus, you’ll get a primer on debugging and forensics with Runscope and learn how to set up a secure tunnel to a local webserver on your machine using a tool called ngrok.
In Figure 1 below you can see what we’re going for. Twilio posts alerts from your Twilio application directly to your HipChat room.
Before we get going, here’s what you need to know about the tools.
About Twilio Monitor: This is Twilio’s Alerting, Notification and Event Monitoring system. It monitors the operational health of your Twilio applications as well as your Twilio account and informs you via a flexible alerting mechanism of security or operational alerts. For more detail on Monitor, you can read up here or see it in your Twilio Account Portal here.
About HipChat – HipChat is a secure, cloud-based collaboration tool for group and private chat. You can get to HipChat rooms via browser, standalone desktop applications, mobile clients and more. You can read up on HipChat here.
Let’s Get Started
Ready for a little adventure? Let’s start.
To integrate Twilio Monitor with HipChat we essentially need to do 3 things:
- Create a HipChat room for our alerts system. In this example, we work with a single room, but you can also use multiple HipChat rooms if desired.
- Establish a way to programmatically post messages to the HipChat room.
- Configure Twilio Monitor to make the webhook calls to expose your alerts in the HipChat room.
Create a HipChat Room – Step 1
Specifically, we’ll be setting up a cloud-based based HipChat room. If you have an existing HipChat instance any admin can give you the rights to post to this room. Just ask!
Let’s head over to HipChat and use the signup button in the top right. Then go ahead and signup for your account.
To sandbox our efforts we just create a new team instead of joining an existing one. In your case, you likely want to do the exact opposite and join an existing team. I call my team “twiliomonitor” which results in the twiliomonitor.hipchat.com access URL. Boom. That one is reserved……
In the next screen you can invite someone or not. That’s up to you. Remember we are just testing stuff here. When you sign up, you will receive a confirmation email to confirm your account. This opens up some HipChat functionality, so best to do it now.
Ok, now you have a useraccount and a HipChat room. We can invite other folks to our room if we want and start chatting, but let’s postpone the social graces until we are ready to brag about our Twilio integration.
Since you are the administrator, you can go to the right side of the icon list and click the “Room Actions”, the icon with the 3 dots and select Integrations.
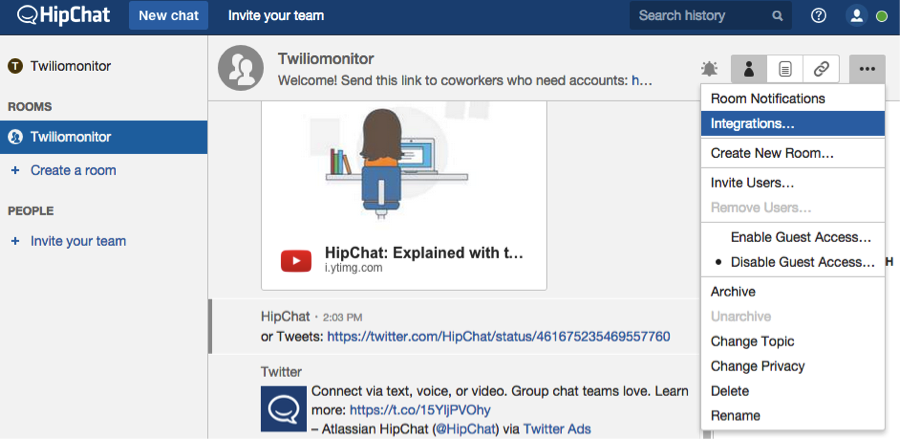
On the integrations screen click the Create button under “Build Your Own!” to continue.
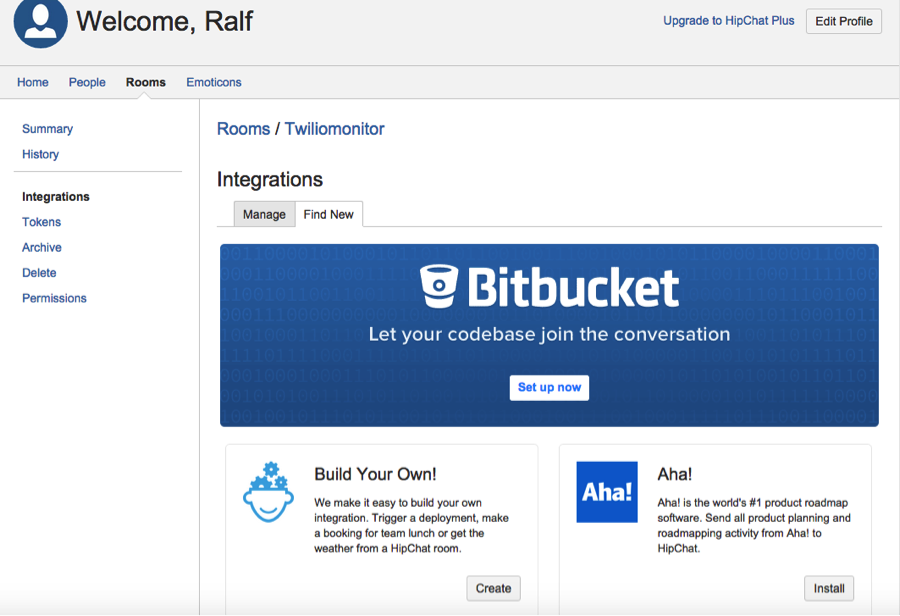
Let’s give our integration a name and create it.
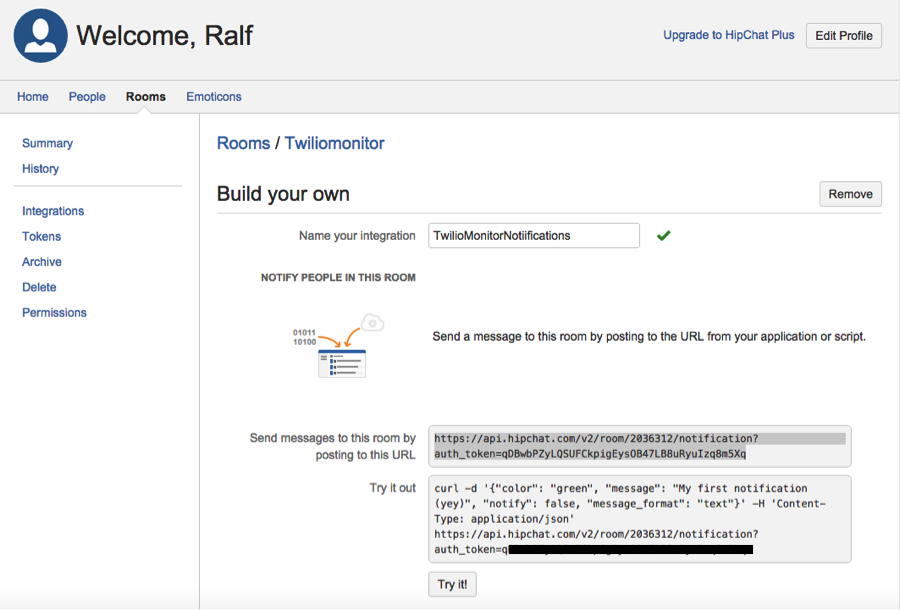
The “Build Your Own” screen gives you the exact URL to POST to in order to create a custom message in your HipChat room. In my case, the URL is
https://api.hipchat.com/v2/room/2036312/notification?auth_token=qXXXXXXXXXXXXXXXXXXXXXXLB8uRyuIzq8m5Xq
In the URL, you’ll see your auth_token. This is your super secret password. Take good care of it and don’t post it on a public blog :-) Under the request URL you can find a working curl example, which you can copy into a terminal (CMD shell on Windows) to try receiving your message or simply use the “Try it!” button.
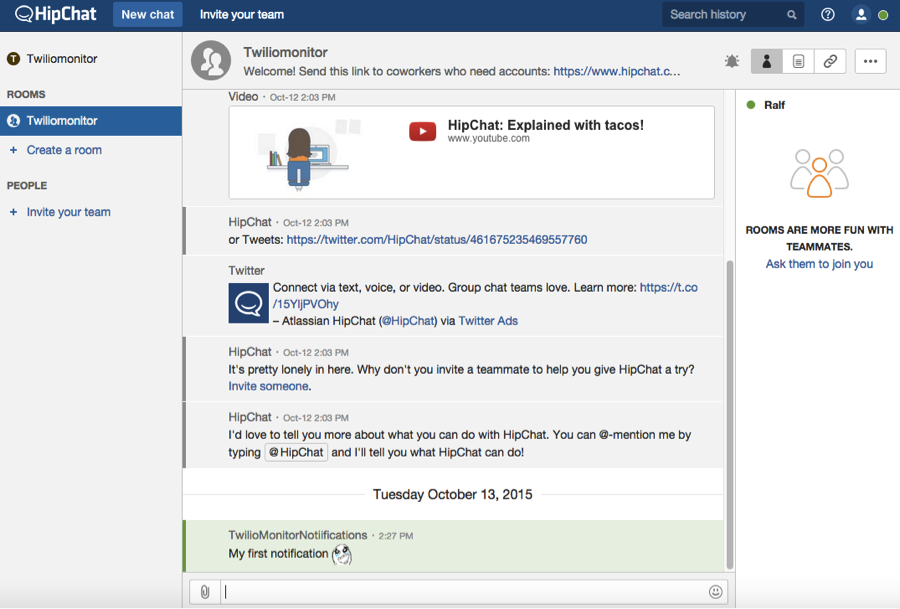
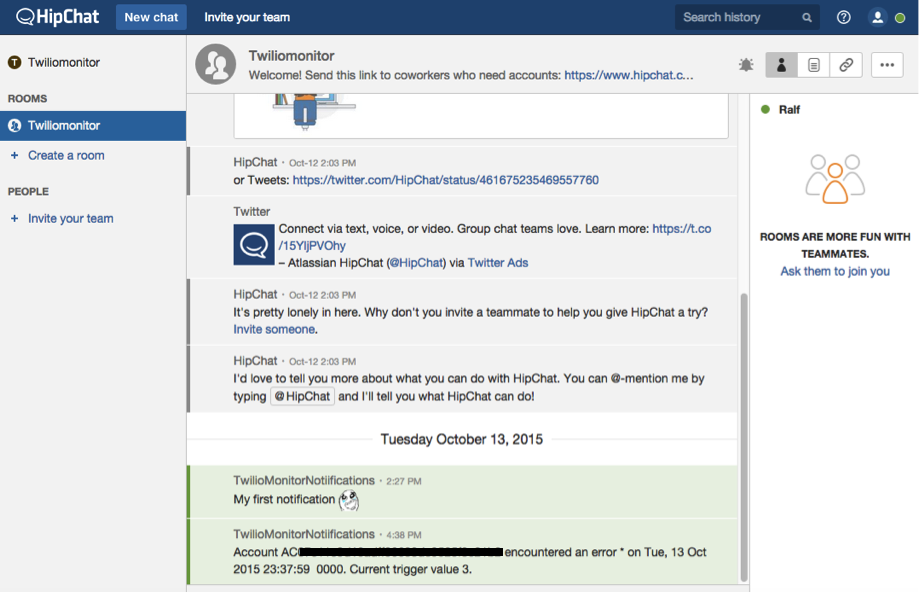
This is what I see in my twiliomonitor room after pressing the “Try it!”: “My first notification”, yeah!
We are essentially done with step 1. We created a HipChat room and can programmatically post to it.
Create a HipChat Room – Step 2: Getting Twilio Alerts in a HipChat format
On to some programming. Here is what we need to achieve. When Twilio posts an alert, the Twilio way of doing things is to have a payload in the POST body that provides details about the error or warning that triggered the alert. To inspect what’s going on, I like to use Runscope. Runscope is basically a proxy server that logs all Request/Response pairs flowing through your system. It’s a fantastic tool. In the figure below you can see the Twilio webhook for an alert notification.
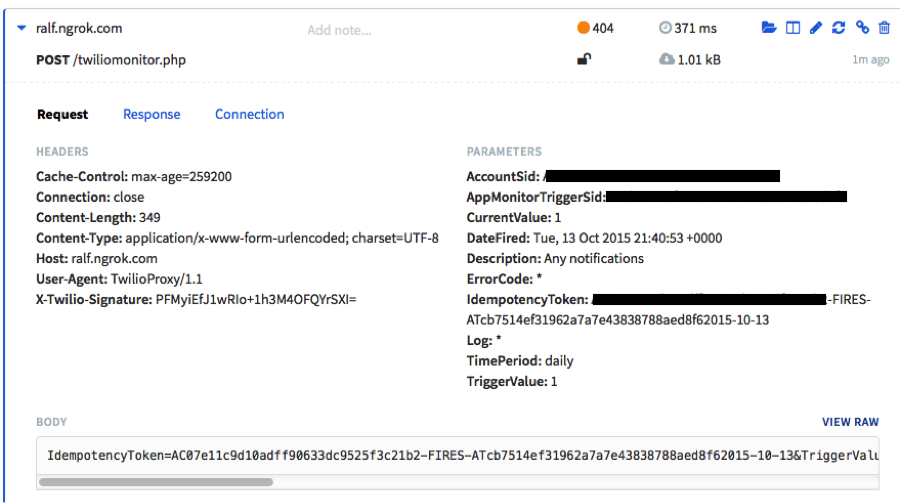
Runscope parses out the parameters from the Body of the request and displays them orderly in the PARAMETERS section.
You can see here that an Alert fired for the first time today ( TimePeriod: daily, TriggerValue: 1 ) related to AppMonitorTriggerSid: ATcb…..
In a minute, I’ll cover where these values come from and how to configure them.
But before that, we have a couple things to sort out. On one hand, we have the Twilio alert mechanism that uses request parameters in the body and on the other hand we have HipChat, which expects messages sent to the HipChat room be configured as JSON payload. Also, the error description for Twilio is in the Description field vs. HipChat that expects it in a field called “message”, which you saw when HipChat gave us the example to post to a room.
Check the content between the “{“ and “}”. This is the JSON object that is sent in the curl request and shows how HipChat expects messages to be formatted.
So we need something to convert between the message format from Twilio and the way HipChat expects messages. There likely are several approaches to this. To keep things simple, I just wrote a little PHP page to do this work of converting between POST parameters and JSON objects. You may want to instead use a proxy server with rewrite rules, though I couldn’t find one to achieve that kind of massaging.
In this case, the Twilio Alert webhook ( essentially a web request ) will post to this php page where we programmatically extract the parameters, reformat and rename them into a JSON object and forward them on to the HipChat room. Simple as that.
Let me quickly explain what I did so you can take this code and modify it to your needs.
Line 2-3: I am always sending a 200 OK back to the Twilio webhook request. I could pass through the status code from HipChat but Twilio will not take action on a failed requests ( only on timeouts ) so there is no point in advanced logic here.
Lines 5-26: Here I am extracting the post parameters from the Twilio webhook requests. These are the ones we talked earlier about, the ones essentially describing the reason for the Alert, AccountSid etc.
Line 29: Remember when I told you that the key JSON name (=key) is the “message”. So what I am doing here is aggregating meaningful, human readable data into a long message string, which we can then post to the HipChat room.
Line 30: The message, which is a string variable, gets embedded into a larger array with supplemental information for HipChat. For example, “color” defines the underlying message color. “Notify” determines if the message should arrive with a Bang, well more like a clang and more. The full list of parameters can be found here. json_encode is a php function that takes a PHP array and converts it for us into a JSON object, here called $messagejson.
Lines 33-48:This is a curl request from the PHP page to the HipChat API. There are other ways to do this but I like this approach. Essentially I am making a POST request with the Content-type set to application/json to the HipChat API and the body carries our $messagejson object. To use this in your integration you would need to modify the URL in line 39 to whatever HipChat gave you earlier. Let me make a quick remark about CURLOPT_SSL_VERIFYPEER=false. What it does is ignore the HipChat TLS security certificate. I don’t know if this is a big deal. We are not posting security confidential information here, but you should ask your security department what they think.
The following diagram illustrates what we are doing with our request broker.

The key is that there are two sides to the PHP script: One that receives and responds to the Twilio webhook request. The other that sends the JSON API request via Curl and receives the status info back from HipChat.
Step Three – Tell Twilio Where to Go
So close now. Just two more things. First, we need to expose our PHP page to the web, so Twilio can call it and then we need to tell Twilio to call our page when an alert happens.
Run the PHP page and make it visible to the net.
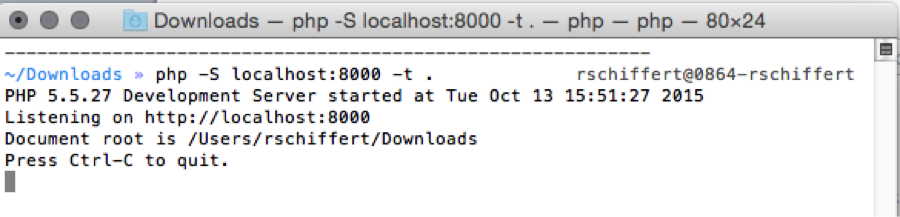
We run the PHP page as a non-production test page with the built-in PHP server. Later you can host it in your mission critical environment if you want. Remember we’re just doing a POC here. My PHP file is called twiliomonitor.php. Let’s launch the built-in php server from the command line. Go to a terminal or CMD shell and type the following.
php -S localhost:8000 -t path/to/directory
( I assume you have PHP installed. If not there are many websites that will walk you through the install for your particular OS)
This command will launch a php server on port 8000 which exposes files in the /path/to/directory. Here is how this looks on my system.
You can use a browser and go over to http://localhost:8000/twiliomonitor.php ( or whatever your final name ) and check that the file loads without any errors. In this case an empty page is indeed a good page.
Now we need to expose our local server to the wider internet so Twilio can call us behind our firewall.
We use ngrok for this.
Download ngrok from here. Ngrok is really an easy to use tool and the documentation is well written so I won’t bother you with the setup details here.
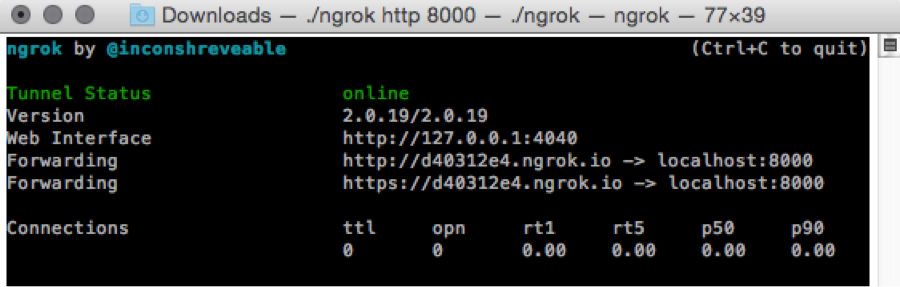
This is how I launch my ngrok instance and point it to my PHP webserver.
./ngrok 8000
What this does is expose my local PHP server listening on port 8000 to the world wide web as http://d40312e4.ngrok.io/.
Ngrok will print the full domain name for you when you start it up. Or you register with them and get a custom subdomain. It’s important is that you let ngrok run. So don’t kill the window it is running in.
Here is how things look like in my world.
Again you can test that your website is loadable by launching your browser with the full ngrok URL. In my case I browse to http://d40312e4.ngrok.io/twiliomonitor.php.
Remember, since we just return an empty page, that’s all you want to see in your browser. Nothing. The difference here is that we access our php page from a www URL, just like Twilio will later do, instead of the localhost, that we used before.
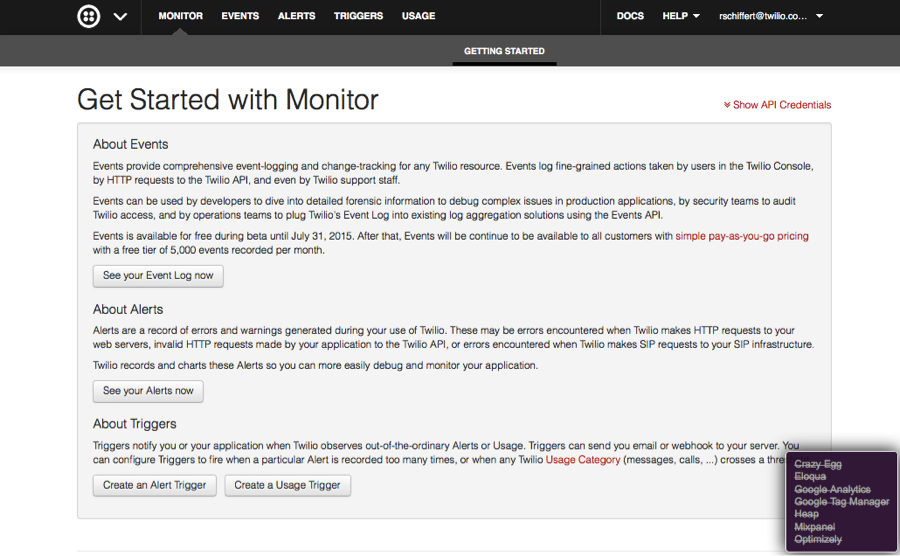
O.K. As promised the very last thing we need to do is have Twilio call our PHP page when an error is thrown in your app. Here is how we go about it. Log into your Twilio account portal and in the selection menu browse to Monitor. Here is how this looks.
Under “Triggers” select the button “Create An Alert Trigger”. Keep it simple for now. Give the Trigger a meaningful name, a Trigger Value of “1”, for Error Code select “any alert”, and under recurring, select “Daily”. You can throw alerts based on different conditions as I mentioned earlier so feel free to adjust these fields as needed. On specific or general errors, warnings, notifications etc. There is also a different section in the portal for Usage Triggers. (the link is just to the top).
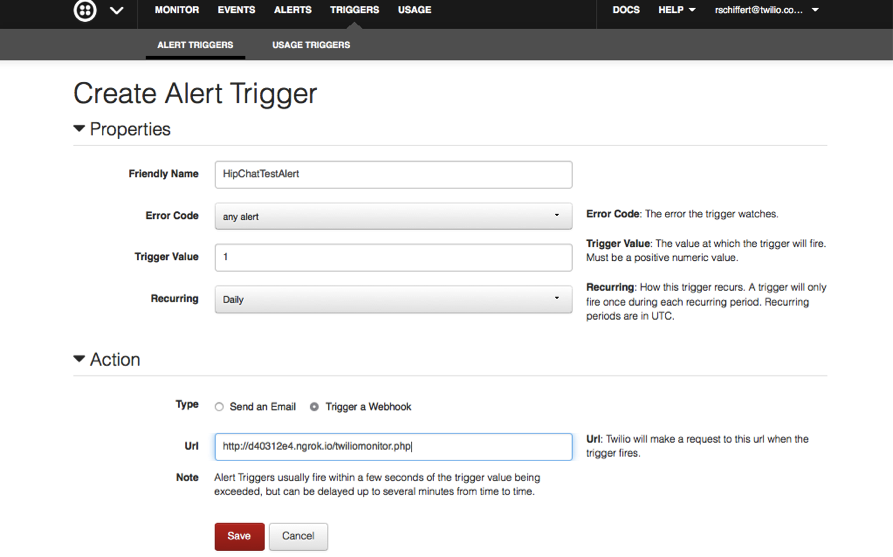
The most important thing for this work is that under “Actions” you select ‘Trigger a Webhook” and specify the URL we used before. In my case, that was: http://d40312e4.ngrok.io/twiliomonitor.php.
Now we have configured the Twilio system to fire a webhook to our PHP page, which in turn posts to the HipChat room. Magic!
In this case, the trigger will fire the first time the Error Code is thrown in a Daily interval. This is an interesting twist, if the alert happens again in the same Recurring interval we won’t get an alert. Twilio did this intentionally as to not flood outside notifications or email systems. It makes testing harder though and you will find yourself deleting and recreating alerts ( which you can do with a curl script as well btw. )
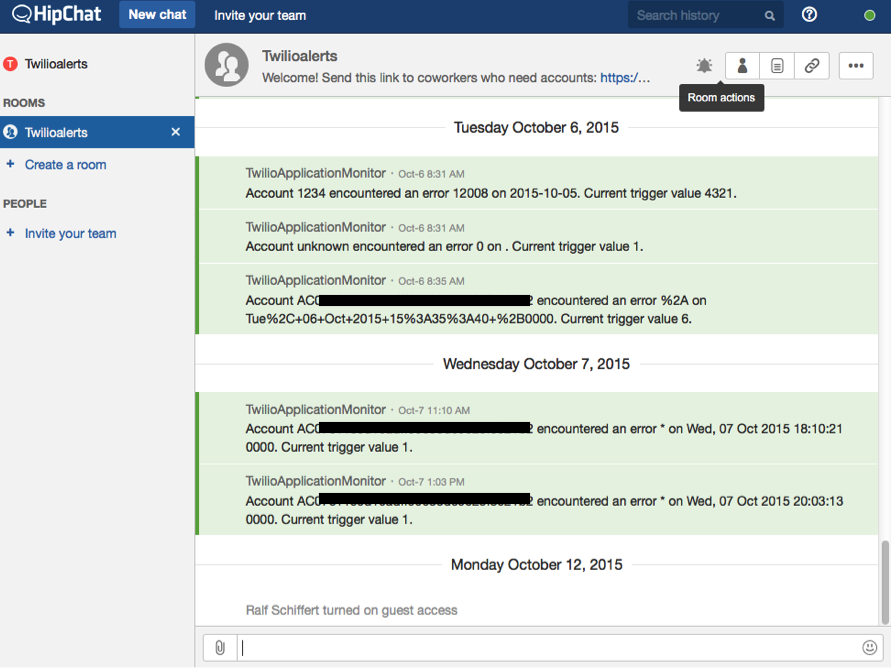
So now, how do we introduce an error? Simple, let’s configure a Twilio phone number with a bogus voice URL and place a phone call to that number. You will hear the dreaded “We’re sorry. An application error has occurred”, but once you head over to your HipChat room and see your alert message you will feel stoked about your achievement today.
In the figure below, in our Twiliomonitor room, you can see two outside alerts. The first is from our ‘Try It!” button and the second comes straight out of Twilio.
What you normally would do here is go back into your Twilio application and investigate the reasons for the error.
That’s it for today. Please ask questions and let me know when you get it working in the comments section below.
I can’t wait to see what you build!

Related Resources
Twilio Docs
From APIs to SDKs to sample apps
API reference documentation, SDKs, helper libraries, quickstarts, and tutorials for your language and platform.
Resource Center
The latest ebooks, industry reports, and webinars
Learn from customer engagement experts to improve your own communication.
Ahoy
Twilio's developer community hub
Best practices, code samples, and inspiration to build communications and digital engagement experiences.