Child Processes, Streams, and Minecraft Server Management via Text Message using Node.js
Time to read:
November 07, 2014
Written by
This post is part of Twilio’s archive and may contain outdated information. We’re always building something new, so be sure to check out our latest posts for the most up-to-date insights.


For a while now, I have been told by my nine year old son Emmett (right, dueling Darth Vader) that his social life was suffering because all of his friends at school are playing Minecraft but he wasn’t. While I was unmoved by Emmett’s peer pressure arguments, I had heard through other sources that Minecraft ends up being a pretty fun and creative game for kids. Further, that it can serve as a catalyst for kids to write their first line of code.
So I decided to download the trial and set up a multiplayer server to play with Emmett and seven year old sister Grace (right, hugging apples). Three hours after logging in, none of us had moved, except to turn our heads and shout ridiculous commands and advice to one another. It turns out that multiplayer Minecraft with a few of your favorite small people can be pretty entertaining. What’s more, Emmett and Grace have both started work programming their own Minecraft mods, where they’re learning skills to pay the bills. Ward Cleaver I am not, but I think I’m going to call that a win.
Today, the three of us play on a Minecraft multiplayer server I set up on a VPS. I have it set up to administer remotely in a variety of ways to both lightly troll and protect the Whinnery kids, but one of the more novel features of the admin setup is the ability to issue in-game admin commands to the server via SMS text messages. If you’re game, I’ll show you how to set up a similar Minecraft server with Node.js, running on a VPS from our friends at Digital Ocean .
If you’d like to try this out, you can sign up for Digital Ocean and use the promo code “twilio10” to receive $10 in credits to run your server.
What You’ll Do
- Create a Digital Ocean Linux server to run a Minecraft multiplayer server
- Install all the prerequisite software on the server
- Write a Node.js script to manage a Minecraft server child process and keep it running indefinitely
- Pass administrative commands to the running Minecraft server
- Create a Node.js web application that can receive text messages through Twilio
- Use SMS commands to administer the Minecraft server process
What You’ll Need
- A Digital Ocean Ubuntu VPS with Java and Node.js Installed
- A Twilio account and phone number (sign up for one here)
- A paid Minecraft game account
- The free Minecraft multiplayer server
Just The Code, Please
Don’t need any help, just the code? Check out the final version of this script here.
Setting Up Our Server
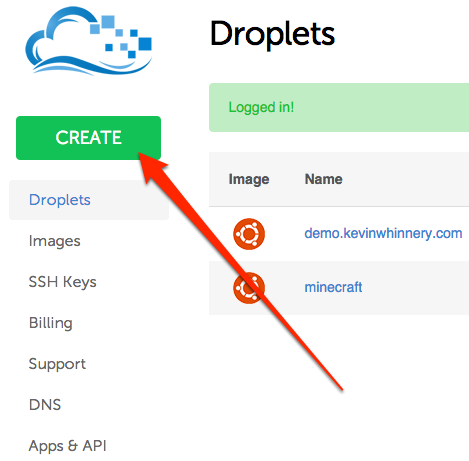
To begin with, we’ll need a machine that we can reach on the public Internet with enough horsepower to run a Minecraft multiplayer server. The instructions in this tutorial assume you are running an Ubuntu Linux server. There are a variety of ways to get a Linux server on the Internet, but a Digital Ocean VPS is easy to set up and configure. Log into your Digital Ocean account, and we’ll create one now:
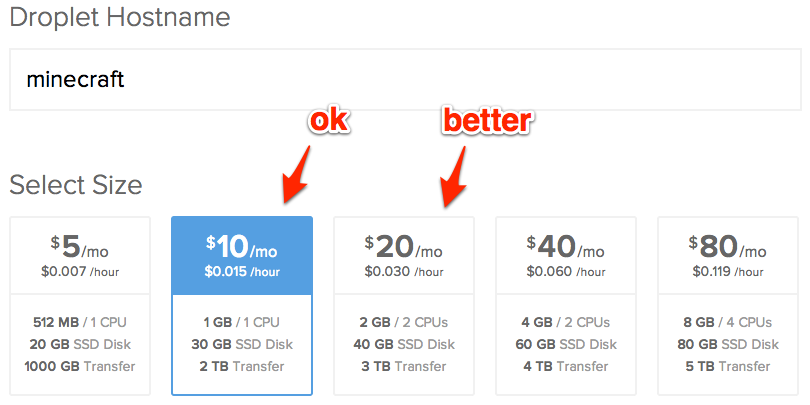
The first decisions you’ll need to make for your server are what to call it (anything you like) and, more importantly, how much RAM to provision for the server. Conventional wisdom dictates that a Minecraft server process needs about a gigabyte of RAM to run, but for the small load my kids and I put on the server, I’ve found that 512 MB is sufficient. However, you’ll still need a bit of memory headroom to run the rest of the system, so we’ll create a droplet with 1 GB of RAM. If you can swing it, 2 GB is probably better:
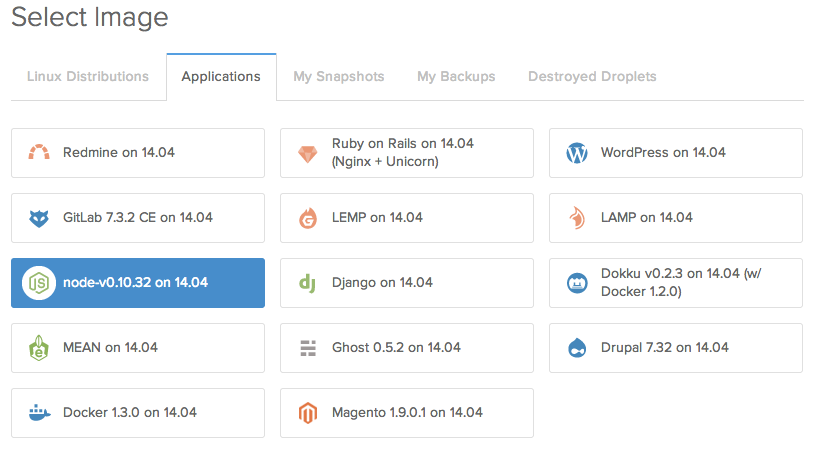
As you scroll down the page, you can select a region that is closest to you and your players, and ignore the “Available Settings” for now. The next bit you care about is selecting a system image. Under the “Applications” tab, choose the system image that has Node.js pre-installed:
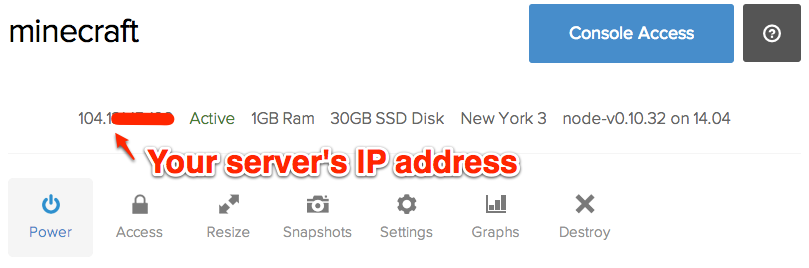
Now, click the big green “Create Droplet” button. In a few moments, you’ll have a shiny new Linux server created for you! By default, the root user’s password will be e-mailed to your Digital Ocean account’s contact e-mail. Once your server is created, it will be assigned an IP address on the public Internet:
Next, you’ll need to SSH into your server as the root (super admin) user to run a few commands. On OS X, you can open the Terminal app and enter the following command (replace “ipaddress” with your server’s IP address):
If you’re running on Windows, you can use an SSH client like PuTTY or similar to do this. You could also use the “console access” button on your droplet’s config page in the browser, but it’s a bit awkward to use.
Anyhoo, back to it – when prompted, enter the root password that was e-mailed to you by Digital Ocean. The first thing you should do is create a new non-root user, and do all your future work and configuration with this user. Here’s a detailed tutorial on how to do that – but here’s a shorter version. Log into your new VPS as the root user. Enter the following command:
Follow the prompts and add as much information as you like about your user – most of these values can be safely skipped using blank values. Once your new user is created, you will need to give that user the ability to execute commands as if it were a root user. Open up the “sudoers” file:
In this file, create an entry for your new user under the root user like so:
Save and exit this file. Log yourself out of the server by ending the SSH session with a Control-C key press or simply closing the current Terminal window. Now, SSH into the server as your new user:
In your home directory, create and enter a new folder that will contain everything we need for our Minecraft server:
Our last step before we start configuring the actual Minecraft software is installing a Java Runtime Environment (JRE) on our Linux server. The Minecraft game (as well as the multiplayer server) are Java programs, so we need to be able to execute them. We can install Java using Ubuntu’s package manager apt. Start by updating apt:
Once your system is up to date, we’ll install the Java Development Kit (JDK) which contains the JRE:
This will probably take a minute or so. Once the JDK is installed, run:
You should see something like:
This indicates that Java has been installed, and we can use it to run our Minecraft server. With that, our server has all the necessary pre-requisites installed to run a multiplayer server. Now let’s get to the actual game software!
Installing and Running Your Minecraft Server for the First Time
Next, you’ll need to download the Minecraft server software from Mojang’s website. You can double check the download URL on this page, but as of this writing the following command on your server will download the latest version of the Minecraft multiplayer server Java Archive (JAR) file:
We can now run the multiplayer server directly from the command line using the java command:
Let’s break down this command a little bit. The -jar option tells Java we want to run a Java program contained in the “minecraft_server.1.8.jar” archive file. The -Xmx* and -Xms* dictate how much RAM can be allocated for the Minecraft server process’ heap. A bigger heap size means more memory for the multiplayer server, which ostensibly means it can handle more concurrent players and perform better.
-Xmx512M means that the maximum size the heap can grow to is 512 MB, or roughly half of our server’s 1GB RAM. -Xms256M means that when the server starts, the heap should immediately be allocated 256 MB of RAM. This should be sufficient for a small number of players, but you may need to allocate more memory to support more players, mods, or features on your server.
The first time you run your server, you’ll probably get an error that says that you must accept the End User License Agreement for the multiplayer server. Hit command-c/control-c to terminate the Java process, and open “eula.txt” with a text editor:
Inside this file, change the line “eula=false” to “eula=true” to accept the terms of the Minecraft license agreement. Now, re-run the server with the same command:
You should see a lot of output in the terminal indicating the server is starting up. Eventually, you’ll see a message like this:
Huh! It’s almost like you could enter commands at this prompt to administer the Minecraft server! I wonder if this will be useful later on…
At this point, we should test that we can connect to the server. Open your legally purchased and downloaded Minecraft game on your desktop. Click the multiplayer button:
Then click the “Add Server” button. On the resulting config screen, type or paste in your Digital Ocean server’s IP address and click “Done”:
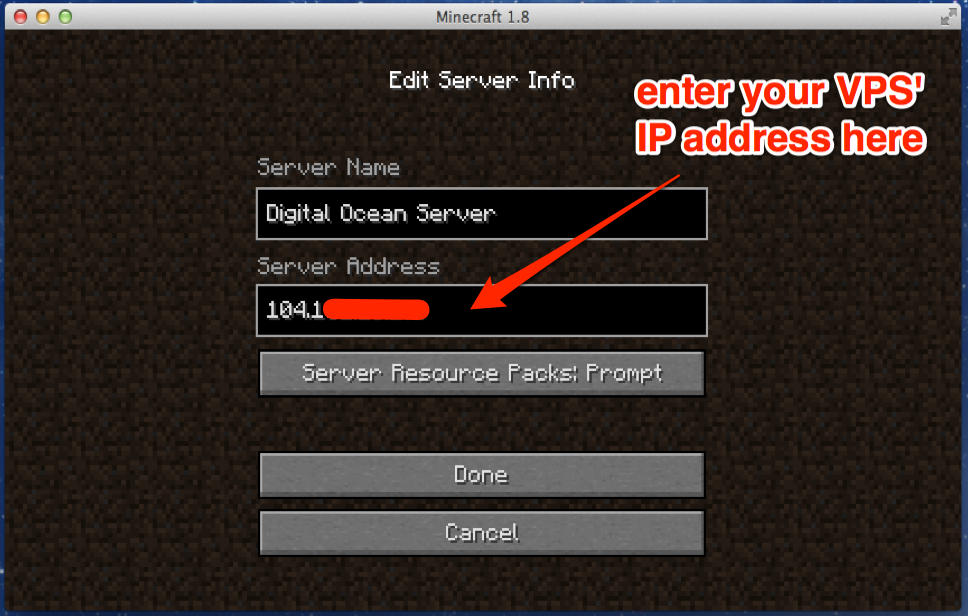
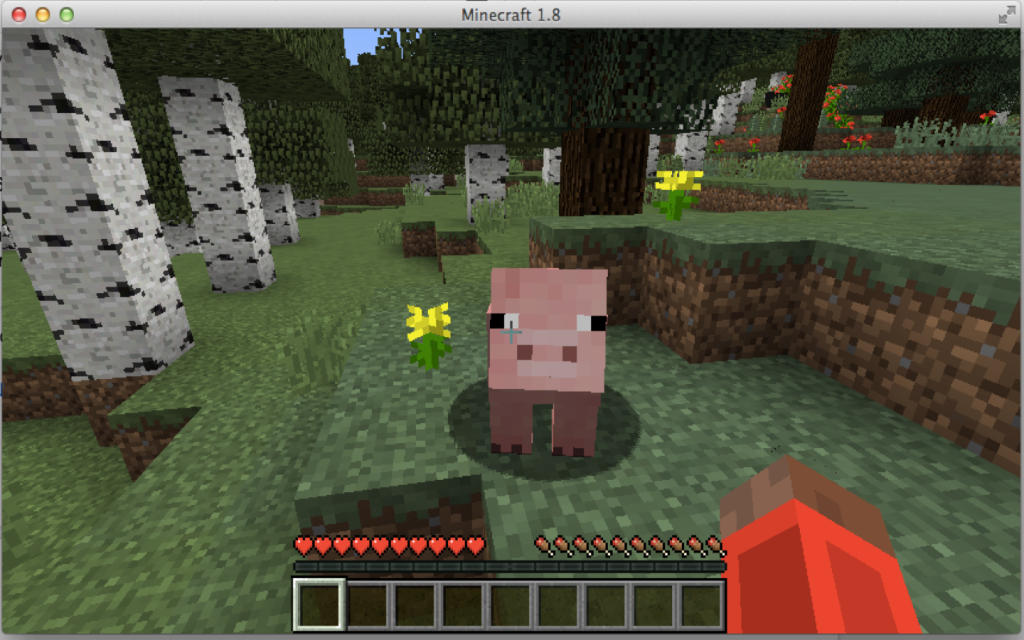
Then, select your new server and click “Join Server” – if all goes well, you should be connected to a Minecraft server in a freshly generated world:
If we were super lame, we could just manually start the server like this every time we wanted to play. But we’re not super lame, are we? With one voice, let us proclaim that “no, we are NOT super lame!” We’d like our Minecraft server to stay up all the time, not just when we’re SSHed into our server. The way we accomplish this is using a Node.js script and a utility called forever. Let’s get that rolling next – for now, kill your server with “control-c”.
Keeping our Minecraft Server Up with Forever
Inside our “server” folder, let’s open a new file called “minecraft.js” in the nano editor:
Inside this file, we’re going to write a small Node.js script to handle starting and shutting down the Minecraft server process. Copy the following code into minecraft.js:
At this point, we’re basically writing a Node.js script to launch our Minecraft server for us. To confirm this piece is working, execute the script with node minecraft.js. The output from this script should be the same as starting the server directly, as we did before.
Now, should our script die for any reason, we want to automatically restart it (we want it to run forever). Luckily, there is a Node.js module which helps us do just that . Install it on your system with the following command:
Now, execute minecraft.js with forever to keep it running continuously:
This will start minecraft.js running in the background. To see which processes you have started using forever, use:
In this list, you will see that output from the script is being saved in a log file. If you should need to see the output from the Minecraft server logs, this would be the place to find it. For now, you can stop the server like so:
Okay, so we now have the capacity to start our Minecraft server and keep it running continuously, which is pretty rad. But what if we want to execute administrative commands on our server to add players to the allow list, or teleport a player to another player? Remember how the Minecraft server prompted us to enter commands in the terminal? Node.js makes it very easy for us to delegate commands to the server, which we’ll do next with an HTTP request to a Node web application.
Sending Admin Commands to the Server
To allow our Node.js application to receive HTTP requests with administrative commands, we’ll need a couple more node packages. In the terminal (and within our ~/server directory), execute the following command:
This will install three packages for Node.js locally. Express is a popular light-weight web application framework, and body-parser is a middleware package that will help us parse incoming HTTP requests. The third package is the Twilio module for Node.js – we won’t use it right away, but it will come in handy later on when we start accepting commands for our server via SMS.
But now, open up “minecraft.js” again. Underneath the previous code we wrote for running the Minecraft multiplayer server process, place the following code. Read through the comments to see what’s happening at each step:
With this code, we’ve created a web application that can administer our multiplayer server by handling an incoming HTTP POST request. Let’s make sure everything is working – on your VPS, start the HTTP server with node minecraft.js – in a moment or two, you should see the Minecraft server start logging information out to your console. Once your server is started, open up another Terminal tab and send an HTTP request to your server with a Minecraft admin command. Replace “your.ip.address” below with the IP address of your Digital Ocean server:
If all goes well, you should see the first page of Minecraft server admin command help! Now that we have a web app running that can send commands to our Minecraft server, let’s take the next step and wire it up to Twilio so we can administer the server with text messages!
Sending Admin Commands to the Server with SMS
If you haven’t already, sign up for a Twilio account and buy an SMS enabled number in your account dashboard. From your phone number page click on one of the phone numbers you control. On the resulting page, you will see two properties associated with your Twilio number – a Voice URL and a Message URL. When your Twilio number receives an incoming call or text, it will send an HTTP POST request with the Body of that text message (along with the number it was sent from and some other information) to a server we control.
In this case, we would like to tell Twilio to send an HTTP POST request to our Minecraft server when it receives a text to that number, so we can use the text to send a command to our multiplayer server. The body of the text message will contain a server command for the Minecraft process. Configure your Twilio number’s Message URL like so:

Now we need to update our server code to talk to Twilio in a way Twilio will understand. When Twilio sends your application a request, it expects a response in the form of an XML document. In this document, you’ll use a set of tags called TwiML to tell Twilio how to respond to an incoming call or message.
Open up “minecraft.js” again. At the very top of the file, require the twilio module:
Then, inside our handler code for the /command route, update the response to send TwiML back instead of the raw content:

Now, restart minecraft.js and fire up the HTTP server and the Minecraft server. Send a text message to your Twilio number with the string “/help” – remember that Minecraft server admin commands are case sensitive! If you get a reply back, you just sent an admin command to your Minecraft server via SMS!
The basic functionality is now in place, but we’ll need to put some rudimentary security in place so that only approved numbers can send admin commands to our multiplayer server. Let’s set up a few basic security measures – a check to ensure incoming requests originated from Twilio, and a “blessed” phone number that can send admin messages.
Securing our Minecraft Multiplayer Server
The first thing we would like to verify before sending an admin command to our server is whether or not the incoming message has been sent to us by Twilio and not just a random HTTP client from the wild wild web. Luckily, the Twilio Node.js module provides a simple helper that helps provide that layer of protection for Express applications.
To verify a Twilio web request, however, we need to configure our Twilio account credentials on the server. From your dashboard page, copy your secret auth token. Add this value to the top of “minecraft.js” – replace the text inside the single quotes with the value for your account:
Beneath this line, add a line that contains a valid phone number for the server admin (e.g. you):
Next, find the Express route for /command and replace it with the following implementation:
Now, only an admin we specify can send commands to our server over SMS.
Tying Up a Few Loose Ends
One thing we should make sure of is that the Minecraft multiplayer server process lives and dies with the Node.js process that spawned it. If there’s an unhandled error anywhere in our Node.js code, it could result in the Minecraft server process being abandoned as our Node process crashes.
To avoid this, we attach a listener to the global process object to kill the Minecraft server when the process exits. You can add this code anywhere, but the bottom of the file works nicely:
All together, with a little bit of cleanup, here’s our final “minecraft.js”:
Don’t forget to start your final server script with forever!
Wrapping Up
In this tutorial, we explored how to set up a Minecraft multiplayer server using Node.js’ first-class APIs for child processes and streams. We also connected our multiplayer server admin interface to a Twilio phone number, so we can text our Minecraft server to administer the game.
There’s a lot more we could have done – Twilio has a REST API for sending outbound messages as well, so we could proactively text ourselves an alert when certain conditions are met within the game, maybe with an MMS screenshot. We could build a web front end for the server to go along with text. Once you have a programmable interface to the server process (outside of a mod), lots of fun possibilities open up.
If you do have little hackers at your house, I recommend Minecraft as a way to get them into programming through game mods. After they get comfortable with the core game and its constructs, they will be familiar with the data model and terminology necessary to make their own mods. What they’ll lack is literacy in a language that will let them interact with the game – that’s where you come in. There are modding tools in a variety of programming languages, but we’ve had good luck with ScriptCraft, a JavaScript based toolchain.
Are you administering your server via SMS already? Just got this going on your own? Hit us up @twilio or let me know directly @kevinwhinnery. Happy mining!


Related Resources
Twilio Docs
From APIs to SDKs to sample apps
API reference documentation, SDKs, helper libraries, quickstarts, and tutorials for your language and platform.
Resource Center
The latest ebooks, industry reports, and webinars
Learn from customer engagement experts to improve your own communication.
Ahoy
Twilio's developer community hub
Best practices, code samples, and inspiration to build communications and digital engagement experiences.