Getting Started With Ember.js 2.0 Using Ember CLI
Time to read:
August 21, 2015
Written by
This post is part of Twilio’s archive and may contain outdated information. We’re always building something new, so be sure to check out our latest posts for the most up-to-date insights.

When it comes to front-end JavaScript frameworks we have a lot of choices as developers. One of my favorites Ember.js just released version 2.0 making this the perfect time to get started using it. Ember is used by many great companies with the most notable application being Apple Music. In this post we’ll get our Ember development environment set up and build a small sample application.
What is Ember?
Ember is described by its creators as a framework for creating ambitious web applications. The core team focuses on identifying common patterns that emerge in the web development world and rolls them into a complete front-end stack. Many JavaScript frameworks start by simply providing a solution to the V in MVC but the Ember team aims to provide a complete solution to building client-side JavaScript applications that encompasses data management and application flow as well as the view layer. The development process is driven by a command-line utility called Ember CLI that incorporates common Ember patterns into the entire app development process from project creation to development time and ultimately to app distribution. The end result is a framework that focuses heavily on developer productivity. It is an opinionated framework and it is best to go with the flow and enjoy the productivity provided by these opinions.
What’s New in Ember 2.0?
The Ember team uses a semantic versioning scheme so technically nothing is “new” in Ember 2.0. All of the changes in Ember 2.0 are present in the previous 1.13.x releases. Along the “Road to Ember 2.0” many changes were made to deprecate 1.x functionality as new patterns were built. As long as these deprecations were fixed by the developer at each release their app will function perfectly now on 2.0. Here are some of the big things that were part of the 2.0 release process:
Ember CLI – The command-line interface for creating Ember apps is now a core part of the platform. Here are some of Ember CLI’s features:
- Fast asset pipeline powered by Broccoli
- Live reloading development server
- Generators that help in the application process by creating the project structure according to Ember best practices
Shift to Components – Ember 1.x was built around a model-view-controller (MVC) pattern but in the 2.0 Ember started a transition away from Views and Controllers to Components. This trend will continue throughout the 2.x release cycles until Routable Components fully replace them.
New rendering engine – Glimmer rendering engine vastly increases rendering speed through the use of a virtual DOM
ES6 modules at the core – The Ember team is always looking to bring new standards into the codebase and ES6 modules are one of the latest to be added to the project
Simplification of many Ember concepts:
- New attribute binding syntax using the new template engine HTMLBars which is a superset of the templating engine from 1.x Handlebars
- HTML syntax (angle brackets) for Components
- More consistent scoping
- much more…
Installing Ember
We’ll use Node.js and npm to install the tools we need for Ember development so make sure you have them installed. Ember requires Git to manage many of its dependencies so you’ll also need to make sure you have it installed and configured. If you are on a Mac or Linux system you’ll also want to install Watchman because it greatly improves file watching performance. We will also be using Bower so make sure to install it. With these prerequisites in place let’s install Ember CLI. Open up your terminal application of choice and fire off this command:
Next we’ll install PhantomJS to enable running tests from the command-line:
Verify that everything was installed correctly by running the following command:

As of the writing of this blog post this should return 1.13.8. Ember CLI was supposed to ship 2.0 at the same time as Ember.js but is lagging slightly behind for this release. We will work around the version differences as we build our application.
Creating Our First Ember App
Let’s use Ember CLI to create our first application. Run the following command to create a new Ember project in a folder named hello-ember:
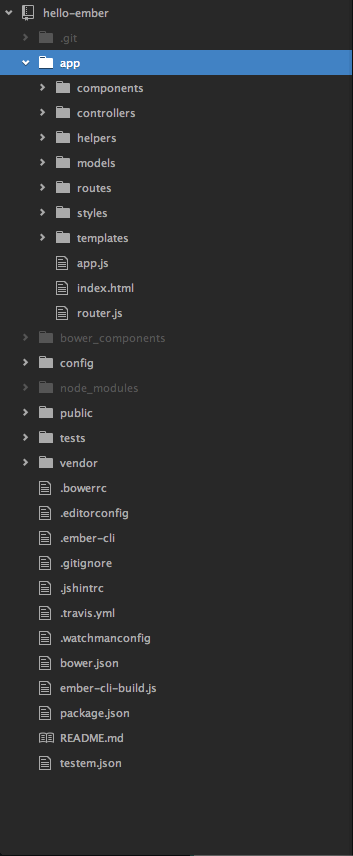
The app folder contains the source files for our application and is where we will focus most of our attention in this post.
We do have to make one important change to a file outside of that directory first. As mentioned above, Ember CLI has not yet reached 2.0. This means the versions of Ember that are specified in the application created by Ember CLI are also not 2.0. Let’s fix that in bower.json. Make these highlighted changes:

Now that our project and its dependencies are set up let’s run the project using Ember CLI’s development server:
Load up http://localhost:4200 in your browser and you should see a header that says “Welcome to Ember”. Let’s see where that welcome message is coming from and update it to see Ember CLI’s live reload in action. Open app/templates/application.hbs. You should see this:
This is the template that represents the markup that wraps the body of our application. No matter what parts of the app we visit this markup will render. Modify the header tag to say “Hello Ember” and save the file. Take a look in your browser to see the change reflected after the short Ember build process. This feature is great for productivity.
One of Ember’s core tenets is that the URL in the browser represents the state of the application. This is accomplished using a router. Currently we are at the root of the application and the route that is used to render content at the root is the index route. If we don’t specify one Ember will create an empty index route in memory filling the outlet above with nothing. Let’s use Ember CLI to define an index route that will be used to set up a model and template for the root of our application instead of the default:
Running this command generates the following files:
app/routes/index.js– The file containing the code that Ember will run when this specific route is loaded.app/templates/index.hbsThe template for the index route. This will render into the {{outlet}} we saw in theapplication.hbstemplatetests/unit/routes/index-test.js– The test file for the index route.
Routes are responsible for setting up any data Ember will use when rendering the template for the route. Ember uses model objects (the M in MVC) to represent data for the route. This is accomplished with what is called a model hook. Open app/routes/index.js and modify its contents to include a model function that returns an array of colors:
When the route renders the index template we’ll have access to this model. We’ll create an unordered list of colors using the {{#each}} Handlebars helper. Open up /app/templates/index.hbs and replace the contents with this markup:
The helper loops through the model array and renders an
- tag for each string. In the
- we use HTMLBars binding syntax to show the color by putting the color inside of curly brackets. Save the file and your browser should automatically update to show the colors below the “Hello Ember” header because we’re at the root of the application where the index template renders. Try adding a color or changing the existing colors in
app/routes/index.jsand save the file to see them change in the browser.Let’s try creating one more route to see how non-index routes are set up and how to link to different routes. In the terminal let’s generate a
usersroute:
Now take a look at app/router.js. Pay close attention to the router map:
The highlighted line was added to this file when we generated the route. A similar line was not added for the index route because it does not need to be explicitly declared. Let’s set up the model hook for app/routes/users.js to return an array of JSON objects representing users:
Each object in the model contains a user’s name and their Twitter handle. Let’s modify the app/templates/users.hbs template to render a list to show our list of users and link to their Twitter pages:
Again, we use the {{#each}} helper to loop through the model array. The difference this time is that we have objects instead of just strings so the binding statements reference properties available on these objects. Save the file and visit http://localhost:4200/users in your browser to see the results.
We now have two routes defined so let’s link them together. Update app/templates/index.hbs to use the {{#link-to}} helper to link to the users route:
The parameter to the {{#link-to}} helper specifies the route to generate a link for and the text inside of it is what will be displayed for the link. Save the file and click on the link to head over to the users route. Now let’s update the users template to link us back to the index route:
Head back into the browser and test that the links. You should be able to go back and forth between the two routes now.
What’s Next?
We just build an application that covers the basics of Ember.js development. We set up a few routes, configured their models and then updated the route templates to show the model and link to each other. Now that you have the basics of Ember.js under your belt you can start building amazing things with it. Here are some things you can try on your own:
- Load model data from an external source using Ember Data (you can read more about this in my follow-up post about using Ember with Firebase)
- Install some addons using Ember CLI
- Build some Components to replace the loose templates in the application (I show you how to use components in this post)
I’m super excited to see what you build with Ember 2.0 so find me on Twitter @brentschooley to show it off!


Related Resources
Twilio Docs
From APIs to SDKs to sample apps
API reference documentation, SDKs, helper libraries, quickstarts, and tutorials for your language and platform.
Resource Center
The latest ebooks, industry reports, and webinars
Learn from customer engagement experts to improve your own communication.
Ahoy
Twilio's developer community hub
Best practices, code samples, and inspiration to build communications and digital engagement experiences.