Creating Web Components in Ember.js 2.0
Time to read:
September 17, 2015
Written by
This post is part of Twilio’s archive and may contain outdated information. We’re always building something new, so be sure to check out our latest posts for the most up-to-date insights.

Web developers have traditionally had a limited choice when it comes to markup tags in HTML. We have basically been limited to what the W3C defines. As web applications become more sophisticated there is a rising need for the ability to create our own tags to represent regions of functionality within them. There are specs currently in process at W3C which aim to address this need. The Custom Elements spec defines a way to create custom tags with their own custom attributes thus creating what are known as web components. Ember has a version of web components it aptly calls Components that are designed to implement the W3C Custom Element spec. Ember Components allow us to create reusable elements within our applications with names and properties that best represent their functionality.
Since my last post that mentioned a fictitious online soda shop I’ve received some inquiries about bacon soda. Can we provide it? Yer darn right we can. In this post we’ll use an Ember component to build a customer list for our online soda shop. Customers that have requested a bacon soda sample will be known as trial customers. Customers that have signed up for monthly delivery of their fixins’ will be known as subscribers. We’ll use Firebase and Ember Data to store our customers (you can read details about how to integrate these technologies in the first soda shop post). We’ll create a page to show trial customers and another page to show subscribed customers. We’ll use the same component for each list and use properties on the component to show different columns for trial and subscribed customers. This will help keep our markup clean and semantic.
If you’re just getting started with Ember.js head over to this post and get everything installed. If you want to dive right in and look at the code for the sample we’ll build in this post you’ll find it in this Github repo.

Components in Ember
Before we dig into our sample let’s take a look at how Components are structured. Components are comprised of two files:
Template file (.hbs) – This HTMLBars file holds the markup that defines the UI for the component. This will be rendered into a div tag by default but we can also define a different tag for the element in the component’s JavaScript file. The template can also include other components.
JavaScript file – This file can be used to add properties and behaviors to the component. Behaviors are typically specified using Actions.
Setting Up Our Project
Let’s start by creating a new Ember application using Ember CLI:
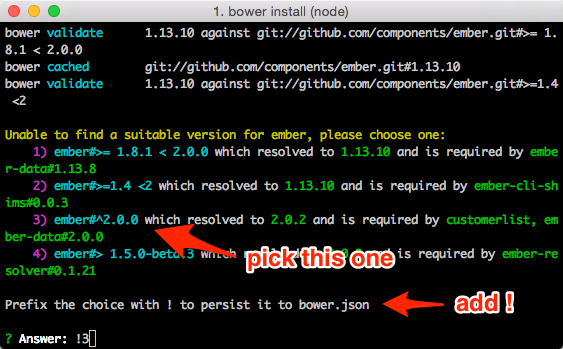
Modify the bower.json file to update the ember and ember-data dependencies to 2.0.0 since Ember CLI has not been fully updated for Ember 2.0:
Run bower install and, if prompted, make sure to resolve Ember to the latest version (currently 2.0.2):
Open app/templates/application.hbs and change the “Welcome to Ember!” message to say “Customer List Demo”:
We’re going to be displaying data in tables and default HTML tables aren’t exactly the nicest things to look at. Let’s add some lightweight styling support by installing Picnic CSS. Run this from the terminal:
Edit ember-cli-build.js to add a step to import picnic.min.css into our Ember app:
The import function adds the contents of picnic.min.css into our application’s vendor.css file at build time which makes the styles it contains available everywhere in our app.
We’ll also be working with some dates in our app so let’s install some Ember helpers for the wonderful moment.js library. This will make it easier to display formatted dates and time durations in our Ember templates. Run these commands from the terminal:
The first command installs the ember-moment addon and the second command generates the helpers that we’ll use in our component templates.
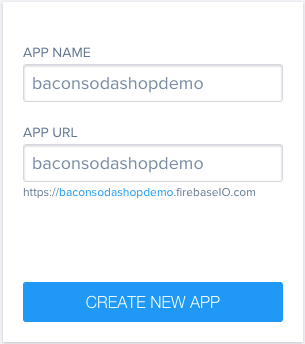
There’s one more thing we need to add to our project before we start adding customers and that’s Firebase. Head over to Firebase and create a free account if you don’t already have one. Once logged in, create a new Firebase app and give it whatever App Name and App URL you want. Just be sure to note the App URL as we’ll need it when we configure the Firebase addon for Ember Data.
Let’s install the EmberFire addon from the latest commit supporting Ember Data 2.0 (more details on why in this post):
Update config/environment.js to set the Firebase URL to the URL of the Firebase app we created earlier:
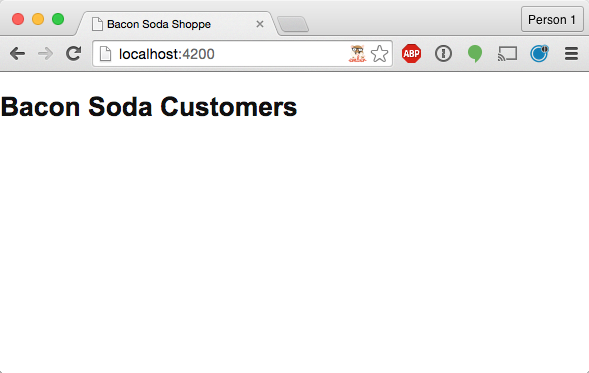
Fire up the Ember development server using the following command and go to http://localhost:4200 just to make sure everything is working:
Loading Some Customers Into Firebase
Before we can display customers in a Component we need to add a customer model and load some customers into our Firebase app. Use Ember CLI to generate a customer model:
Replace app/models/customer.js with the following code:
Most of this is standard Ember Data attribute definitions. The highlighted lines create a computed property that updates whenever subscriptionDate or subscriptionDuration changes. It uses moment.js to calculate the expiration date for a subscription. We’ll use this in our customer list component to display how much time is remaining in a customer’s subscription.
Now we’ll use the JavaScript console in our browser to add some customers to Firebase. You’ll need Ember Inspector for either Chrome or Firefox for this step so install that if you don’t have it. Open the app at http://localhost:4200 if you don’t already have it open and then fire up your dev tools in the browser. Go to the Ember tab, click on Routes and then click the >$E link next to the index route:
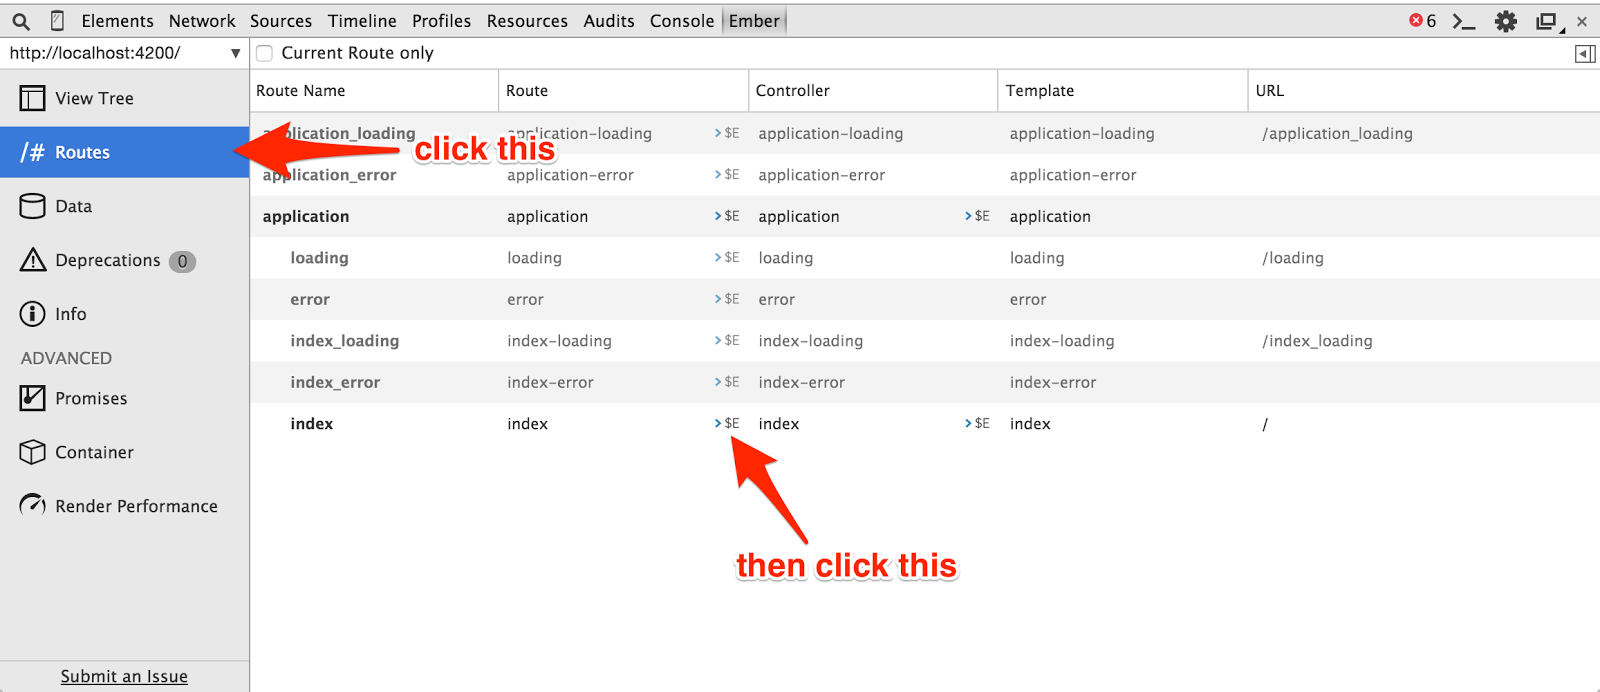
Now we can use $E to refer to the route in the JavaScript console and use it to add some data into Firebase using Ember Data. Run the following lines in the JavaScript console to add a couple trial customers and a few subscribers:
Check your Firebase app to make sure all 4 records were successfully synced before moving on.
Displaying Trial Customers Without Components
To get a good feel for the code cleanup and reusability we gain from components let’s start without using them. We’ll create a route and a template like we usually would in an app without components and then see why we might want to refactor. Let’s start by creating the route for our trial customer display:
Edit app/routes/trials.js to set its model hook to return only customers who have not subscribed:
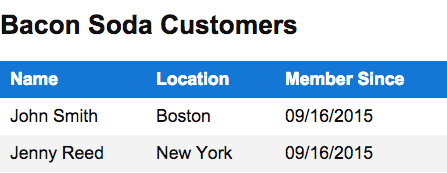
The highlighted lines are an Ember Data filter that will update every time a model is created. It returns only customers who are not subscribed. Now let’s edit the app/templates/trials.hbs template to display a table listing the trial customers’ names, locations and signup dates:
The highlighted line uses the moment-format helper to give us a nice clean date format. Save your work and hit http://localhost:4200/trials in your browser. It should look like this:
Great, it works. At this point we could repeat this entire process for subscribers including duplicating all of that template markup. We won’t do that though because we’ll follow the DRY principle. We’ll instead create a component to represent the customer list that can display certain info for trial customers and different info for subscribers. We’ll then use this in the templates for trial customers and subscribers.
Creating the Component
Ember CLI makes it super easy to create components. There is a generator for components just like the generators we’ve been using for models and routes. Let’s create a customer list component:
This command generates a template and a JS file for the component. Copy the table markup from app/templates/trials.hbs into app/templates/components/customer-list.hbs and modify the #each loop to iterate over a customers list instead of model:
Now head back to the trials.hbs template and replace the table markup with this component declaration:
Here we’re passing the customers from the trial route’s model into the customer-list component using an attribute called customers which we used in the component template above. Save your work and check http://localhost:4200/trials to make sure everything still works (if you still have it open it will auto reload). Now let’s work on showing our subscribers.
Show Me The Money, I’ll Show You The Soda
We’ll start by creating a route for displaying the subscribers:
Next we’ll set up the model hook in app/routes/subscribers.js using a filter like we did for trial customers:
Now edit app/templates/subscribers.hbs so that it contains a customer-list component just like the trials component:
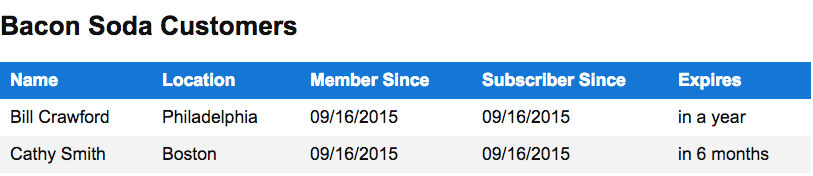
Take a look at http://localhost:4200/subscribers. This works fine and displays the basic information for the subscribers just like it did for trial customers. We have more information we can display for subscribers though so let’s edit the component template to support that. Edit the customer-list.hbs template so that it looks like this:
The two highlighted sections add some subscriber-specific info only if a showSubscriberInfo property is set to true on the component. We can easily set that by editing the component declaration in subscribers.hbs:
Save your work and check out http://localhost:4200/trials and http://localhost:4200/subscribers to see the difference between the trial and subscriber displays. Here’s what the subscribers should look like:

Next Steps
In this post we built a customer list for purchasers of fine, artisanal, hand-crafted bacon soda. We were able to remove code duplication by creating a reusable component in Ember. This component is something we could easily use in future projects and with a little bit of work we could even share it with the Ember community as an addon. Here are some other things you can try with what we built:
- Create a customer-row component that can be used inside of the customer-list template. (Hint: You’ll need to customize the element this component renders into)
- Add a Subscribe button to the trial list and use an action to update the customer when this button is clicked.
- Try packaging your components as an Ember addon.
- Try some of the components at Ember VCL
- If the strong Content Security Policy warnings in the JavaScript console are bothering you there’s some info here on how to clean them up.
I’m really stoked about Ember and I’m even more stoked to see what you build with it. Share it with me on Twitter @brentschooley or email me at brent@twilio.com.

Related Resources
Twilio Docs
From APIs to SDKs to sample apps
API reference documentation, SDKs, helper libraries, quickstarts, and tutorials for your language and platform.
Resource Center
The latest ebooks, industry reports, and webinars
Learn from customer engagement experts to improve your own communication.
Ahoy
Twilio's developer community hub
Best practices, code samples, and inspiration to build communications and digital engagement experiences.