Screen capture in Google Chrome
Time to read:
October 12, 2017
Written by
To build screen sharing capabilities into a WebRTC video chat application you must first be able to capture the content on screen. In this post we’re going to see how to access the screen capture capabilities of Google Chrome from within a web application.
What you need
In order to build this project you will need:
- Google Chrome
- A text editor
- A local web server – I like to use servedir for things like this
Screen sharing
As of right now, Chrome does not allow you to access the content of a screen via the mediaDevices API. There is a draft spec for a getDisplayMedia method but no browser has implemented it yet. Screen sharing on the web has many security concerns for the end user, so the browsers are handling this feature with concern.
What can we do right now then?
Well, in Chrome we can write a extension which will give us access to the screen, application windows, and browser tabs. Chrome extensions have extended permissions and APIs that allow access to resources that regular JavaScript on the page cannot.
Let’s write an extension that will give access to screen capture and then show the results of that on the page.
Building a Chrome Extension
The extension we are going to build is very simple. It consists of two parts: a manifest.json file that describes the extension and the script we want to run, which we’ll call extension.js.
The extension manifest
Create a new directory in which to build our application, a directory for the extension itself, and the files manifest.json and extension.js.
Open up manifest.json in your favourite text editor. We need to add a few basic details to the manifest to start with: a name, a description, the version of our extension and the version of the manifest file format that we require which in this case is 2.
Now we need to describe how the extension works. Add the following to the manifest:
This tells Chrome what the extension actually does.
Firstly, it runs the file extension.js in the background. The "persistant": false option indicates that we are building an event page. This means that when the extension isn’t needed it is unloaded and doesn’t take up system resources.
Being externally_connectable means that this extension can receive messages from a web page on a matching URL. In this case this is a development extension and will only work for localhost. If you want to build this into an extension for your site, you’ll need to add your own domain matching code here.
Finally, the permissions part means we want access to the Chrome extension’s desktopCapture API. We’ll see how that works as we write the code for the extension itself.
The extension code
To build an event page we need to create an event listener. We’ll be waiting for a message from a web page so open extension.js and start by entering:
chrome.runtime is the API we use to respond to events external to the extension as well as return other details about the extension itself. onMessageExternal is fired when a message is received from outside the extension so we need to listen to it. When our listener gets called it receives three arguments, the message we send from our page, a runtime.MessageSender object and a function we can use at most once to send a message back to the page.
Once this event fires, we then need to use chrome.desktopCapture.chooseDesktopMedia to pop up the screen sharing choice. We need to pass an array of sources to capture. These can be “screen”, “window”, “tab”, or “audio” and we’ll pass them through from the web page in the message we send. We also pass the tab that sent the message to the extension. Finally, we need to pass a callback that will be called once the function returns a streamId for the stream we asked for access to. In order to let us use the sendResponse function asynchronously we also need to return true at the end of the listener function.
Once we get the response to the callback we’re nearly done with the extension. All we need to do is to check if the user authorised access to a screen and send back either an unsuccessful response or the ID of the stream to the web page using sendResponse.
This is all we need to write for this version of our extension. Now we need to install it before we can use it.
Install the extension
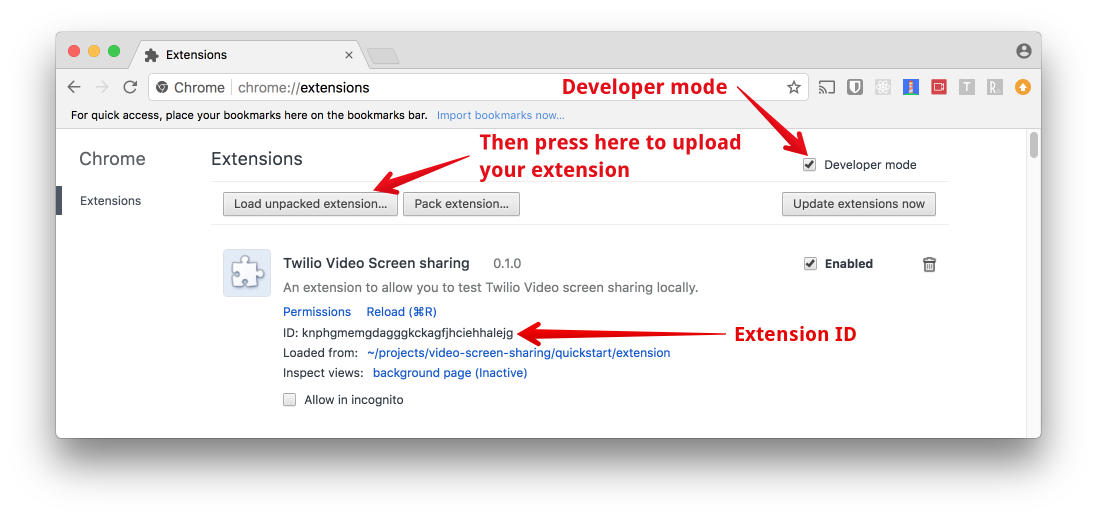
Installing an extension that you’re working on in Chrome to test is nice and easy. Just open up the extensions settings page by typing chrome://extensions into the address bar of the browser.
Then, to install the extension you need to check the “Developer mode” box and then choose “Load unpacked extension…”. From the dialog, navigate to the directory you saved the extension in and select the whole directory.
Once it’s uploaded you will want to take a note of your extension ID. We’ll need that in the next part.
Building screen capture
For the rest of this post we’re going to see how to use our new extension to get access to capture our screen. We’ll show that in a <video> element on a web page for now. In another post we’ll look into using the stream in a video chat so we can share our screen remotely.
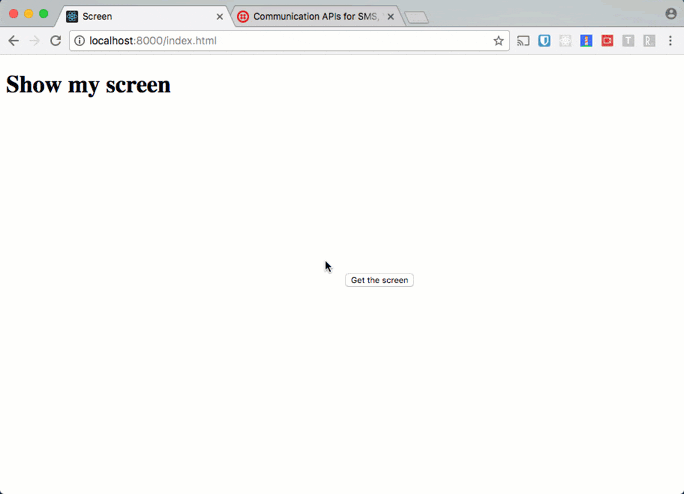
Get started by creating directory called chrome within your project directory and inside that a new HTML page called index.html. Add the following markup:
This is a basic HTML page with one <video> element inside to show our results, two buttons to start and stop the screen capture and a <script> block where we will write the rest of the code.
We’ll start the code by gathering the DOM elements we are going to use. We also set up an object for the request we’ll make to the extension later. Remember we could supply the sources we wanted to select from. In this app we’ll be able to choose from the whole screen, a window of an app or a tab from Chrome. You’ll also need the extension ID from when you loaded your extension into Chrome earlier. Add this inside your <script> block:
Now, to start on capturing the desktop. When we click on the button to get the screen we make the request to the extension and get the response in a callback.
Once we have the response we check whether it is a success. If so, we can take the stream ID that the extension returned to us and pass it to the mediaDevices API. If not, then we log that access was denied.
In this code we pass options to the video option for mediaDevices.getUserMedia. The chromeMediaSource should be set to 'desktop' and the chromeMediaSourceId is the stream ID we got from the extension.
The rest of the code we need to write is just the same as regular getUserMedia code. The function returns a Promise that resolves with the stream, so we need to set the stream as the source to the page’s <video> element. We’ll also hide the get screen button, show the stop screen button and catch any errors that may occur.
Finally, we can write the code to handle stopping the screen capture. This will listen for clicks on the button, get the stream’s tracks and stop them all. It also removes the src from the <video> and reverses the visible buttons.
That’s all the code. Let’s run this.
Capturing the screen
The last thing we need to do is serve this HTML file on localhost. I usually use an npm module called servedir. If you have Node.js and npm installed, you can install it with
npm install servedir -gYou can then navigate using the command line to the directory you saved your file in and serve it on localhost:8000 by entering:
serve .If you have another method you use to serve static files on localhost you can use that too.
Open up the page, click on the “Get the screen” button and choose the screen, window or tab you want to share. You’ve captured your screen!

Next steps
If you didn’t write all that code down, you can also check out the results in this GitHub repo.
Everything we have done here is very specific to the Chrome browser, but it turns out you can get access to screen capture in Firefox too. With that knowledge check out how to use the code for both Chrome and Firefox to build a screen sharing video chat application with Twilio Video.
We have implemented a very minimal version of the required extension to get access to screen capture. For a more robust version, check out the screen capture guide in the Twilio docs. You’ll also find more information there on how to use this new ability with Twilio Video to screen share during a video call.
Do you have an interesting use case for screen capture in browsers? Drop me your ideas or any questions in the comments below. Or feel free to reach out on Twitter at @philnash or by email at philnash@twilio.com.
Related Posts
-
 How To Build An AI Phone Agent With Twilio Conversation Relay in Node.jsDhruv Patel Dylan Frankcom
 -
Build Real-Time Speech to Speech with Twilio Media Streams and NVIDIA PersonaPlexChristopher Connolly
-
Build and Test a Patient Appointment Scheduling Agent with Twilio and BluejayDeepti Naidu Rohan Vasishth
Related Resources
Twilio Docs
From APIs to SDKs to sample apps
API reference documentation, SDKs, helper libraries, quickstarts, and tutorials for your language and platform.
Resource Center
The latest ebooks, industry reports, and webinars
Learn from customer engagement experts to improve your own communication.
Ahoy
Twilio's developer community hub
Best practices, code samples, and inspiration to build communications and digital engagement experiences.