How to Build Chat into Django Applications with Twilio Programmable Chat
Time to read:
May 15, 2018
Written by
This post is part of Twilio’s archive and may contain outdated information. We’re always building something new, so be sure to check out our latest posts for the most up-to-date insights.

Looking to build a realtime chat app? Building this from scratch requires thinking about lots of concerns at once. How should you model your users? What about different channels and different access levels? How about showing which users are online and when they start typing a message? There’s these questions and a lot more to answer when building a quality chat app.
That’s where Twilio Programmable Chat comes in. This awesome service helps abstract away the groundwork involved in building realtime chat applications. Chat comes with support for basic chat features such as channels, users, roles and permissions. There are also many other advanced features that you can add incrementally to your app.
We will create a chat room application, where users can chat on different topics in different rooms, typically known as “channels”. Our application will be simplified and through it we will explore how to build out a chat application using the Django web framework. The chat functionality will be fully powered by Twilio Chat.
Development Environment
To get through the tutorial, these are the tools we’ll need:
- Python 3
- The 1.11 version of the Django framework
- A free Twilio account with the Twilio Programmable Chat API enabled
- The Twilio Python helper library for communicating with the Twilio APIs
Time to go over each of these setup steps one by one.
Python 3
The Python community is moving to Python 3 and it supports all of libraries that we will use. You can check your Python version by running the following command in your terminal.
You can download the installer from the official website if you do not yet have it on your system. Once Python is installed on your system and running the python command takes you to the Python prompt, we can proceed to the next step. At the time of writing, the latest version is Python 3.6.5.
Virtual Environment Setup
Virtualenv is a nifty tool that will help us set up isolated Python environments along with their application dependencies. Go ahead and follow the installation instructions if you do not already have it installed.
Once it is installed, we need to choose a location for storing our virtual environments. I usually store mine in ~/.virtualenvs. Once you’ve decided on a location, then create the virtualenv with this command:
This creates the virtualenv in ~/virtualenvs and sets Python 3 as the default Python version inside the virtualenv.
To activate the environment, we should run on the command line:
Once the virtual environment is activated, we should see the name of our env in the command prompt e.g. (django-chat)$.
Install Dependencies with pip
pip is a tool for installing Python dependencies. With our virtualenv activated, install the Django and Twilio libraries into our virtualenv:
Our initial setup is now complete and we can start building the chat room app. Keep in mind that the virtualenv should stay activated for the remainder of the tutorial.
Build the Chat Room App Backend
We’ll kick things off by setting up the Django project. We first need to create a new Django project then switch directories to the newly created folder. We will run all future commands from the chatroom_app folder.
In the Django project folder, we should now create a new Django app by running:
This command will create a chat/ folder where all our Python code relating to the chat app should go. Change directories to get to the chatroom_app folder, where you’ll find a settings.py file. This is where we need to do some initial setup. We need to instruct Django to load the chat app in our project. This is configured in the INSTALLED_APPS setting.
In chatroom_app/settings.py, find INSTALLED_APPS and append 'chat.apps.ChatConfig' to it so it ends up like this:
This configuration indicates to Django that it should load the ChatConfig class from the chat/apps.py file. That should be enough to load our chat app along with the other inbuilt apps. We will now set up Twilio. Still in settings.py, we need to load in some environment variables that we’ll need later to connect to Twilio. We’ll get the actual credentials from Twilio later on, so don’t worry about them quite yet.
Add these settings at the bottom of the file beneath the STATIC_URL line and we’ll go through how to fill in each one shortly:
To ease the process of loading in these environment variables, we’re going to create a .env file in the root Django project folder, and load the config from this file through the python-dotenv package.
Install the package by running in the terminal:
Then add the following to settings.py:
With this in place, any settings we add to the .env file will be loaded in to the environment variables. You can copy the starter .env file from that we will then populate with our Twilio credentials in the GitHub repository.
Time to get the authorization settings from Twilio.
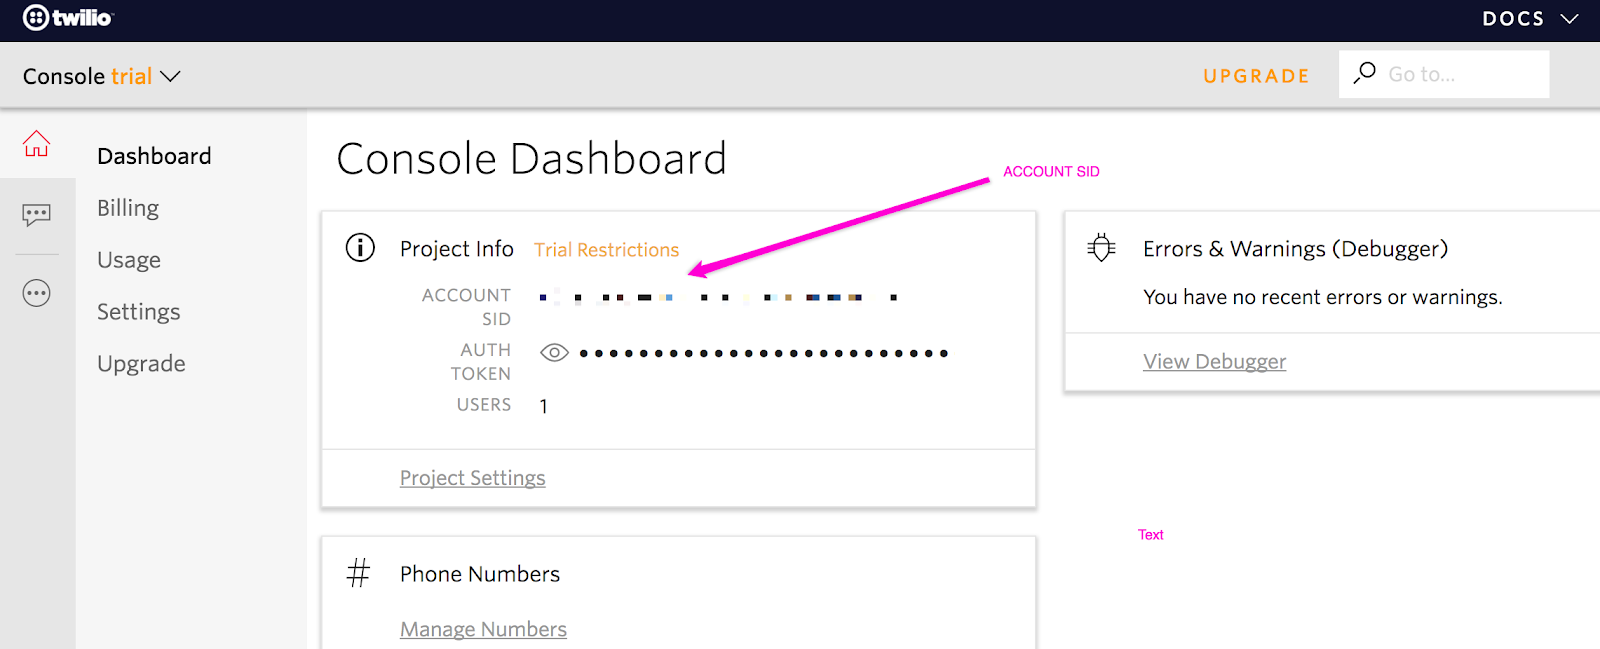
Head over to the Chat Services section and click on the Create new Chat Service button. You will be prompted for a name and once you enter that, click on Create:
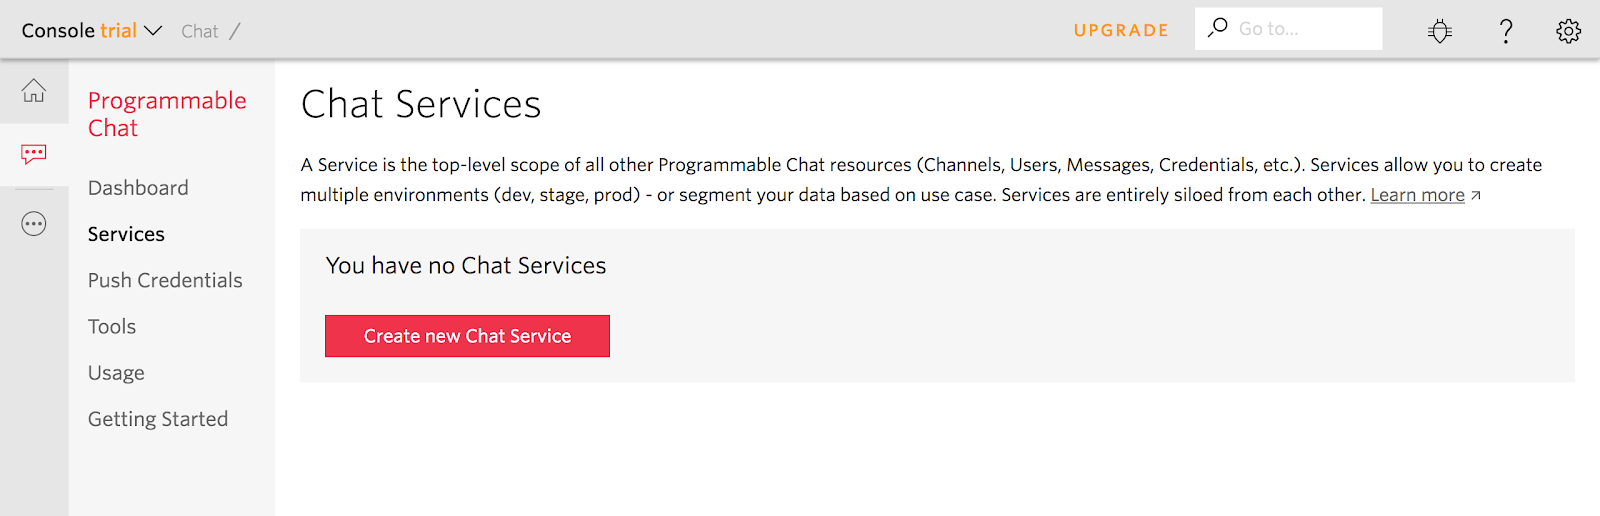
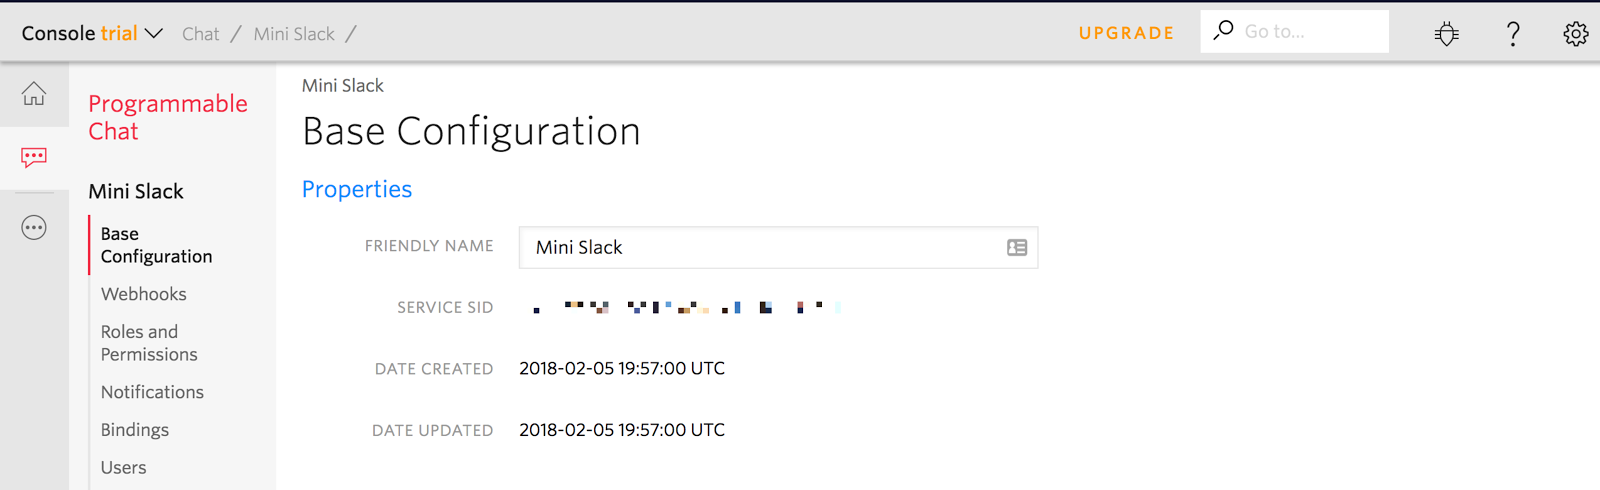
You will be redirected to a page showing your app’s details. You will see a Service SID. Save this as the TWILIO_CHAT_SERVICE_SID setting in our .env file.
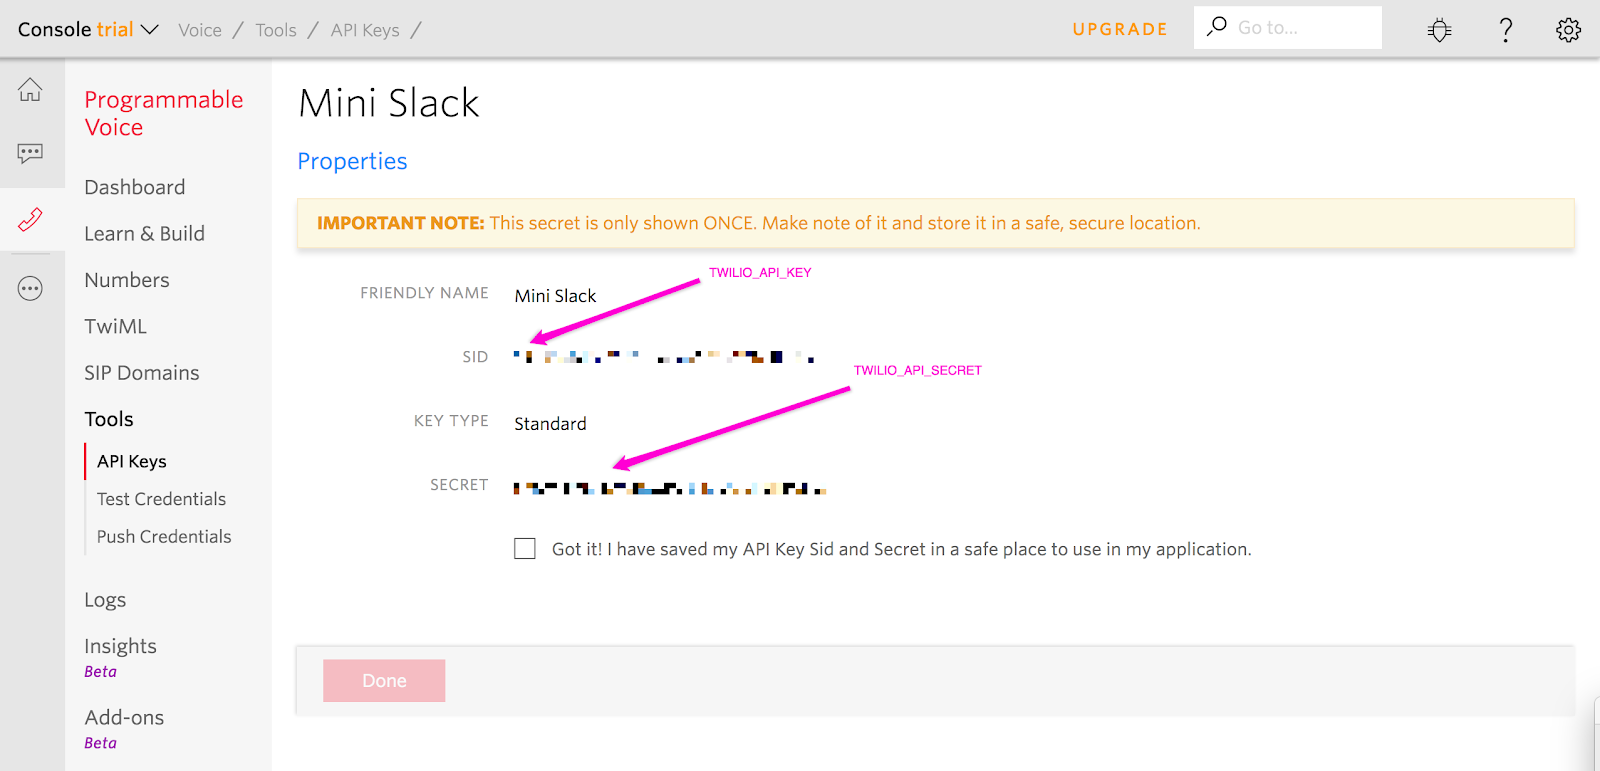
For the remaining settings, navigate to the API Keys page and click on the Create new API Key button. Give it a name, then click on Create API Key.
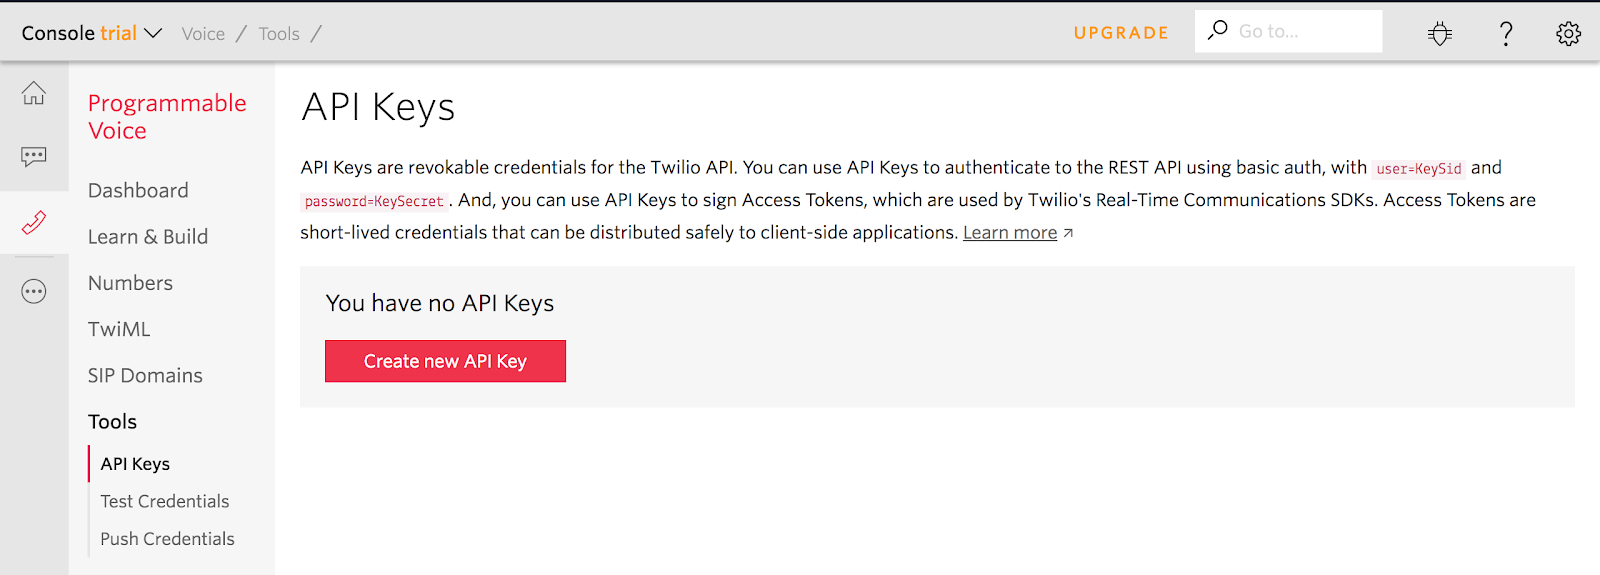
You will be navigated to a page showing your newly created credentials. Save the SID as the TWILIO_API_KEY and save the Secret as the TWILIO_API_SECRET environment variable.
With these settings in place, we can now proceed to write up the rest of our application. The first thing we need to address is creating the Django models. This is where we define what information from our app will be persisted in our database. For our case, we are going to need to store the available chat rooms in the database. For each room, we’ll store its name, description and slug.
This info will live inside chat/models.py. We should go up a directory and then cd into the chat folder to get to the file.
With these changes made to the models, we need to tell Django to track these changes in order to eventually apply them to the database. Django tracks these changes through a migration, which is the link between our models and the database.
Therefore to create the migrations, we need to back up a directory to where manage.py is and run:
This creates a file chat/migrations/0001_initial.py that will contain the changes that Django will apply to the database. To actually apply the changes, we need to run the migrate command to apply the newly created migration to the database.
We can now use our models from Django to insert data in the database. We can create some rooms and save them to the database. We’ll need to use them later on. To do this, we’ll need to go into the interactive Python shell by running on the command line:
From here we can create the room instances we need by running the following commands:
We can now exit the shell by typing exit() on the Python prompt.
At this point we have a populated models.py file and some rooms stored in the database. This seems like a good time to run our app and confirm that there are no issues so far. We can do this by running the following terminal command:
Our app is now running on http://localhost:8000. We should see the Django default page saying “it worked”. In case you encounter any errors, you can go back and see if you missed any step we’ve been through so far.
In Django, views are responsible for fetching data from the database and providing this data to the templates for it to be displayed to the user.
We’re going to add 2 views:
- A view to fetch all available rooms – We’ll use this to show all the rooms on the homepage
- A view to fetch a single room’s details, given it’s slug – We’ll use this to populate the chat room with the room’s details
Add these lines to the chat/views.py file:
Let’s go over the views and what they do. The all_rooms view is responsible for fetching all the rooms from the database, and passing them to the chat/index.html template to be rendered. Inside the chat/index.html template, the rooms will be available as the rooms variable. This will be hooked up to the homepage URL as we will see later.
The room_details view, on the other hand, takes a slug, and uses that to fetch a specific room, which is then passed to the chat/room_detail.html template to be rendered. The slug is fetched from the URL, as we will also see shortly when defining the routes.
We’re done with the views, but we also need to define the route to use to access them.
Create a new file in the chat/ folder and name it urls.py. Keep in mind that this is a separate file from the urls.py file in the chatroom_app folder. Inside this file, add the following contents:
The urls.py file is responsible for mapping a route to the corresponding view. The first pattern in the urlpatterns list designates the all_rooms view to handle the requests made to the root url of the chat app.
The second one instructs Django that any URL starting with /rooms/* should be handled by the room_detail view and it should pass the part after the rooms/ as the slug parameter to the view.
There’s one more thing left to do. The chat/urls.py file only handles URLs for the chat app, and not for the whole Django project. We need to add another entry to chatroom_app/urls.py pointing to the chat app’s URL entries and what route they need to be namespaced under.
Go up a folder and edit chatroom_app/urls.py to look as follows:
Right now, accessing http://localhost:8000 should give us the following error:
The error instructs us that we haven’t created the template yet. We can fix that now.
Django templates are used to build the HTML that we should eventually see and interact with on the screen.
In our views, we defined a couple of templates i.e. chat/index.html and chat/room_detail.html that we now need to create and fill out.
Under the chat/ folder, create a new folder called templates. Inside the templates folder, create another folder and name it chat. This is where Django expects to find the templates used by the chat app. Inside the templates/chat/ folder, we can now create our actual templates: index.html and room_detail.html.
Add the following content to chat/templates/chat/index.html:
Let’s go through the most important changes we’ve made to our template:
- We are using the Bulma CSS framework, which we’re loading from CDNJS to make our app look nicer. If you see us using some unfamiliar classes, they’re most likely from Bulma.
- As you may recall in the
all_roomsview, we fetched all the rooms and passed them to the template asrooms. Now that we can access the rooms, we loop over theroomscollection and display some details about the room i.e. the name, description and slug (link to an individual room)
If everything is working as expected, our web app’s homepage should look like this screenshot:
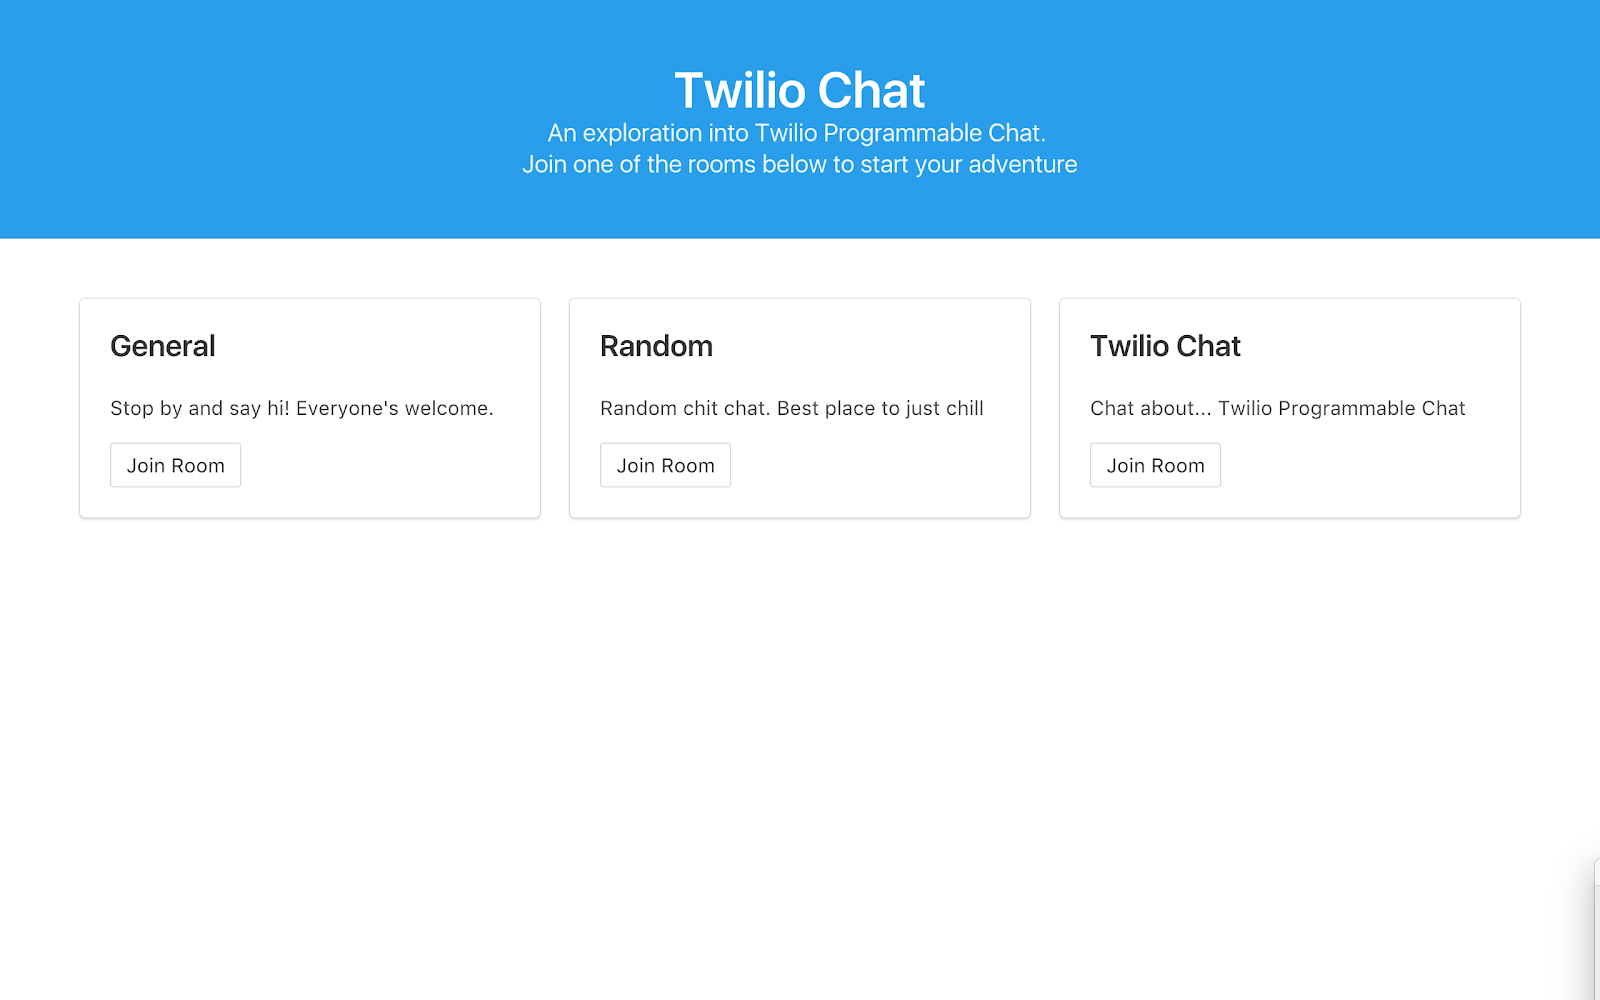
Note that if you had the server running, you need to restart it in order to load the newly created templates.
Now we can populate the other template i.e. room_detail.html in the same chat directory. This is the template for the page that you be shown once you click on any of the ‘Join Room’ links from the homepage. It will also be the room where the chat will happen.
It’s going to have the main chat area and a section showing the room’s details. This is the content we’re going to add to the template:
At the bottom of the page, we’re loading the Twilio JavaScript SDK, along with jQuery.
We’ll need these in the next section once we start interacting with Twilio and building up the chat interface frontend.
We’re also loading a new file, `chat/scripts/rooms.js`, that we’ll create later on. This is where we’ll be writing our custom JavaScript code to interact with Twilio and manage the chat interface.
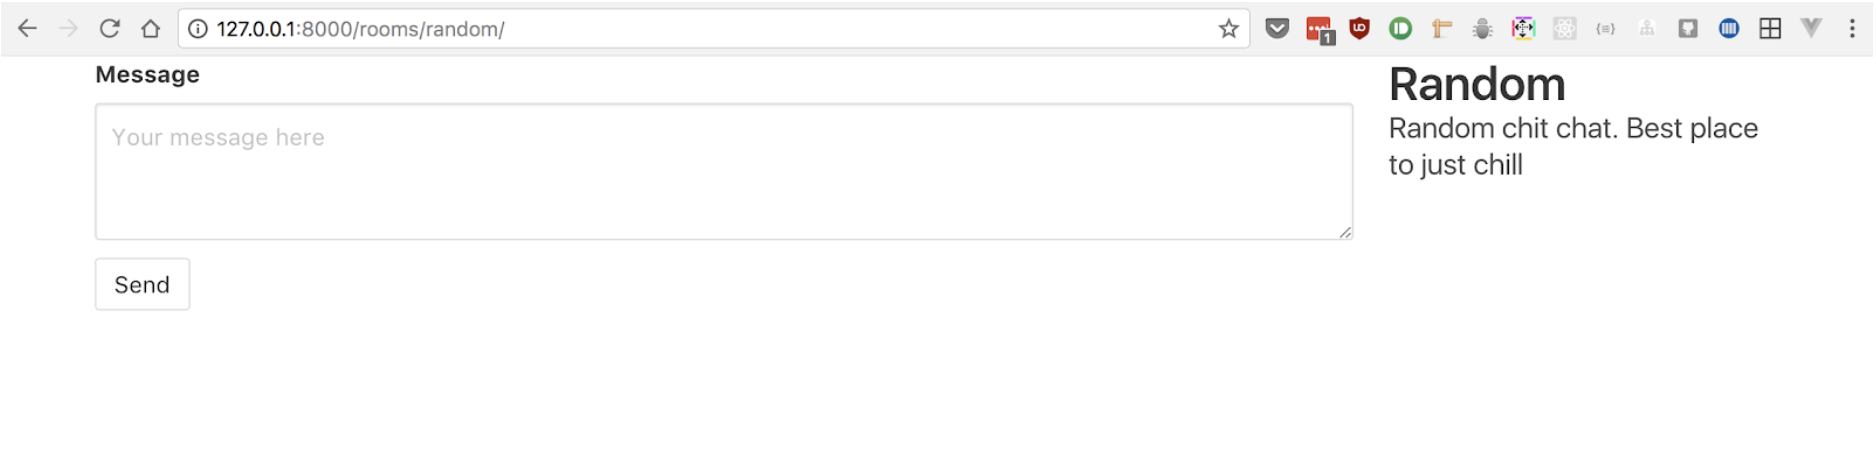
Clicking on one of the Join Room links on the homepage should take you to the individual chat room that should look like this:
With that our frontend setup should be in place. All the rooms can be fetched from the database and we can show a page showing an individual room’s details. Next up, we’re going to focus on the frontend and hook up our app to the Twilio API to enable live chat.
Building the Chat Room App Frontend
For the frontend, we’re going to be interacting with the Twilio Programmable Chat service through the JavaScript SDK.
The first thing we need to set up in order to work with Twilio is getting a unique token that will help us uniquely identify users. The token should be unique per user and per device.
This token needs to be generated on the server, then the browser will request for it and forward it to the Twilio service.
Let’s add the endpoint responsible for returning the token. We’ll first need to go up three folders to add the middle line below to urlpatterns in chat/urls.py.
Then in views.py, we can now add our token view. It will return a JSON response containing a token and a username for the current user. For now, the username will be randomly generated using Faker.
To install Faker, run in the terminal:
pip3 install Faker
Once Faker’s installed, let’s add the token view in views.py in the current directory:
In the above snippet, we add a few new imports for accessing our settings and we also bring in JsonResponse from the Django library. The AccessToken and ChatGrantimports are from the Twilio helper library. They allow us to create the appropriate JWT token to return to the client based on our Twilio account credentials. The final response is encoded as JSON and sent back to the browser.
Our complete views.py file should now look like this:
We now need to create a JavaScript file and send a request to the /token endpoint to request for a token.
Create a static folder under the chat folder. This is where our CSS and JavaScript files will live. Under that create a chat folder that will hold the static files for our chat app.
There, create a styles folder and inside it create a room_detail.css file. Populate the CSS file with the following content:
Go back up a folder so you're in the chat/static/chat folder and create a scripts older and this is where we’ll create a rooms.js file. Add the following content to the JavaScript file and we’ll go over it in a bit.
Here, we set up a few variables to keep track of things that we’ll be storing later. We also have the print and printMessage functions, which are utility functions to help us print messages to the chat window.
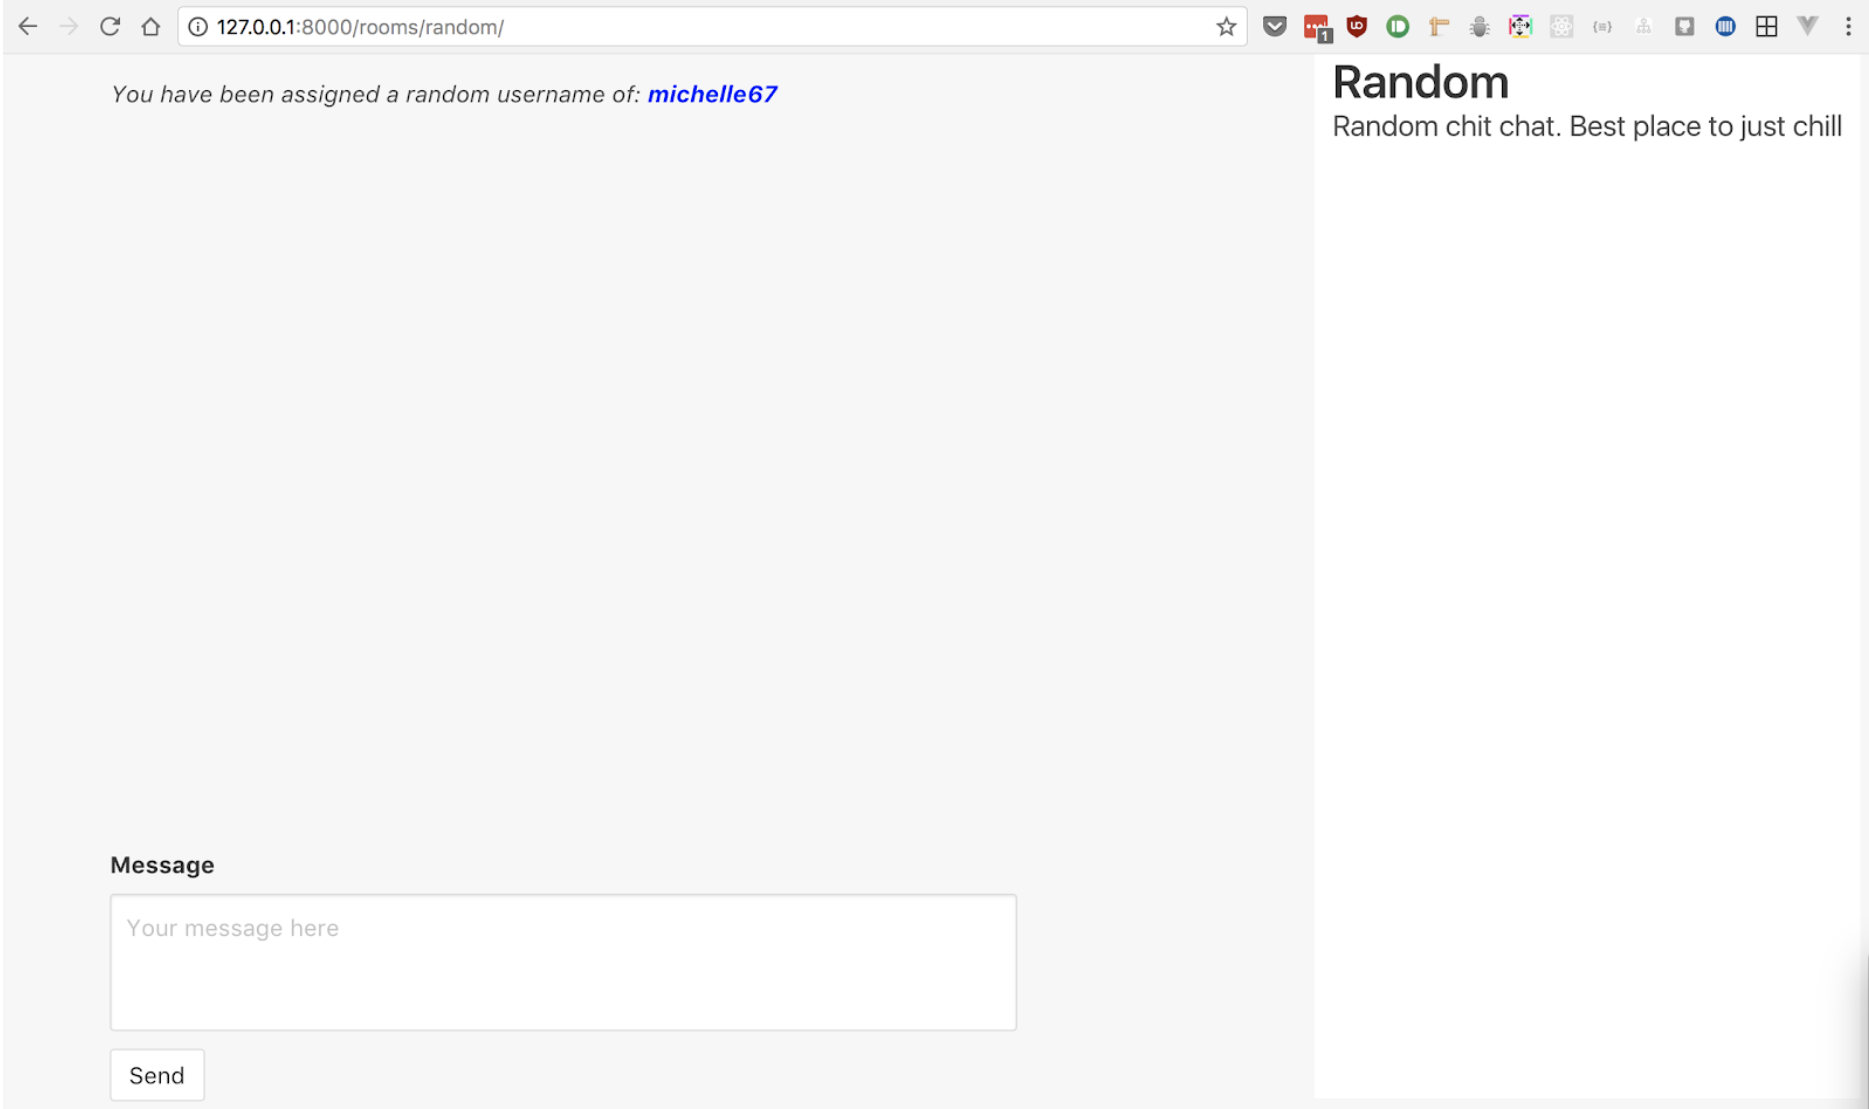
The most relevant part of this script is the request we make to the /token endpoint. When we get a response from the server, we append a message to the chat area (using our helper functions) informing the user that they have been allocated a username.
We then use the received token to create our chat client. When the client is ready, we store a reference to it as chatClient.
To ensure our app is working, go to one of the rooms and you should see this message showing that you’ve been assigned a username:
Up next, we’re going to register our channels with the Twilio chat service. For example, if we’ve joined the general channel, we need to fetch and display the messages that have been sent to it. Before we do this, we need to check if the channel has been created on Twilio, and create it if not. We will do this in a createOrJoinChannel function still in static/chat/scripts/rooms.js.
This function will be called as follows, immediately after initializing our chat client:
Add the the implementation of the createOrJoinChannel function, right after where the $.getJSON function ends (see comment in code below).
First, we extract the channel name from the last portion of the URL and check if the channel has already been created on Twilio. If it has, we handle that in the setupChannel function that we’re going to create shortly. If the channel doesn’t exist yet, we proceed to create one using the channel name and once that’s done, we also call setupChannel to proceed with the channel processing.
Next up, we need to add the setupChannel function. This function’s job is to enable the user to join the created channel, then fetch the previously sent messages in the channel. Let’s look at how this happens. Add the following to the rooms.js file right below where the createOrJoinChannel function ends:
This function adds the user to the channel, prints a message to the chat window informing the user that they’ve joined the channel, then proceeds to load the previously sent messages in batches of 30. Message fetching is handled by the processPage function.
The processPage function iterates over all messages previously sent in the channel and prints them to the chat window. It continues this cycle until all messages are added.
Going back to the setupChannel function, we set up an event listener to listen for when any message is added and appends the message to the chat window.
If you’re interested in learning more about how pagination works with the Twilio Chat SDK, the Paginators docs are a great reference point
The only missing functionality in our app now is the actual sending of messages. Let’s proceed to add it.
At the very bottom of our chat room page, we have a form where you can send messages to the channel. Let’s make this functionality work.
This is enabled by the following code snippet. We’ll add it immediately after where the processPage function ends:
This is an interaction made simple by the Twilio Chat library. Once the user submits the form, all we have to do is take the typed message and passing it to the roomChannel.sendMessage function and that’s it. After the message is sent, we clear the input field to give way to the next message.
We also need to check a couple of conditions before sending the message:
- We check if the
roomChannelexits first. This is necessary since the Twilio SDK could still be in the process of initializing / loading when a user tries to send a message. - We should also check if we have a valid message. The message we write must have at least one non-whitespace character before we send it.
As you can recall, the room has a listener for any new message added. So right now if you type in a message and click on Send, it should be added to the chat messages area right away.
The app should now function correctly and should look as follows:
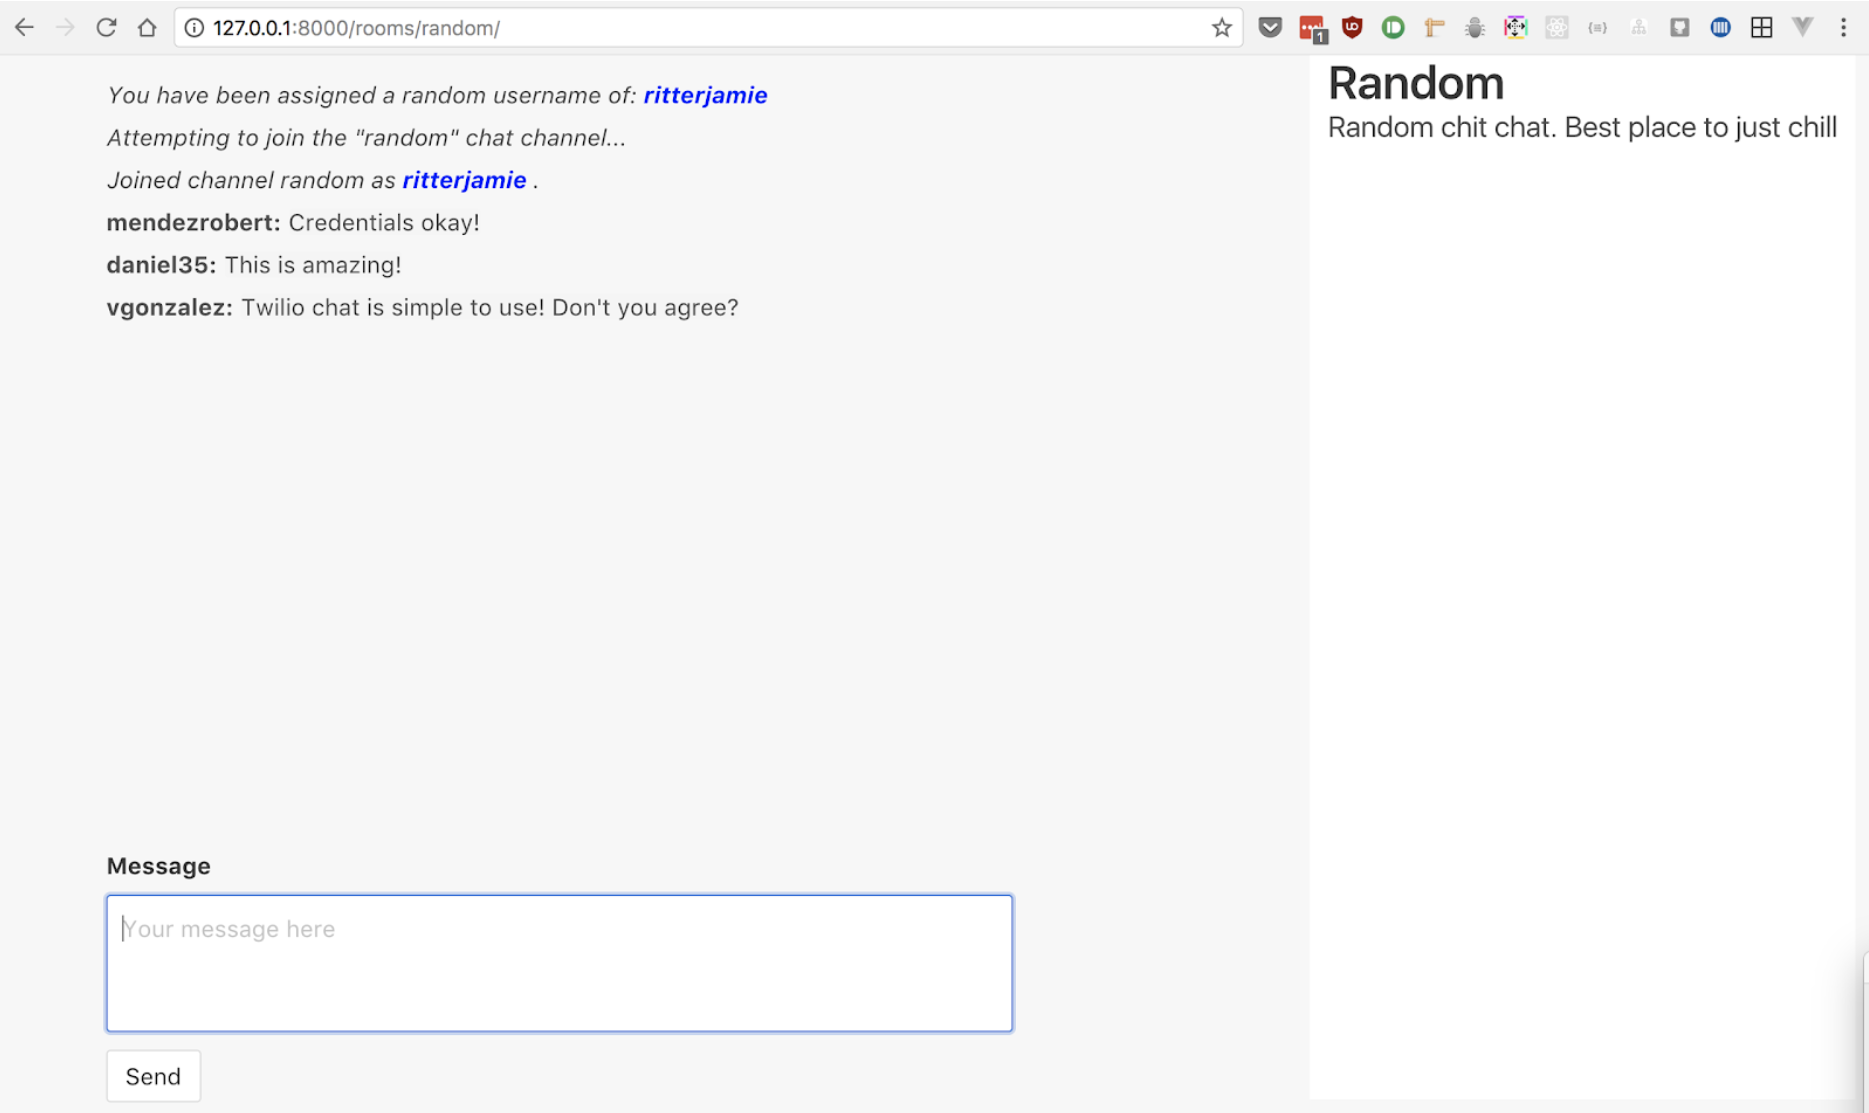
With that, the basic chat functionality should be done. When you send a message, it should be shown to you and other users in the chat room right away. Go ahead and try it!
You can even open a new tab and see the message appearing on both tabs at the same time.
Testing the Chat Room Application
For this section, we are going to look at how you might approach testing for such an application.
This is not exactly Test Driven Development but it’s important to add some sanity checks to ensure we don’t break functionality in future without being aware of it.
Starting with the backend, we’re going to focus on tests that cover as much ground as possible. For this, we’re going to make a request to a specific URL, in this case, the homepage and ensure that it shows the contents we expect. Such a test covers all layers of the Django application i.e the urls, views, and the templates.
With that in mind, let’s back up three directories to write the first test in the chat/tests.py file.
Let’s go over it. First of all, we need to import our Room model from the models.py file. We’ll need it to create a few instances of our model during testing.
Next up, we create a class HomePageTestthat subclasses django.test.TestCase . The methods we add in this class will be the actual tests.
We then proceed to the first test, which will help us ensure that all rooms in the database are rendered in the homepage. In the test, we first need to create some test rooms.
Having the test instances created and saved in the database, we can then create a request to the homepage, and ensure that the response we get back contains the content we’re expecting i.e. The room names and slugs for all the available rooms.
To actually run the tests, we need to move back up to the root chatroom_app directory where we run the server from, and run this command on the command line:
python manage.py test
Running it right now should show one passing test. Let’s proceed to add some tests for the room details page.
For the room details test, we’re going to follow the same procedure we did with the previous test. First of all, we create some sample data, in this case, a single room, access the route and ensure it has the info we expect.
This is the complete test, added on to tests.py:
It is pretty similar to the first test. We start by creating a new class that subclasses django.test.TestCase then we create our test data and save it to the database. In this case, we only create a single room.
We then fetch the room details page and check that the response we get contains the room name and description.
Running our tests again should confirm that both our tests are passing and we should now have a fully functional and partially tested chat application.
Just keep in mind that the tests we’ve written are not conclusive and I encourage you to think of more cases we can cover with more tests.
Wrapping up
It is my hope that by now you have learnt how to use the Twilio Programmable Chat library to build up your own chat or other real time applications.
However, there’s lots of different use cases for Twilio Programmable Chat that we didn’t explore here. A couple of good additions to our app would be:
- Enabling the user to set their username of choice instead of getting a randomly generated one
- Making it possible to create new chat rooms from the frontend
- Member lists for a particular chat room
- Typing Indicators
There’s lots more we can do to improve our app, but I’ll leave it up to you to explore even more capabilities of the Twilio Programmable Chat API.
In case you get stuck following any of the steps outlined, please drop a comment in the comment box below. Also you can check out the complete code from the GitHub repo.

Related Resources
Twilio Docs
From APIs to SDKs to sample apps
API reference documentation, SDKs, helper libraries, quickstarts, and tutorials for your language and platform.
Resource Center
The latest ebooks, industry reports, and webinars
Learn from customer engagement experts to improve your own communication.
Ahoy
Twilio's developer community hub
Best practices, code samples, and inspiration to build communications and digital engagement experiences.