How to Build a Basic Flask Website to Authenticate Users with Twilio Verify
Time to read:
January 27, 2021
Written by
Reviewed by

When it comes to protecting your users' information, it can be a hassle to figure out the best course of action. Conveniently enough, Twilio offers solutions to not only bring your project to life, but to help protect your users and their information.
You can use Twilio Verify to generate one-time passcodes for your user to verify their identity and access your app with the peace of mind knowing that they have a less chance of being hacked. Secure authentication on a site helps reduce the chance of fraud and data loss.
In this article, you will learn how to develop a functional website to authenticate your users and protect their identity and access to the site.
Tutorial requirements
- Python 3.6 or newer. If your operating system does not provide a Python interpreter, you can go to python.org to download an installer.
Set up the environment
Create a project directory in your terminal called twilioverify to follow along:
If you are on a Windows machine, enter the following commands in a prompt window:
If you are curious to learn more about the packages installed in the command above, you can check them out here:
- The Flask framework, to create the web application that will receive message notifications from Twilio
- The python-twilio package, to send messages through the Twilio service
Create your first Twilio Verify
In order to use Twilio Verify, an API key must be generated. Head to the Twilio Verify Dashboard - you should be on a page that says Services.
Click on the red plus (+) button to create a new service. Give the service a friendly name of "site-verify". The friendly name will actually show up on the text message that is sent to people's phones so if you have another specific name you would like to use, such as "<YOUR_NAME> website verify" feel free to do so.
Click on the red Create button to confirm.

Creating the Twilio Verify service will lead you to the General Settings page where you can see the properties associated with your new Twilio Verify service.
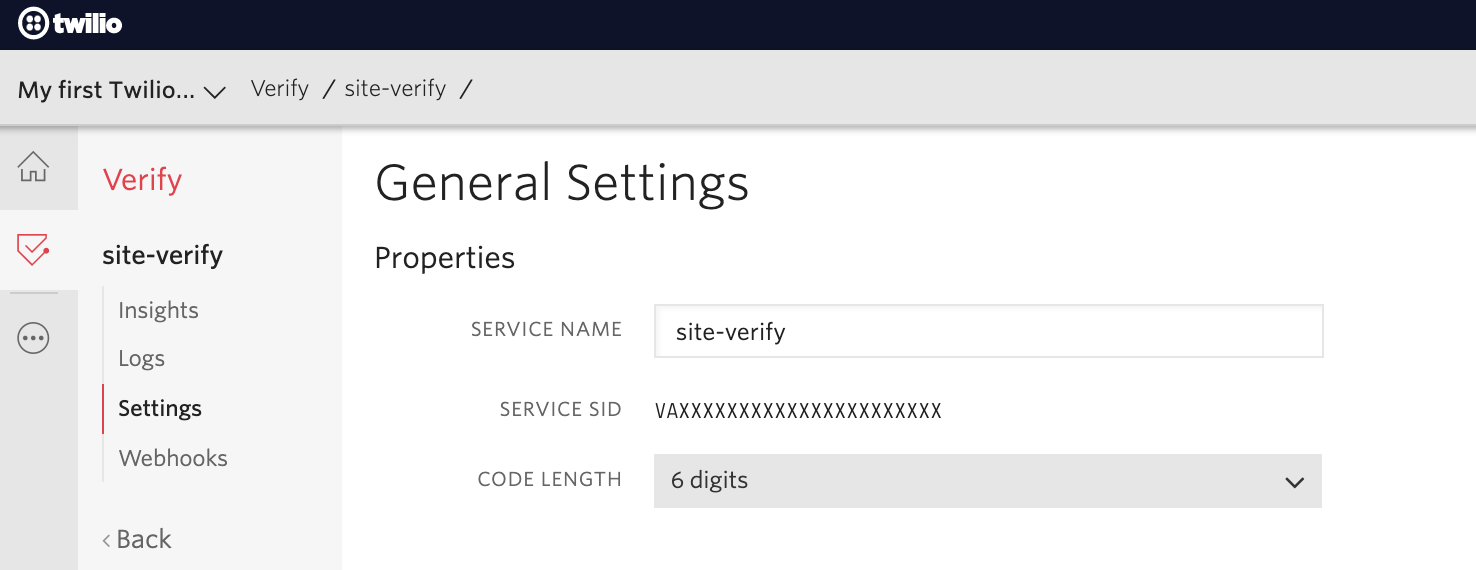
Open your favorite code editor and create an .env file. Inside this file, create a new environment variable called VERIFY_SERVICE_SID. Copy and paste the SERVICE SID on the web page as the value for this new variable. .
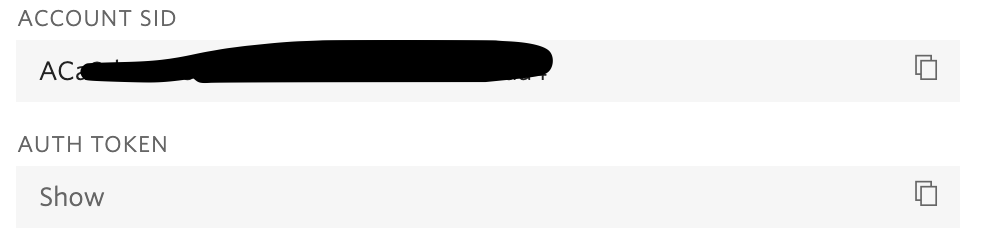
To complete the .env file, create two additional environment variables: TWILIO_ACCOUNT_SID and TWILIO_AUTH_TOKEN. You can find the values for these variables on the Twilio Console as seen below:
Set up a development Flask server
Make sure that you are currently in the virtual environment of your project’s directory in the terminal or command prompt. Since we will be utilizing Flask throughout the project, we will need to set up the development server. Add a .flaskenv file (make sure you have the leading dot) to your project with the following lines:
These incredibly helpful lines will save you time when it comes to testing and debugging your project.
FLASK_APPtells the Flask framework where our application is located.FLASK_ENVconfigures Flask to run in debug mode.
These lines are convenient because every time you save the source file, the server will reload and reflect the changes.
Then, run the command flask run in your terminal to start the Flask framework.
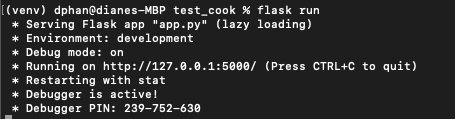
The screenshot above displays what your console will look like after running the command flask run. The service is running privately on your computer’s port 5000 and will wait for incoming connections there. You will also notice that debugging mode is active. When in this mode, the Flask server will automatically restart to incorporate any further changes you make to the source code.
However, since you don't have an app.py file yet, nothing will happen. Though, this is a great indicator that everything is installed properly.
Feel free to have Flask running in the background as you explore the code. We will be testing the entire project at the end so that we don't make too many calls to the Twilio Verify API when we don't need to generate a new verification code.
Create a database file of eligible users
For the purposes of this tutorial, we will be hardcoding a list of accounts that are allowed to enter the website, along with their phone numbers. In a production setting, you would have to use your chosen database instead.
Keep in mind that if you were to use your own database, you would have to avoid storing passwords as plaintext. There are plenty of libraries that help developers manage passwords such as Flask Security.
Create a file in your working directory named settings.py and copy the code below into the file:
The dictionary can be modified to include different emails and phone numbers as you please. Make sure the phone numbers are in E.164 format as seen in the settings.py example above. Be sure to add your phone number to an existing item in the dictionary, or create a new item with your information. Each username is a unique key which is helpful in our case because we want to look up the usernames quickly in the login step.
Plan the logic of the project
The flow of logic for the project goes as follows:
- A user from
KNOWN_PARTICIPANTSwill enter their email on the website homepage. - The Flask application sends a one time passcode to the user's phone number.
- The user is prompted to enter the verification code they received from their phone to verify their identity to their account.
With that said, let's start coding!
In your working directory, create a file named app.py and copy and paste the following code:
At the top of the file, we imported the necessary Python modules and libraries so that the project can load the environment variables, the list of participants from settings.py, and start the Flask app.
The Flask app will also have a secret_key for some level of encryption. Any random string can replace "secretkeyfordungeon". This is also required in our project since we need to store the users' account information and pass it along to other routes on the site using Flask's session.
Create the template folder for HTML pages
To build the UI for this project, you’ll be using Flask templates. Create a folder in the working directory named templates and create the following files inside of the folder:
- index.html - the landing page for the user to enter their email and request a verification token.
- verifypage.html - for the user to enter the verification code when prompted.
- success.html - page indicating the success of protection for the user's account!
Build the user login page
For this project, the user will go to the website and enter their username, which is an email in this case. Copy and paste the following code at the bottom of your app.py file:
A POST request is made to allow the participant's username to be stored in the Flask session. If the username is in the database, in this case the KNOWN_PARTICIPANTS dictionary, then the username is stored in the current Flask session and the verification token is sent to the corresponding phone number. The participant is redirected to another route where they will see another form allowing them to submit the verification code.
However, if the user enters an unknown username, then the page will be refreshed with an error message.
In order to retrieve the text from the participant, a proper HTML form must be created for the participant to interact with. Create a form that takes in a username input, as well as a button to submit. Feel free to copy and paste this barebones HTML form into the index.html file:
With the form set up, it’s now time to build the send_verification() function that will fire after the user submits the form.
Generate a verification code with Twilio Verify
Time for the fun part - calling the Twilio Verify API!
We want to send the verification token after the user enters a valid email in our database. Add the following code to the app.py file under the same route as the login() function:
The Twilio Client sends a verification token to the phone number associated with the username stored in the current Flask session. The specified channel in this case is SMS but it can be sent as a call if you prefer.
Keep in mind that this is a simple function that sends a verification passcode and does not yet account for error handling.
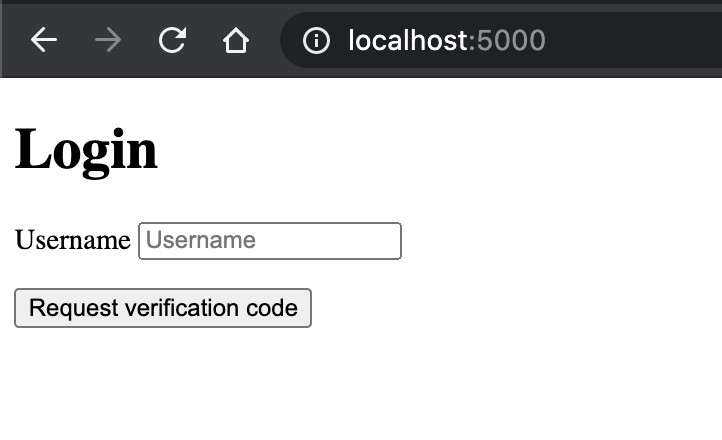
Time to test it out. On the webpage, enter the first username in settings.py that corresponds to your phone number. You should get an SMS with a passcode shortly.
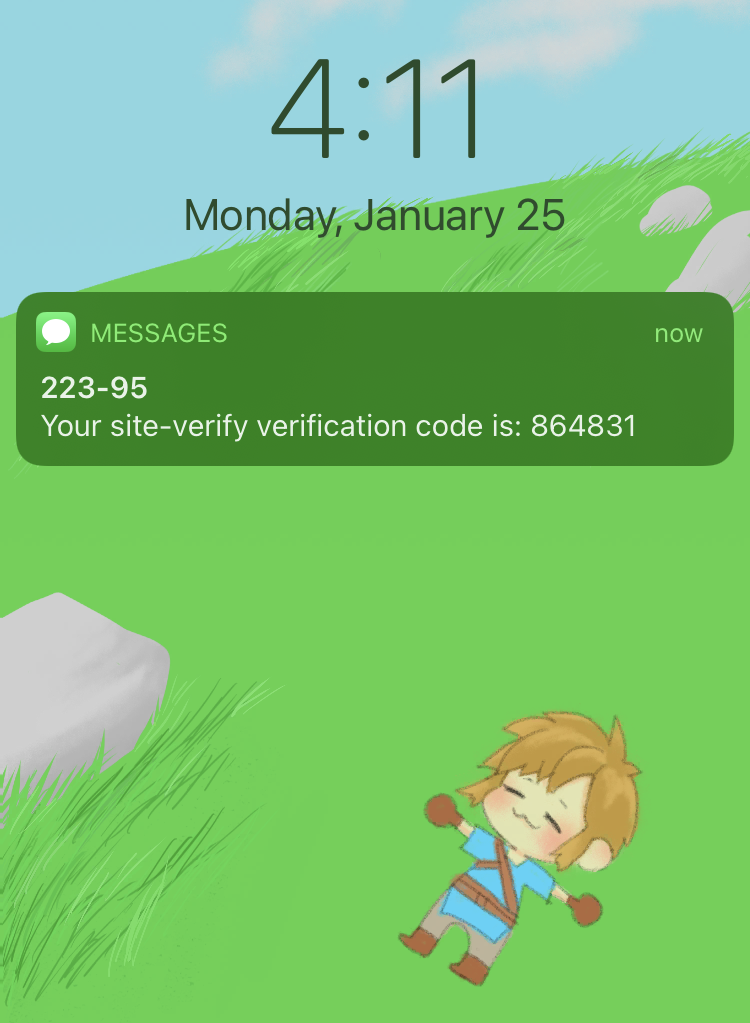
Check your phone to see the notification for the verification code provided by Twilio Verify. In my case the passcode was 864831.

Verify the user's phone number
In this route, we will be taking the user input from a new form and making sure it is the same exact verification code that Twilio texted via SMS to the phone.
Let's wrap it up by creating the form on the HTML side. Copy and paste the HTML into the body of verifypage.html:
Awesome! Now the user is able verify their identity with the 6 digit code that was sent to their SMS enabled device.
But wait - how can we verify the 6 digit code if Twilio is the one that sends out the code? We need to define the /verifyme route and define the appropriate functions so that the user can verify the passcode.
Copy and paste the following code to the bottom of the app.py file:
We need to define the check_verification_token() function beneath the verify_passcode_input() code so that this function can be called within this route:
The check_verification_token() function takes in the Flask session's phone number and the verification_code that the user typed into the textbox and calls the Verify API to make sure they entered the one time passcode correctly.
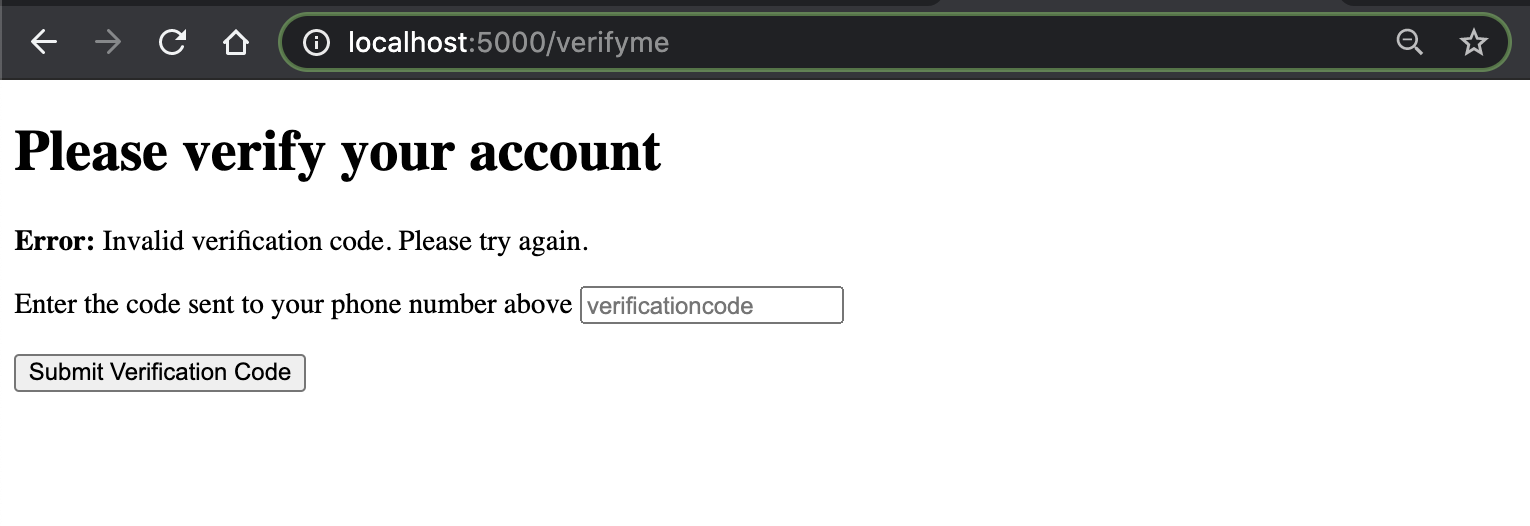
So once the user submits the form, which then makes the POST request to the /verifyme route, the verify_passcode_input() function is called. If the passcode was correct, the success page is rendered. Similar to the logic for the login page, if the participant enters an incorrect verification code, the page will refresh and show an error message. The page will also let the user enter the verification code again.
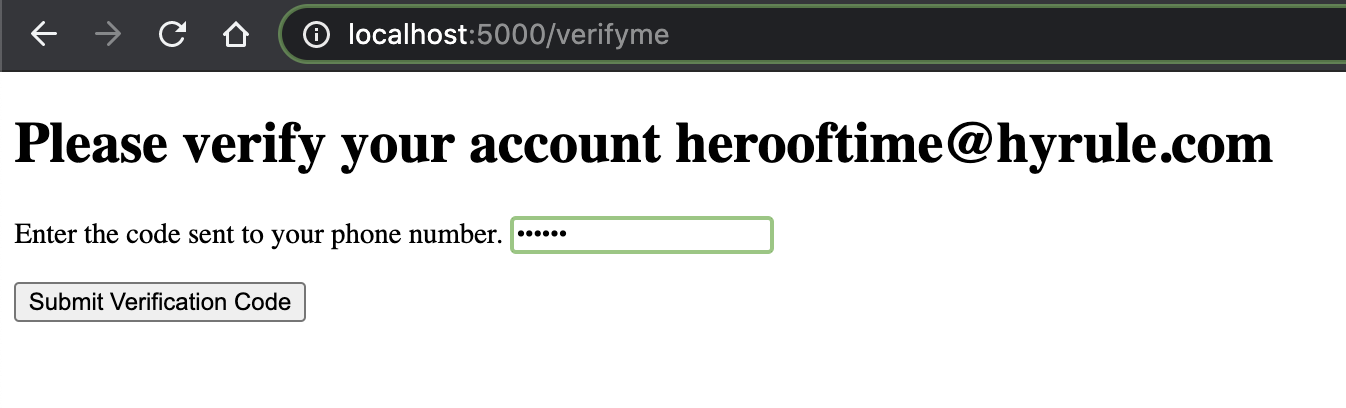
Here's an example of what you would see:
Display a success message
At this point, the user has entered their credentials and verification code correctly. You can now redirect them somewhere else as you please, but in this tutorial, you’ll redirect them to a success page, as coded in the verify_passcode_input() function.
Copy and paste the HTML into the success.html file within the templates directory:
Authenticate your account with Twilio Verify
It's time to test out the app. Feel free to look at the completed code on GitHub.
Make sure that Flask is running on your terminal with flask run. Visit http://localhost:5000/ and enter any username from the defined dictionary in settings.py.
I'll use Link's username which is the key for my own phone number for testing:
Check your phone to see the notification for the verification code provided by Twilio Verify. Seems like the code for my case was 864831.
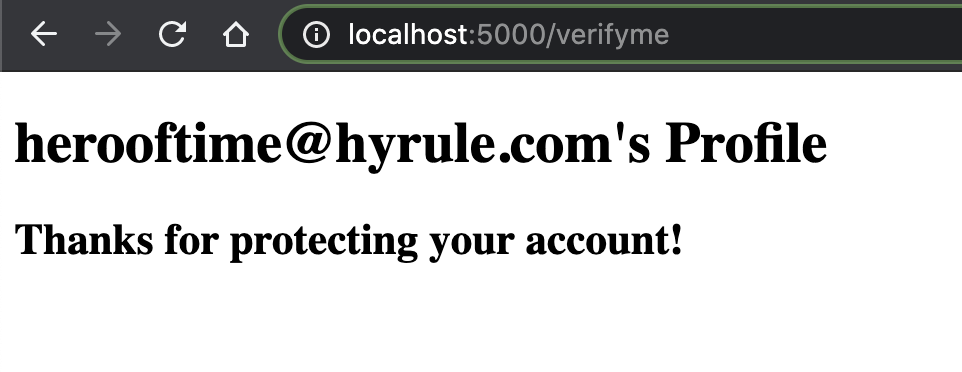
After entering the code correctly, you'll see this page:
Whew, hopefully the journey to protecting your account and identity is not too difficult!
What’s next for authenticating users with Twilio Verify?
Congratulations on implementing safe practices and incorporating security measures into your project!
Another way you can use Verify for authentication is to send a verification code over email using Twilio Verify and SendGrid. In that case, you would use the username in the database or any email address on the user's profile. You also don't need to ask for the user's phone number if it's already registered in the database.
You can also build a one-time passcode protected conference line with Twilio Verify and Python or add two-factor authentication to a blog.
Let me know if you used Twilio Verify API to protect your users in your project by reaching out to me over email!
Diane Phan is a Developer on the Developer Voices team. She loves to help beginner programmers get started on creative projects that involve fun pop culture references. She can be reached at dphan [at] twilio.com or LinkedIn.
Special thanks to Amy Yee for the phone wallpaper art.


Related Resources
Twilio Docs
From APIs to SDKs to sample apps
API reference documentation, SDKs, helper libraries, quickstarts, and tutorials for your language and platform.
Resource Center
The latest ebooks, industry reports, and webinars
Learn from customer engagement experts to improve your own communication.
Ahoy
Twilio's developer community hub
Best practices, code samples, and inspiration to build communications and digital engagement experiences.