Twilio Sync is a service provided by Twilio that helps you keep your application state in sync across different services. Specifically, it provides a “stack-agnostic” API that helps you add real-time capabilities to your application.
In this article, we will explore how we can build a custom real-time API analytics tool powered by Sync Lists, a Sync primitive type that helps us synchronize individual JSON objects.
NOTE: You can learn more about Sync Lists and other primitives from the Twilio Sync Object Overview.
Prerequisites
To complete this tutorial you will need the following:
- Laravel CLI, Composer, and npm installed on your computer
- Basic knowledge of Laravel
- Basic knowledge of Vue.js
- A Twilio Account
- cURL or Postman installed to test our API endpoints
Creating the Sample Application
We will generate a fresh application with the Laravel installer and enter into the project directory with:
$ laravel new api-analytics && cd api-analytics
Next, install the Twilio SDK for PHP with the command below:
$ composer require twilio/sdk
Now, create a new Sync service in your Twilio console and populate your .env
file with the generated service SID, together with your Twilio API credentials as follows:
TWILIO_API_KEY="TWILIO_API_KEY"
TWILIO_API_SECRET="TWILIO_API_SECRET"
TWILIO_ACCOUNT_SID="TWILIO_ACCOUNT_SID"
TWILIO_SYNC_SERVICE_SID="SYNC_SERVICE_SID"
TWILIO_AUTH_TOKEN="TWILIO_AUTH_TOKEN"
Also, remember to update your database credentials in the same file to match your local setup.
Models and Migrations
Our application will contain two models; a Recipe and Hit. They will both be used in setting the conditions and recording the API hits of our users, respectively. Create the Recipe model and its corresponding migration file with:
$ php artisan make:model Recipe -m
Now, open the generated recipes migration file and make the following changes:
<?php
use Illuminate\Database\Migrations\Migration;
use Illuminate\Database\Schema\Blueprint;
use Illuminate\Support\Facades\Schema;
class CreateRecipesTable extends Migration
{
public function up()
{
Schema::create('recipes', function (Blueprint $table) {
$table->id();
$table->string('title');
$table->text('body');
$table->timestamps();
});
}
public function down()
{
Schema::dropIfExists('recipes');
}
}
Our recipes need to contain formatted texts such as lists and headers. We achieve this using Mutators in the getBodyAttribute
method below i.e, the body string is stored in markdown and transformed into HTML using the CommonMark parser which comes bundled with Laravel. Replace the content of the Recipe model class, located at app/Recipe.php
with the following:
<?php
namespace App;
use Illuminate\Database\Eloquent\Model;
use League\CommonMark\CommonMarkConverter;
class Recipe extends Model
{
protected $fillable = [
'title', 'body'
];
public static function getBodyAttribute($value) {
$converter = new CommonMarkConverter([
'html_input' => 'strip',
'allow_unsafe_links' => false
]);
return $converter->convertToHtml($value);
}
}
Similarly, generate the Hit model and it’s migration file with: php artisan make:model Hit -m
and paste in the following in the migration file that Laravel generates for us:
<?php
use Illuminate\Database\Migrations\Migration;
use Illuminate\Database\Schema\Blueprint;
use Illuminate\Support\Facades\Schema;
class CreateHitsTable extends Migration
{
public function up()
{
Schema::create('hits', function (Blueprint $table) {
$table->id();
$table->string('path');
$table->string('method');
$table->string('query_params')->default(null);
$table->string('request_ip');
$table->string('response_code');
$table->timestamps();
});
}
public function down()
{
Schema::dropIfExists('hits');
}
}
Now update the $fillable
attribute of the generated Hit
model to the code below:
protected $fillable = [
'path', 'method', 'query_params', 'request_ip', 'response_code'
];
Apply the migrations we have created with the artisan command:
$ php artisan migrate
Seeding our Database
To try things out, we need some dummy data in our recipe table. Create the seeder file by running php artisan make:seed RecipesTableSeeder
from your terminal. Next, replace the content of the RecipesTableSeeder
file at database/seeds/RecipesTableSeeder.php
with the following:
<?php
use Illuminate\Database\Seeder;
Use app\Recipe;
class RecipeTableSeeder extends Seeder
{
public function run()
{
Recipe::insert([
[
'title' => "Nigerian Jollof Rice with Chicken",
'body' => "Test Recipe. Chicken is first sauteed on the stove top to produce a wonderful aromatic base for the rice.",
'created_at' => \Carbon\Carbon::now(),
'updated_at' => \Carbon\Carbon::now()
]
]);
}
}
Next, we need to make Laravel aware of our seeder file by opening the DatabaseSeeder class file (database/seeds/DatabaseSeeder.php
) and updating the run method to the following:
public function run()
{
$this->call(RecipeTableSeeder::class);
}
Populate the database with the dummy data by running:
$ php artisan db:seed
Building the API Controller
With our models in place, let’s create the corresponding RecipesController
class. This controller class will handle all recipe-related operations in our API. Open up your terminal and run the command below in your application directory:
$ php artisan make:controller Api/RecipesController
This will create the Api
folder in your Controllers directory (if it doesn’t exist) and generate the RecipesController.php
there. Open the created file and add the following to it:
<?php
namespace App\Http\Controllers\Api;
use App\Http\Controllers\Controller;
use App\Recipe;
use Illuminate\Http\Request;
use Illuminate\Support\Facades\Validator;
class RecipesController extends Controller
{
public function index() {
$recipes = Recipe::orderBy('created_at', 'desc')->get();
return response()->json($recipes);
}
public function store(Request $request) {
$validator = Validator::make($request->all(), [
'name' => 'string|required',
'body' => 'required'
]);
if ($validator->fails()) {
return response()->json($validator->errors(), 400);
}
$recipe = new Recipe([
'name' => $request->name,
'body' => $request->body
]);
$recipe->save();
return response()->json($recipe, 201);
}
public function show($id) {
$recipe = Recipe::findOrFail($id);
return response()->json($recipe);
}
public function update(Request $request, $id) {
$recipe = Recipe::findOrFail($id);
$recipe->update(['name' => $request->name, 'body' => $request->body]);
return response()->json($recipe);
}
public function destroy($id) {
Recipe::findOrFail($id)->delete();
return response()->json();
}
}
Using Laravel’s After Middlewares
Our core application API is ready now, but we still need to monitor all requests and responses our API is processing. We will achieve this with Laravel after middlewares. After middlewares are regular Laravel middlewares, except they perform their tasks after the request has been handled by the application. Let’s create a SaveEndpointHit middleware for this case with:
$ php artisan make:middleware SaveEndpointHit
This will generate a new file at app/Http/Middleware/SaveEndpointHit.php
. Fill it with the code below:
<?php
namespace App\Http\Middleware;
use App\Events\ApiHit;
use App\Hit;
use Closure;
use Illuminate\Support\Facades\Log;
use Twilio\Rest\Client;
class SaveEndpointHit
{
/**
* Handle an incoming request.
*
* @param \Illuminate\Http\Request $request
* @param \Closure $next
* @return mixed
*/
public function handle($request, Closure $next)
{
$response = $next($request);
$path = $request->path();
$method = $request->method();
$ip = $request->ip();
$params = json_encode($request->query());
$code = $response->status();
$hit = new Hit([
'path' => $path,
'method' => $method,
'query_params' => $params,
'request_ip' => $ip,
'response_code' => $code
]);
$hit->save();
$this->updateSyncList($hit);
return $response;
}
private function updateSyncList(Hit $hit) {
$client = new Client(env('TWILIO_ACCOUNT_SID'), env('TWILIO_AUTH_TOKEN'));
$serviceSID = env('TWILIO_SYNC_SERVICE_SID');
$syncList = $client->sync->v1->services($serviceSID)->syncLists("api_calls");
$sid = $syncList->syncListItems->create($hit->toArray());
Log::debug($sid);
}
}
Next, register the SaveEndpointHit
class as a route middleware by appending it to the $routeMiddleware
array in app/Http/Kernel.php
.
protected $routeMiddleware = [
...
'hit.save' => \App\Http\Middleware\SaveEndpointHit::class,
];
At this point, our controller and middlewares are ready. Let’s proceed to create our application routes. We will be putting our API related routes in routes/api.php
. That way, they’ll become accessible at APP_URL/api
instead of the regular APP_URL
. Open the API routes file (routes/api.php
) and replace its content with the code below:
<?php
use Illuminate\Support\Facades\Route;
Route::resource('recipes', 'Api\RecipesController')
->only(['index', 'store', 'show', 'update', 'destroy'])->middleware('hit.save');
In the code block above, we have attached the hit.save
middleware (which is an alias to the SaveEndpointHit class) to the recipe route resource. That way, every call to any of the endpoints triggers the middleware..
Setting up our Dashboard with Vue
We will now hook into our API from a Vue-powered dashboard, responsible for displaying the API calls. We achieve this by using the Laravel UI package which makes it easy to work with frontend libraries and frameworks like React and Vue.js. Install and configure the package by running the commands below in your terminal:
$ composer require laravel/ui --dev
$ php artisan ui vue
$ npm install && npm run dev
For our dashboard, we will create a new Dashboard component for viewing our API hits.
$ touch resources/js/components/DashboardComponent.vue
Next, replace the default example component with the dashboard component by replacing the content of the resources/js/app.js
file with the following:
require('./bootstrap');
window.Vue = require('vue');
Vue.component('dashboard-component', require('./components/DashboardComponent.vue').default);
const app = new Vue({
el: '#app',
});
Also, get rid of everything inside the resources/views/welcome.blade.php
template file and replace its content with the following:
<!DOCTYPE html>
<html>
<head>
<meta charset="utf-8">
<meta name="viewport" content="width=device-width, initial-scale=1">
<title>Overseer!</title>
<link href="https://fonts.googleapis.com/css?family=Nunito:200,600" rel="stylesheet">
<link href="{{mix('css/app.css')}}" rel="stylesheet" />
</head>
<body>
<div id="app">
<dashboard-component :token="'{{ $token }}'"></dashboard-component>
</div>
<script src="{{mix('js/app.js')}}"></script>
</body>
</html>
Notice that we are passing a token
prop to our dashboard component. This token represents our Twilio Sync token which is passed down from our controller (which we will create next).
Create the controller responsible for rendering the dashboard with:
$ php artisan make:controller DashboardController
The command above creates a DashboardController.php
file in app/Http/Controllers
. Open the file and paste in the following code:
<?php
namespace App\Http\Controllers;
use App\Hit;
use Twilio\Jwt\AccessToken;
use Twilio\Jwt\Grants\SyncGrant;
use Twilio\Rest\Client;
class DashboardController extends Controller
{
public function showDashboard() {
$data = [
'token' => $this->getToken()
];
return view('welcome', $data);
}
private function getToken() {
$identity = "Overseer";
// Create access token, which we will serialize and send to the client
$token = new AccessToken(
env('TWILIO_ACCOUNT_SID'),
env('TWILIO_API_KEY'),
env('TWILIO_API_SECRET'),
3600,
$identity
);
// grant access to Sync
$syncGrant = new SyncGrant();
$syncGrant->setServiceSid(env('TWILIO_SYNC_SERVICE_SID'));
$token->addGrant($syncGrant);
return $token->toJWT();
}
}
Next, register the controller in our web routes by replacing the content of routes/web.php
with the following:
<?php
use Illuminate\Support\Facades\Route;
Route::get('/admin/{any}', 'DashboardController@showDashboard');
Viewing API Calls in Real-time
Our controllers and Vue components are ready, but when you visit the dashboard URL at http://localhost:8000/admin/dashboard
, it renders a blank page. This is because we have no way of populating the API calls for now. We will use the Twilio Sync SDK to fetch the hits from our Sync service and prepare them for rendering when our dashboard component is created. Install the twilio-sync
package with:
$ npm i --save twilio-sync
Next, replace the content of the dashboard component file (resources/js/components/DashboardComponent.vue
) with the following:
<template>
<div class="container">
<nav class="navbar navbar-expand-lg">
<a class="navbar-brand font-weight-bold" href="#">Overseer!</a>
<button class="navbar-toggler" type="button" data-toggle="collapse" data-target="#navbarNav" aria-controls="navbarNav" aria-expanded="false" aria-label="Toggle navigation">
<span class="navbar-toggler-icon"></span>
</button>
<div class="collapse navbar-collapse" id="navbarNav">
</div>
</nav>
<div class="row">
<div class="col-12 hits-container mt-5">
<table class="table table-hover">
<thead>
<tr>
<th scope="col">#</th>
<th scope="col">Timestamp</th>
<th scope="col">Path</th>
<th scope="col">Method</th>
<th scope="col">Request IP</th>
<th scope="col">Status</th>
</tr>
</thead>
<tbody>
<tr v-for="hit in endpointHits" :key="hit.id">
<th scope="row">{{hit.id}}</th>
<td class="text-muted">{{ hit.created_at }}</td>
<td class="font-weight-bold">{{ hit.path }}</td>
<td>{{ hit.method }}</td>
<td>{{ hit.request_ip }}</td>
<td v-if="Number(hit.response_code) <= 202" class="text-success font-weight-bold">
{{ hit.response_code }}
</td>
<td v-else-if="Number(hit.response_code) <= 308" class="text-info font-weight-bold">
{{ hit.response_code }}
</td>
<td v-else-if="Number(hit.response_code) <= 418" class="text-orange font-weight-bold">
{{hit.response_code}}
</td>
<td v-else class="text-danger font-weight-bold">
{{hit.response_code}}
</td>
</tr>
</tbody>
</table>
</div>
</div>
</div>
</template>
<style>
body, .navbar {
background-color: #e3e3ec !important;
}
thead th {
border-top: none;
}
.hits-container {
background-color: #fff;
border-radius: 3px;
}
.hits-container td {
padding-top: 0.90rem;
border-top: 1px solid #f1f1f1;
}
.text-orange {
color: #f6993f;
}
</style>
<script>
import SyncClient from 'twilio-sync';
export default
{
props: ['token'],
data() {
return {
endpointHits: [],
}
},
methods: {
updateHitsList(items) {
items.map((item) => {
this.endpointHits.push(item.data.value);
})
}
},
created() {
let token = this.token;
let syncClient = new SyncClient(token, {logLevel: 'info'});
syncClient.on('connectionStateChanged', (state) => {
if (state !== 'connected') {
console.log("Sync not connected");
}
});
syncClient.list("api_calls").then((syncList) => {
syncList.getItems().then(endpointHits => {
console.log(endpointHits);
this.updateHitsList(endpointHits.items);
});
// this is called when new item is added to our list (whether remotely or locally)
syncList.on("itemAdded", (args) => {
this.endpointHits.unshift(args.item.data.value);
});
});
},
}
</script>
Testing
We’re now ready to test the application. Your files will need to be compiled by running the following command:
$ npm run dev
The server will also need to be started in a new terminal:
$ php artisan serve
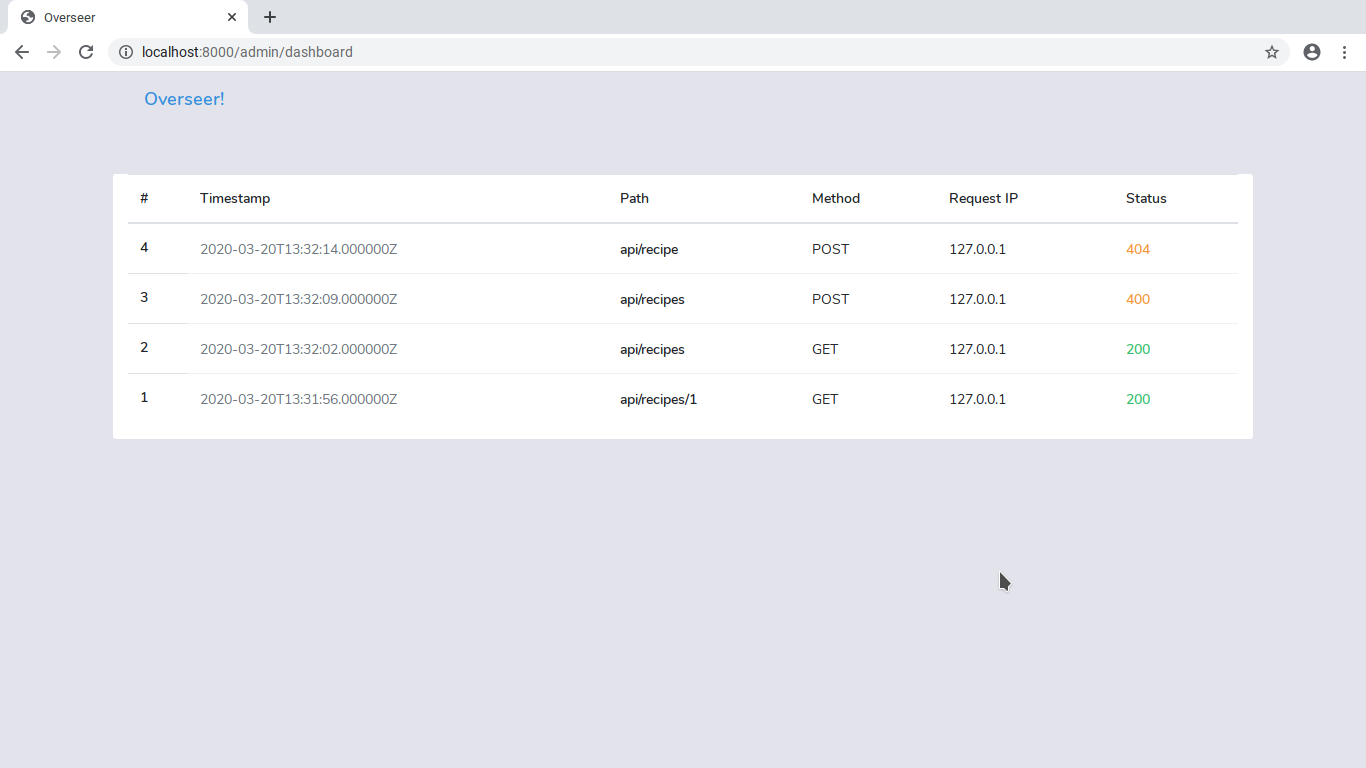
Now visit (or refresh) the dashboard URL at http://localhost:8000/admin/dashboard
in your browser and make some API calls with curl like so in a separate terminal:
$ curl -v -i GET http://localhost:8000/api/recipes
You should see subsequent requests being rendered in real time.
Monitoring Application Crashes
Because our middleware depends on successful responses, it fails in cases where exceptions are thrown before Laravel can finish processing the request. To handle such cases, open the exceptions handler at (app/Exceptions/Handler.php
) and create a new private method responsible for logging the errors as in the code block below:
private function logError($request, $response) {
$hit = new Hit([
'path' => $request->path(),
'method' => $request->method(),
'query_params' => json_encode($request->query()),
'request_ip' => $request->ip(),
'response_code' => $response->status()
]);
$hit->save();
$client = new Client(env('TWILIO_ACCOUNT_SID'), env('TWILIO_AUTH_TOKEN'));
$serviceSID = env('TWILIO_SYNC_SERVICE_SID');
try {
$syncList = $client->sync->v1->services($serviceSID)->syncLists->create([
"uniqueName" => "api_calls"
]);
} catch (RestException $e) {
$syncList = $client->sync->v1->services($serviceSID)->syncLists("api_calls");
}
$syncList->syncListItems->create($hit->toArray());
}
Next, call the method above in the render
method of the Handler
class as shown:
public function render($request, Throwable $exception)
{
$response = parent::render($request, $exception);
$this->logError($request, $response);
return $response;
}
Build your files again with npm run dev
and start your Laravel server if it isn't running already and visit http://localhost:8000/admin/dashboard
. You should see all API requests being displayed on your dashboard - whether they were completed or not.
Conclusion
Twilio Sync provides a powerful and flexible API that helps us add real-time capabilities to our applications, and in this article, we have seen how it can be used to power a simple API analytics tool. You can find the complete source code on Github, and if you have an issue or a question, feel free to create a new issue in the repository.
Michael Okoko is a student currently pursuing a degree in Computer Science and Mathematics at Obafemi Awolowo University, Nigeria. He loves open source and is mostly interested in Linux, Golang, PHP, and fantasy novels! You can reach him via: