Build a Photo Guest Book With WhatsApp, Node.js and Twilio
Time to read:
February 06, 2023
Written by
Reviewed by

Birthday parties, weddings, anniversaries, and other social events are always great gatherings where we create memories that last a lifetime. At these events, everyone is a photographer who tries to capture the best moments on their phone and possibly share them with the host afterward. But other guests usually never see the photos because they are not shared with the entire party. A common solution to this is using photo-sharing apps, on which you can upload the photos you took.
The problem with these apps is that they first need to be installed by everyone and often have a complicated setup process. And in the end, only a tiny fraction of the guests share their memories.
To combat that, I decided to build on top of a messenger that almost everyone already uses: WhatsApp. Hence, WhatsApp users already know how to send pictures and receive messages with the app.
In this article, I'll show you how I used Twilio and the WhatsApp Business API to build a photo guest book for a recently attended wedding.
Prerequisites
- Node.js installed.
- An upgraded Twilio account.
- Install the Twilio CLI.
- A Twilio number that is connected to a WhatsApp Business Profile.
You can also build the bot with the Twilio Sandbox for WhatsApp. The onboarding experience will be a bit more complicated as you need to join the sandbox first, but that's fine for development purposes.
Features
The greatest challenge for a collaborative photo gallery is motivating the guests to participate. That’s why the onboarding process needs to be as convenient as possible. A website explaining the process might already be too complicated for some guests who just want to enjoy the party.
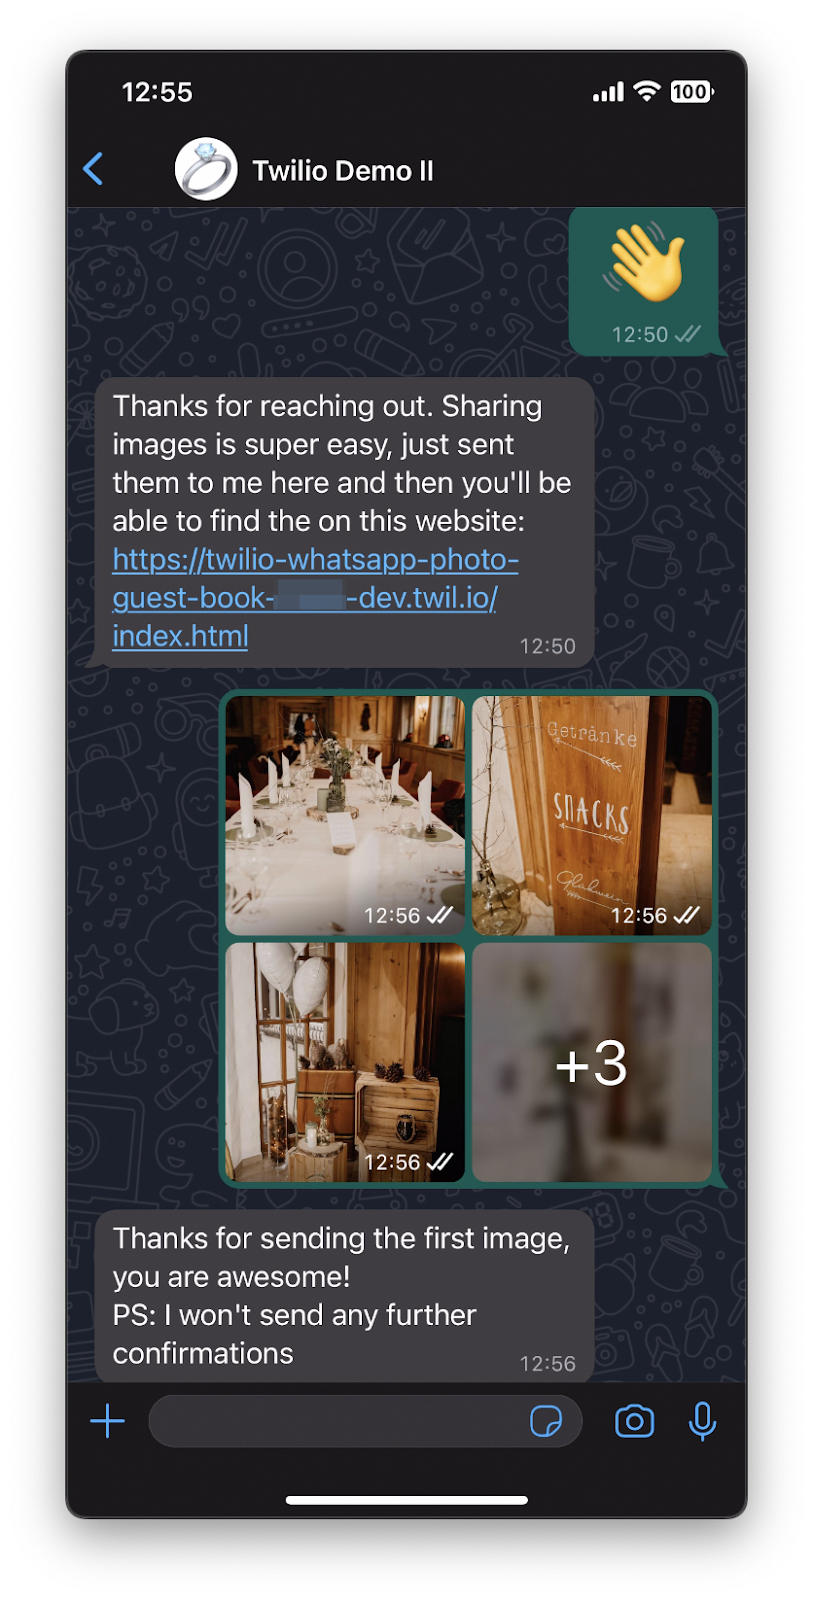
To minimize the required user interactions, we will allow users to message the WhatsApp bot right away. I find QR codes pointing to "WhatsApp-URLs" very practical to do so. The users only need to scan the code, and WhatsApp automatically opens with a suggestion for the initial message. In our case, we won't mind about the message itself and respond with the how-to instructions and a link to the website that contains all images. In parallel, we'll also schedule a message that will be sent in 23 hours to remind the user whether they want to send additional photos to the bot.
When the users send their first media file to our bot, we'll confirm that we received it and wait for more images. For all following media files, we won't send a confirmation as the user might consider them annoying when sending multiple images simultaneously. We also check whether the message contains a media file to ensure the bot is used correctly. If it only contains text, we remind the user how the bot works.
Build the backend service
To build these features, we need to provide two API endpoints. The first one is the webhook invoked on each incoming WhatsApp message. The second one will then return a list of all images to visualize them on a website. For this blog post, we will implement these endpoints in Node.js and run them on the Twilio Serverless platform.
The first step is to create a project:
Let's start with the function that handles incoming messages. First, we initialize the response object and load the previous conversation from this sender. We check if this is the first message, if there is an image attached to the message, or if the message contains no image.
Depending on the outcome of these checks, the code responds differently. As described above, the response is either an introductory message for first-time users with a URL to find the images, a confirmation of the receipt of the first image, or a message saying it couldn't find an image in the message.
Rename the file functions/blank.js to functions/incoming.js and include the following code.
We want to schedule a reminder 23 hours after receiving the first message. You could also schedule a message that will be sent two or more days, but then the 24-hour messaging session will likely be over, and you would need to use a pre-approved message template.
This feature requires a Messaging Service that we will create later. To keep this part optional, we only schedule the message if there is a Messaging Service. Add the following code after the line twiml.message(firstMediaResponse);
Twilio conveniently stores the files for us so that we don't have to worry about how to store the incoming media files onto 3rd party cloud storage such as AWS S3 buckets.
The second function will extract all media files from the log and expose them for consumption by the frontend. Depending on the size of the message log, it might take a while to receive all sent files and the user would need to wait. To reduce this idle time, we'll use paging to fetch only 15 messages per page and wait until the user requests the next page. Our code will fetch a page, and for each message, it requests the Twilio API to retrieve the associated media. It then filters the media files and returns them along with the metadata, including the phone number, caption, date sent, and content type in a callback function. The content type supports not only images, but also videos. We also mask the sender's phone number to avoid exposure to other event attendees.
Create a second file media.js with the following content to implement this endpoint:
Since we'll use two additional packages in this code, we need to add them to the package.json project descriptor. Run the following command in the project root to do so.
Deploy the backend
Complete the placeholders in the .env file and a new property so that the file looks like this.
With this, we can deploy the backend and get some sample images in the gallery. Run the “deploy” command from the terminal to trigger the flow.
You should see a Deployment Details section in the log when the process is done. Among other information, there'll be a sub-section called Functions that contains the URL of the “incoming” endpoint. Copy the URL that looks like this one:
Go to the Console, visit the Messaging Services page and click the Create Messaging Service button. On step 1, select a friendly name and go to the next page via the Create Messaging Service button. When asked for senders, use the Add Senders button, select the "WhatsApp Number" for the "Type", and choose the number you connected to your WhatsApp Business Profile.
Once the number has been added, click Step 3: Set up integration. On that page, select the radio button "Send a webhook" and enter the URL you copied above in the field "Request URL". Finish the creation of the Messaging Service with Skip Setup.
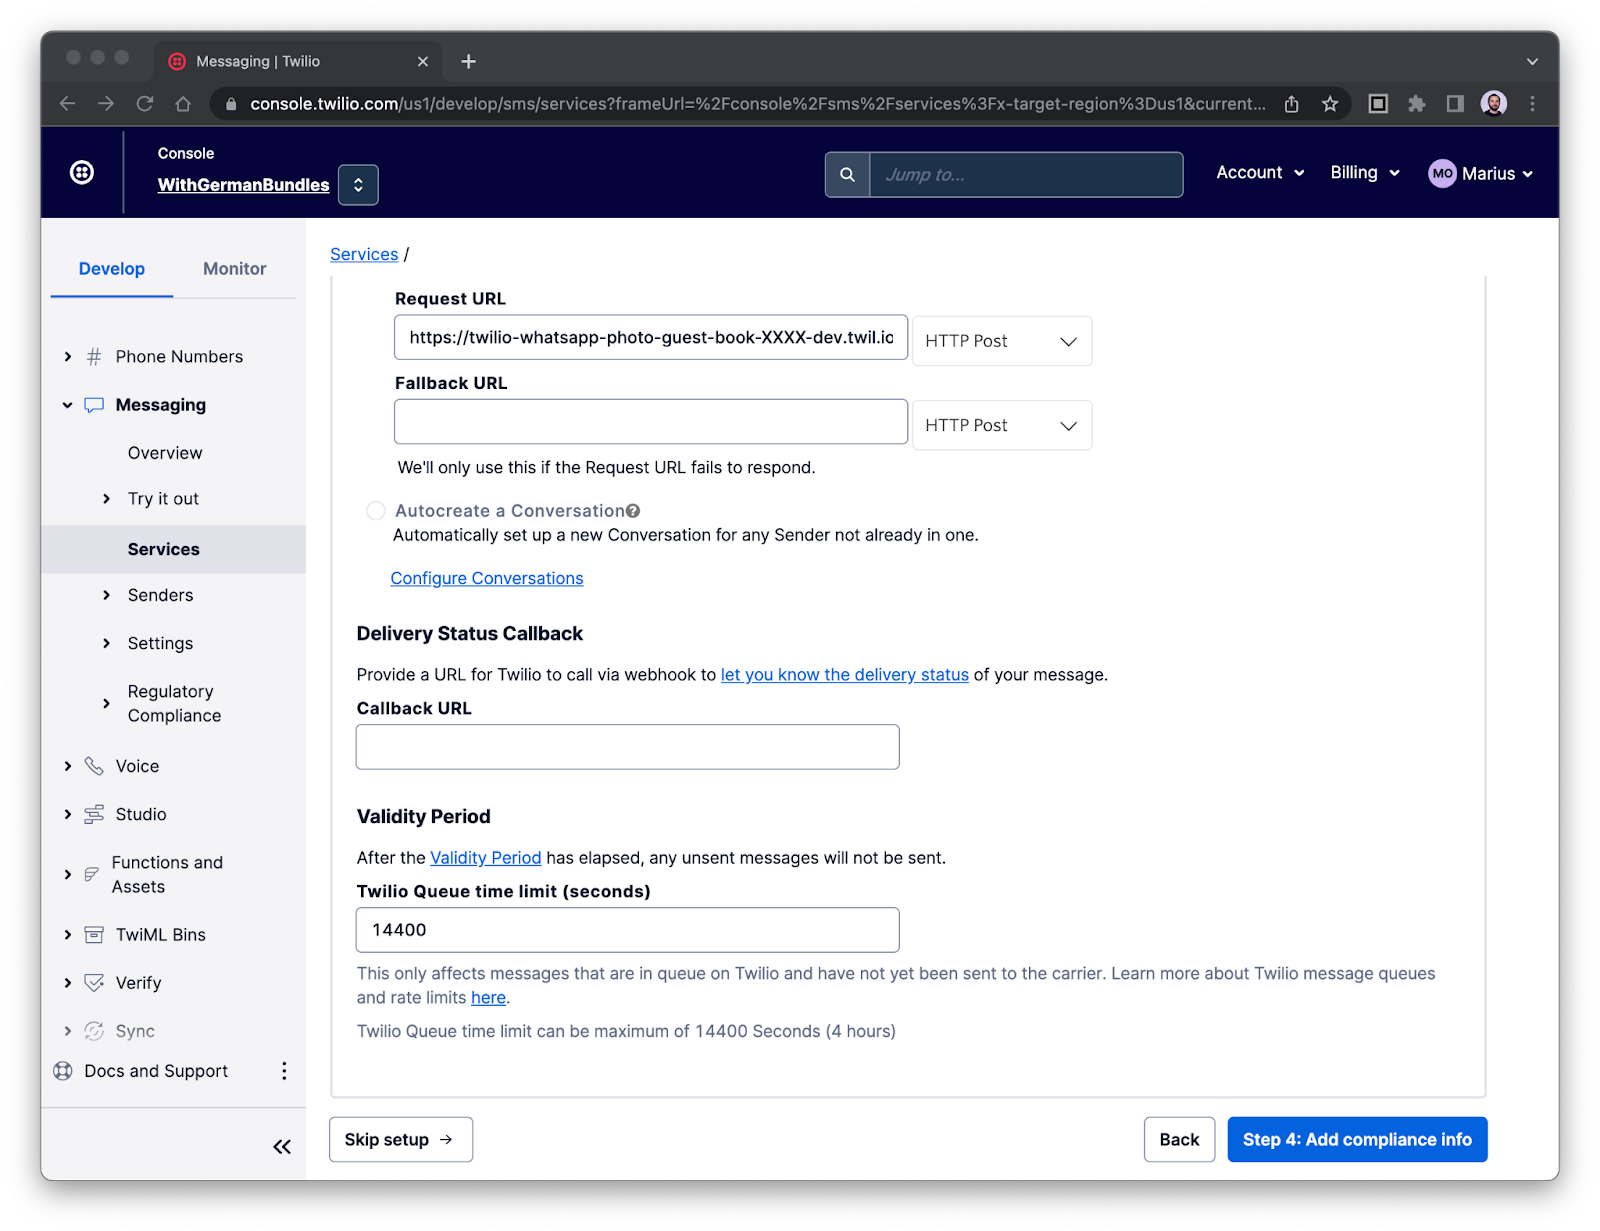
You'll see the "Messaging Service SID" on the next page. Copy this value and append a new line to the .env file.
Run the photo guest book app
It's time to test whether the bot can handle incoming messages. Open WhatsApp on your phone and send the initial message. Feel free to send a few test images to the number to have sample data to visualize.
Great, test whether the images are accessible in your browser via the media endpoint from the "Deployment Details" above. You should see a response like this one:
Build the frontend service
We’ll keep this part about the frontend short and focus on creating a minimal viable product (MVP). To keep the footprint as small as possible, we only use functions and hooks of the browser and React library. The web app will fetch the media metadata from our endpoint and display them on a page.
Start by creating a new React app inside the functions project.
We'll use two hooks from the React library: useState and useEffect.
The useState hook manages the state of the component, which in this case is an array of media files. The hook creates a new state variable called media and a function called setMedia to update the variable.
The useEffect hook is used to perform some side effects, in this case, it accesses our serverless media endpoint. The hook is called with an empty array as the second argument. This tells React that the effect only needs to run once after the component has mounted.
When the media has been received, it’s up to the component to check the length of the array. If it's empty, the component shall render a message indicating that the media files are not yet there. If there are media objects, the component will iterate through the array and check if it is an image or a video and render the proper HTML tag. A more advanced application should differentiate between a loading and error state but that’s not part of the MVP.
The entire MVP will be implemented in the App component. Replace the frontend/src/App.js file with the following content.
Let's test this locally. Add the following line in the package.json file of the frontend folder to be able to access our endpoint from localhost during development.
Now, let's run the React app to see our MVP in action.
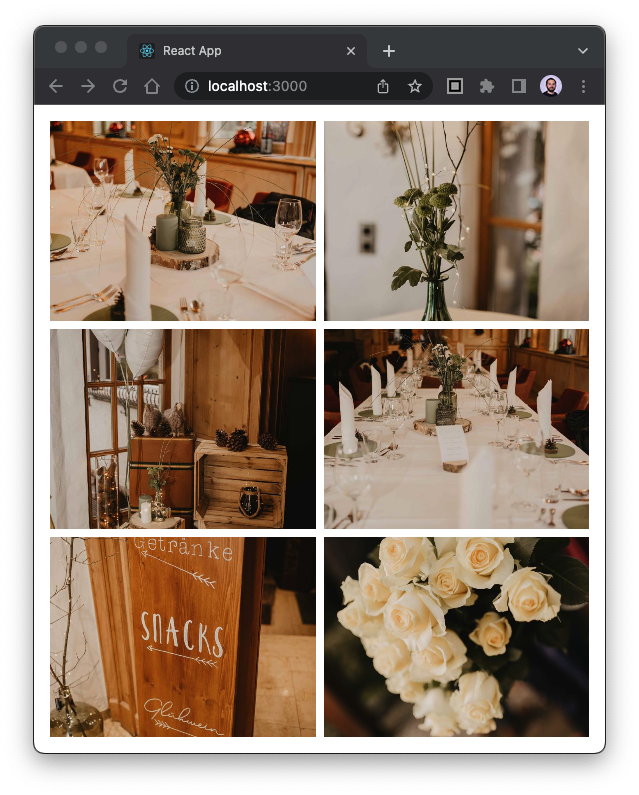
This MVP currently only displays 15 media files of the first page and doesn't access the others. To keep this concise, I won't go into further detail about the frontend part but instead give recommendations on how it can be extended from here. But that doesn't mean the code is kept closed. You can find the complete source code of the project on GitHub.
The full version uses SWR to fetch the other pages when needed. It also goes a step further and adds a service worker to upgrade the app to a Progressive Web App that can be used like a native app. To improve the user experience, it uses React UI libraries like Material UI, for the layout, and React Viewer, to view a single media file. And the Sync API helps with the like-feature to drive the user engagement a bit. With that, the frontend gets the looks and feel of a modern application.
Deploy the app with Twilio Serverless Functions
As of now, the project descriptor's "deploy" script only deploys the serverless functions, but not the web app. Whereas Twilio Serverless Functions can host static assets such as web applications from their assets/ folder. This means we need to move the built web app from the frontend/build folder in assets/ before the deployment happens. This can be done in a single command as npm scripts are very flexible. Add the following line to the package.json in the project root.
Then, run the script to deploy everything to the serverless runtime.
The "Deployment Details" in the console output should now include a list of assets. One of them ends with "index.html". That is the URL of the application that displays the gallery.
With this, our MVP is ready. We recommend the creation of a QR code pointing to the Twilio WhatsApp Bot with a custom message. This code lowers the entry barrier and helps everyone in sharing their favorite moments! With that, you are all-set for the upcoming celebration.
Download and clear the gallery
All these memories should be downloadable as a photo album. We can do this with a script that iterates over all logged messages and extracts the media URL from those containing a media file.
Then, use axios to download the content and write it into a new file. WhatsApp automatically compresses all media files to save bandwidth. That’s why we also want to log the sender of each submission to be able to contact the photographer and ask for the uncompressed version.
Create a file download.js with the following content:
You can run this script as soon as you create the downloads folder.
Before the event starts, you should probably remove all the test images from the gallery. Clearing the message log is the best way to do this. Create and run the following clearGallery.js script to clear the log.
Learn more about WhatsApp chatbots
With this WhatsApp chatbot, you're all set for a big celebration with your friends and family.
This was just a tiny primer into what you can build with the WhatsApp Business API on the Twilio platform. The platform also supports rich messaging features such as locations, message headers, footers, and messages with buttons to allow quick responses conveniently. And we're continuously working on adding more features. If you are eager to learn more, check out the documentation for the WhatsApp Business API.
I can’t wait to see what you’ll build with WhatsApp!
Marius is a Developer Evangelist at Twilio who's a regular at various developer events in the DACH-Region. When not on the road, he works on innovative demo use cases that he shares on this blog and GitHub. You can contact him via the following channels if you have any questions:
- Email: mobert@twilio.com
- Twitter: @IObert_
- GitHub: IObert
- LinkedIn: Marius Obert

Related Resources
Twilio Docs
From APIs to SDKs to sample apps
API reference documentation, SDKs, helper libraries, quickstarts, and tutorials for your language and platform.
Resource Center
The latest ebooks, industry reports, and webinars
Learn from customer engagement experts to improve your own communication.
Ahoy
Twilio's developer community hub
Best practices, code samples, and inspiration to build communications and digital engagement experiences.