Building Integrations for a First-Party Data World: Connecting Twilio SendGrid with Twilio Segment
Time to read:
April 20, 2023
Written by
Reviewed by
Data privacy concerns and regulatory compliance demands are compelling today’s businesses to shift their approach to customer data. They’re moving away from third-party customer data, instead depending more heavily on first-party customer data. With that dependence comes new strategies that leverage modern tools for collecting, analyzing, and activating customer data.
In this extended tutorial, we’ll walk through how a business can leverage first-party customer data by integrating Twilio SendGrid with Twilio Segment. In this tutorial, you will learn how to send Sendgrid data to Segment and learn how to activate that data in Segment to personalize your emails to users.
After a brief review of why companies are turning to first-party data and introductions to Twilio SendGrid and Twilio Segment, our tutorial will guide you through the following:
- Connecting SendGrid as a source in Segment
- Sending SendGrid data to a data warehouse
- Sending SendGrid events to Segment with webhooks
- Using Segment source functions to track SendGrid engagement
- Using Segment destination functions to call the SendGrid API
Before our deep dive into the SendGrid-Segment integration, let’s first consider why today’s companies are turning to first-party data.
Why Companies Are Turning to First-Party Data
Even though today’s businesses have access to a massive amount of customer data, not all customer data is equally reliable. Changing winds regarding customer data sources and reliability are causing businesses to reduce their dependence on third-party data in favor of first-party data.
Third-party data is collected through a variety of sources, ranging from web browser cookies to demographic data to behavioral data. Some of this data is actively provided by users, while some of it is collected in the background without users’ awareness. Online advertisers and data brokers collect this data, which is then sold to businesses for use in marketing and sales.
First-party data, on the other hand, is collected directly from customers in the everyday course of business. Sources include social media interactions, online purchases, customer service interactions, marketing campaign engagements, and survey participation.
The drawbacks of third-party data
A primary example of third-party data is web browser cookies. Cookies capturing user browsing behavior on one site are then used for targeted advertising on other sites. Users are becoming increasingly wary of this highly-targeted advertising, causing an erosion of customer trust.
In addition, governments and regulators are increasing efforts to protect the data privacy of consumers. Whether it is because of GDPR in the EU or consumer privacy laws in the United States (such as in California or Connecticut), businesses need to tread carefully when it comes to the collection and usage of third-party data.
The benefits of first-party data
On the other hand, first-party data is collected by businesses with the customer’s knowledge and consent. Of course, businesses still need to comply with data privacy regulations when it comes to the collection and use of first-party data. However, first-party data provides more accurate pictures of customers. The result is products, services, and marketing that are more relevant to customers.
A first-party data strategy requires the use of effective tools. Among those tools are Twilio SendGrid and Twilio Segment.
Twilio SendGrid and Twilio Segment prerequisites
Before we begin, you'll need to register accounts (if you haven't yet) with SendGrid and Segment. You'll also need to perform a few initial setup steps.
First, sign up for a free Twilio SendGrid account if you haven’t yet. There are some initial setup steps you’ll need to take if this is your first time. The single most important step in being trusted as a sender of email is completing the Domain Authentication process. Once your domain is authenticated, meaning you've given SendGrid permission to send email on behalf of your domain, you'll be ready to start delivering your messages. You can find additional setup steps to improve deliverability and secure your account in the Account Setup section of this guide.
Second, sign up for a new Segment account if you haven't yet.
SendGrid and Segment
Twilio SendGrid is an email delivery service that provides programmable Email API capabilities as well as an application-based Marketing Campaigns platform. SendGrid processes over 130 billion emails each month through their proprietary mail transfer agent.
- Twilio SendGrid Email API is built for developers looking to build reliable, scalable, email delivery into their product experience.
- Twilio SendGrid Marketing Campaigns enables businesses to manage customer lists, schedule complex email campaigns, and design beautiful email content for delivery to customers.
Users across both products can utilize dashboards, visualizations, and event webhook data to determine which emails are being opened, which links are being clicked, and which customers are unsubscribing.
As a customer communication solution that tracks direct user engagement with email, Twilio SendGrid is an excellent source of first-party customer data.
Twilio Segment is a customer data platform (CDP) with pre-built integrations – and the flexibility to create custom integrations – that help businesses quickly connect their customer data sources (such as Twilio SendGrid, Facebook Ads, or Braze) with destinations for activating customer data. Those destinations might include Salesforce, Bento, or HubSpot. By providing a central database to capture all customer interactions across all of a business’s touchpoints, Twilio Segment helps businesses build accurate and complete profiles of their customers and audiences.
As a CDP, Twilio Segment provides a secure means for your business to collect, govern, synthesize, and activate first-party customer data.
Now that we’ve laid the foundation, let’s begin our walkthrough and learn how to integrate these two tools.
Connecting SendGrid as a Source in Segment
SendGrid is one of dozens of sources available on the Twilio Segment Platform. This integration streamlines sending SendGrid data to Segment, which in turn can be sent to a data warehouse. Setting up the SendGrid source is straightforward.
We will start start by adding some initial customer data (after you log in). We’ll be using the SendGrid Marketing Campaigns product to manage contacts for this part of the tutorial.
Add initial data to SendGrid
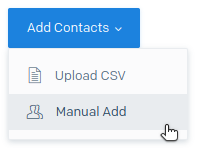
We navigate to Marketing, Contacts to add a list with two customers. On the Contact Lists page, we click on Add Contacts, Manual Add.
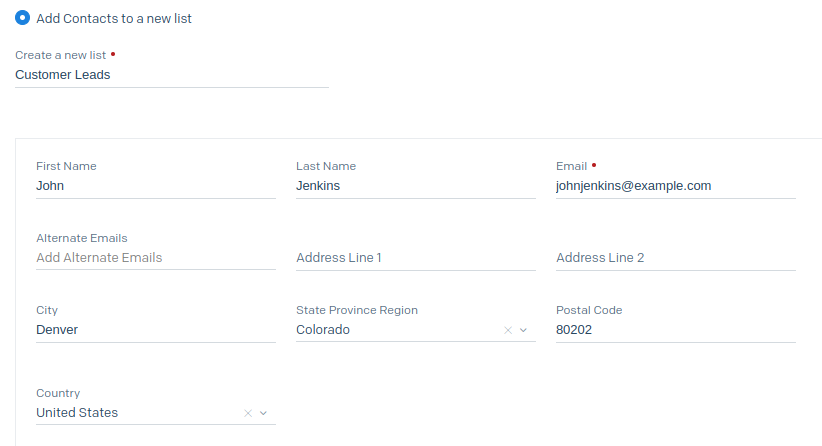
We will Add Contacts to a new list. We choose a name for our list (“Customer Leads”), and we add information for our first contact.
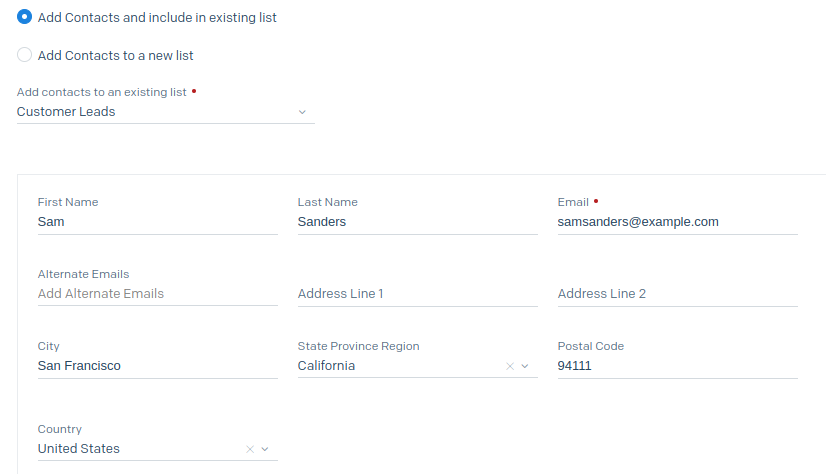
We add our second contact to the same list.
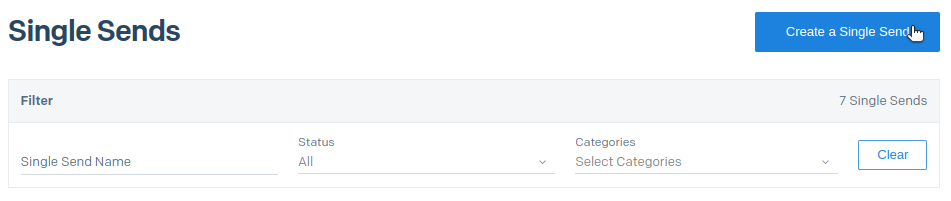
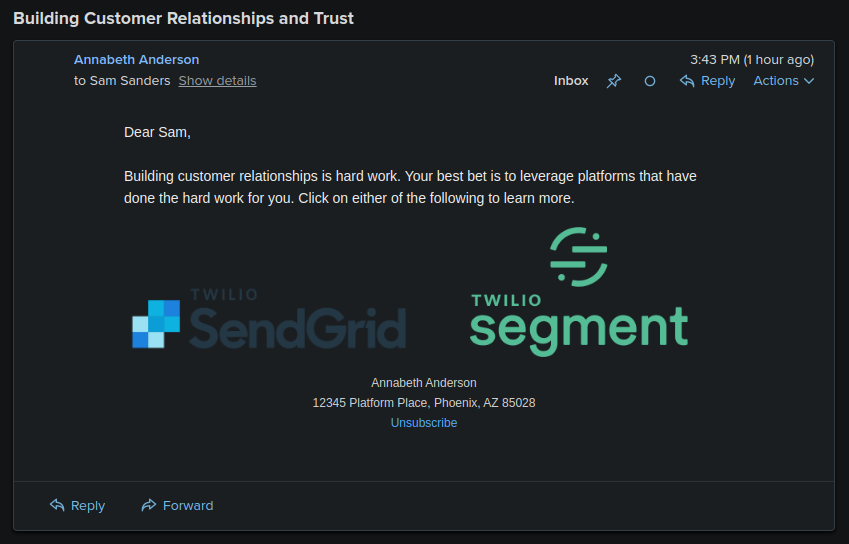
We now have a SendGrid contact list called “Customer Leads” with two contacts. Next, we’ll prepare an email for SendGrid to deliver to our contact list. We navigate to Marketing, Single Sends. On the Single Sends page, we click on Create a Single Send.
We use a blank template and the Design Editor to craft our email. We choose a name for our campaign, provide an email subject, and choose the contact list with the recipients for this email.
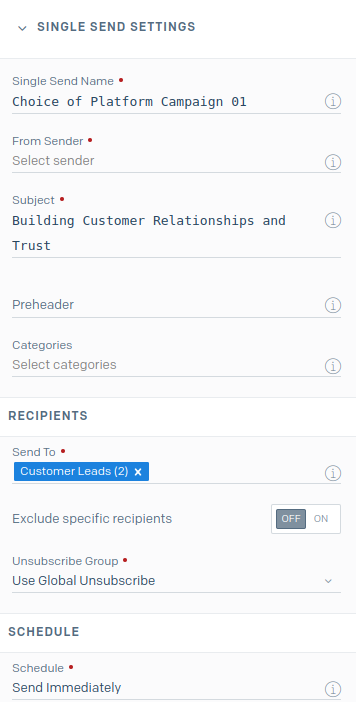
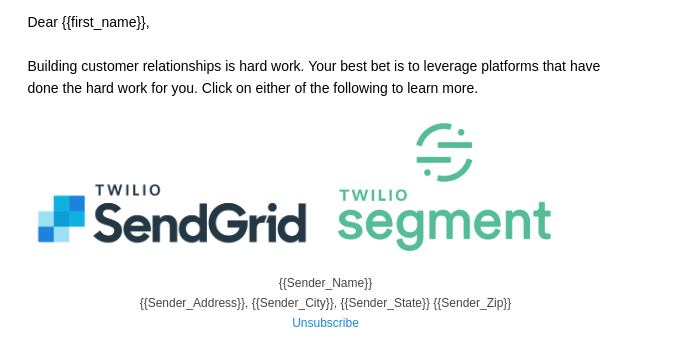
Next, we craft the body of our email. Our email will contain two different images with links. This will allow us to test click tracking in Segment. Our email body looks like this:
Finally, we Save our email draft and exit back to the Dashboard. We want to set up some things on the Segment side before we send our email.

Add SendGrid as a source in Segment
Next, we will add SendGrid as a customer data source in Segment. Segment will pull information about our SendGrid objects for use in downstream destinations. However, to access that SendGrid data, we will need to provide Segment with a SendGrid API key.
Generate SendGrid API key
In SendGrid, we navigate to Settings, API Keys. On the API Keys page, we click on Create API Key.
We will give our API key a name (“Segment: Pull Marketing Objects”) and create a key with Restricted Access. We do not need an API key with full access to our SendGrid account. For use as a Segment source, we only need to authorize access to marketing-related data.

After creating the API key, we copy the value of the key for use in Segment:

Add and configure source
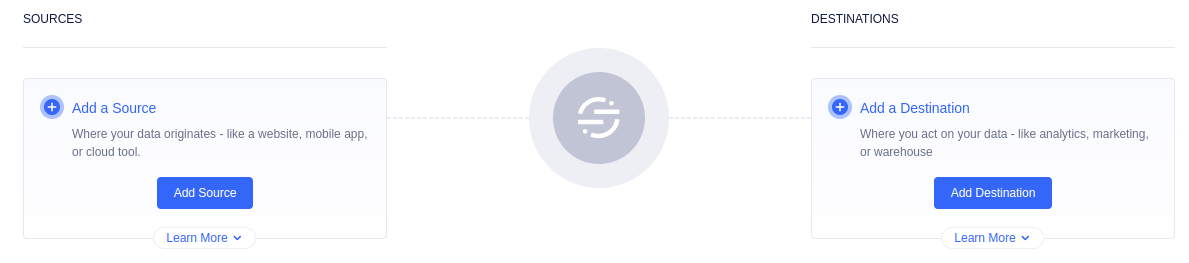
Just as we did with SendGrid, we sign up for a free account with Segment and sign in. The initial Connections page shows that we need to start by adding a source and a destination.
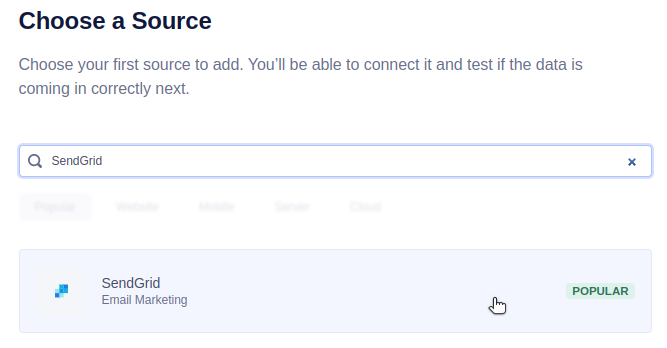
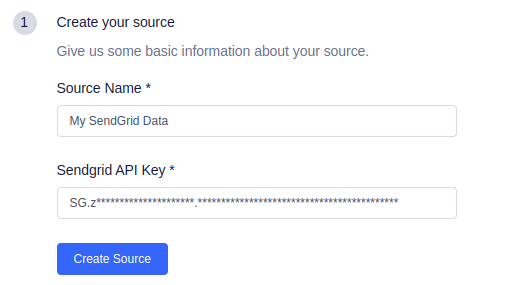
We click on Add Source. Although there are many sources to choose from, we search for the SendGrid source, select it, and click Next.
We provide a name for our source and paste in our SendGrid API key. Then, we click Create Source.
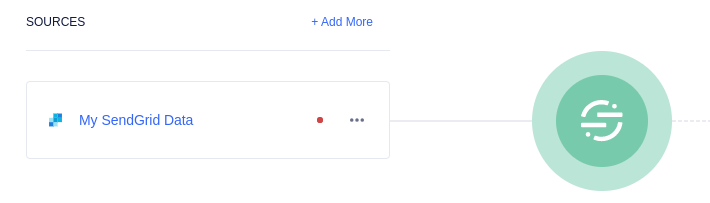
The next step for setting up a source deals with adding a Segment webhook URL to SendGrid. We won’t do this step yet, so that we can see first what kind of data Segment pulls from SendGrid apart from the webhook.
There is an optional step to test the connection with SendGrid, which we’ll skip. We click on Next and then Done to complete setting up this source. We now have one source set up for our Segment Hub.
Segment pulls SendGrid object data regularly
When we click on our source ("My SendGrid Data"), we see an overview with the sync status for that source.
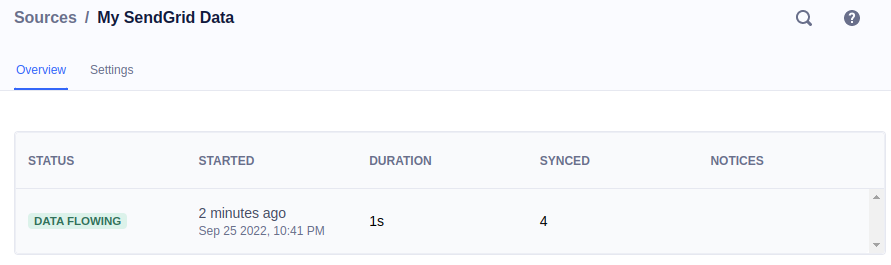
Segment tells us that it performed a data sync recently, pulling SendGrid object data from our SendGrid account. When we click on the table for details, we see more granularly the kind of data that was pulled.
These numbers look correct. We created a single contact list (“Customer Leads”) with two contacts (John and Sam), and we also created a Single Send email (which we haven’t sent yet).
The Segment documentation for the SendGrid source tells us that Segment will pull data from SendGrid every three hours. This data is stored in the Segment Hub until it is sent to the downstream destination. For the SendGrid source, that downstream destination is a data warehouse.
Sending SendGrid Data to a Data Warehouse
Each source in Segment has its set of options for available destinations. For the SendGrid source, however, the only option for a destination is a data warehouse. (Later, in the section on source functions, we’ll show a workaround for additional ways to leverage SendGrid data.)
For our data warehouse, we will use a PostgreSQL database.
Set up a PostgreSQL database
While any PostgreSQL database in the cloud is supported by Segment, we set up an AWS RDS database running PostgreSQL 14.4. For AWS, we also need to ensure that our database is part of a Security Group with an inbound rule accepting connections from Segment by using the CIDR 52.25.130.38/32.
Add data warehouse as a destination in Segment
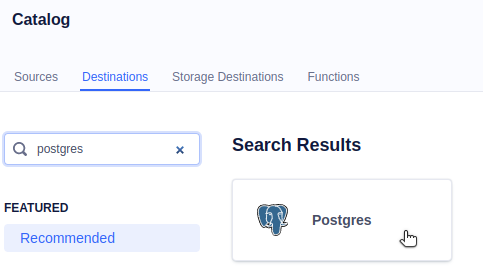
In Segment, we click Add Destination and search for the Postgres destination.
Next, we are asked to choose a data source for this warehouse. We see our (only) source, called “My SendGrid Data.” We select it and click Next.
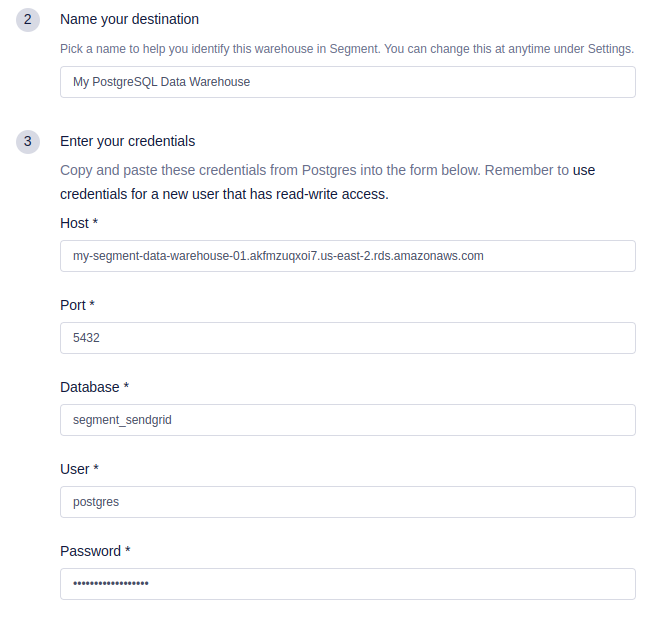
Finally, we provide a name for our destination (“My PostgreSQL Data Warehouse”) along with credentials and connection information.
We click Connect to complete the destination setup.

Segment pushes SendGrid data regularly
Once your destination is created, Segment will perform an initial sync, forwarding any source data stored in Segment Hub to the destination. After this, Segment will sync data to your data warehouse once or twice per day, depending on your Segment plan.
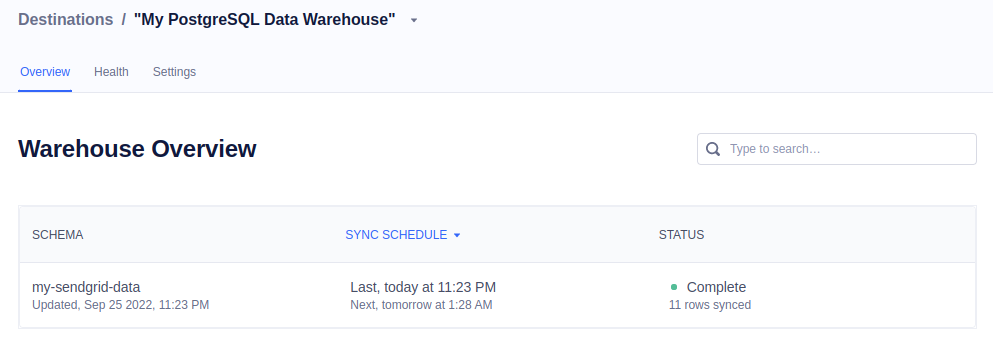
After the first sync completes, we can inspect our database to see what data was sent over. Keep in mind that all data related to a specific source is accessible in the schema based on that source’s name. For our example, with our SendGrid source called “My SendGrid Data,” the schema in our PostgreSQL database will be named my_sendgrid_data. The corresponding schema name for each source can be found on the Warehouse Overview page for your destination. (Note: The schema name will use underscores instead of the displayed hyphens.)
Using a PostgreSQL client to connect to our instance, we can see the data that has been sent from Segment to our data warehouse.
Sending data about our SendGrid lists, contacts, and single send email campaigns is a good start. However, we also want to collect and store information about real-time events in SendGrid, such as email deliveries, users opening emails, and users clicking on links. For this, we will configure SendGrid to send requests to a Segment webhook whenever there is email activity.
Sending SendGrid Events with Webhooks
Whether you’re using SendGrid’s Email API or Marketing Campaigns, whenever a SendGrid email event occurs, SendGrid can send a POST request with event information to a URL that you specify – this is a webhook.
When we were setting up our SendGrid source, you’ll recall that Segment provided a webhook URL for us to use for receiving real-time events. That webhook URL is what we need to give SendGrid for posting events as they occur.
Understanding the SendGrid webhook call
Before we direct SendGrid to send events to our Segment endpoint, let’s examine what comes across in the POST request. For this, we’ll use a Mockbin endpoint.
Create a Mockbin
Mockbin is a service that provides a unique endpoint to which you can send HTTP requests for testing and tracking. We’ll configure SendGrid to send its events to Mockbin, and then we’ll look at our request log to examine the kinds of requests that have come across the line.
First, we go to Mockbin and click on Create Bin.
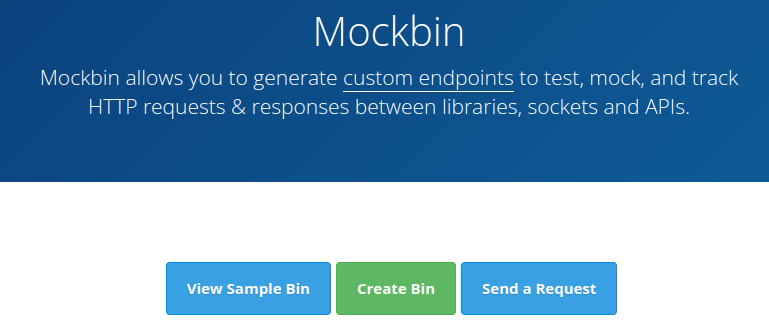
On the Bin Builder page, we keep all of the defaults and click on Create Bin again. Now, we have a unique Mockbin address that can receive HTTP requests.
With our example Mockbin, we can send HTTP requests to the following URL:
We copy this endpoint URL.
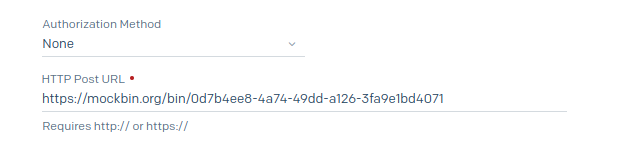
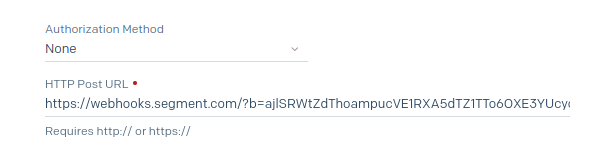
In SendGrid, navigate to Settings, Mail Settings. At the top of the “Event Settings” section, find the Event Webhook setting. Click on the icon to edit this setting.

For the “Event Webhook” settings, leave Authorization Method as “None”, and then we paste our Mockbin URL as the HTTP Post URL.
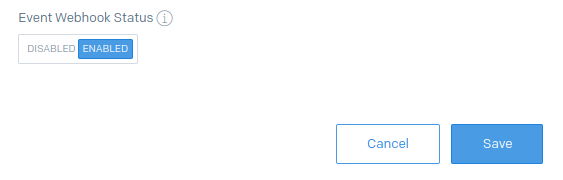
We leave the default selections for events to be sent to the URL (all of them). We set the “Event Webhook Status” to “Enabled” and then click Save.
Validate an email address
You can’t just send an email from your personal email address. Before you do any sending, you’ll want to look into authenticating your domain if you didn't do so earlier in this tutorial. Domain authentication signals to email providers that SendGrid has permission to send emails on your behalf.
Our Domain Authentication tutorial walks through how to prepare your domain to send emails. Further, visit our Single Sender Verification tutorial to see how to authenticate a new sender.
Send an email from SendGrid
With our event webhook pointing to Mockbin and a valid sending address, we’re ready to trigger some events by sending some emails, and then examine the resulting requests. Although you can send emails through Twilio SendGrid via the Email API or through Marketing Campaigns, we’re going to use Marketing Campaigns to send the Single Send email that we prepared earlier.
In SendGrid, we navigate to Marketing, Single Sends. We find the draft of our email and click Edit.

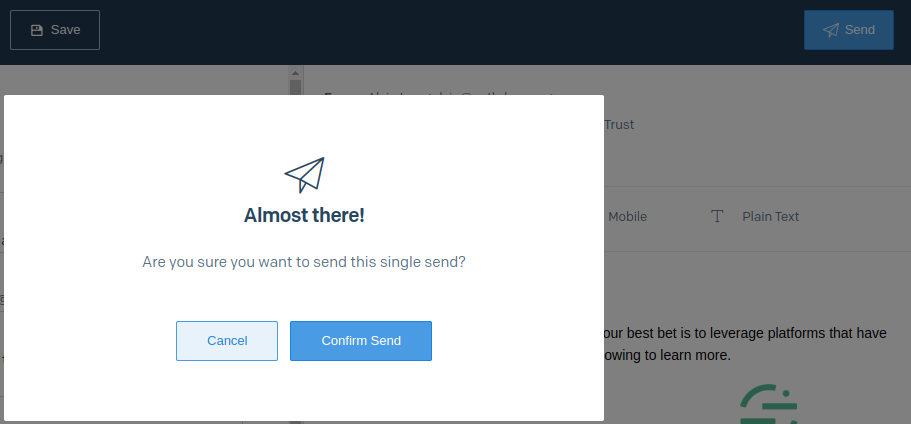
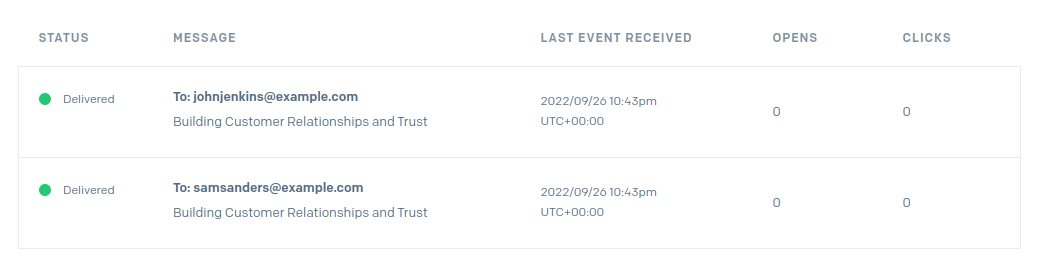
Since our email is already prepared, we click Review Details and Send. We click Send to send our email and confirm our decision.
The Single Send email is queued up immediately to deliver within a few minutes. Sure enough, our recipients receive an email soon after.
Examine the SendGrid activity log
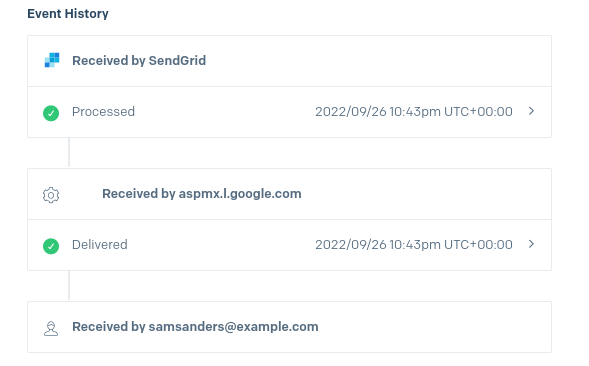
In SendGrid, we click on Activity to view the email activity feed. What we see here will mirror what is sent to our webhook URL.
When we click on the details for one of our recipients, we see more granular details for each event related to a single email delivery.
Examine the events pushed to the Mockbin endpoint
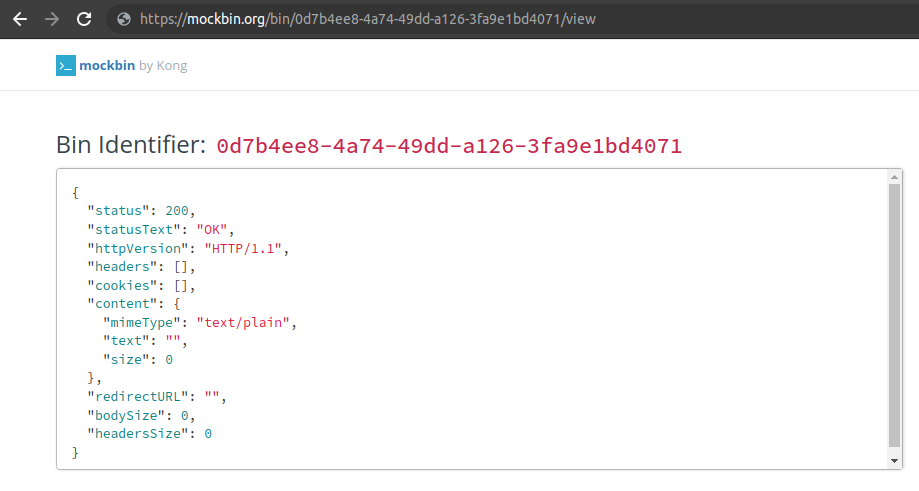
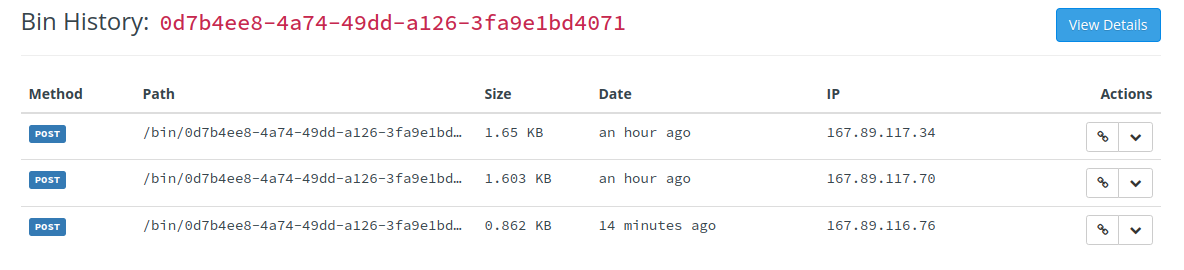
Now, as a result of this email activity, we can see the subsequent POST requests that the SendGrid event webhook sent to our Mockbin endpoint. We can view the request history for our Mockbin endpoint at the following URL:
We see several POST requests have been sent to our endpoint.
When we examine the request body for one of the requests, we see the following:

The request body, which is in JSON format, is an array of two events—a processed event and a delivered event—related to the same recipient. When we examine the body of the request that follows (an open event), this is the JSON data we see:
SendGrid has an Event Webhook Reference which details the types of events that trigger webhooks, as well as the shape of the payload data that can be expected with each request.
Now that we have a better understanding of how the SendGrid event webhook works, we’ll swap out our Mockbin endpoint for a Segment endpoint.
Send real-time events to SendGrid source in Segment
In Segment, we navigate to our SendGrid source and then to Settings, Endpoint. We see the Segment webhook URL that we should provide to SendGrid for its event webhook.
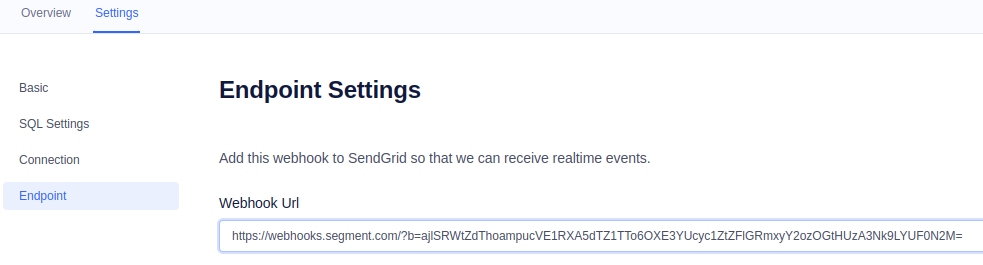
We copy the URL and then go to SendGrid, navigating to Settings, Mail Settings. Just as we did above when using the Mockbin endpoint URL, we will use this Segment URL for our event webhook URL in SendGrid. We update the URL and click Save.
SendGrid objects and SendGrid events stored in Segment Hub
Now, as SendGrid email activity occurs, SendGrid will send POST requests to Segment. Segment stores this event data in the Segment Hub until it is time to send the data to the data warehouse.
We now have two different types of data coming from our SendGrid source:
- SendGrid objects, which Segment pulls every three hours.
- SendGrid activity, which is pushed to Segment in real time, via a webhook.
Note that our SendGrid source overview only shows information regarding the SendGrid objects which Segment pulls. It does not show information about real-time events. To see this information, we need to wait until the data has been sent to the data warehouse, and then we can examine it there.
Data in Segment Hub sent to the data warehouse
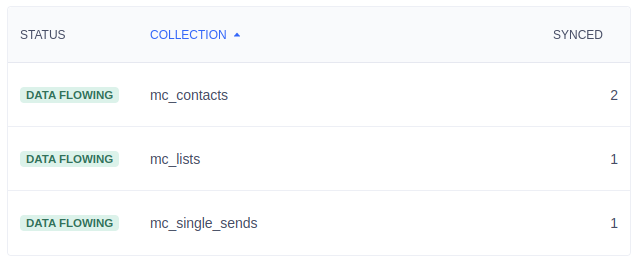
After the data from our SendGrid source is sent to our PostgreSQL data warehouse, we see new tables in addition to the mc_contacts, mc_lists, and mc_single_sends tables.
For each type of event received from SendGrid, Segment will create a corresponding table in the data warehouse. We see new tables called _open and click (_open begins with an underscore because open is a reserved word in PostgreSQL). Segment’s documentation notes that it will create an additional table, activity, which is the union of all SendGrid event tables. This is useful for creating funnels.
Activating Segment data in your data warehouse
The SendGrid event data stored in your data warehouse can be coupled with data from other sources, laying the foundation for business analysis that yields powerful insights into your customers. For example, you can correlate the historical data for a customer’s engagement with SendGrid email campaigns with purchasing behaviors from your ecommerce data source. You can use queries on historical data to forecast Customer Lifetime Value. You can even feed the data from your warehouse to an AI/ML recommendation engine, like Norrøna did.
Although the standard solution for integrating SendGrid data uses the Segment source and a data warehouse destination, we can also take advantage of source functions in Segment to identify, track, and group customers based on SendGrid email activity.
Using Segment Source Functions to Track SendGrid Engagement
Segment source functions allow you to gather data from third-party applications without the need to set up additional infrastructure. They are written in Node.js (v14) and function similarly to serverless functions called as a webhook. In the previous section, we directed SendGrid to call a webhook endpoint URL upon new email activity. We demonstrated this with a Mockbin endpoint and then with our SendGrid source in Segment. In this section, we’ll send SendGrid email activity to a Segment source function.
By using a Segment source function, we can take advantage of the Segment Spec, which allows us to capture data more meaningfully and correlate that data with our customers. We can use this enriched data with more effectiveness in our downstream destinations.
What will our function do?
As an example, we’ll create a source function that is called whenever SendGrid sends a POST request from its event webhook. Because we’ve already examined the shape of that request from SendGrid, we can craft our function to handle it accordingly. For our example, we will:
- Process only
openandclickevents, ignoring all others. - Reach out to the SendGrid Marketing Campaigns API to fetch additional information about the SendGrid recipient—our customer—based on the email address associated with the event.
- Tell Segment to track the action, associating it with the specific customer.
Create a Segment source function
To create a source function in Segment, we navigate to Connections, Catalog. On the Functions tab, we click on New Function.
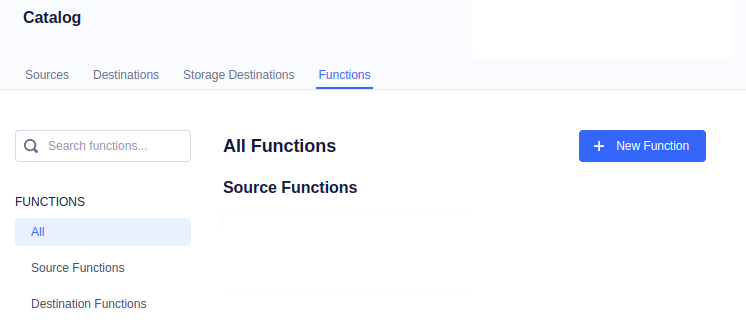
For function type, we select Source and then click on Build. In the editor for our new source function, we see a template with some initial Node.js code.

The code consists of a single async function called onRequest, and it takes two parameters:
- The
requestobject gives us access to the incoming HTTPS request, including the request headers and body. - The
settingsobject contains any configurable variables that Segment will pass to the function when it’s called. This is useful for passing sensitive data like API keys, which shouldn’t be hard-coded into the function.
Although this Node.js runtime is already loaded with several dependencies, the only one we’ll use for our example is node-fetch, which is exposed as fetch. We also have access to the Segment API using the Segment object, which is how we’ll make our calls to track actions.
This is the code for our main onRequest function:
Let’s walk through this code step by step.
First, we parse the request body into an object called sgEvents. We know, from examining our SendGrid event webhook calls, that the request body is a JSON-formatted array of events. Next, we use a for loop to iterate through the sgEvents. We ignore any events that are not open or click, moving on to the next iteration.
Reach out to the SendGrid Marketing Campaigns API for customer information
Based on the email associated with an event, we reach out to the SendGrid Marketing Campaigns Contacts API to fetch more information about the SendGrid recipient associated with that email address. We call a separate helper function, getSendGridUser(), which we’ll define alongside onRequest() like this:
The SendGrid API provides a large set of endpoints for accessing your SendGrid data. In our example, we use the Search Contacts endpoint to fetch a recipient’s information. To access the API, we will need to provide an API key with permissions for accessing marketing-related data. We can use the same API key (“Segment: Pull Marketing Objects”) which we created earlier.
Note also that our code examples have all been simplified and do not contain any error or exception handling. In production use, you’ll need to handle edge cases and error paths properly.
Call Segment Spec to track a user action
Next, we call Segment.track to send information about this open or click event to Segment, associating it with a unique user (identified by their email address). When calling track, we can pass additional properties of our choosing. We build our properties object with a separate function called buildTrackProperties:
By adding data about the user or the SendGrid Single Send email to our properties, we provide helpful context surrounding the tracked user action.
Forward the request to our SendGrid source in Segment
Recall that we will need to reconfigure the SendGrid event webhook to send real-time events to this source function. That means SendGrid will no longer send those events to our SendGrid source in Segment, as we had previously configured. However, what if we still want to send those events to our SendGrid source in addition to this source function?
Fortunately, we can have our source function forward the original request to other endpoints, such as the Segment endpoint URL for our SendGrid source. For this, we call forwardRequest with the original request and our endpoint URL. The function looks like this:
const forwardRequest = async (jsonBody, url) => {
await fetch(url, {
method: 'POST',
headers: {
'Content-Type': 'application/json'
},
body: JSON.stringify(jsonBody)
});
}
The entire code for our Segment source function consists of the main onRequest function along with declarations for three helper functions:
getSendGridUser()buildTrackProperties()forwardRequest()
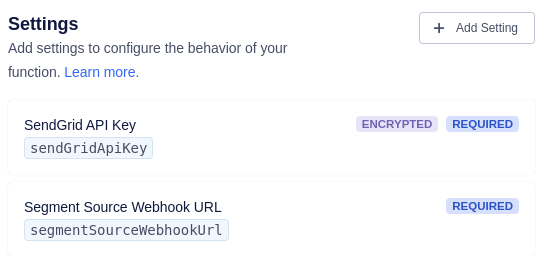
Use settings to protect sensitive data values
In our onRequest function, we have two references to values in the settings object:
settings.sendGridApiKeysettings.segmentSourceWebhookUrl
We will provide these values when we add this function to our set of sources in Segment. It’s possible to deploy this source function multiple times as different sources, with each instance using different configuration values in this settings object.
To set up these settings, click on Settings, Add Setting.
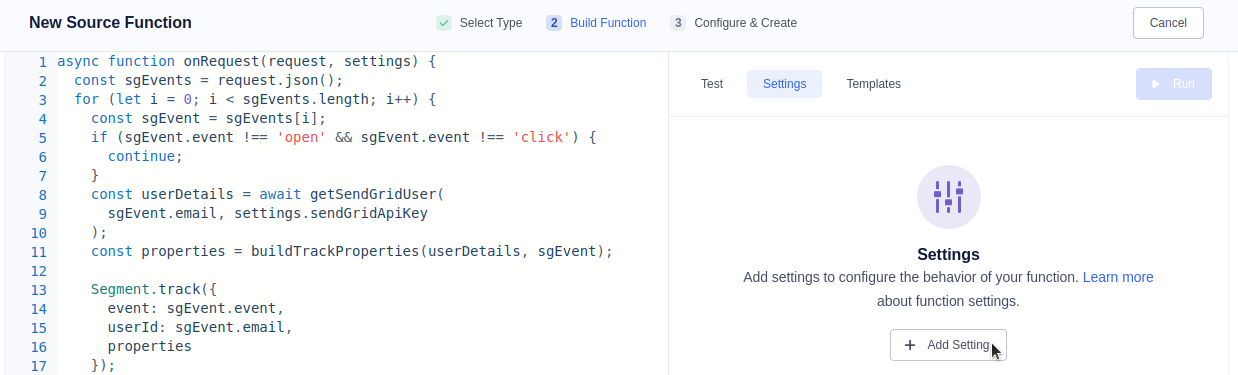
We add a setting for our SendGrid API key. We turn on “Encrypted” so that the key is not readable after it has been entered. Then, we add a setting for our Segment webhook URL.
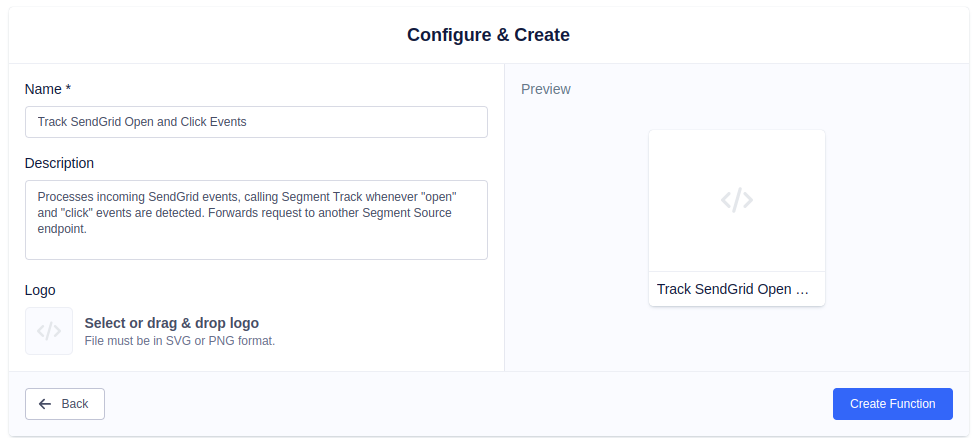
Finally, we finish creating our source function by providing a name and clicking on Create Function.
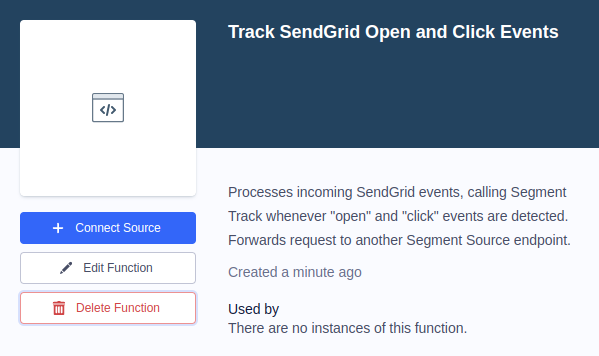
Add the new source to Segment
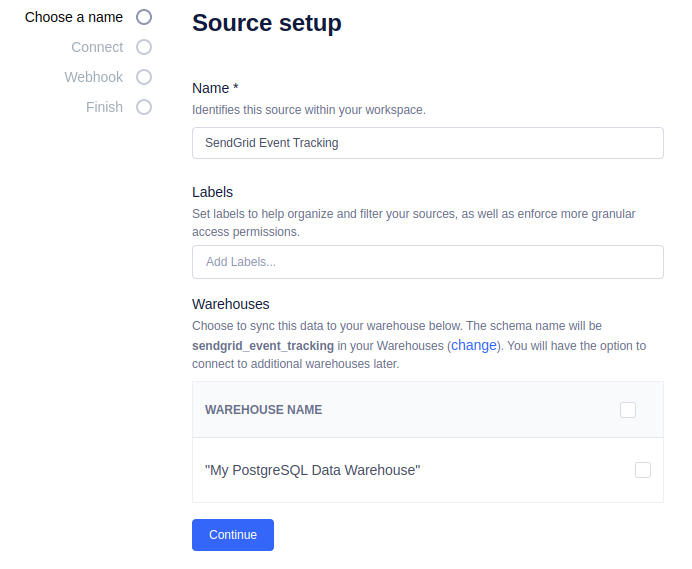
With our source function created, we can add it to our set of Segment sources by finding it in the Connections Catalog, under the Functions tab. We click on Connect Source.
We specify a name for our new source. Then, we uncheck the data warehouse destination for this source. Because our source function will forward the request to our SendGrid source—which will already sync data to our data warehouse—we don’t need our source function to send redundant data.
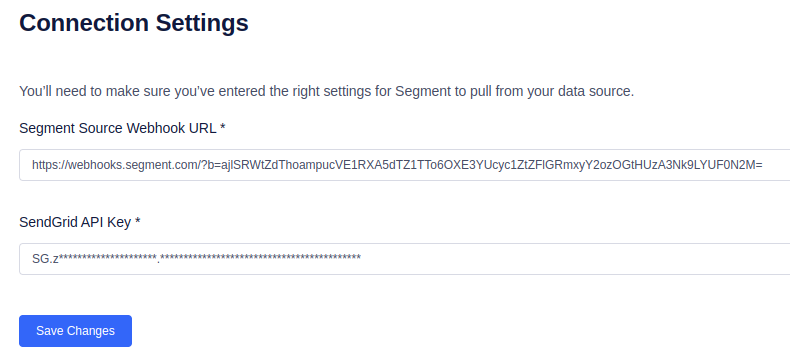
For connection settings, we’re required to provide the following:
- Segment source webhook URL: We use the webhook URL found in the “Endpoint Settings” for our original SendGrid source.
- SendGrid API key: We use the same key that we set up originally for accessing SendGrid marketing objects.
Configure SendGrid to send real-time events to this source
Our deployed source function has its own Segment webhook URL which a third-party service can call to send real-time event data. We find this URL in the Endpoint Settings for this source. This is the URL that we now want SendGrid to send its events to.
We copy the URL and, just as we did before, return to SendGrid’s Mail Settings, replacing the URL for the Event Webhook with this new URL.
Here is a quick recap of how all our pieces connect together:
- Our SendGrid source in Segment, called “My SendGrid Data,” pulls marketing object data from SendGrid every three hours.
- Whenever there is any SendGrid email activity, it will send a POST request to the webhook URL for our “SendGrid Event Tracking” source function.
- Our source function will use Segment Spec to track
openandclickevents. - Our source function will forward the request to the webhook URL for our “My SendGrid Data” source.
- Segment stores all data received in the “My SendGrid Data” source in the Segment Hub.
- On regular intervals (daily), Segment sends that stored data to our destination, a PostgreSQL data warehouse called “My PostgreSQL Data Warehouse.”
Test the new source
Now that our pieces are all connected together, we can test our solution.
Create and send another SendGrid email
In SendGrid, we’ll duplicate our original Single Send email, using the name “Choice of Platform Campaign 02.” We use the same recipient list for this email, and we send it immediately.
Shortly after, one of our recipients opens the email and clicks on a link in the email body.
View track data
In Segment, we can view the Debugger tab to see the track calls that our source function has made.
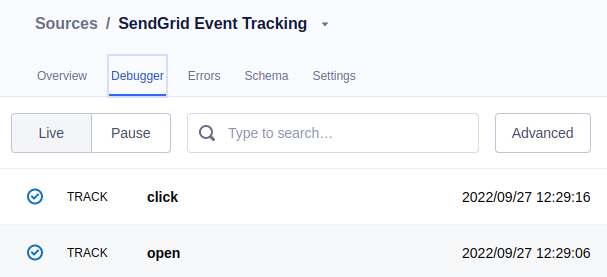
When we look at the details of the click event, this is what we see:
We’ve successfully associated this track call with a specific customer in Segment, identified by that customer’s email address as the userI. We’ve added properties to provide context around this click event. Some of those properties come directly from the original SendGrid event (such as the singlesend_id or the url), while others came through our call to SendGrid’s API for fetching user contact information (such as first_name or sendgrid_user_id).
Activating Segment data with Profiles and Engage
The Segment Spec lets us capture semantic information about a customer. Businesses can use this captured information in conjunction with Segment Profiles and Identity Resolution to better understand how a customer interacts across all of a business’s touchpoints, including SendGrid email campaigns. In addition, businesses can activate the data with Segment Engage, a customizable personalization platform that helps them connect to customers through different channels.
Using Segment Destination Functions to Call the SendGrid API
As a simple demonstration of how to activate the data captured by our source function, we will create a Segment destination function. A destination function lets us perform actions whenever a Segment Spec event—such as a call to track—occurs.
Our destination function will do the following:
- Listen for Segment track events (which we generate in our source function) related to a
clickevent from SendGrid. - When this type of event is detected, call the SendGrid API to schedule the sending of a follow-up email to that customer.
- The follow-up email will use a dynamic template in SendGrid. We’ll customize our content based on the link that the customer clicked on in the original email.
Create a dynamic template in SendGrid
Because our destination function will use a dynamic template in SendGrid’s Email API, we need to create that template first. In SendGrid, we navigate to Email API, Dynamic Templates. We click on Create a Dynamic Template.
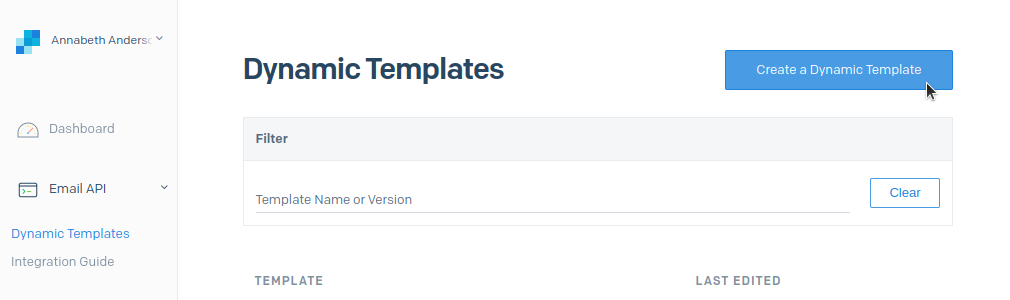
We provide a name for our template (“Platform Chooser Follow-Up”), and we click on Add Version to begin creating the body for our email.
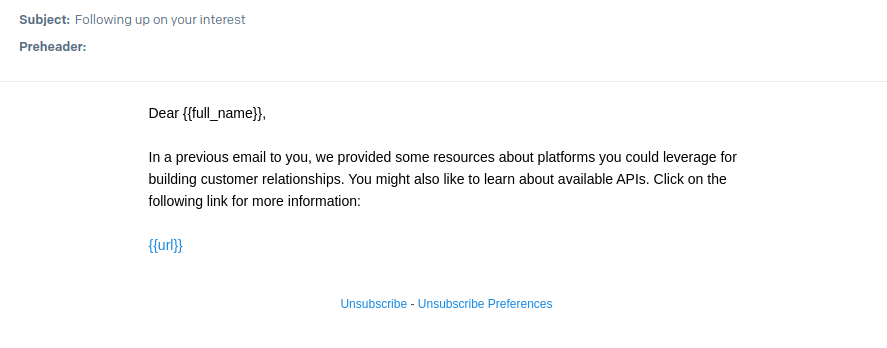
SendGrid uses the Handlebars templating language for personalizations and the substitutions of dynamic content. We will provide the {{full_name}} and {{url}} values in real time, when we make the request to the SendGrid API for sending the email.
We save our dynamic template.
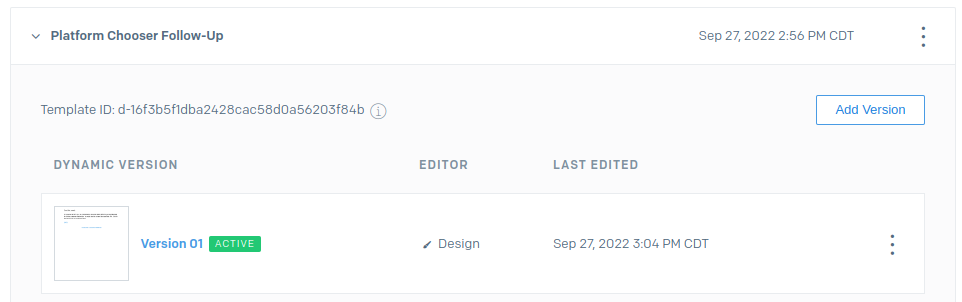
Note the Template ID value. We will use this in our Segment destination function.
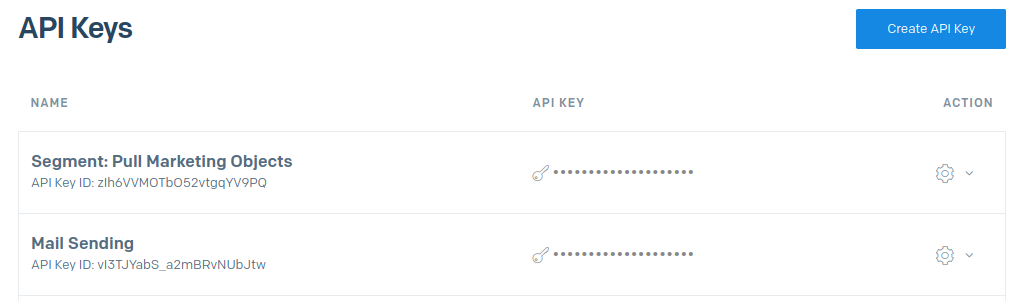
Create a SendGrid API key for sending emails
The SendGrid API key we used in our source function had the authorization to access marketing object data. Our destination function will issue SendGrid API requests for sending emails. For this, we will need a SendGrid API key with Mail Send permissions turned on:

After creating the API key, we copy the value and store it. We now have two SendGrid API keys that we use for different purposes in Segment.
Just as we did for our source function, we will provide the API key value to our destination function as a real-time setting.
Create a Segment destination function
In Segment, we navigate to Connections, Catalog, and we click on New Function. For function type, we select Destination, and then we click Build.
Use the onTrack handler function
In the destination function editor, we see references to various async handler functions (such as onTrack or onGroup) which will be called whenever Segment Spec receives a corresponding call. We want our destination function to execute onTrack, and we’re particularly interested in click events. Our function looks like this:
Let’s walk through what our function does. First, we will only process tracked click events related to a specific Single Send email from SendGrid. We will set the singlesendId that we care about in our settings when we deploy the function.
Next, we set up the body for the request that we will send to SendGrid’s Mail Send API endpoint. As part of the personalizations, we need to provide values for full_name and url. This will be inserted for the {{full_name}} and {{url}} handlebars variables that we use in our SendGrid dynamic template. We create a helper function to map the customer’s originally clicked link with the follow-up link that we want to provide:
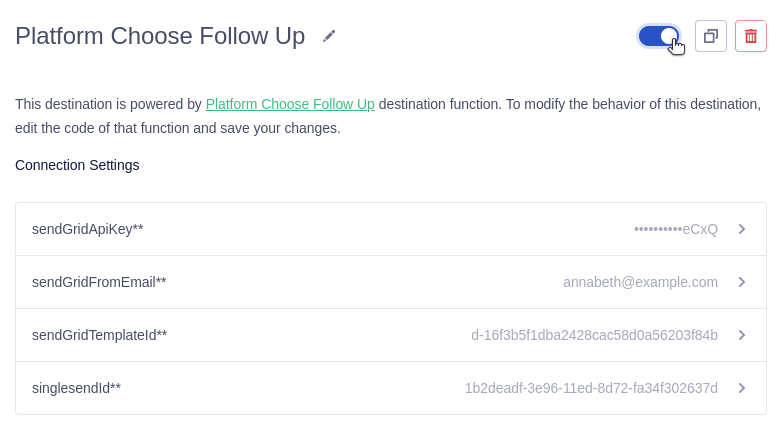
We need to specify the templateId for the dynamic template we will use. We will provide this as a real-time setting. We also need to specify the sender (from) of this email, because a single SendGrid account can be set up to send from multiple email addresses. We’ll also use a real-time setting for this value.
In the last part of our body, we set a send_at value for scheduling this email. We don’t want this follow-up email to be sent as soon as a customer clicks on the link in the first email they receive. Instead, we will schedule the email to be sent on the next day, at 4:00 PM UTC. We have another helper function to calculate that timestamp value (in seconds):
Finally, we send our HTTP request to the SendGrid API. To send an email through the SendGrid API, we need to provide a SendGrid API key, which we will supply as a setting.
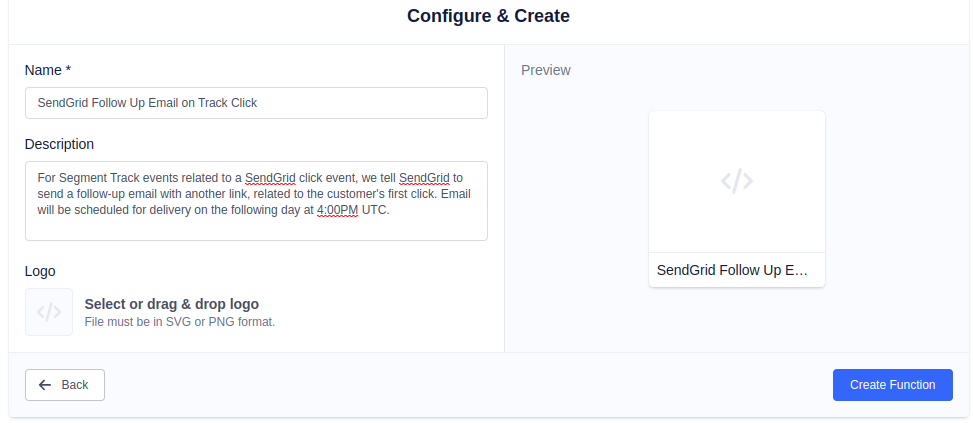
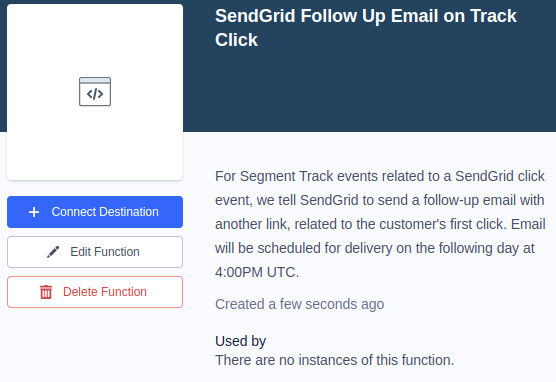
We complete the creation of our destination function by providing a name and clicking Create Function.
Add the new destination to Segment
Just as we did when setting up our source function as a Segment source, we will perform similar steps to connect our destination function as a Segment destination. We click on Connect Destination.
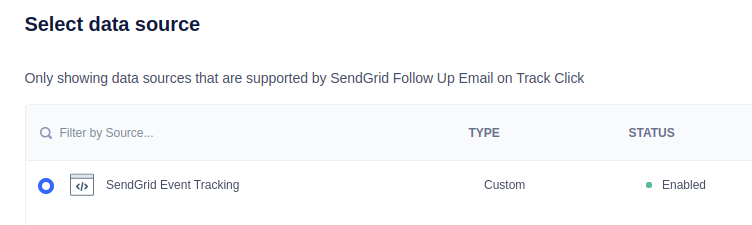
Next, we’re asked to connect this destination to a data source. Our data source that generates the track calls is our “SendGrid Event Tracking” source. We select it and click Next.
We choose a name for our destination and click Save. Then, on the Settings page for our new destination, we need to supply values for several settings. We also enable our destination by clicking on the toggle in the upper right.
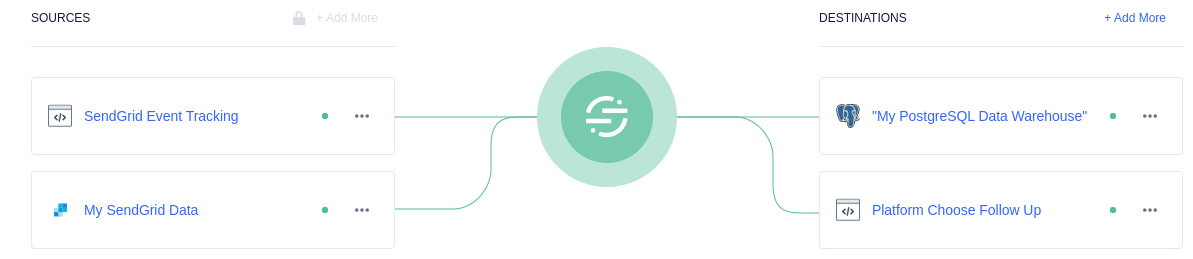
With our new destination added, this is what our Segment connections map looks like:
Test the new destination
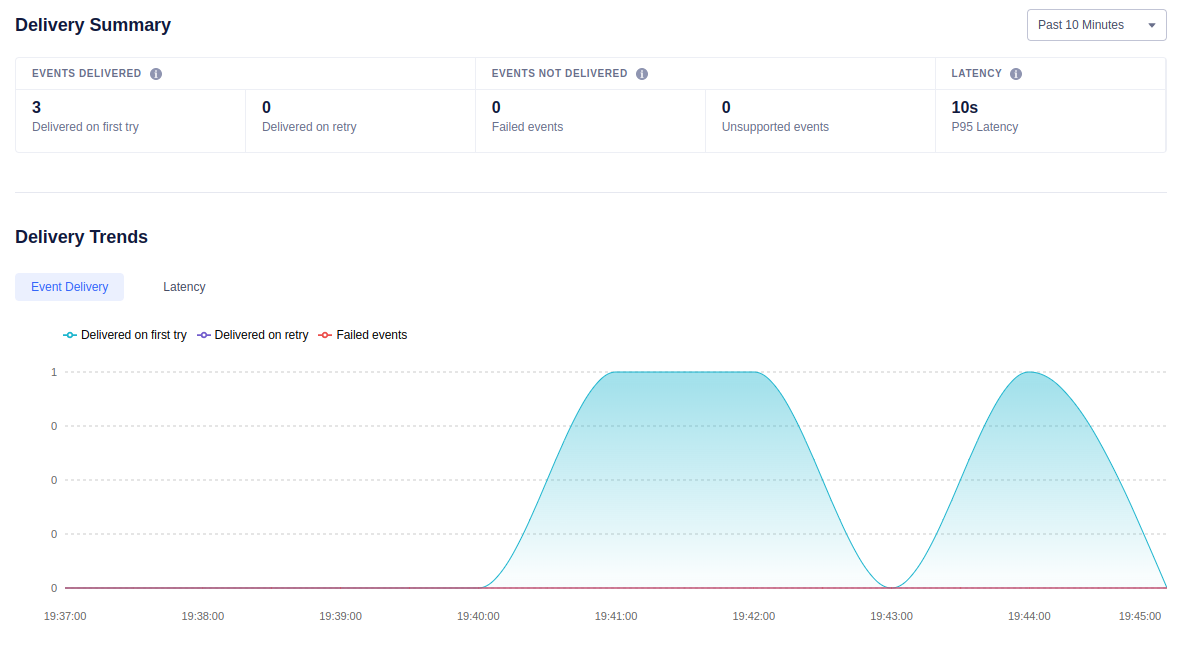
We return to our email client and open the email associated with our Single Send campaign called “Choice of Platform Campaign 02.” This is the campaign with the singlesendId that our destination function is listening for. After opening the email for each recipient and clicking on a link, we see on the “Event Delivery” page for our Segment destination that the track events are being processed.
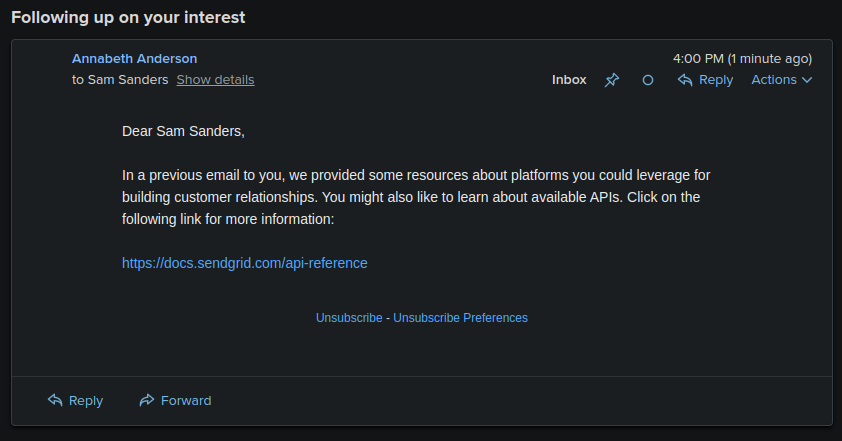
The follow-up email is scheduled for the next day at 4:00 PM UTC. At that time, our interested customer sees the following email:
Congratulations! You have successfully created a Segment destination function that listens for click tracking events from a Segment source, activating that data by reaching out to the SendGrid API to schedule the sending of a follow-up email.
Conclusion
As businesses shift their customer-relationship strategies away from third-party data, they are looking for tools that are built expressly for leveraging first-party data. Twilio Segment is a customer data platform designed to synthesize first-party data. This, in turn, helps a business to gain a complete picture of its customers as they engage across various touchpoints. Twilio SendGrid, as a customer communication platform specializing in transactional email, serves as an excellent source of first-party customer data.
In this tutorial, we walked through different methods of connecting Twilio SendGrid as a customer data source in Twilio Segment. Then, we looked at different ways to activate that customer data, including sending it downstream to a data warehouse for deeper analysis or sending it to a destination function which closes the loop by subsequently calling the SendGrid API.
When your business is ready to adopt a first-party data strategy for building relationships and engaging with your customers, contact the team to talk about how Twilio SendGrid and Twilio Segment can help you get there. And don’t forget to check out Twilio Engage, to help you build customer relationships at scale.
Alvin Lee is a full-stack developer based in Phoenix, Arizona. He specializes in web development, integrations, technology consulting, and prototype building for startups and small-to-medium businesses.


Related Resources
Twilio Docs
From APIs to SDKs to sample apps
API reference documentation, SDKs, helper libraries, quickstarts, and tutorials for your language and platform.
Resource Center
The latest ebooks, industry reports, and webinars
Learn from customer engagement experts to improve your own communication.
Ahoy
Twilio's developer community hub
Best practices, code samples, and inspiration to build communications and digital engagement experiences.