Convert Videos on Your Phone Into Animated GIFs Using Node, Libav & Imagemagick
Time to read:
October 14, 2014
Written by
This post is part of Twilio’s archive and may contain outdated information. We’re always building something new, so be sure to check out our latest posts for the most up-to-date insights.

One of the great ironies of the last few years has been the explosion in popularity of the animated GIF. Just as browsers were finally starting to embrace cutting-edge technologies like WebRTC, WebSockets and WebGL, a technology first supported by Netscape 2.0 in 1995 completely took over cultural landscape on internet. You can’t read a sports blog, a tweet or even go to a technology conference without running into the humble animated GIF.
Despite the popularity of animated GIFs, the tools for making them aren’t great. Personally, I wanted something simple that I could use to convert cute videos of my kids on my phone into animated GIFs. Now, there are several tools for converting videos to animated GIFs on your computer. Recently some developers from Yahoo released Gifshot, a tool that converts videos into animated GIFs inside of your browser using open web technologies. But I wanted to build a web service, so I needed to rely on software that was either built-in to or could be easily added to a standard Linux server distro. After some trial and error, I landed on the following combination of technologies:
- Ubuntu 14.04 on a Digital Ocean VPS
- Libav – to process the videos and retrieve the frames
- Imagemagick – to stitch together the animated GIF
- Node.js – to orchestrate and serve the generated animated GIFs
- Twilio – to send and receive MMS messages
You can try out a hosted version of the app I built by sending a short video (think Vine, 6 seconds or less) to:
United States: (747) 900-4443
Canada: (778) 655-4263
After being notified that your video has been queued, you should receive an animated GIF version of your video. In this blog post we’ll walk through the process of building this app from scratch by spinning up a Linux VPS, installing the necessary software on it, building a simple Node application to orchestrate the conversion of videos to animated GIFs and wiring it into a Twilio number. This is what you will accomplish when you’re done:

What You Will Need
Here are the two things you’ll need to get started:
- Twilio account with an MMS-enabled phone number
- Ubuntu Linux server with Node.js installed
For the purposes of this blog post I’m going to use a Digital Ocean droplet to power this service. If you already have an Ubuntu VPS with Node.js installed you can skip ahead to Step 2.
Step 1: Create a Digital Ocean Droplet
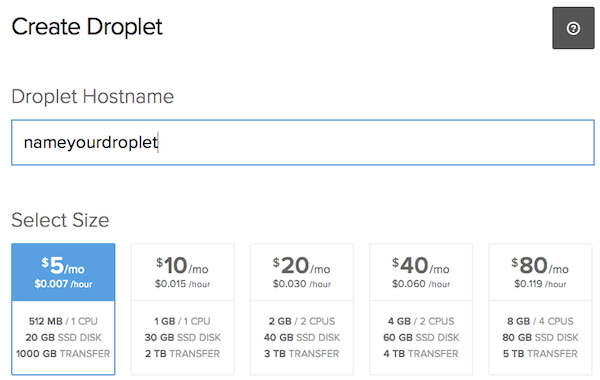
Create a Digital Ocean account and get a free $10 credit with the code twilio10. Once you’re logged in click on the “Create” button to spin-up a new droplet (this is what they call a VPS).

Give your droplet a name and select the smallest plan.
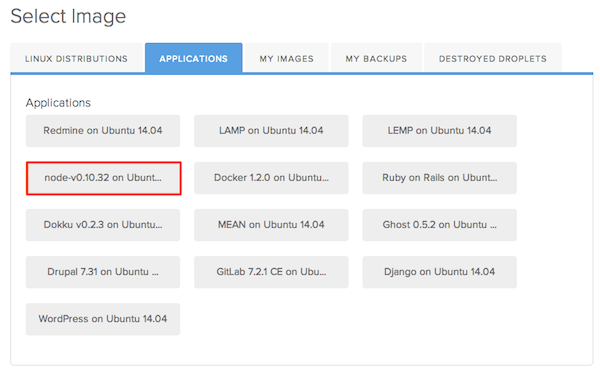
Scroll down and under the “Select Image” section click on “Applications” and then choose the Node/Ubuntu image. This will spare you from having to manually install Node on your new droplet.
Finally, click on “Create Droplet”. Once your droplet is up and running the root password will be emailed to you.
Step 2: Install libav and imagemagick
Now it’s time to install the binaries that we’re going to use to process video and create animated GIFs. Open up a terminal program on your local machine and SSH into your droplet. If you haven’t already, please create a non-root user and grant that user sudo privileges. Next, install libav and imagemagick:
Libav is a set of programs for processing video and you’re going to use the program avconv to pluck frames out of the video you receive from Twilio. Make sure that it’s working on your system as it should by creating an animated GIF from a video.
Here you are passing in a video in the 3gp format. If you’re curious what video formats that avconv supports on your system just run avconv -formats.
Here is an explanation of the flags used in the example above:
- -i : the input file
- -r : the number of frames per second to grab
- -vframes : the maximum number of frames to grab
- -f : the output format
The last parameter to the command tells avconv what to name the output files. The “%03d” is a special mask that avconv will use to number each of the files starting at 1. If all goes well you should end up with 48 (or less) jpeg files in the tmp directory.
Like libav, imagemagick is a set of programs for manipulating images. Use the convert program to stitch the frames together into an animated GIF:
There are the flags I’m using:
- -delay : number of 1/100ths of a second to pause between each frame
- -loop : causes it to loop over and over
You should now have an animated GIF named bouncing.gif in your directory. Take a look at that GIF in your browser using Node.
Step 3: Create the Node App and Serve Static Files
In your home directory create a new application directory and initialize node:
When you run npm init the process will ask a series of questions to help set up your Node application and create a package.json file. Give it any name you like and use the default entry path ( index.js ). Next, add the node-static module to your app:
This module will make it easy for us to serve the generated GIFs as static files. Now edit index.js and add some code to serve static files:
In your application’s directory create a subdirectory called public and copy the animated GIF that you generated earlier into the that new directory. Now start-up your Node server:
Open up a browser and go to the IP address of your VPS at port 3000 and append the name of the generated GIF: http://your_ip_or_domain:3000/bouncing.gif
If everything is working you should see this:


Now that your system can successfully convert videos into animated GIFs, it’s time to add some logic to your Node application to accept video content from Twilio, orchestrate its conversion and return the animated GIF. Add the following modules to your project. I’ll discuss what these modules do as you build out your service.
Go ahead and open up index.js and add the following code to the top:
The url module is built-in to Node and will give you an easy way to get information about each web request to your Node application. You might ask why I’m not using a framework like Express or Hapi to build this application. The answer is that this application handles only two kinds of requests and doesn’t do anything fancy with the inputs or outputs. I felt like this was a good opportunity to keep things close to the metal.
Modify your HTTP server code to parse the incoming request and invoke the handleMessage function when the path is /message .
In the handleMessage function, you need to determine if the media you’ve been sent is indeed a video. If so, send the user a message that their video has been queued and will be processed shortly. If not, send them a message letting them know that they need to attach a proper video file.
Now that you have a URL to a video file you can create a function called processVideo to handle the conversion of this file into an animated GIF.
Step 5: Orchestrate using child_process

At a high level there are a few things that processVideo needs to do:
- Download the video to the local filesystem.
- Call avconv to convert this video file into frames.
- Call convert to stitch these frames into an animated GIF.
- Send a message to the user with a pointer to this hosted GIF.
Since there will be files created during this process (some of them being temporary and subject to later deletion) you can use the node-uuid module to create a practically unique prefix for these files.
The os.tmpdir function returns the operating system’s temporary directory which should be available for you to create and delete files in. The request module helps you fetch this URL and save it to the temporary directory with the filename of the generated UUID. When the download is finished its time to kick off the processing of the video.
There are two ways in Node to start a child process: exec and spawn . The main difference between the two is that exec buffers output from the child process and returns it in its entirety and spawn streams output from the child process as it comes back. Since you aren’t interested in the output (stdout, stderr, etc) of the process you can simply use exec.
Exec takes a string that represents the operating system command that Node will execute. This command will be identical to what you executed manually earlier. The util module helps to format the command string with variables representing the operating system’s temporary directory, the UUID and the current directory of the Node process. Notice that you are chaining 3 processes together using the && shell operator. This has the effect of only executing subsequent commands if the previous command executed without error.
The second argument to exec is a callback. If any of the processes returned an error, send the user an SMS apologizing for the error. If there was no error, you can write a sendGif function to send an MMS to the user that includes the generated animated GIF.
Step 6: Send Animated Gif Back to User

In order to send an MMS back to the user you must construct a fully qualified URL to the animated GIF. Twilio will fetch the animated GIF from this location in order to construct the MMS that it delivers to the user. This is easy to do using the host information included in the request headers and the UUID you generated.
Step 7: Cleaning Up
Whether the exec process succeeded or not, make sure to clean-up all of the temporary generated files. The glob module makes it easy to get all of the files in a directory that match a given mask.
Step 8: Testing the App
Save the index.js file. Now it’s time to wire this app to your MMS-capable Twilio number and take this app for a test drive!
First, set the following environment variables:
The TWILIO_CALLER_ID should be set to same number you’ll be using to receive messages on. Now, start the Node process: node .
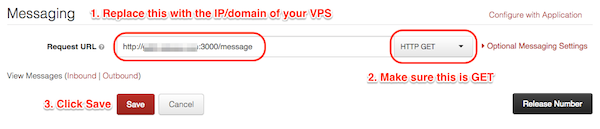
Go to your Twilio account dashboard and click on the number you are going to use. Update the Messaging Request URL to point at your VPS on port 3000 with a path of /message . Make sure to select HTTP GET , your code is expecting GET parameters to be passed. Click “Save”.
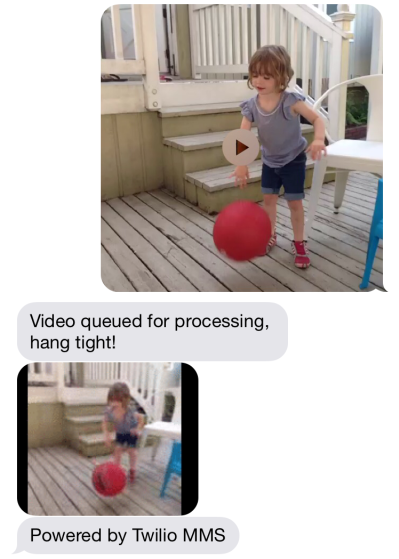
The moment of truth. Send a short video (6 seconds or less) to your Twilio number. You should get an immediate response that your request has been queued, followed by a response that includes the newly minted animated GIF.
Wrapping-up
In this blog post I walked you through using Node.js to convert videos sent to a Twilio phone number into animated GIFs. This included:
- Spinning up an Ubuntu VPS with Node.js installed on Digital Ocean
- Installing Libav and Imagemagick binaries
- Using Node.js to orchestrate these programs and serve static files
- Integrating Twilio to accept MMS videos and send out animated GIFs
There are two exercises left to the reader that are necessary to make this a more robust service:
- Using a job queue (like Bull) to handle the orderly processing of conversion jobs. This is important because the programs doing the conversion (acconv and convert) are CPU-bound and will quickly soak up system memory and resources.
- Configuring your server to run Node as a daemon and start the process on boot.
All of this code is hosted up on Github: https://github.com/crabasa/gifit
Hope you enjoyed this tutorial, happy hacking!


Related Resources
Twilio Docs
From APIs to SDKs to sample apps
API reference documentation, SDKs, helper libraries, quickstarts, and tutorials for your language and platform.
Resource Center
The latest ebooks, industry reports, and webinars
Learn from customer engagement experts to improve your own communication.
Ahoy
Twilio's developer community hub
Best practices, code samples, and inspiration to build communications and digital engagement experiences.