Integrate Discord and Sentiment Analysis with Twilio Flex
Time to read:
November 30, 2021
Written by

In this post, you will learn how to set up a Discord bot connected to Flex so agents can chat directly with customers on that platform, while pulling in sentiment analysis of previous messages. You will learn how to use IBM’s Tone Analyzer API and Segment to calculate a user’s sentiment from their texts in a Discord channel.
Originally this project was created as a part of the 2021 Solutions Engineering Hackathon. We pared our original project down to the following for simplicity’s sake and to distill the project’s essence, which is to help contact center teams interact with customers directly in Discord. To see the original contents of the project, see this Github repo.
To see a demo of the original project and background on why we chose Discord, check out this quick video below.
Prerequisites
For this project, you will need:
- A Twilio account. Sign up for free here.
- Twilio CLI installed. See instructions here.
- A Discord account. Sign up for free here.
- An IBM Cloud account. Sign up for free here.
- A Twilio Segment account with Personas enabled. Sign up here and talk to your account representative to get Personas enabled.
- Ngrok installed. Download here.
- Node version 17+ installed. Download here.
Setting up your Node application
Let’s set up your Node application first--start by opening your terminal and run the following:
As we go through the rest of the setup, you will gather the keys for the rest of the variables in your .env file.
To allow both our app.js and sentiment.js files to run in parallel, we’ll need to update our ‘npm start’ command in our package.json file. Locate the “scripts” section and paste the following as :
Next we need to set up an ngrok tunnel to run your application, so that the local project can be temporarily accessed over the Internet. Begin by running the following in your terminal:
Copy the https URL generated by the ngork command, and paste it as the value for the NGROK_URL in your .env file. Additionally add the port you used, 10123 for the default, as the APP_PORT variable.
Setting up your Flex Project
First we will walk through setting up your Flex Project. Follow the documentation here to create your Flex Project. In your Flex Project dashboard, copy your Account SID and Auth Token and add them as the values for the TWILIO_ACCOUNT_SID and TWILIO_AUTH_TOKEN variables in your .env file.
Next, navigate to Twilio Studio in your Twilio console, and create a new flow. Give this new flow a name such as “Custom Webchat Flow”, and in the template selection pop-up, select “Import from JSON”. When prompted, copy and paste the following JSON block:
After you paste this JSON to your Studio Flow, click ‘next’, and you will be redirected to your Studio Flow editor. Next click “publish” to publish your Studio Flow. Once you have published your flow, open up your terminal to use the Twilio CLI. Login to your Twilio CLI account with the twilio login command, using the Account SID and Auth Token from the account with your Flex project that you’re using for this project. Then create a new Flex Flow by running the following Twilio CLI command in your terminal:
Additionally, copy and paste the Flex Chat Service SID as the value for the TWILIO_FLEX_CHAT_ID variable in your .env file. Finally copy and paste the Flex Studio Flow SID as the value for the TWILIO_FLEX_FLOW_ID variable in your .env file.
Setting up your Discord server
Now that your Flex project is set up, let’s set up your Discord server with a bot and support channel, so your Flex agents can chat with your users in Discord.
First, create a Discord login if you don’t already have one on their site here. Log in to your Discord account, and create a new server by clicking the green plus icon on the left toolbar, select Create My Own, and give your Server a name. See Discord's documentation for more screenshots and details.
Next, create a new text channel by selecting the + icon next to Text Channels on the left hand side, and name it “Support”. For more details see Discord's documentation.
Lastly, follow Discord.JS’s documentation on how to set up a bot in your Discord UI and retrieve your bot key. Copy this key and use it as the value for the DISCORD_TOKEN variable in your .env file in your Node application.
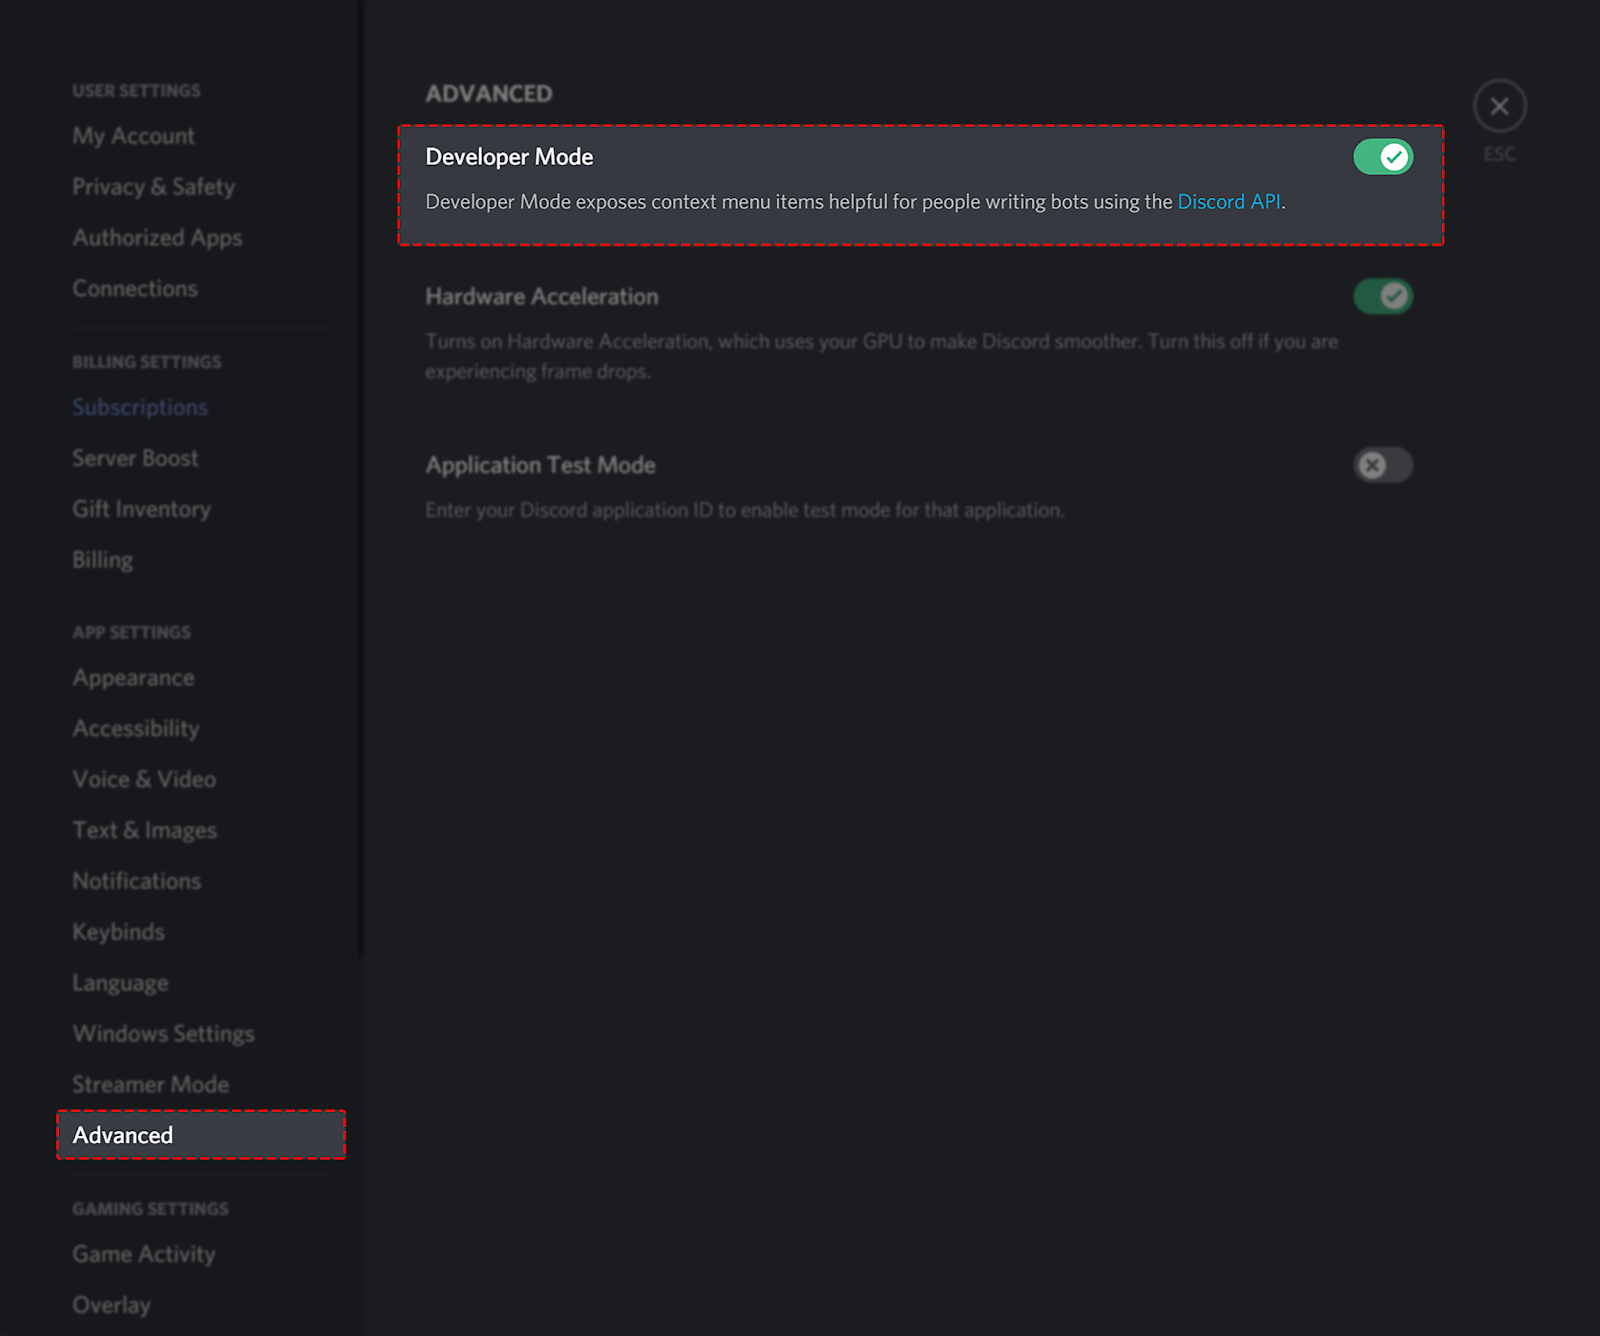
Your node app will program your Discord bot to respond to help if typed in your #support channel after you have all of the .env keys and run your Node application. The next two variables to find are the “Channel ID” and “Bot ID” which correspond to the BOT_ID and the SUPPORT_CHANNEL_ID in your .env file. To find these ids, navigate to your Discord User Settings, click “Advanced” and toggle “Developer Mode” on.
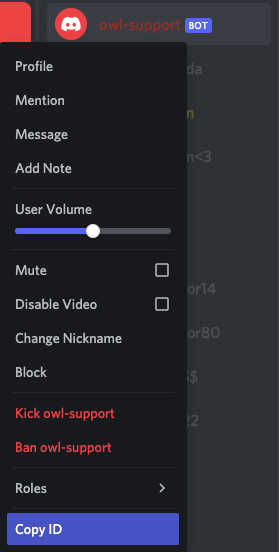
Then navigate to the support channel you created and right click on the channel name and select “Copy ID”; paste this value for the SUPPORT_CHANNEL_ID variable in your .env file.

Finally navigate to the bot you created and right click on the bot name and select “Copy” ID. Paste this as the value for the BOT_ID variable in your .env file.
Setting up Segment and IBM for sentiment analysis
Next, you will set up your Segment instance. Start by logging into your Segment account. Navigate to “Connections” and create a new Node Source. More detailed instructions on setting up Sources can be found on Segment's site here.
Copy your source write key and paste this as the value for the SEGMENT_KEY variable in your .env file. More detailed instructions on where to find your write key are on Segment's site here.
Next, in your Segment account, navigate to “Personas”, then to “Settings”, then to “Sources”, and add your newly made Node source. Then navigate to “API Access” in the “Personas > Settings” section, generate a token, and copy the token. Paste that as the value for the SEGMENT_PERSONA_TOKEN variable in your .env file. Additionally, copy the Space ID that is above your token and paste it as the value for the SEGMENT_SPACEID variable in your .env file as well.
The last system to set up is the IBM Watson Tone Analyzer application. To start, sign into your IBM developer account. Then follow the instructions on IBM's site (documentation here), navigate to the Tone Analyzer service, and find the token and URL. Copy the token and paste it as the value for the WATSON_KEY variable and copy the URL and paste it as the value for the IBM_TONE_ANALYZER_URL variable in your .env file.
Start your Node Server
Make sure to save your work and run this command to start the server:
Make sure that there are no errors, and then navigate to your Discord server. Type any sentence with the word “help” in the support channel you created. You should receive a DM from the bot you created. Type “agent” in the DM to initiate a Flex conversation. Navigate to your Flex instance, and you should see a new task created from Discord. Feel free to chat away and see the messages from Flex populate in Discord just like a Twilio web chat.
The last and final step is to set up your Segment trait now that you have Segment events coming in from Discord. Anytime someone posts a message to your support channel, the message body is analyzed using the Watson Tone Analyzer API, the sentiment is recorded, and that sentiment is sent as an event to Segment using the Discord user id as the Segment user id.
Open up your Segment dashboard and navigate to your Node source debugger. You should see the user from your Discord chat and their Contacted Discord Support event where the event property, sentiment, is the strongest sentence sentiment that the Tone Analyzer API recorded.
Once you’ve confirmed that users and events are getting tracked in Segment, navigate to Personas dashboard and click into “Computed Traits” and click “Create new trait”. Select “Last” from the list, and click “configure”. In your trait builder, select the event name “Contacted Discord Support” and under that select “Sentiment” for the event property. This creates a trait that shows the last sentiment recorded for this user. Now you can see if people in your support channel are helpful community members or trolls that need to get booted.
Conclusion
Now you have a two-way chat connection between Flex and Discord and you can analyze the sentiment of those messages automatically. Users can chat with support in a Discord server rather than going to a web chat on a site, which is great for companies with large communities in Discord such as gaming companies. Flex agents can handle those incoming Discord bot DMs seamlessly and receive additional context about those users from Segment so they can be apprised of how those users may behave in their chat.
To take this project to the next level try:
- Creating a Flex Plugin to pull in the Segment Sentiment attributes using the Segment Profile API.
- Adding a chatbot to handle FAQs before being routed to an agent. We used Google Dialogflow in our original hackathon project.
- Integrating your CRM using a Flex Plugin to pull in additional data about your Discord users.
- Continue to level up your gaming engagements by implementing the solutions outlined in this blog post.
To get started sign up for a free Twilio Developer account and a free trial of Segment.
Biography
Heather Hargreaves
Heather is a Solutions Engineer at Twilio in New York City, and she loves helping people optimize their products and messaging through analytics and A/B testing. She can be reached at hhargreaves [at] twilio.com
Nick Littman
Nick is a Solutions Engineer at Twilio. He helps developers from different industries architect engaging experiences that keep their customers coming back. He can be reached at nlittman [at] twilio.com
Natalie Huynh
Natalie is a Solutions Engineer at Twilio. She is always looking for new ways to improve the customer experience through digital communication. She can be reached at nhuynh [at] twilio.com
Saumil Bapat
Saumil is a Solutions Engineer at Twilio and brings a wealth of experience on CRMs from working at Salesforce. He can be reached at sbapat [at] twilio.com.


Related Resources
Twilio Docs
From APIs to SDKs to sample apps
API reference documentation, SDKs, helper libraries, quickstarts, and tutorials for your language and platform.
Resource Center
The latest ebooks, industry reports, and webinars
Learn from customer engagement experts to improve your own communication.
Ahoy
Twilio's developer community hub
Best practices, code samples, and inspiration to build communications and digital engagement experiences.