Getting Started With 2FA Using Twilio Authy and ASP.NET Core
Time to read:
July 21, 2020
Written by

Security is important, just ask any blue check Twitter user. Rolling your own authentication system is time consuming and fraught with peril. So how do you move beyond user credentials that consist of nothing more than an email address and a password that’s long and probably difficult to remember if it’s any good?
Two-factor authentication (2FA) is a great way of improving both the strength of your authentication system and your users’ experience with your authentication process. 2FA adds something a user has to what a user knows to the process of verifying they’re who they say they are.
If you’re developing web applications (or straight-ahead websites) using ASP.NET Core, Microsoft and Twilio have a number of resources to speed you on your way to a robust and scalable 2FA that’s not a pain for your customers to use or for your admins to administer. If you’re new to ASP.NET Core security, you can read an overview on docs.microsoft.com.
If you’re new to Twilio Authy here are a few key facts: Authy is an authentication API that’s intended for ongoing relationships with a customer. Authy provides both one-time passwords, like SMS codes, and soft token push authentication through an Android or iOS app. With the Authy API you can add secure passwordless logins to your web application.
If that all sounds great, but you’re unsure where to start with 2FA, you can get started by running a demo in your own development environment. This post will walk you through the process of running Twilio’s Authy quickstart for ASP.NET Core using Visual Studio 2019 and Windows 10.
Prerequisites
You’ll need the following resources to complete the tasks in this tutorial:
Windows 10 – Yep, this is a Windows-centric guide. macOS users, fire up a VM for best results.
.NET Core 2.1.808 SDK – The SDK includes the APIs, runtime, and CLI. The Quickstart uses ASP.NET Core 2.1, which is a long-term servicing (LTS) branch.
Visual Studio 2019 (the Community edition is free) with the following options:
- C#
- ASP.NET and web development workload
- .NET Core cross-platform development workload
- SQL Server Express LocalDB
- GitHub Extension for Visual Studio
Node.js and npm – The Node.js installer also installs the npm package manager.
In addition to these tools you should have a working knowledge of C# and .NET Core. You should also be familiar with the Visual Studio user interface. Experience installing NuGet and npm packages will also be helpful.
The frontend for the demonstration application uses AngularJS. You won’t have to make any changes to it to run the app, but you’ll need a working knowledge of JavaScript and AngularJS (not Angular) to fully grok how it works.
There is a companion repository available on GitHub. It contains the complete source code for the application you’ll be building by following the tutorial.
Getting and securing your Twilio account credentials
If you haven’t already done so, sign up for a free Twilio trial account using the link above.
Your Twilio account credentials enable you to access the Twilio products available in your Twilio account. Get your Twilio Account SID and Auth Token from the upper right-hand side of the dashboard in your Twilio console. These are user secrets, so handle them securely.
One of the best ways to handle user secrets on a development system is to store them as environment variables. This helps prevent them from accidentally being checked into a publicly accessible source code repository.
Storing your account credentials as environment variables makes them automatically accessible to the Twilio CLI. While the CLI isn’t necessary for this tutorial, it’s a handy thing to have.
To store these values as environment variables on Windows, open a PowerShell or Windows Command Prompt console window and execute the following command-line instructions, substituting your credentials for the placeholders:
For more information about storing your credential as environment variables, including instructions for macOS and Linux, see the post:
Setting Twilio Environment Variables in Windows 10 with PowerShell and .NET Core 3.0.
For more information on getting started with your Twilio trial account, see the post:
How to Work with your Free Twilio Trial Account.
Once you have a Twilio account you can create an Authy application.
Creating an Authy application
Sign into your Twilio account and use the icon bar on the left side to go to the Authy section of the ExplorationOne project (or whichever project you like if you’ve created more than one). Click the + (plus-sign) icon to create a new application and give it a friendly name like “AuthyDotNet21”.
The console will redirect you to the General Settings page of the new application. In the Properties section, next to the Production API Key field, click the eye icon. This will reveal the Production API Key. Copy it to a safe place: this is a user secret.
Open a PowerShell or Windows Command Prompt console window and execute the following command-line instruction, substituting the Production API Key for the placeholder:
The environment variable name AuthyApiKey follows a different convention than the one used for your account credentials. The format of the environment variables for your account credentials enables them to be used automatically by the Twilio CLI. The format for AuthyApiKey follows a different convention that enables another “automatic” feature that you’ll see later.
Verifying your SQL Server Express instance name
You’ll need a SQL Server database installation the application will use as a data persistence layer. If you installed SQL Server Express 2016 LocalDB with Visual Studio 2019, which is a typical thing to do, you’ll have the necessary database engine. (Note that SQL Server Express 2016 LocalDB is the most current compatible version for Visual Studio 2019.)
If not, you can find it in the list of Individual components in the Visual Studio Installer. From the Visual Studio 2019 menu bar, select Tools > Get Tools and Features to access the installer. Select the Individual Components tab on the left side of the window, then scroll down and check the following components:
SQL Server Command Line Utilities
SQL Server Data Tools
SQL Server Express 2016 LocalDB
Click Install to perform the installation.
Unless you’re already sure of it, you can verify the name of your instance(s) of LocalDB using the SqlLocalDB Utility. Open a PowerShell or Windows Command Prompt console window and execute the following command:
The utility will return the names(s) of all the instances of LocalDB owned by the current user. The most likely result is one instance, MSSQLLocalDB.
With the name of your instance of LocalDB, you’ll be able to update the connection string Entity Framework Core needs to connect to the database.
Setting up the Authy demo project
The baseline code you’ll be using to get started with Twilio Authy is part of the Twilio Docs Quickstart for C# (.NET Core), so you’ll be able to refer to the Quickstart for additional information. By completing this tutorial you’ll be able to work with the Quickstart code in Visual Studio 2019 and SQL Server Express Edition on a Windows 10 machine.
Create a new directory named AccountSecurityCs in an appropriate location on your computer.
Open Visual Studio 2019 and clone the following GitHub repository:
https://github.com/TwilioDevEd/account-security-csharp.git
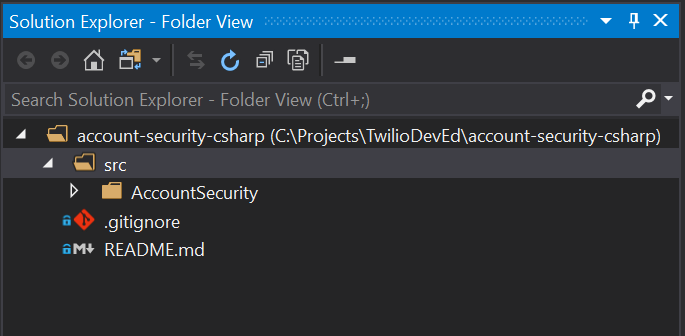
When the cloning process is complete complete you should see the Solution Explorer panel in Folder View showing the following folder/directory structure and files:
AccountSecurityCs
/src
README.md
Click open the src folder. You’ll see a subfolder named AccountSecurity. The folder structure will look like this in the Solution Explorer panel:
You won’t be able to switch the Solution Explorer to its default solution view because the repository doesn’t have a solution (.sln) file. Creating one for this project will help you manage the code.
Updating the .gitignore file
There’s a better version of .gitignore available now for Visual Studio 2019 and Visual Studio code projects. Open the existing .gitignore and replace the contents with the code from the following resource:
https://raw.githubusercontent.com/github/gitignore/master/VisualStudio.gitignore
This list of file exclusions is more comprehensive and accurate than the existing one.
Adding a Visual Studio solution file to the existing project
It’s easy to add a solution file to an existing .NET Core project that doesn’t have one, although the process isn’t immediately obvious or intuitive. The technique is convenient when the original project was created using Visual Studio Code or the .NET CLI. You’ll also be able to create the solution file in a separate parent folder from the project files.
Select the src folder in the Solution Explorer panel.
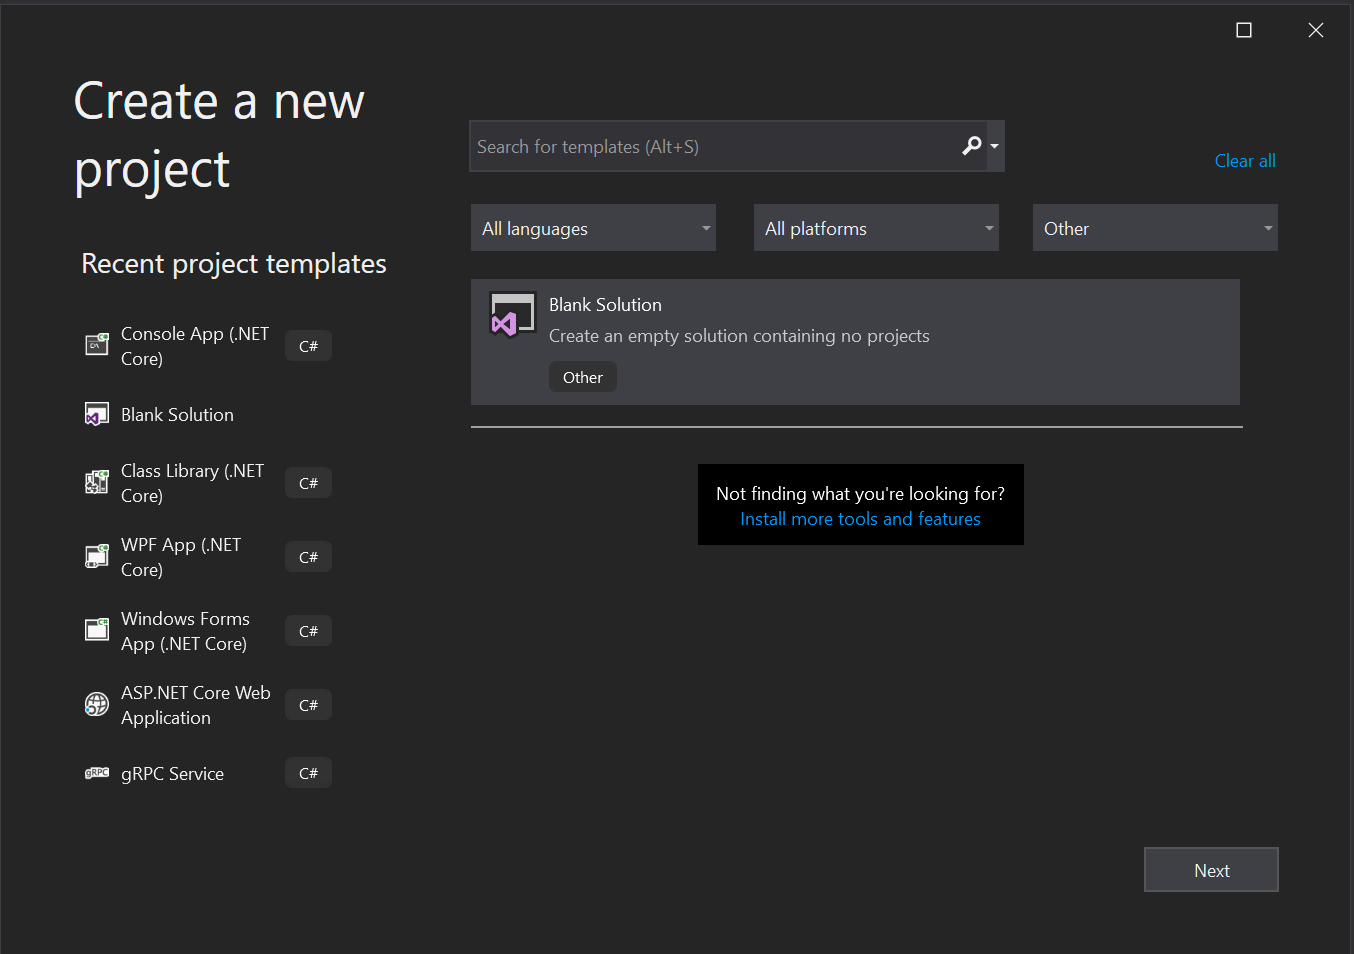
From the Visual Studio 2019 (VS 2019) menu bar, select File > New > Project.
In the Create a new project window, set the project type filter dropdowns, from left to right, to the following values:
All languages All platforms Other
You should see one project template listed: Blank Solution. Select it and click Next.
If you don’t see the template listed, check to be sure you have the filter dropdowns set correctly. If that doesn’t work, try closing VS 2019 and restarting it. As of the date of this post, if you use the search box to look for this template it won’t show up in the template list until you restart VS 2019.
In the Configure your new project window, enter the following values:
Solution name: AccountSecurity
Location: <your local path>\AccountSecurityCs\src
Solution: Create a new solution
Click Create.

In the VS 2019 Solution Explorer panel you’ll see a single entry for Solution 'AccountSecurity' along with “(0 projects)”. Don’t panic. All is well.
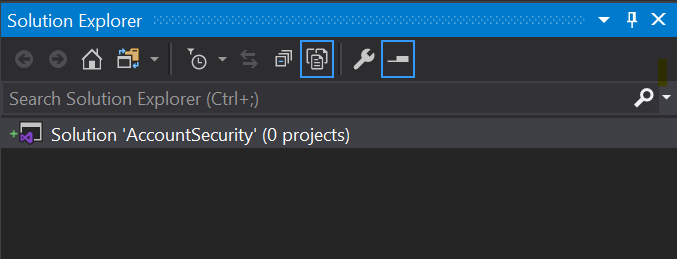
You should also see a little green plus sign to the left of the solution icon, indicating the file will be added to your local Git repository. This confirms the updated .gitignore file is doing what it’s supposed to do.
Right-click on the solution and click Add then Existing project.
Navigate to <your local path>\AccountSecurityCs\src\AccountSecurity in the file browser and select the AccountSecurity.cs file, then click Open.
When you return to the Solution Explorer you should see the AccountSecurity solution and project in the more familiar folder structure.
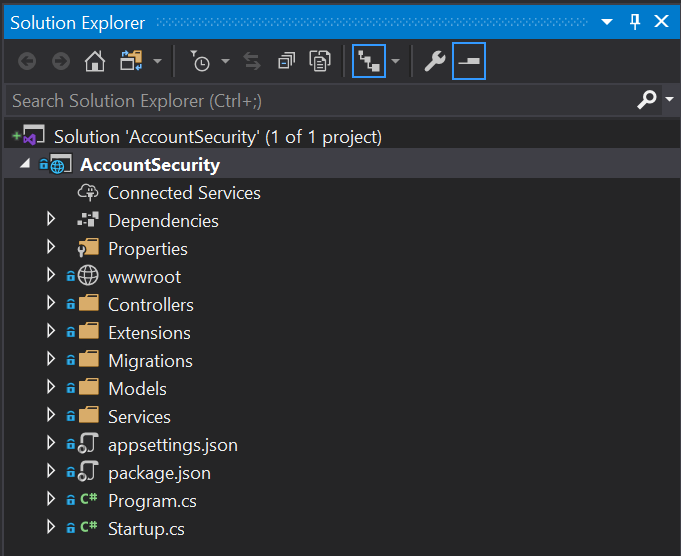
Note that the .gitignore and README.md files haven’t gone away; they’re still part of the repository and are still in the AccountSecurityCs folder, they’re just not part of the solution. You can see them by switching the Solution Explorer to Folder View.
This would be a good time to commit your changes to your local Git repository.
Updating the application settings model
In the Models directory, open the AppSettings.cs file.
Replace the contents with the following C# code:
Since the AppSettings class is a POCO, it doesn’t require and using directives.
This class will be used to create an instance that will hold the Authy API Key you obtained through the Twilio console.
Adding application settings to configuration dependency injection
You can make your Authy API Key available in any class in which it’s needed by using .NET Core configuration dependency injection.
Open the Startup.cs file in the AccountSecurity project root and find the ConfigureServices method.
Insert the following code at the top of the method:
This code will retrieve the Authy API key that you’ve stored securely in an environment variable of the same name and add it to a configuration instance that’s available for dependency injection.
Updating configuration files
There are a couple files to change to ensure the application runs more securely and with the most current compatible components.
Open the appsettings.json file in the AccountSecurity project root and delete the following element:
Be sure to remove the preceding comma (“,”) as well.
Change the DefaultConnection element so that:
- the
DefaultConnectionconnection string refers to your instance of SQL Server Express 2016 LocalDB Integrated Securityis set to “true”User IDandPasswordare removed
The completed appsettings.json file will look something like this:
This is a more secure way to connect to your database. The “sa” account is a frequent target of hacking attempts.
Open the AccountSecurity.csproj file by right-clicking on the AccountSettings node in the Solution Explorer panel and clicking Edit Project File.
In the <PropertyGroup> node, delete the following element:
In the <ItemGroup> node, delete the following element:
Open the package.json file in the AccountSecurity project root and change the name node so it looks like this:
Change the dependencies node so it looks like the following:
Build the solution. It should build without any errors or warnings (unless you have coding style rules turned on that aren’t part of the standard VS 2019 configuration).
Installing updated components
There are a couple NuGet packages to update. You can do this with the VS 2019 NuGet Package Manager user interface or the Package Manager Console. The PM Console commands are as follows:
Note that while it’s fine to update the SendGrid package to the latest version without a version number, it’s not fine to do that with Entity Framework Core. You need the 2.1.14 version for it to work correctly with ASP.NET Core 2.1, which is used in this project.
Creating the database
The demonstration project already has EF Core migrations for creating the account-security database. The SQL Server .mdf and .ldf files will be created in the default location used by SQL Server Express 2016 LocalDB, which is:
<drive>:\users\<username>
For reasons of its own, Windows will truncate your login name to a 5-character string when creating this directory.
In the Package Manager Console window, verify that the Default Project is set to AccountSecurity, then execute the following instruction at the command prompt:
Because the logging level is set to “Warning” in appsettings.json, you will see a lot of output in the PM Console window. If EF Core is successful in creating the account_security database the last few lines of output should be:
You can verify that the database was created successfully by checking for the account_security.mdf and account_security_log.ldf files in the default directory. To verify further, connect to the database using VS 2019 or Microsoft SQL Server Management Studio, or another tool, and check for the presence of tables in the database. There are seven dbo.AspNet… tables and a dbo._EFMigrationsHistory table.
Now you’re ready to try out the app!
Testing the app and experimenting with Twilio Authy
When you signed up for your Twilio account you registered a phone number associated with a mobile device. Have that phone handy when you begin testing the app.
Build and run the AccountSecurity project. Since the default logging level is set to “Warning” in the appsettings.json file, the Output window will show a lot of information for AccountSecurity - ASP.NET Core Web Web Server. You’ll also see a lot of output from the Debug console. This is normal for the Warning level of output.
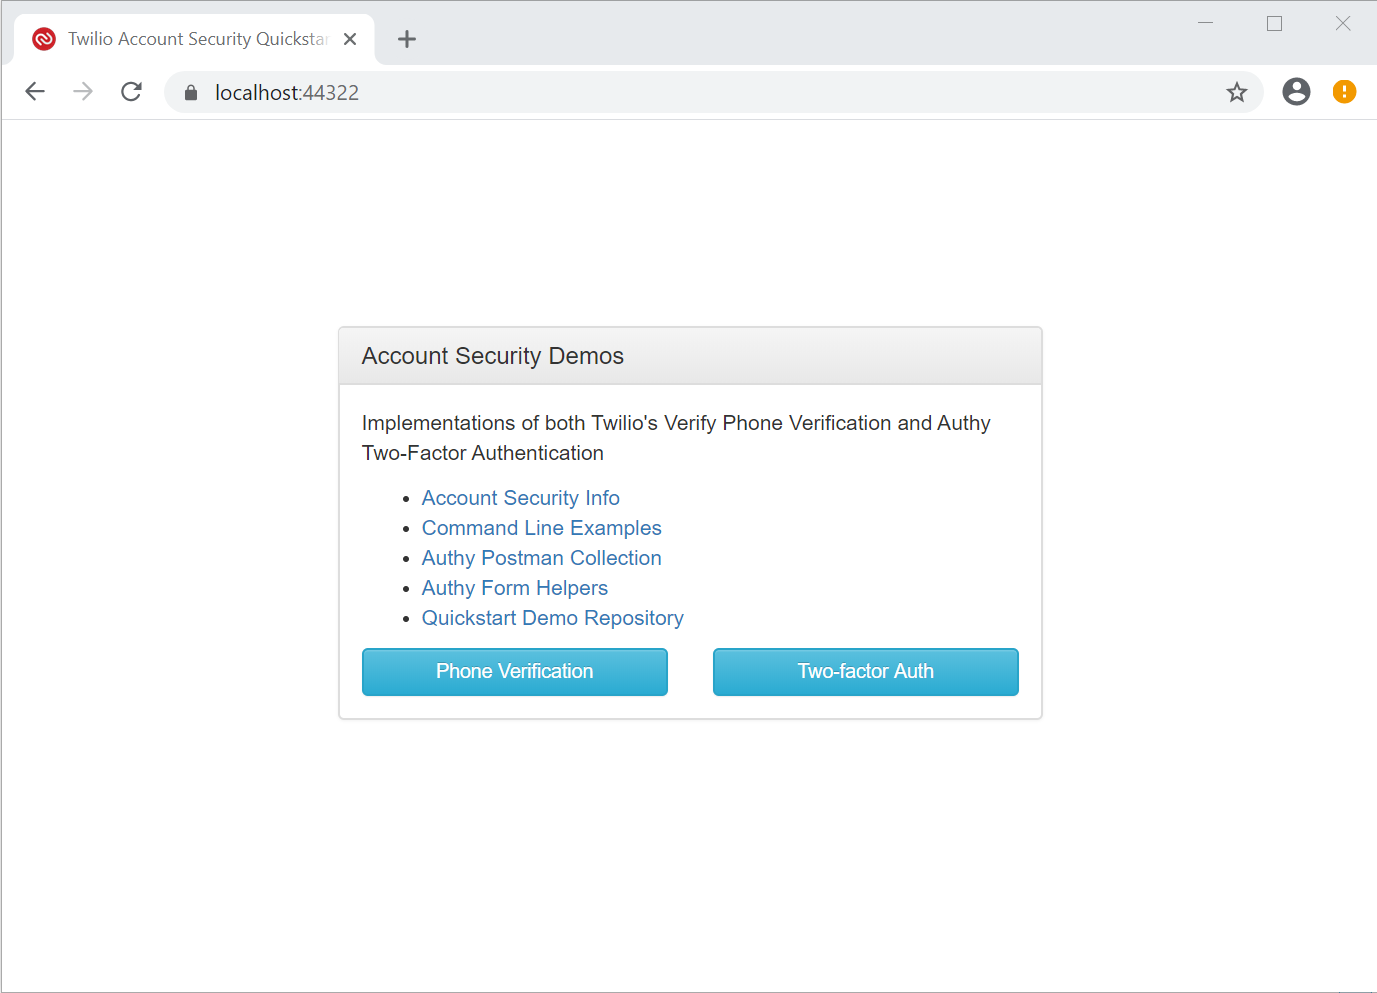
When the application starts successfully you’ll see a new browser window with a panel titled Account Security Demos and two buttons: Phone Validation and Two-factor Auth.
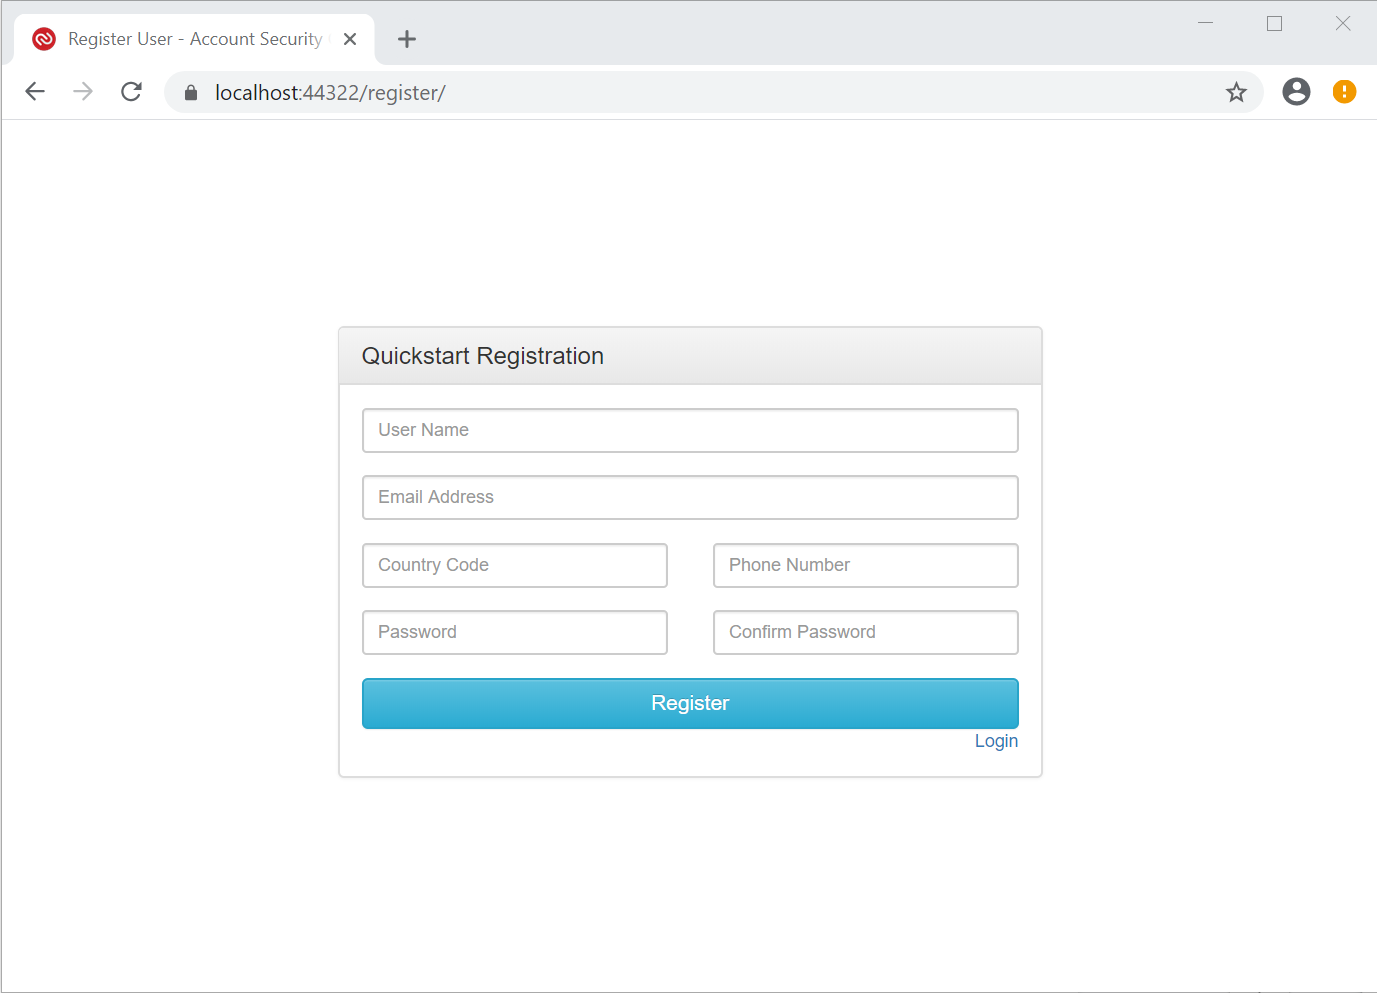
Go to https://localhost:44322/register in this browser window. (Your port number will probably be different.)
You should see a web page with a panel titled Quickstart Registration. This page is rendered by the AngularJS front end RegistrationController function in app.js using register/index.html.
Enter the following information in the associated fields:
- User Name: keep this short, alphanumeric, and no spaces
- Email Address: use a valid email address, such as the one you used to sign up with Twilio
- Country Code: use the numeric country code for the phone number you’re going to enter
- Phone Number: enter the mobile phone number you registered when you signed up for Twilio
- Password and Confirm Password: 7+ characters, alphanumeric, 1+ capital letter, 1+ number, one non-alpha character (!@#$%^&*)
Click Register.
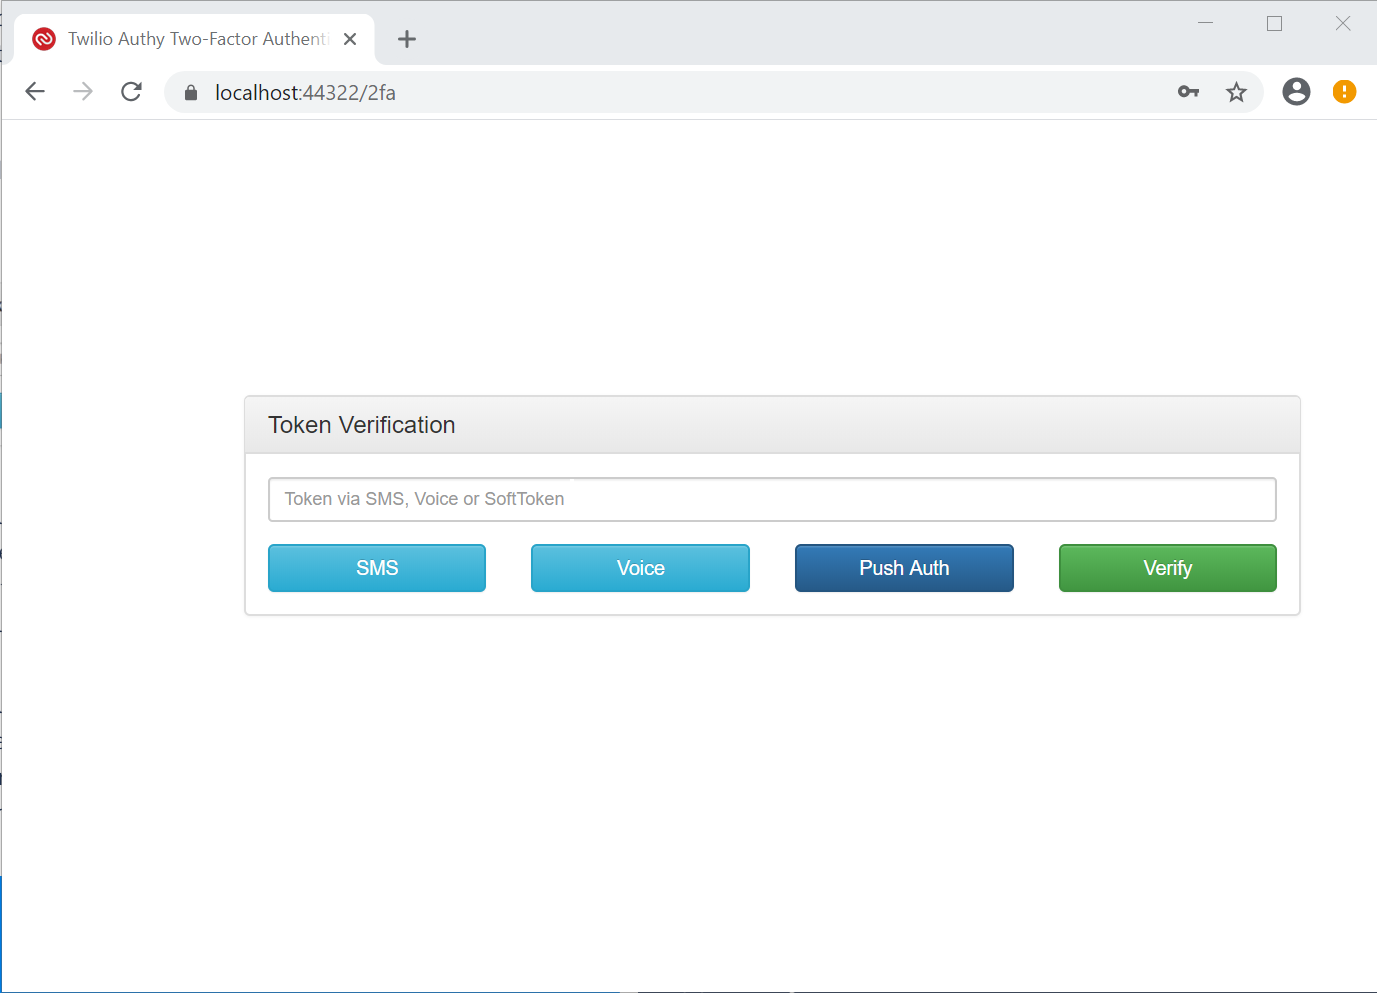
You’ll be redirected to https://localhost:44322/2fa. (Your port number will probably be different.) You’ll see a panel titled Token Verification with a textbox and four buttons.
Testing SMS authentication
Click the SMS button and check your mobile phone. In a few moments you should receive an SMS message containing “AuthyDotNet21 security code:” and a 7-digit number.
Enter the number in the Token via SMS, Voice, or SoftToken textbox and click the Verify button. You should be redirected to the page at https://localhost:44322/protected, which has a panel titled Protected by Twilio Authy 2FA.
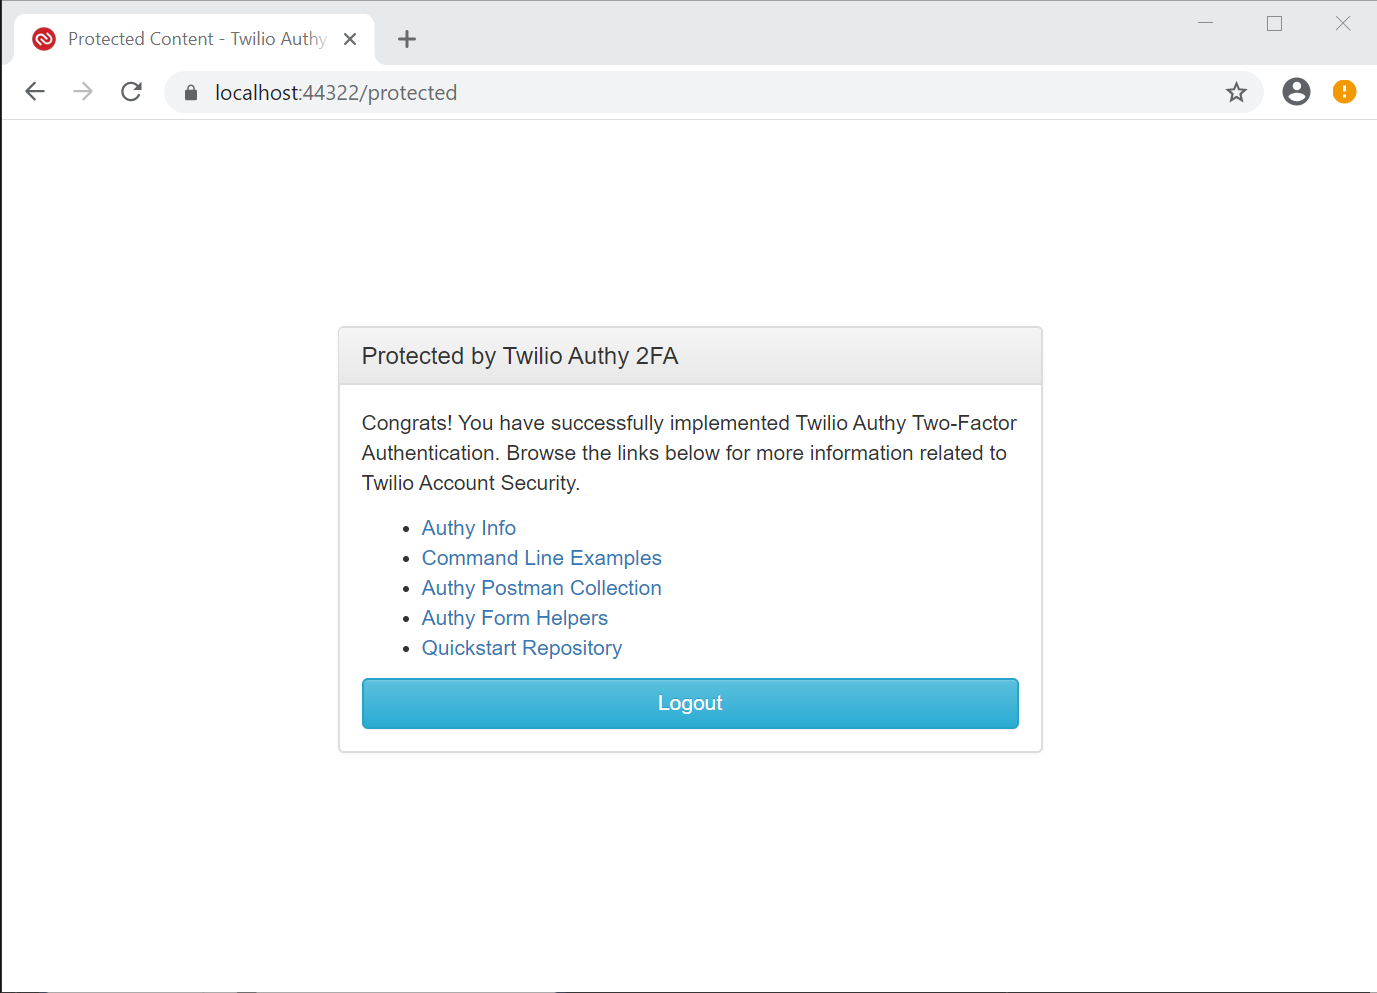
This indicates that:
- The phone number you entered has been successfully verified through Twilio Authy.
- The user credentials you entered have been registered with the ASP.NET Core Identity system and stored in the SQL Server Express 2016 LocalDB database.
To verify the user’s registration with Authy, open your Twilio console dashboard, go to the Authy section, select the AuthyDotNet21 application, and select Users. You should see the email address you provided along with an Authy ID number and a Status of Active. Make note of the Authy ID number.
To verify that the user information is recorded in the ASP.NET Core Identity database tables, connect to the database with Microsoft SQL Server Management Studio, LinqPad, or the Visual Studio SQL Server Object Explorer and execute the following SQL query:
You should see a record containing your user name, email address, and (way over to the right) the same value for Authy ID that you saw in the Twilio console.
Testing Voice authentication
On the Protected by Twilio Authy 2FA panel, click Logout. You should see the Account Security Demos panel.
You should see the Account Security Demos panel.
Click the Two-factor Auth button. You should see the Quickstart Registration panel again.
Underneath the Register button you should see a Login link. Click it. You should be redirected to the https://localhost:44322/login page.
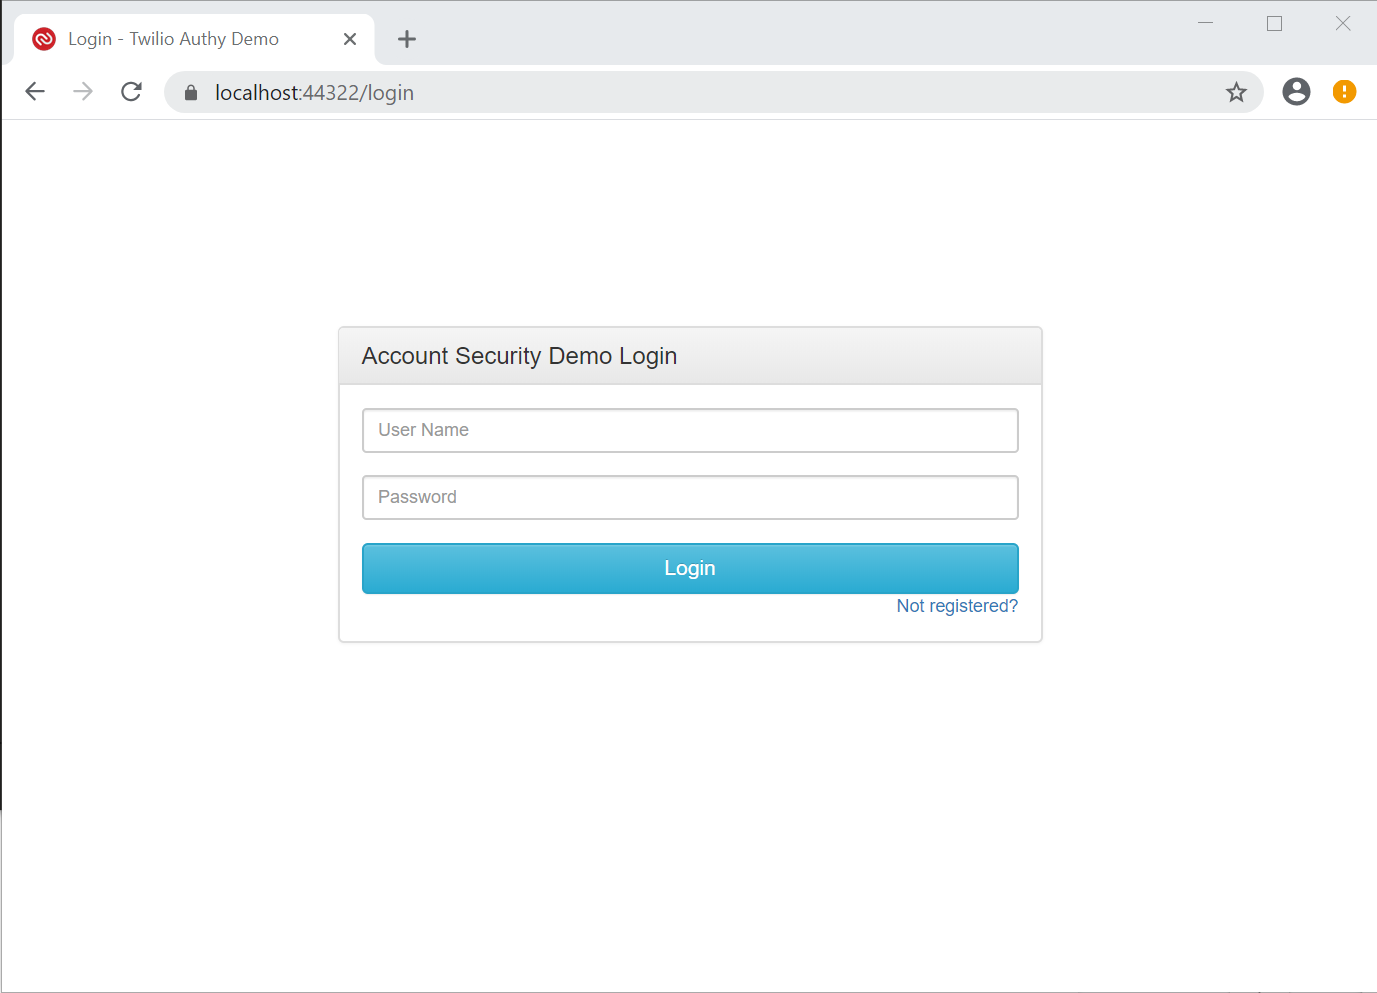
Enter the user name (not the email address) and password you used during the registration process and click Login.
You should be redirected to the /2fa page and see the Token Verification panel again.
Click the Voice button and accept the next call you receive on your mobile device. Enter the numbers spoken by the automated voice and click Verify. You should be redirected to the /protected page and see the Protected by Twilio Authy 2FA panel again.
Understanding Push authentication
Push authentication using the Push Auth button in the Token Verification panel of the /2fa page requires setting up a webhook for the application you created in the Twilio console. You can find more information on Twilio Docs – Authy Push Authentications.
Next steps
To get a better understanding of push authentication you can complete the implementation required to use the Authy apps for Android and iOS. There are also other projects you can undertake to gain experience with ASP.NET Core Identity and Twilio Authy:
Update from ASP.NET Core 2.1 to 3.1 – This will involve some general changes to the app as well as some decisions about how you are going to handle the user interface. But once you’ve made the leap from 2.1 to 3.1 you’ll be better positioned for the transition from 3.1 to 5.0. You can learn more about the process in the Migrate from ASP.NET Core 2.2 to 3.0 article on docs.microsoft.com and the related migration articles in the same section.
Update from AngularJS to Angular – If you’re going with a SPA on the front end and a REST API on the backend, consider implementing the front end with a new and improved version of Angular. It will, of course, depend on your interest in learning TypeScript.
Convert from AngularJS to Razor Pages – One of the advantages of moving to ASP.NET 3.1 is the opportunity to take advantage of the Razor Pages features of ASP.NET Core Security.
Additional resources
Consult the following sources for a deeper understanding of topics related to the material covered in this post:
Authy API – Twilio Docs reference information for the Authy REST API.
Authy Reporting API – Twilio Docs reference information for the reporting API, which offers powerful query capability to get detailed information about your Authy application activity.
Overview of ASP.NET Core authentication – docs.microsoft.com reference information and tutorials for understanding authentication features and building them into the design of your websites.
TwilioQuest – Learn more about Twilio products and sharpen your programming skills in a variety of languages while playing an exciting video game! Join TwilioQuest and help defeat the forces of legacy systems!
AJ Saulsberry is a Technical Editor @Twilio. Get in touch with him if you’d like to contribute your own post on the Twilio blog to help other developers build better .NET Core software.

Related Resources
Twilio Docs
From APIs to SDKs to sample apps
API reference documentation, SDKs, helper libraries, quickstarts, and tutorials for your language and platform.
Resource Center
The latest ebooks, industry reports, and webinars
Learn from customer engagement experts to improve your own communication.
Ahoy
Twilio's developer community hub
Best practices, code samples, and inspiration to build communications and digital engagement experiences.