Build a GraphQL API with Subscriptions using Python, Asyncio and Ariadne
Time to read:
January 15, 2021
Written by

In my previous GraphQL article, we learnt about creating a GraphQL API that implements queries and mutations. GraphQL, however, has a third type of operation called subscriptions.
Nowadays, most applications have a real-time component. For example, social media applications notify you in real time of new messages, or ride hailing apps stream the driver’s location in real time. GraphQL subscriptions allow a server to send real time updates to subscribed clients each time new data is available, usually via WebSocket.
In this tutorial, we will build a project in which the server pushes messages sent by other users to subscribed clients.
Requirements
The only requirement to follow this tutorial is to have Python 3.6 or higher installed. If you don’t have it installed, get it here.
Create a Python virtual environment
We will install a few Python packages for our project. A virtual environment will come in handy as it will give us an isolated Python environment that will not affect other Python projects. Let’s go ahead and create one now.
Create a directory called chat_api for our project and navigate to it.
Create the virtual environment:
If you are using a Mac OS or Unix computer, activate the virtual environment as follows:
To activate the virtual environment on Windows, use the following command:
We install uvicorn with the “standard” option since that brings optional extras like WebSocket support.
What we will build
We will build a GraphQL API that allows users to message each other. The goal is to implement the following:
- A mutation to create a new user. A user will have a
user_idand ausername. - A mutation to create a new message. A message will have a
senderand arecipient. - A query to retrieve the
user_idof a user given its username. - A query to list all the messages addressed to a user.
- A subscription that sends new messages to subscribed clients when they are created.
Asynchronous servers in Python
ASGI is an emerging standard for building asynchronous services in Python that support HTTP/2 and WebSocket. Web frameworks like Flask and Pyramid are examples of WSGI based frameworks and do not support ASGI. Django was for a long time a WSGI based framework but it has introduced ASGI support in version 3.1.
ASGI has two components:
- Protocol Server: Handles low level details of sockets, translating them to connections and relaying them to the application
- Application: A callable that is responsible for handling incoming requests. There are several ASGI frameworks that simplify building applications.
As an application developer, you might find that you will be mostly working at the application and framework levels.
Examples of ASGI servers include Uvicorn, Daphne and Hypercorn. Examples of ASGI frameworks include Starlette, Django channels, FastAPI and Quart.
Ariadne provides a GraphQL class that implements an ASGI application so we will not need an ASGI framework. We will use the uvicorn server to run our application.
Async in Python using asyncio
The asyncio library adds async support to Python. To declare a function as asynchronous, we add the keyword async before the function definition as follows:
We can call asynchronous functions in 3 ways:
asyncio.runasyncio.create_task- Using the
awaitkeyword
Using await, we would call our asynchronous function as follows:
We will use the third approach throughout the article. It is important to note that we can only use await inside an asynchronous function. This article provides an in-depth introduction to asyncio in Python.
Writing the GraphQL schema
Create a file called schema.graphql. We will use it to define our GraphQL schema.
Custom types
Our schema will include five custom types, described below.
The User type represents a user of the application and has two fields:
username: A string.userId: A string.
The Message type represents a message and has three fields:
content: String representing message content.senderId: user id of the sender.recipientId: user id of the recipient.
createUserResult is the return type for the createUser mutation we will create later. It has three fields:
user: An object of type User.success: Boolean flag indicating whether an operation was successful.errors: A list of errors if any that occurred during processing.
createMessageResult is the return type for the createMessage mutation we will create later. It has three fields:
message: An object of typeMessage.success: Boolean flag indicating whether an operation was successful.errors: A list of errors if any that occurred during processing.
messagesResult is the return type for the messages query and it has three fields:
messages: A list whose elements are of typeMessage.success: Boolean flag indicating whether an operation was successful.errors: A list of errors if any that occurred during processing.
Let’s add these types to the new schema.graphql file:
Queries
Our schema will define the following queries:
hello: Returns the StringHello World. We will use this query to test that our GraphQL APi is running. We will then remove it.messages: Accepts auserIdand returns the messages for that user.userId: Returns the user id of the user with the given username.
Add these queries at the bottom of schema.graphql:
Mutations
Our API will have two mutations:
createUser: Accepts ausernameand creates a user.createMessage: Accepts the user ID of the sender, the user ID of the recipient and the content of the message as a string, and creates a message that will be delivered to the recipient.
Add the mutation definitions at the bottom of schema.graphql:
Subscriptions
In the GraphQL schema, subscriptions are defined similarly to queries. We will have one subscription, called messages. It will take a userId argument and the API will return messages for that user, as soon as they are created.
Let’s define the subscription at the end of the schema.graphql file:
To complete the schema and tie everything together, add the code below to the top of the schema.graphql file:
Setting up the project
Create a file called app.py and add the code below:
We read the schema defined in the schema.graphql file and added a simple query called hello that we will use to test that our server is running. Our server is now ready to accept requests.
Start the server by running:
Open the GraphQL PlayGround by visiting http://localhost:8000. Paste the hello query below and hit the “Play” button:
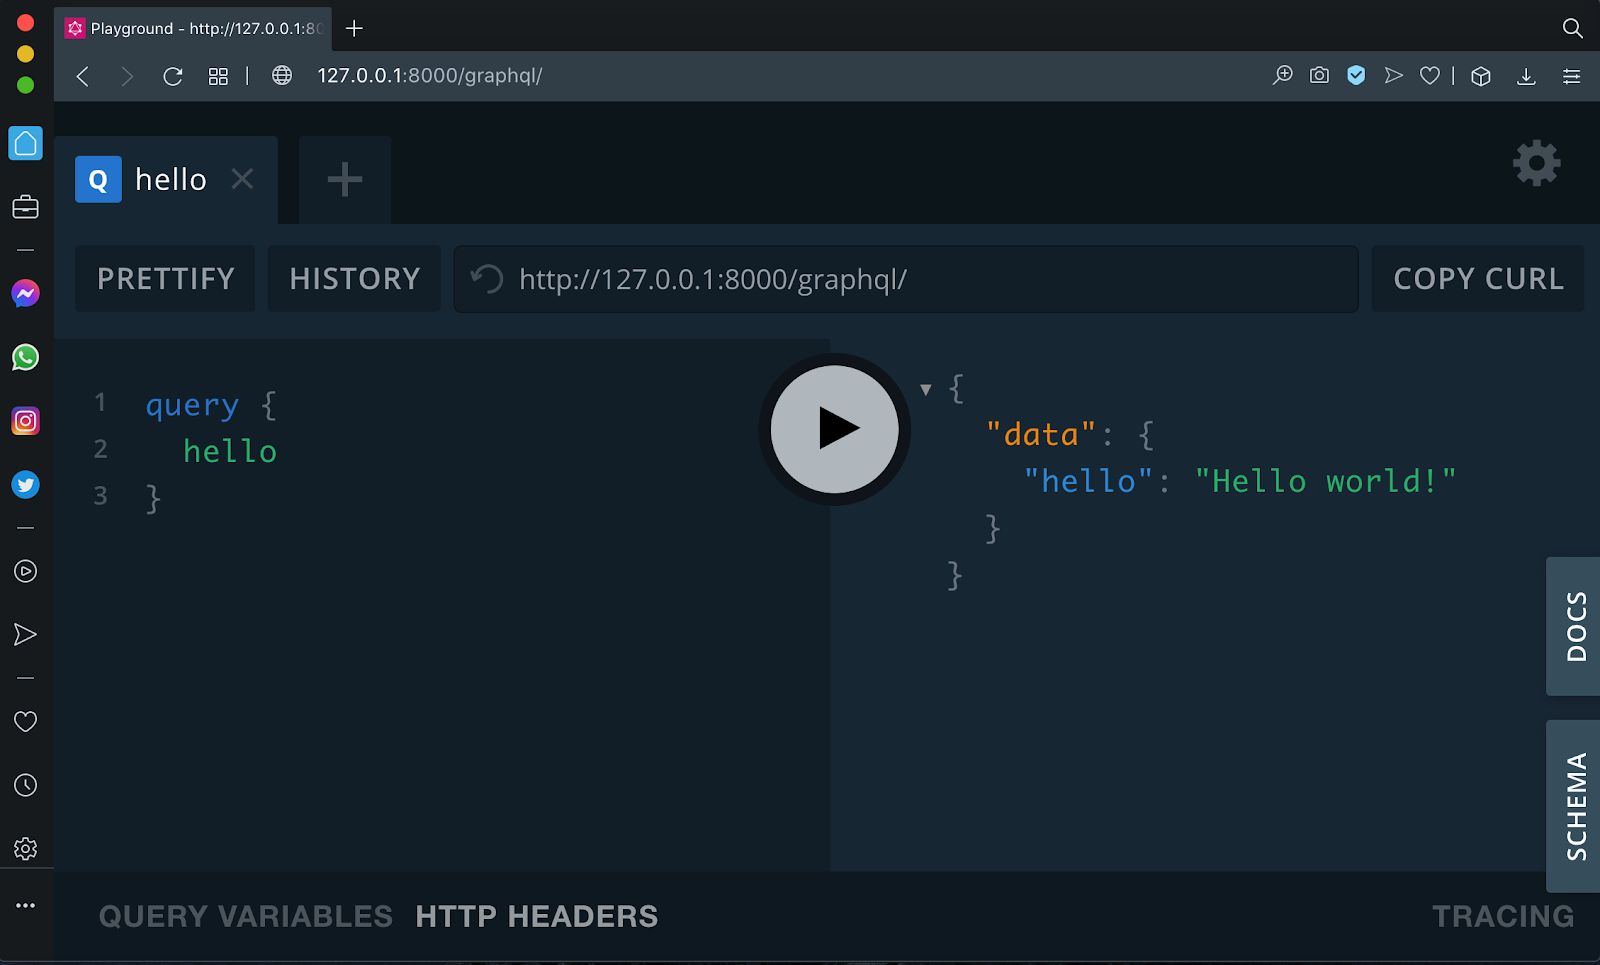
Congratulations, your GraphQL server is running!
Once you confirm that the server is running fine, you can delete the resolve_hello function from app.py and delete the hello query in the type Query section of schema.graphql.
Storing users and messages
Since this article discusses GraphQL operations with an emphasis on subscriptions, we will skip the database component entirely and store our data in memory. We will use two variables for this:
users: A python dictionary where the keys are usernames and the values are the user details.messages: A python list which will store all messages
Create a file called store.py. Initialize users to an empty dict and messages` to an empty list.
Defining the mutations
Let’s add resolvers for the mutations defined in the schema. These will live inside a file called mutations.py. Go ahead and create it.
First add the createUser resolver to mutations.py.
We import ObjectType and convert_kwargs_to_snake_case from the Ariadne package. ObjectType is used to define the mutation resolver, and convert_kwargs_to_snake_case recursively converts arguments case from camelCase to snake_case.
We also import users and messages from store.py, since these are the variables we will use as storage for our users and messages.
Inside resolve_create_user, we check if a user with the given username exists. If the username exists, we return an error message warning that the username is taken. If the username is new, we create a dictionary to store user_id and username and add it to users with the user’s username as the key. We calculate the user_id by taking the length of the users dictionary and adding one to it.
Next, we add the resolver for creating a new message after the resolve_create_user function in mutations.py:
In resolve_create_message, we create a dictionary that stores the attributes of the message. We append it to the messages list and return the created message. If successful, we set success to True and return success and the created message object. If there was an error, we set success to False and return success and the error message.
We now have our two resolvers, so we can point Ariadne to them. Make the following changes to app.py:
At the top of the file, import the mutations:
Then add mutation to the list of arguments passed to make_executable_schema:
Defining the queries
Now we are ready to implement the two queries of our API. Let’s start with the messages query. Create a new file, queries.py and update it as follows:
The resolve_messages function accepts a user_id argument and returns a list of messages for that user. We use the Python standard library function filter, which accepts a function and an iterable and returns the elements from the iterable for which the function returns True. The implementation filters messages for messages where the sender_id or recipient_id match the user_id passed as an argument.
Let’s implement the userId query by adding the following code at the end of queries.py:
The resolve_user_id function accepts a username, checks whether a user with that username exists, and in that case returns their user_id. If no user is found, then None is returned.
We are now ready to register the two queries with Ariadne. Replace all the code in app.py with the updated version below:
Real time message notifications
One defining feature of chat applications is receiving notifications of new messages in real time. We want to implement similar functionality in our GraphQL API. In a conventional HTTP request/response cycle our clients would need to poll the API at regular intervals to see if there are any new messages.
The problem we want to solve is informing our clients in real time as soon as new messages are available. For this we will use the subscriptions feature of GraphQL.
At a high level, each active subscription will have a queue, on which new messages are published. This will enable the client subscription to watch the queue for new messages.
Introduction to message queues
Python provides implementations of a FIFO queue in queue.Queue and asyncio.Queue. We will use asyncio.Queue since it is specifically designed to be used in async/await code.
We initialize an asyncio queue as follows:
maxsize is an optional argument that defines the maximum number of items allowed in the queue. If maxsize is zero, less than one or not provided, the queue size is infinite.
The following example shows how to add items to a queue:
The asyncio.Queue.put method adds an item into the queue. If the queue is full, the call blocks until a free slot is available to add the item.
To retrieve items from the queue the asyncio.Queue.get method is used:
The asyncio.Queue.get method returns the first item from the queue. If the queue is empty, it blocks until an item is available. For each get() used to fetch an item, a subsequent call to task_done() is used to tell the queue that the processing on the item is complete.
Adding new messages to a queue
Now that we know how to work with a queue we can add queuing support to our API. Whenever a client subscribes to the messages of a user, a queue for the subscription will be created. Replace the contents of store.py, with the following updated version:
The new queues list will hold the queues that are allocated by the active subscriptions.
Next, we will import the list of queues into our mutations file. Add the following import to mutations.py:
Finally, let’s rewrite the resolve_create_message function to pass new messages to all the subscription queues:
Take note of the line await queue.put(message). This is where we add the newly created message to each of the queues that will be watched by active subscriptions.
Subscribing to new messages
New messages are now being added to subscription queues, but we do not have any queues yet. All that is remaining is implementing our GraphQL subscription to create a queue and add it to the queues list, read messages from it and push the appropriate ones to the GraphQL client.
In Ariadne, we need to declare two functions for every subscription defined in the schema.
- Subscription source: An asynchronous generator that generates the data we will send to the client. This is where we will read new messages from the queue.
- Subscription resolver: This tells the server how to send the data received from the subscription source to the client. The return value of the subscription resolver needs to match the structure defined in the GraphQL schema.
Subscription source
Create a new file, subscriptions.py and define our subscription source in it as follows:
Several things are happening here. First, we import Ariadne utilities to set up our resolver, then we import the queue list, and finally we initialize a subscription type.
Inside the messages_source function, we create a new queue and add it to the list. From this point on, the createMessage mutation will add new messages to this queue.
Inside the while-loop, we check for new messages being posted to the queue. When a message is retrieved, we check if the recipient_id matches the user_id provided by the client of the subscription. This makes sure that we only act on messages that were sent to this user and not to others.
If the recipient_id matches the provided user_id, we yield the message, which will tell Ariadne that it needs to notify the client. If the recipient_id does not match the user_id, it means that the message belongs to a different user, so we do nothing and go back to wait for the next message.
When the subscription is removed by the client, this function is going to be cancelled. We catch the CancelledError exception and at that point we remove the queue from the list.
Subscription resolver
All that is remaining to complete our API is to implement a subscription resolver. In our resolver, we will define how the message yielded from the subscription source will be sent to the client.
Add the following code at the end of subscriptions.py:
The messages_resolver function receives three arguments:
-
message: This the value yielded by the subscription sourcemessages_source. info: Context information passed to subscription resolvers.user_id: The user_id passed in the subscription call made by the client.
The return value of messages_resolver needs to adhere to the expected return type defined in the GraphQL schema. We return message as it is without further processing since the return value of our subscription source is a dictionary with the expected structure.
Finally, let's bind our subscription so that they are available on the GraphQL API.
Add this import near the top of the app.py file:
Then replace the code that creates the schema variable with the following updated version:
All the hard work is done! Now comes the easy part; seeing the API in action. Open the GraphQL Playground by visiting http://localhost:8000.
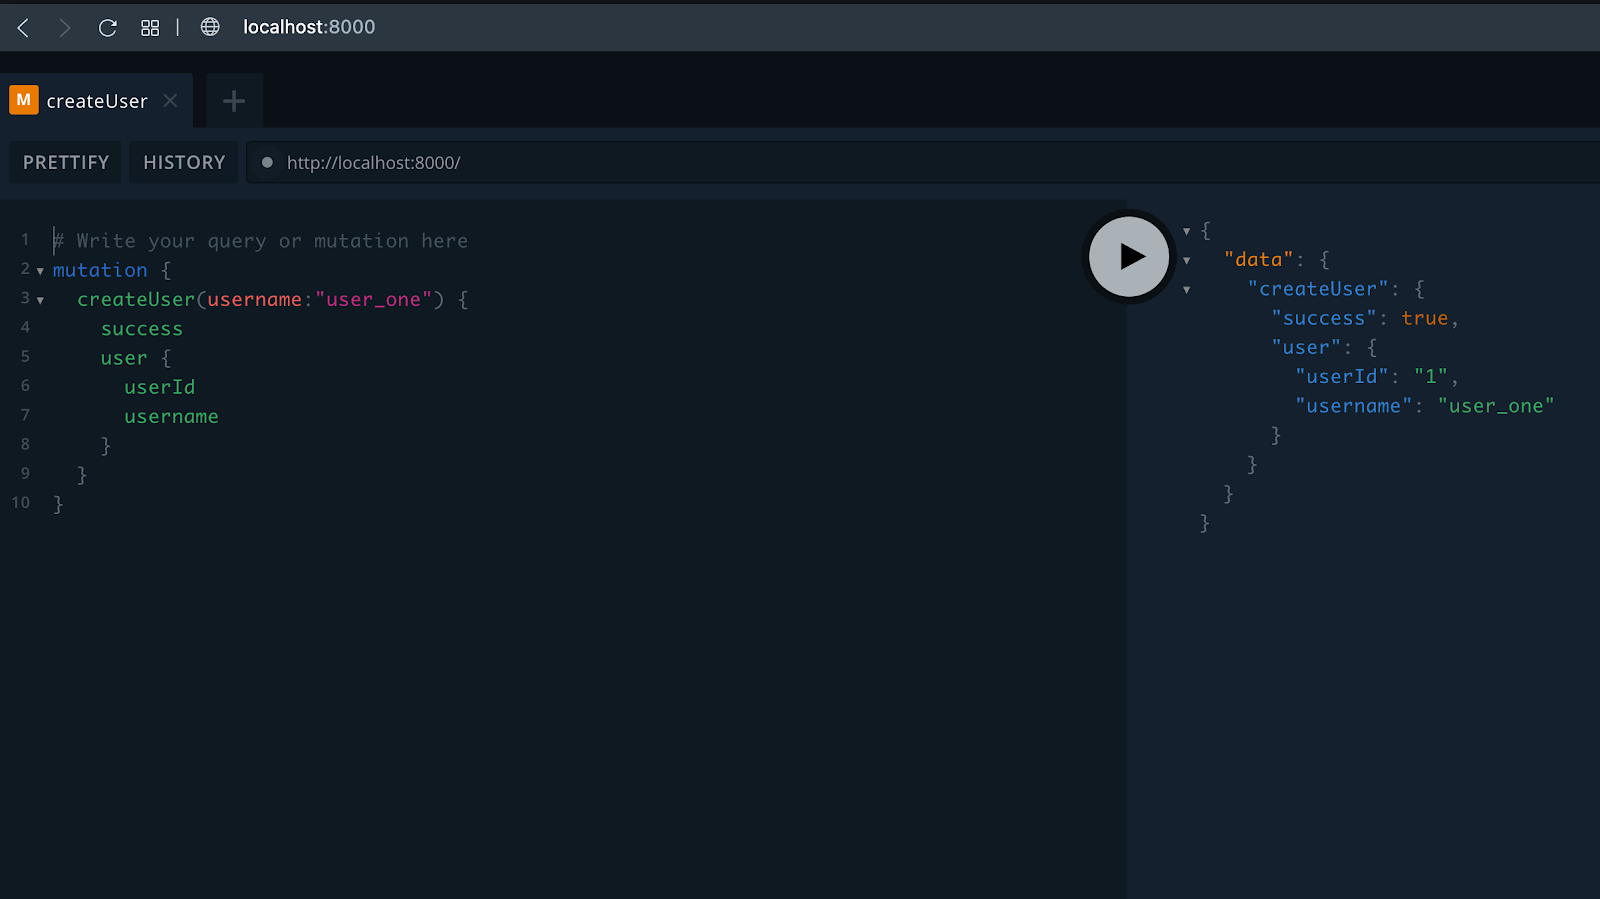
Let’s begin by creating two users, user_one and user_two. Paste the following mutation and hit play.
Once the first user is created, change the username in the mutation from user_one to user_two and hit play again to create the second user.
Now we have two users who can message each other. Our createMessage mutation expects us to provide senderId and recipientId. If you looked at the responses from the createUser mutations you already know what IDs were assigned to them, but let’s assume we only know the usernames, so we will use the userId query to retrieve the IDs.
Paste the query below in the GraphQL Playground and hit play to query for the user ID of user_one:
Take note of the userId returned and repeat the same for user_two. If you are following the tutorial instructions, you should have userId == ”1” for user_one and userId == ”2” for user_two.
Next, we are going to test sending and receiving messages. Open a second GraphQL Playground window and position it side by side with the first.
In the first window, we will execute the messages subscription to subscribe to incoming messages for user_two. In the second window, we will execute the createMessage mutation to send a message from user_one to user_two.
In the first window, paste the following subscription in the GraphQL editor and hit play:
If your user_two had a different id, then replace “2” above with the correct userId.
A WebSocket connection is now created and our client (GraphQL Playground) is listening for notifications and ready to receive new messages as they are sent to user_two.
On the second Playground window, paste the following mutation to send a message and hit the play button:
Remember to replace senderId with the appropriate user id for user_one and recipientId with the appropriate user id for user_two if they are different.
When we execute the createMessage mutation, the same message is pushed to the client as a response in the window running the subscription. Feel free to send as many messages as you want to user_two and watch them show up on the subscription window in real time.
Conclusion
Congratulations for completing this tutorial. We learnt about ASGI, how to add subscriptions to a GraphQL server built with Ariadne, and using asyncio.Queue.
To learn more about ASGI, you can get started with this gentle yet detailed introduction to ASGI, written by the author of Uvicorn and Starlette. Using coroutines (async/await) is just one way to add async capabilities to an application. To understand more about sync v async python and the various ways you can add async capabilities to an application, read this article that compares both in depth.
This was just a simple API to demonstrate how we can use subscriptions to add real time functionality to a GraphQL API. The API could be improved by adding a database, user authentication, allowing users to attach files in messages, allowing users to delete messages and adding user profiles.
If you are wondering how you can incorporate a database to an async API, here are two options:
- aiosqlite: A friendly, async interface to sqlite databases.
- gino: A lightweight asynchronous ORM built on top of SQLAlchemy core for Python asyncio. Note that gino only supports PostgreSQL at this time.
I can't wait to see what you build!
Alex is a developer and technical writer. He enjoys building web APIs and backend systems.


Related Resources
Twilio Docs
From APIs to SDKs to sample apps
API reference documentation, SDKs, helper libraries, quickstarts, and tutorials for your language and platform.
Resource Center
The latest ebooks, industry reports, and webinars
Learn from customer engagement experts to improve your own communication.
Ahoy
Twilio's developer community hub
Best practices, code samples, and inspiration to build communications and digital engagement experiences.