How to Write Custom Queries Using JdbcTemplate In Spring Boot
Time to read:
March 22, 2022
Written by
Reviewed by

When developing applications it is crucial for a developer to understand the abstractions behind the libraries that are used in the application. This will help the developer understand the code better and assist them in writing efficient applications.
In this tutorial, you will learn how to write custom queries using JdbcTemplate which is a wrapper class for writing row JDBC queries. There are other implementations that are much more convenient than JdbcTemplate such as Hibernate and the Java Persistence API (JPA) because these API’s hide the actual implementations from the developer and only expose the necessary details such as the methods to insert, update and delete records from your database.
When you decide to use JdbcTemplate as opposed to Hibernate and the Java Persistence API you are prone to have boilerplate code in your application. The benefit of using JdbcTemplate is that it provides low level access to your queries providing flexibility and the ability to work with stored procedures.
To work efficiently using these abstractions it is crucial to understand how the code works behind the scenes, which is made possible by leveraging JdbcTemplate.
Prerequisites
- Knowledge of some Java programming basics.
- Knowledge of some SQL.
- Java development Kit(JDK) 11 or above.
- MySQL - a database management system that you will use to store, retrieve, and update your data.
- Intellij - an integrated development environment that you will use to edit your code.
- Postman - an application that you will use to test your API’s.
Setting up your Spring Boot project with JdbcTemplate
Go to Spring Initializr and generate a new Maven project on Spring Boot version 2.6.3 with the following dependencies:
Spring Webwill allow you to create different http requests such as GET, POST, and DELETE to be executed on our web services.MySQL Driverwill provide connection functionality to your database to ensure transactions are complete.Flyway Migrationwill allow you to manage your database tables by creating, editing, and deleting them each time a new migration is added.JDBC APIwill allow us to use theJdbcTemplateto write our custom queries by leveraging the different methods it provides.Validationwill allow us to add constraints to the inputs to ensure correct and consistent data is saved into the database.
In the Project Metadata section, enter "com.twilio" as the Group id and "jdbcTemplate'' as the Artifact ID. The Package name section shows the "com.twilio.jdbcTemplate" folder structure that your project will have when you import it into the development environment.
Make sure that the Packaging is set to "Jar" and the project has Java version 11 as seen below:
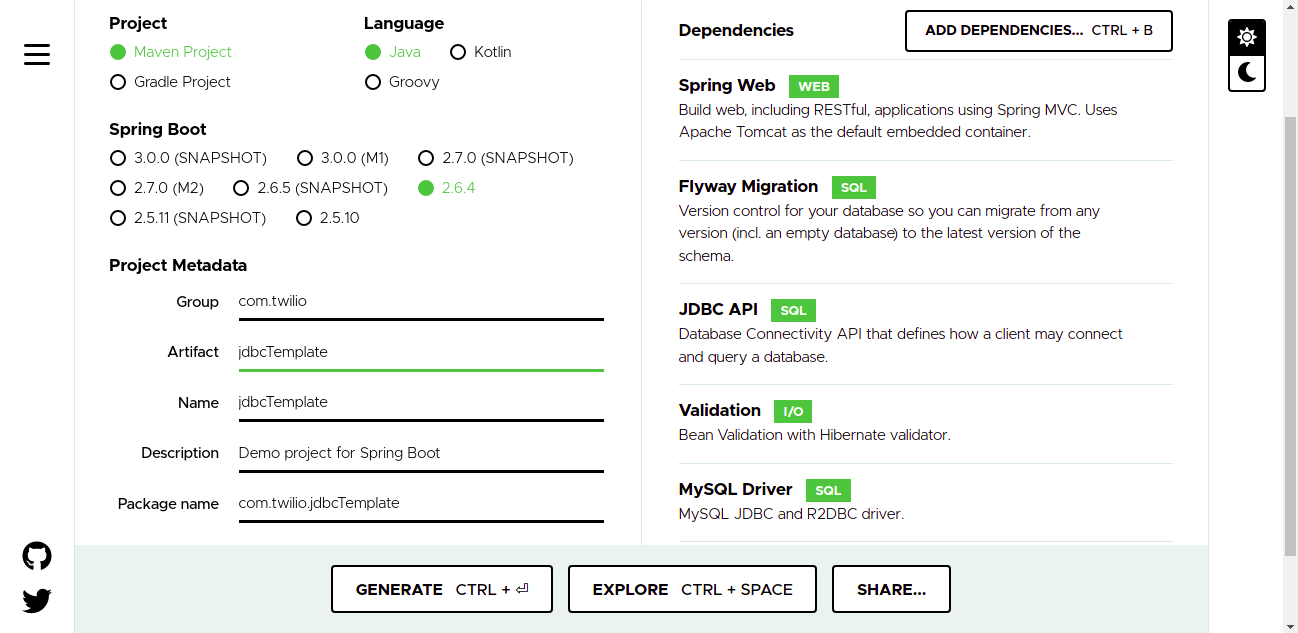
Click the Generate button below.
After generating the project, unzip the zipped folder and open your IntelliJ IDEA. To import the project, click on File at the top navigation toolbar , then select Open… A window showing the folder structure of the computer will open. Navigate to the location where you unzipped your "demo" Spring Boot folder and click the folder.
Intellij will open the folder and the dependencies will be downloaded from the Maven central repository if they are not in the local repository. You should ensure that you have an active internet connection to ensure your dependencies are downloaded.
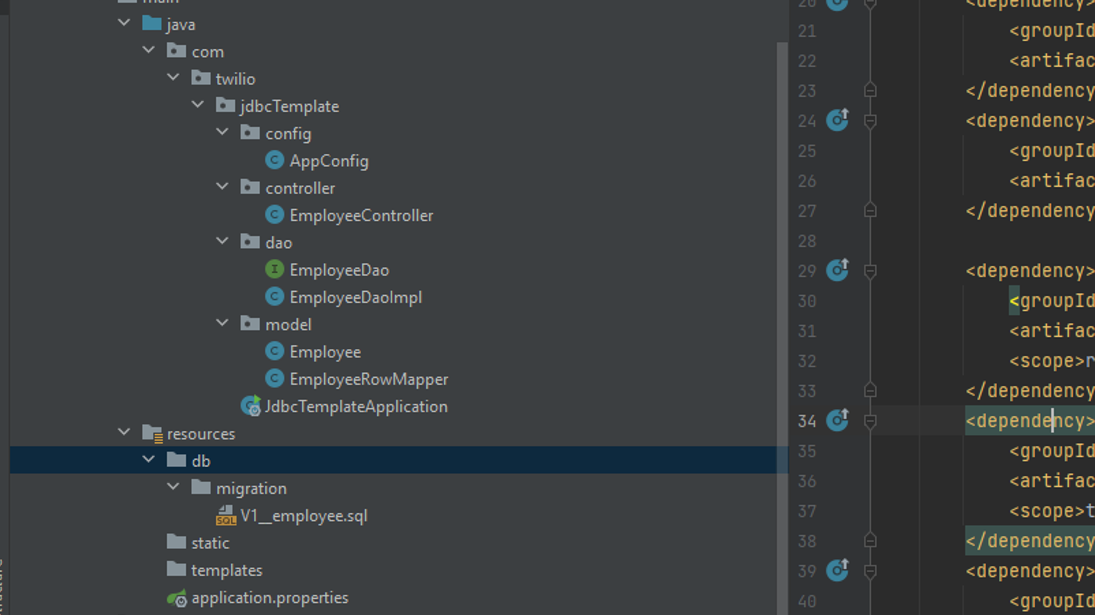
The following image shows the folder structure of your application.
Set up the database and access credentials
The database that we will use for this tutorial is MySQL and you can follow the guide on how to install MySQL on your computer. Create a username and password for yourself during installation as you will use the credentials later in the application.
To verify that MySQL was installed successfully you can use MySQL Workbench or your computer's command line editor to login to the database server. To test whether the database server was installed using the command line, add the location of the MySQL bin folder to the computer's system variables to ensure the commands we use are recognized by the machine.
Use the following command to login to the MySQL database server. The -u is a flag that shows you provide the username and the -p flag prompts for the password once you press enter. Provide the username and password that you specified during the database installation.
After the login has been successful, use the following command to create a database that will hold our entity to capture data.
Configure data source properties in Spring Boot
To ensure our applications connect to the database you need to provide the connection details in a file named application.properties. In this tutorial, you will use Spring Boot autoconfiguration to configure a data source automatically.
The application.properties file is located in the root of the project folder src/main/resources and was created when you initialised the project. To ensure that your data source is autoconfigured, append the prefix of the data source properties with spring.datasource followed by the property type and value. The main properties required to ensure that you connect to the database successfully are the database URL, username, and password.
Copy and paste the following to the applications.properties file and save:
Configure JdbcTemplate
Under the com/twilio/jdbcTemplate create a package named config. Right click on the config package and create a new class named AppConfig which you will use to configure JdbcTemplate.
Copy and paste the following code snippet and replace the pregenerated contents of the AppConfig.java file:
The @Configuration annotation indicates that this class will hold a collection of beans for our application.
To configure your JdbcTemplate, we need to add a bean definition of JdbcTemplate. This definition is a method that accepts a data source containing the connection details and returns a new JdbcTemplate containing this data source passed to it through its constructor.
The @Bean annotation to this method indicates that it will be managed by the spring context and we do not need to create a new instance whenever we want to use it.
Create a model class
This denotes the entity in the database that you will use to store different records for the different objects created in our application. Create a package named model under the com/twilio/jdbcTemplate folder.
Inside this package, create a class named Employee with the following properties:
idfirstNamelastNameemail
Generate getters, setters, and toString() methods that you will use to retrieve the data from our request and view the data to the console for testing purposes.
You will also need to generate a constructor with all the fields as arguments because you will use it when writing the queries.
Copy and paste the following code to the Employee.java package file:
The @JsonProperty annotation shows that this property will be used during serialisation and deserialisation of your JSON data.
The @NotBlank annotation shows that our application will not accept any null values and the size of the input is greater than zero.
Create a migration for employee entity
The flyway dependency that we added is important in this step as it will help us manage our database. Create a package named db under the resources package within the src/main/ subfolder.
Create another folder named migration under the db folder where all of your migrations will be located.
Create a file within the newly created subfolder and name it V1__employee.sql. Copy and paste the following SQL lines into the migration file to create the employee entity:
Define CRUD methods
This project will define and utilise the create, read, update, and delete operations, also known as CRUD. Each operation is defined by its own method and implemented in another class.
Create a package inside the com/twilio/jdbcTemplate folder named "dao". This package will contain our data access object functionality to interact with the database. There will be an interface named EmployeeDao consisting of methods to create, read, update, and delete.
Copy and paste the following code to the EmployeeDao.java interface:
Create Dao implementation
Create a class named "EmployeeDaoImpl" in the dao subfolder and implement the EmployeeDao interface. This is where JdbcTemplate is used and injected in the configuration class. Initialise a final JdbcTemplate object and create a constructor injection using this field.
Copy and paste the following code to the EmployeeDaoImpl.java class:
The @Autowired annotation above will automatically inject the JdbcTemplate into the implementation class.
Override all the methods from the EmployeeDao.java interface into the EmployeeDaoImpl.java class. This can be done automatically by pressing the ctrl+enter button on your keyboard if you are using a windows computer.
Implement a method to add employee
Since you declared the method in the interface you have just created, implement the method addEmployee() in the EmployeeDaoImpl.java class which accepts an Employee object. Inside this method is where you create the query to create an employee in the database.
The addEmployee() method utilises the updated() function from the JdbcTemplate class. The update method is overloaded, meaning it accepts different types of parameters than its usual parameters to perform insert, update, and delete operations. Use the update method that accepts a string containing your SQL query and object arguments.
The SQL string contains the bind parameters and the object arguments that will be used to perform a single insert operation.
Create a RowMapper
When retrieving records from the database you need a way to map the rows to objects. This functionality can be added to your application by leveraging a functional interface known as RowMapper that provides a method to map the rows to objects.
Create a class named EmployeeRowMapper under com/twilio/jdbcTemplate/model and implement RowMapper with the code below. Override the mapRow() method and return a new employee object's specific property retrieved with the ResultSet method.
Copy and paste the following code in the EmployeeRowMapper.java class.
Since the functional interface is generic and you are retrieving objects of type employee, pass the Employee object as the type parameter.
Implement a method to find all employees
Override thefindAll() method to return a list of employees retrieved from the database. When retrieving records from the database you use the query() method provided by JdbcTemplate.
To retrieve records from the database you need to map all the records to objects. The JdbcTemplate query method accepts a string containing your SQL query and a RowMapper to make this possible.
The SQL string contains a query to select all the records from the database and the RowMapper maps each of the records to an employee object using the method you have implemented above.
Copy and paste the following code into the EmployeeDaoImpl.java class.
Implement a method to find employees by ID
Implement the method named findById() which accepts a single parameter of type integer. This integer value is used to search for an employee who has an ID that matches with the passed ID. This method is similar to the one we have implemented above except that we specify the ID.
The JdbcTemplate query method is overloaded and provides a method that accepts three parameters consisting of an SQL string to select based on ID, a RowMapper to map the returned row to an object, and an id to be bound to the query.
Copy and paste the following code in the EmployeeDaoImpl.java class.
Since we are expecting a single result, you can return an optional and use the findFirst() method to return the first value that is matched with the id you have passed.
Implement a method to update employee
The update method provided by JdbcTemplate can be used for insert, update, and delete operations. Override the updateEmployee() method that contains an ID for the employee in the database to be updated and the employee object to be updated.
Create a SQL string to update the employee by ID and pass the string to the update method of JdbcTemplate followed by object arguments of type string which are the first name, last name and email. Note that the ID is only used to find the employee to be updated but the ID itself is not updated.
Copy and paste the following code in the EmployeeDaoImpl.java class.
Implement a method to delete employee
Override the method named deleteEmployee() that contains one parameter of type integer. The integer indicates the ID of the employee to be deleted from the database. Create a SQL string to delete the employee by ID. Call the update method of JdbcTemplate and pass the string and the ID to be bound to the query.
Copy and paste the following code in the EmployeeDaoImpl.java class.
Create a controller class
Create a package named controller under the com/twilio/jdbcTemplate folder. In the controller package, create a class named EmployeeController and annotate it with the @RestController annotation.
Copy and paste the following code in the EmployeeController.java class.
The @RestController annotation means that this class is a controller for the web services in your application. Add @RequestMapping annotation to the class which adds the base path for our web requests. All the requests to this application will use the following base path: api/employee.
Inject the EmployeeDao which you will use to call the different implementations to perform create, read, update, and delete operations.
Implement a controller to add employee
Copy and paste the following code in the EmployeeController.java class to create a method named addEmployee() with a single parameter of type employee:
Annotate the method with @PostMapping to show that this method is handling your HTTP post requests and all the requests must have the /add path to ensure they are mapped to this method. Call the addEmployee() method of the EmployeeDao and pass the employee object to be created.
The @Valid annotation and @RequestBody before the employee parameter in the method. The @Valid annotation ensures that the data we provide is validated because you set @NotBlank on the firstName, lastName, and email fields in the Employee.java file. The @RequestBody annotation allows you to deserialize the JSON being passed from the client to a Java object in our application.
Implement a controller to find all employees
Copy and paste the following code in the EmployeeController.java class.
This method returns a list of employees and calls the findAll() method of the EmployeeDao which returns all the employees that have been created in the database. The methods to retrieve data are annotated using a @GetMapping to indicate that the method is handling a GET request. The requests to this method are mapped to the /all path using the annotation.
Implement a controller to find employees by ID
Copy and paste the following code in the EmployeeController.java class.
Create a method that returns an employee and accepts a single integer parameter. The parameter is passed as a path variable and you need to add a @PathVariable annotation before the parameter in the method to retrieve the value that is passed with your request.
Call the findById() method of EmployeeDao and pass the ID retrieved from the request. The method returns an employee whose ID matches with this ID to the client. Since we are issuing a GET request you need to add @GetMapping annotation to this controller. The requests to this method are mapped to the /{id} which is the ID of our employee being attached to the request.
Implement a controller to update employee
Copy and paste the following code in the EmployeeController.java class.
This method updates an employee by accepting two parameters consisting of an object of type employee and an ID of type integer. The employee object contains the changes that were made to the object and the ID is used to search for an employee that is to be updated with the new changes.
Add @PutMapping to this method which indicates that it is handling the PUT requests to update the data. The requests for the update method are mapped to the /update/{id} path.
Implement a controller to delete employee
Copy and paste the following code in the EmployeeController.java class.
This deleteEmployee() method accepts a single integer parameter and adds an @PathVariable annotation before the parameter in the method to retrieve the ID from the request.
The deleteEmployee() passes the ID in which the method returns the number of affected rows after successfully deleting the employee with the given ID. This method uses the @GetMapping annotation to perform a GET request to delete the object from the database.
Run and test the application
You can run the application directly from the editor since no parameters or actions are required before executing the application. Go to the JdbcTemplateApplication.java file which is the main class of your application. Press the

near the class declaration in the gutter.
Select the first option on the panel that opens to Run the application using the default port 8080 provided by Spring Boot.
To test your application use Postman which is a software that provides different HTTP methods such as POST, GET, and PUT to test your API’s. The code for this article can be accessed from the GitHub repository.
Open PostMan and click on the Workspaces menu which can be accessed on the navigation bar. Click on the Create Workspace button to create a new work space for your project.
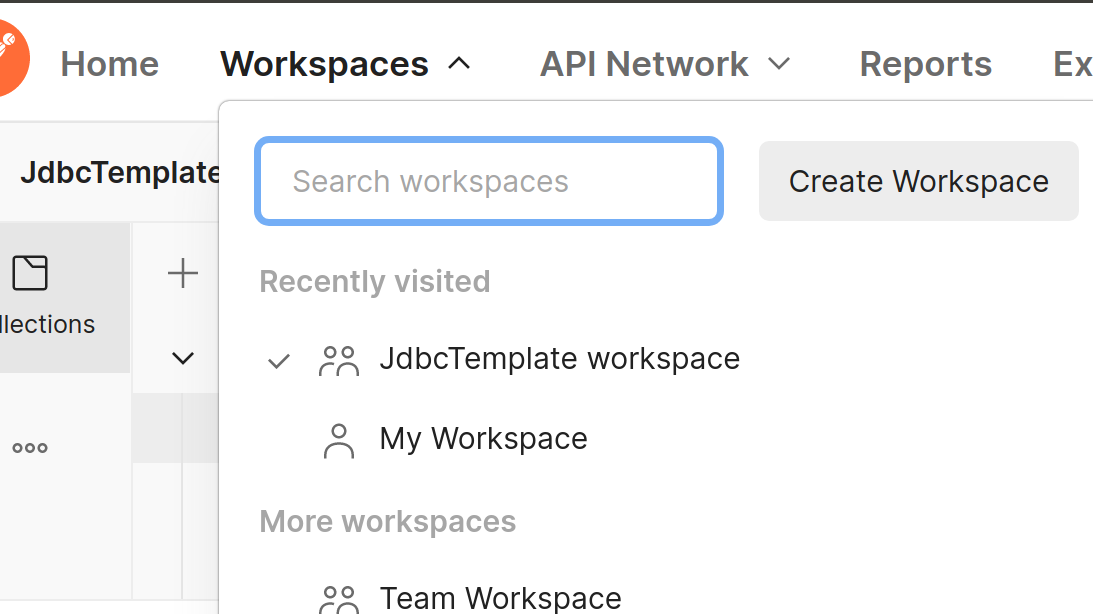
On the panel that opens, enter the name of the workspace as “JdbcTemplate workspace” and press the Create Workspace button which is at the bottom of the panel.

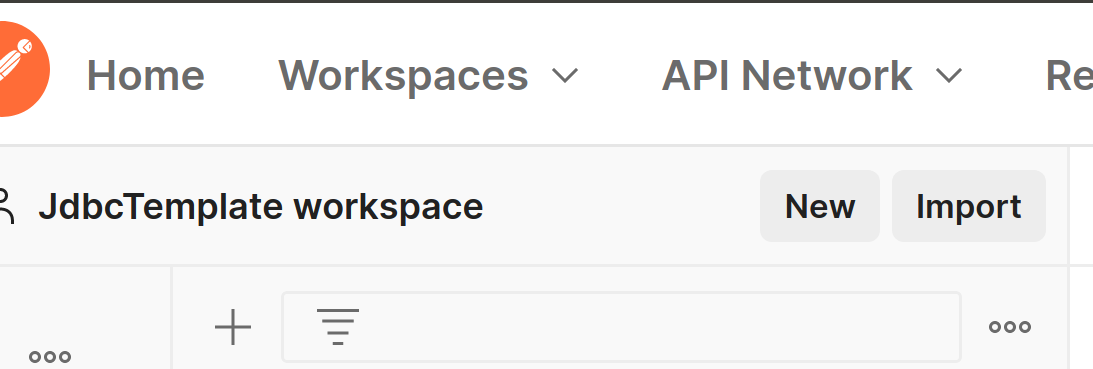
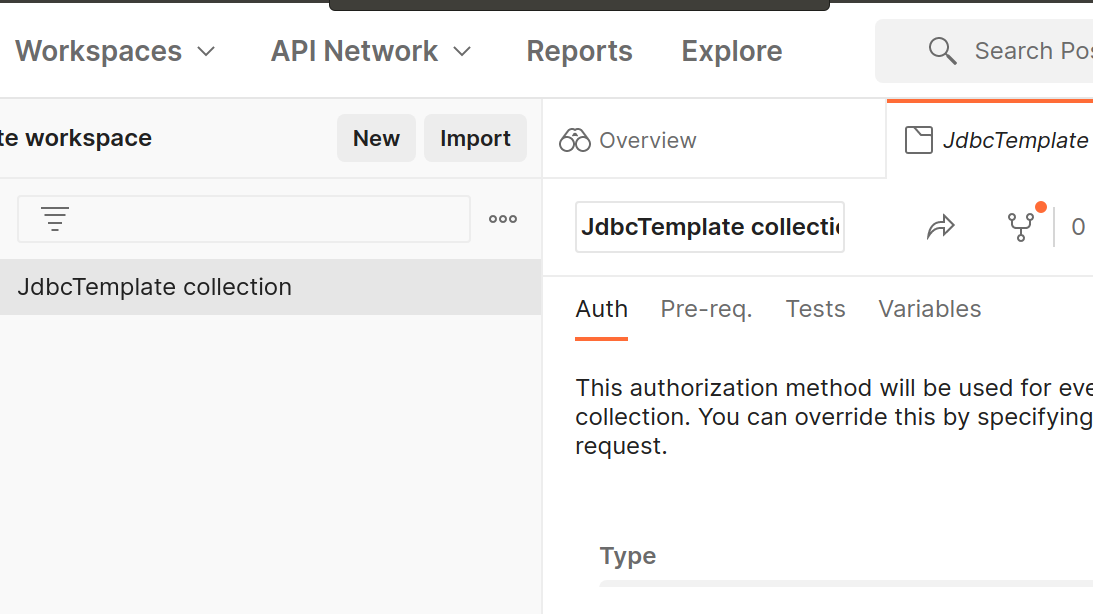
On the workspace section that opens, click on the New button on the right to create a new collection.
On the panel that opens on the right side of the workspace section, enter the name of the collection as “JdbcTemplate collection” and press the enter button on your keyboard. The collection will help you to group your APIs in the workspace depending on the operations you are performing.
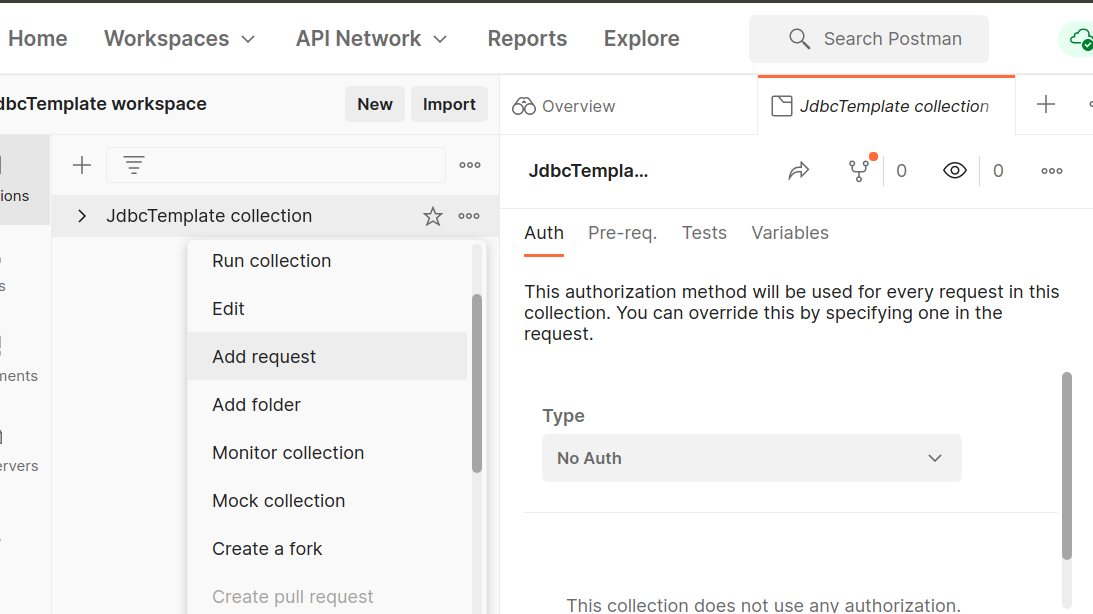
On the left side of the collection section that is added, click the three icons and select the add Request sub menu on the panel that opens to create a new HTTP request.
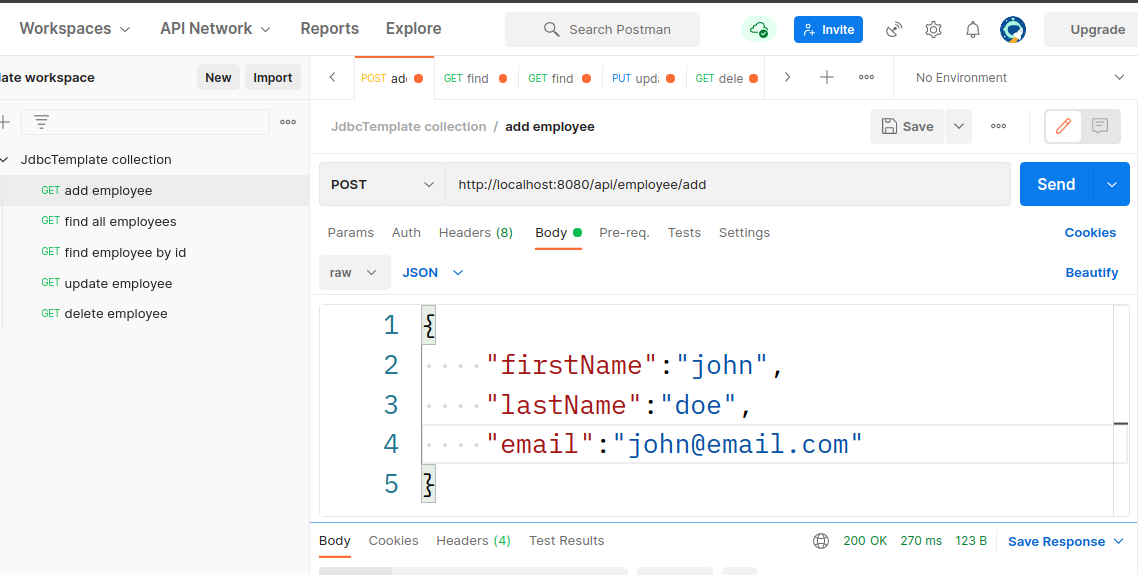
Name the new request “add employee” and change the GET method to the POST method on the dropdown. Add the http://localhost:8080/api/employee/add link on the input field.
To create a new employee, we need to write a JSON representation of our object to be created in the database. On Postman, select Body, Raw, and then select JSON as the Content Type. On the panel that opens, add the JSON to create a new employee and press the Send button. If the employee is created, a status code of 200 showing success will be returned.
Create an employee named "John Doe" with the following body:
To retrieve all employees, Create a new request with the name “find all employees” and let the HTTP method be GET. Add the http://localhost:8080/api/employee/all link in the input field. Press the Send button and note that the employee we created will be returned to a new panel.
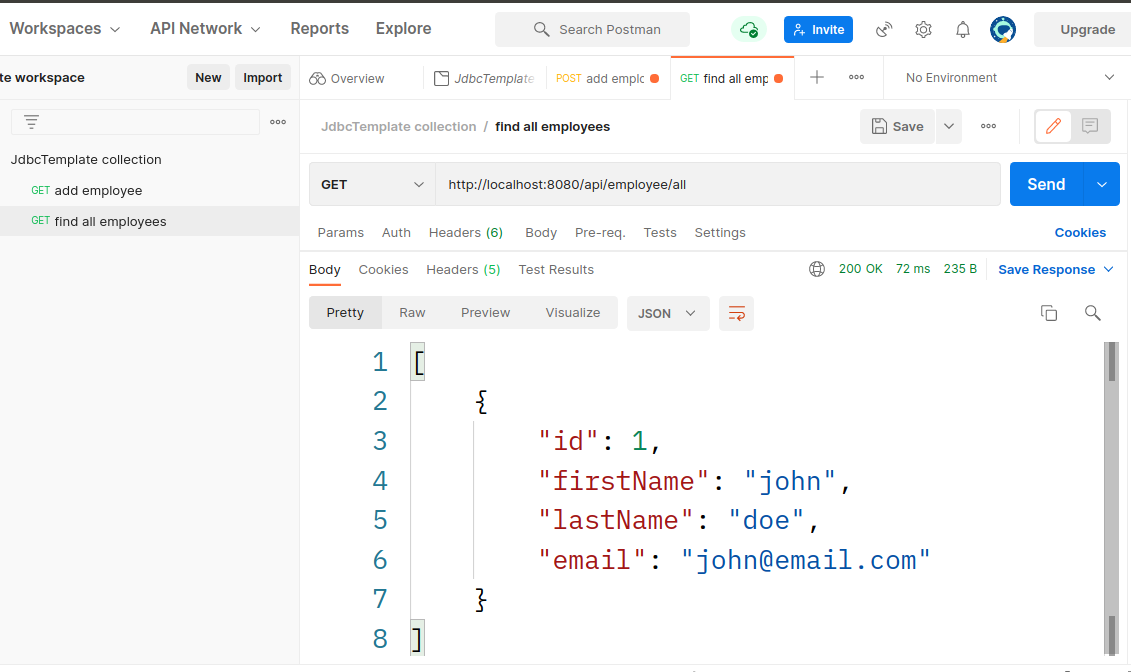
The JSON response for the GET method to retrieve all employees is provided below.
To retrieve the employee by ID, Create a new request named “find employee by id” and let the HTTP method remain to be GET. The link to find an employee by ID contains a path variable attached at the end of the link and it is used to provide the ID of the employee to be retrieved from the database. Add the http://localhost:8080/api/employee/1 link in the input field and click the Send button.

The JSON response of the GET method to retrieve an employee by ID is provided below.
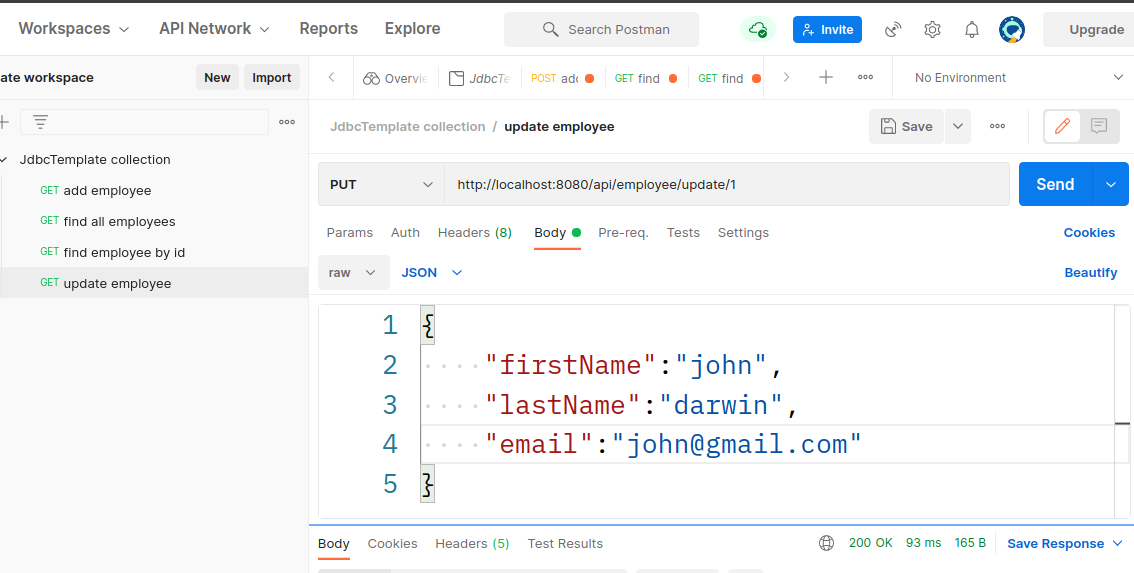
To update an employee, create a new request named “update employee” and change the HTTP method from GET to PUT. Add the link http://localhost:8080/api/employee/update/1 in the input field. Change the last name of the existing user in the database from doe to darwin. Copy and paste the following JSON containing the changes to be made in the PostMan Body.
Press the Send button and note the success status is returned. For your changes, you can change the first name, last name, or the email format.
Retrieve the employee with this ID to verify that the properties modified were persisted to the database and no new record was inserted because you are performing an update operation.
The following JSON response confirms that the last name of the user with ID one was updated from doe to darwin.
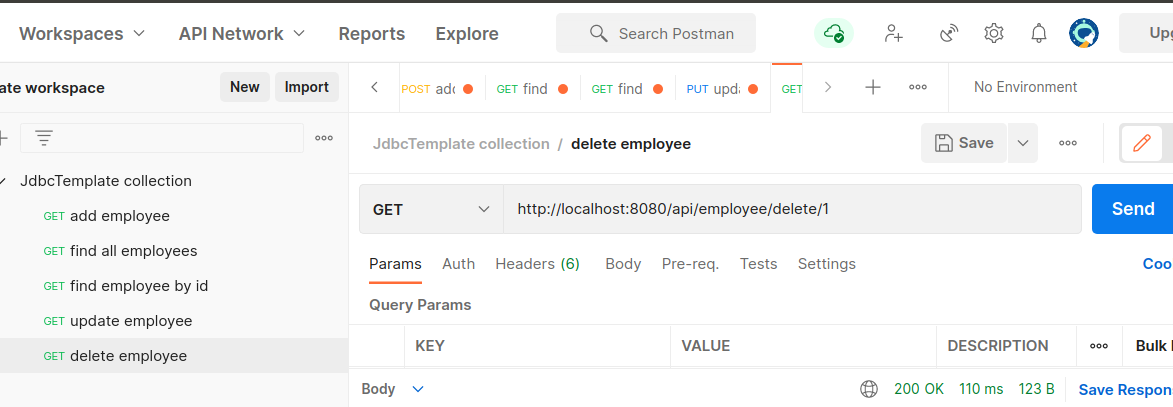
To delete an employee, Create a new request named “delete employee” and let the HTTP method remain as GET. Add the http://localhost:8080/api/employee/delete/1 link to the input field and press the Send button. Note that a success status is returned with only one row affected.
Conclusion
In this tutorial, you have learned the basic operations that can be implemented using JdbcTemplate. Use the knowledge gained in this tutorial to perform more advanced and complex queries using JdbcTemplate. The Twilio blog is also a great resources to learn about their API’s and other technical content that is very crucial to you as a developer.
David is a back end developer with a major in computer science. He loves to solve problems using technology, learning new things, and making new friends. David is currently a technical writer who enjoys making hard concepts easier for other developers to understand and his work has been published on multiple sites. Feel free to follow him on LinkedIn and GitHub.


Related Resources
Twilio Docs
From APIs to SDKs to sample apps
API reference documentation, SDKs, helper libraries, quickstarts, and tutorials for your language and platform.
Resource Center
The latest ebooks, industry reports, and webinars
Learn from customer engagement experts to improve your own communication.
Ahoy
Twilio's developer community hub
Best practices, code samples, and inspiration to build communications and digital engagement experiences.