How to Receive Notifications for LinkedIn Job Postings with RapidAPI and Twilio
Time to read:
February 06, 2023
Written by
Reviewed by

LinkedIn is the most popular platform to search and apply for job opportunities and share information related to different technologies. However, the platform has many users which means that the chances of getting a job opportunity as the first candidate are very few.
In addition, when you do find a job that perfectly meets your skills, you will often find that you were either too late to apply or there are too many applicants. Usually, you end up not applying for the job.
However, what if you could have an application that sends you notifications of the latest jobs posted on LinkedIn? In this tutorial, you will learn how to use Twilio to get notifications of the latest jobs posted on LinkedIn using RapidAPI.
Prerequisites
- Knowledge of Java programming language.
- Java development kit(JDK)8 and above.
- Twilio account - Register and verify WhatsApp numbers that will be used to send messages. Create a trial account to use the free balance to experiment with this application.
- RapidAPI account - To have access to the LinkedIn jobs search API provided through the RapidAPI hub. This API is free to use but with a limited number of requests per month.
- IntelliJ IDEA community edition - development environment for the Java programming language.
Project setup
To create a new project, go to Spring initialzr and select Maven on the Project section. Secondly, select 2.7 as the project version in the Spring Boot section.
Thirdly, in the Project Metadata section, enter the Group as com.twilio.twilionotification, and Artifact as twilio-notification. Once this is done, the Project name section should have the structure com.twilio.twilionotification.twilio-notification.
In addition, select Jar in the Packaging section and 17 in the Java section. Finally, ensure you add the following Maven dependencies from the Dependencies section.
- Spring Web - This is the main dependency of the project. It will help you to make requests to RapidAPI to fetch a collection of jobs. In addition, you will use some of the APIs provided by this library to configure the Spring Boot application.
- Lombok - This dependency will help you to auto-generate the getters, setters, string methods, and constructors.
To generate this project, press the GENERATE button. A zip file containing the project will be downloaded into your machine.
Unzip the twilio-nofication.zip file and extract the twilio-notification folder into a desired location in the computer.
Once the folder has been extracted from the zip file, open IntelliJ and import the project into the IDE. Importing a project in IntelliJ is done by pressing File > Open on the IDE toolbar and then selecting the extracted project on the window that opens.
The process of downloading the dependencies will start immediately after importing the project. In addition, the project structure will be displayed on the IDE once the download is complete. During this stage, you need to add the following Twilio dependency to the pom.xml file.
Add sub-packages to the project
Navigate to twillio-notification/src/main/java/com.twilio.twilionotification in the sidebar and right click it. Select New > Package to create a new package. On the window that opens enter the new package as com.twilio.twilionotification.twilionotification.x where x is the name of the package such as repository. Repeat the process for the following package names.
- model
- config
- service
Create a model class for the job request
To make a request to the RapidAPI you need to pass the parameters search_terms, location, and page. The search for the collection of jobs is made based on these parameters.
However, instead of passing the values manually, it is better to create a class to represent these values. When these values are required, you only need to pass an instance of these classes.
Create a file named JobRequest.java under the package named model and copy and paste the following code into the file.
The @ToString annotation before the class declaration is a Lombok annotation used to generate a string representation of our object. This annotation has the same effect as the toString() method in Java.
Since the media type for the request is JSON, using the @JsonProperty enables the application to map the object fields to the corresponding JSON values. For example, the object field searchTerm will be mapped search_term in JSON.
In addition, you have added a constructor that accepts all the fields of the class. This is required since all the parameters are used to search RapidAPI.
Create a model class for the job response
Once a request is issued to RapidAPI and the search is made using the request values, a JSON response is returned back containing the collection of jobs that met the search criteria.
Since the response needs to be filtered to retrieve the latest jobs which cannot be achieved using JSON, the jobs must also be mapped to Java objects.
Create a file named JobResponse.java under the model package and copy and paste the following code into the file.
This class has a new Lombok annotation named @Getter that enables the application to get the individual values from the Java objects. Generally, this annotation enables the application to call the getter method for each of the fields without defining it in the class.
Create a model class for the message
The Twilio service for WhatsApp requires the parameters to, from, and body to send a message successfully. The first parameter represents the receiver of the text, the second parameter represents the sender, and the last parameter represents the text itself.
Instead of passing these parameters manually, this application uses a class that gets called whenever these values are required.
Create a file named Message.java under the model package and copy and paste the following code into the file.
Configure LinkedIn jobs search API
Head over to the LinkedIn jobs search API from the RapidAPI hub, and note the headers X-RapidAPI-Key and X-RapidAPI-Host. You will use the headers in this section to set the headers for the request.
Additionally, note the URL which you will use in the next section to make a request using the API.
Create a file named RapidAPIConfig.java under the config package and copy and paste the following code into the file.
The @Configuration annotation before the class is an annotation from the SpringWeb library and it is used to define configurations for the application.
Moreover, this is the class where you will define all the @Bean definitions which identify individual configurations for specific functionalities.
For example, the first @Bean definition defines a RestTemplate using the restTemplate() method and it returns a single instance every time it is called to make a request.
In addition, RestTemplate has used the method named setMessageConverters() to set the converter that will be used to map the JSON response to Java objects. The converter to be used for this purpose has been defined using the private method named messageConverter() and this method was in turn passed as the argument of the setMessageConverters().
The second @Bean definition defines HttpHeaders for the request using the httpHeaders() method. To set both the X-RapidAPI-Key header, and the X-RapidAPI-Host header, you only need the set() method and pass the key-value arguments. Replace the YOUR_API_KEY placeholder with your API key retrieved from earlier.
Create a RapidAPI service interface
Create a file named RapidAPIService.java under the service package and copy and paste the following code into the file.
This interface defines only one method named getLatestJobs() that returns a collection of JobResponse objects. This interface is implemented in the next section.
Implement the RapidAPI interface
Create a file named RapidAPIServiceImpl.java under the service package and copy and paste the following code into the file.
The @Service annotation before the class declaration is an annotation from the Spring Web library and it is used to identify classes used to implement the functionality or logic of the application.
To implement the method named getLatestJobs(), we start by injecting RestTemplate and HttpHeaders that we defined in the configuration using the @Autowired annotation. As a result, we get a single instance for each to use in this class.
In addition, we have declared the URL from the LinkedIn jobs search API using the string named JOB_URL.
To define the body and headers for the request, call the constructor HttpEntity and pass the arguments jobRequest and httpHeaders. Note that the first parameter is passed as the argument of the getLatestJobs() method and the second parameter is the one injected into the class. The response from this call is used by RestTemplate to make a request to the API.
Lastly, make a request to the API by invoking the exchange() method of RestTemplate and then pass the expected arguments to this method.
The arguments that were passed to the method are URL, HTTP method, request entity, and the response type. The getBody() method enables the application to return the collection of JobResponse objects as defined using the parameterized type reference in the request.
Create a message service interface
Create a file named MessageService.java under the service package and copy and paste the following code into the file.
This interface defines only one method named createMessage() that returns a Message instance. This interface is implemented in the next section.
Implement the message service interface
Create a file named MessageServiceImpl.java under the service package and copy and paste the following code into the file.
The purpose of this class is to create a message instance containing phone numbers for the receiver and the sender behind the scenes. When creating a message you only need to pass one parameter for the body of the message.
The WhatsApp phone number for the sender is the one provided by Twilio. In this case, it is denoted using the string FROM. The WhatsApp phone number for the receiver is the personal number verified using Twilio. In this case, it is denoted using the string TO. Replace the YOUR_NUMBER placeholder with your phone number.
Create a Twilio service interface
Create a file named TwilioService.java under the service section and copy and paste the following code into the file.
This interface defines only one method named sendMessage() that does not return any value. Note that this method accepts an instance of a Message that will later be sent using Twilio WhatsApp. This interface is implemented in the next section.
Implement the Twilio service interface
Create a file named TwilioServiceImpl.java under the service package and copy and paste the following code into the file.
The objective of this method is to send the message using the Twilio Sandbox for WhatsApp. The init() method is a method from the Twilio library and it initializes the API by using TWILIO_ACCOUNT_SID and TWILIO_AUTH_TOKEN.
These keys can be obtained from the Twilio Console by navigating to Account > Keys and Credentials. These keys must be added to the environment variables.
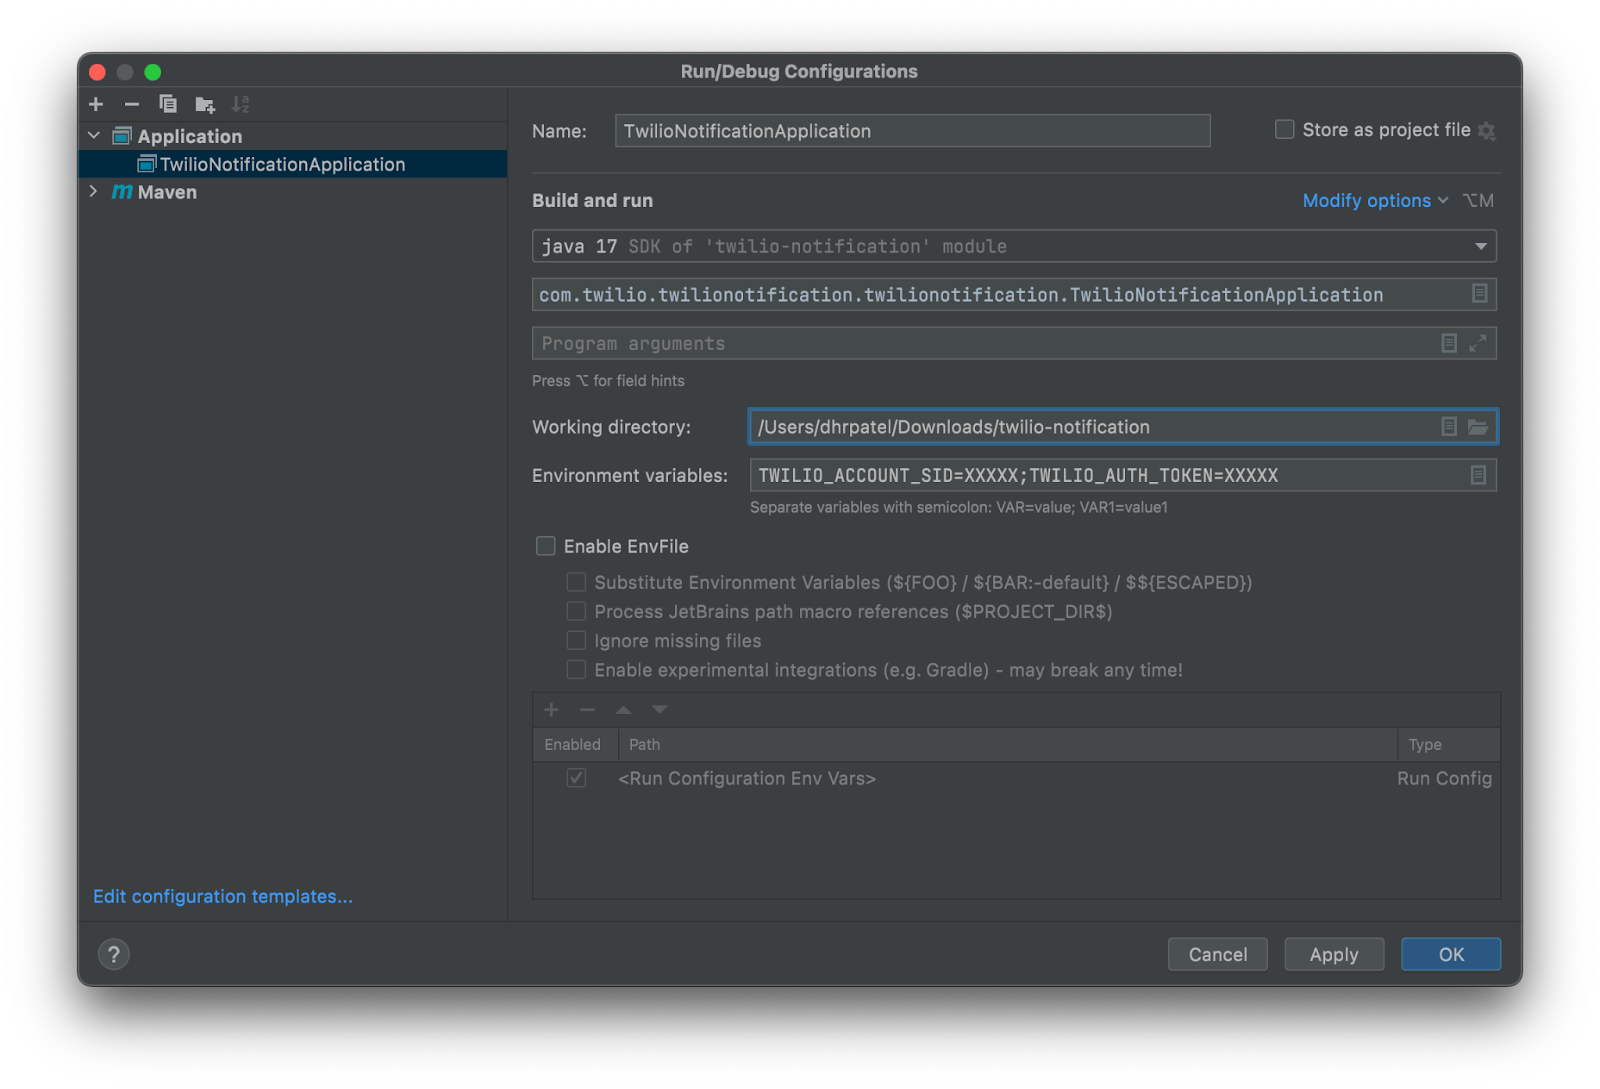
To implement this in IntelliJ, click on Run > Edit Configurations, click Add new… and select ApplicationMaven. For the Name enter TwilioNotificationApplication and for the Main class select the square button, then select TwilioNotificationApplication and click OK. In the Environment variables section enter the following and replace the placeholder with your credentials:
Click Apply then Ok. Your configuration will then look like this:
The three methods,getTo(), getFrom(), and getBody(), return the phone number of the receiver, the phone number of the sender, and the message text respectively from the Message instance passed as the argument of the sendMessage() method.
Implement the code to send the latest LinkedIn jobs
The objective of this section is to implement the code that will make a request to the LinkedIn jobs search API, filter the latest jobs, and finally send the latest jobs using Twilio Sandbox for WhatsApp.
Open the file named TwilioNotificationApplication.java and replace the code in the file with the following code.
To begin, inject the RapidAPIService, MessageService, and TwilioService into the class using @Autowired annotation.
Next, define a CommandLineRunner using the commandLineRunner() method. This bean definition will get executed automatically once you run the application.
To make a request to the LinkedIn jobs search API, use the RapidAPIservice instance injected into this class to call the getLatestJobs() method. Pass an instance of JobRequest containing the values Java, USA, and 5.
These values will be used to search for Java jobs in the USA and return 5 pages of the result. You can modify these values as you want or define a separate call containing a different job request instance.
The next step filters the latest jobs by date by matching the jobs returned using the now() method of Localdate. Since the class JobRequest has a getter annotation, you only need to call the getPostedDate() method to do the comparison.
After getting the latest jobs, limit the list to three using the limit() method and return the result as a List using the toList() method.
Lastly, to send the three jobs using Twilio Sandbox for WhatsApp, use the TwilioService instance injected into the to call the sendMessage() method. Since this method expects a Message instance, pass the MesageInstace injected into this class and call the createMessage() method
The createMessage() method returns a Message instance to the sendMessage() method. Since the createMessage() expects a text to be sent, pass the collection of the three jobs as the argument of the method. Ensure you call the toString() method on the collection as it expects a string.
In addition, add two print statements to the class for testing purposes. The first should print the filtered jobs and the second should be printed if the message was sent successfully.
Run the application
Before running the application, you have to ensure that your Twilio sandbox for WhatsApp is connected. Follow the steps on the Twilio Docs for this: Get started with the Twilio Sandbox for WhatsApp. Once this is done you can send and receive messages.
After connecting to the sandbox, you can run the application by pressing on the run icon located on the top right section of IntelliJ.

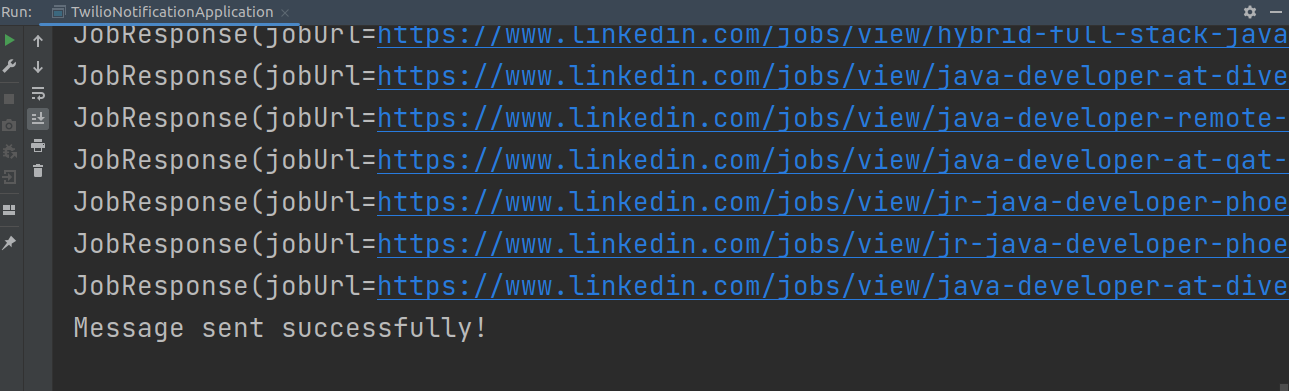
If there were no errors in the application, you should have the following displayed on the console window of IntelliJ:
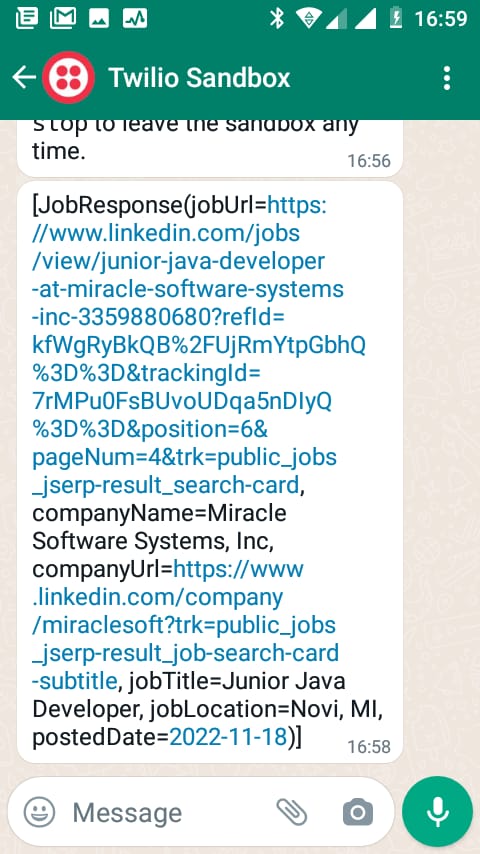
You should then receive a WhatsApp message on your phone that contains the jobs which were filtered by date. Note that the date will be different depending on the time you are reading this article.
Conclusion
In this tutorial, you learned how to use the Twilio Sandbox for WhatsApp to send the latest job postings on LinkedIn using the LinkedIn jobs search API by RapidAPI. As you have seen in this tutorial, sending notifications using Twilio only takes a few lines of code. You can also implement your application to use other Twilio messaging services such as Twilio SMS API.
Feel free to play with the application to return different jobs based on the search criteria. You can also modify the application to send notifications at a particular point in time.
If you want to learn more about WhatsApp messaging services, Twilio provides detailed documentation where you can learn about the WhatsApp Business API. Furthermore, you can also use the Twilio blog which has a wide variety of tutorials regarding WhatsApp messaging services and other services they offer.


Related Resources
Twilio Docs
From APIs to SDKs to sample apps
API reference documentation, SDKs, helper libraries, quickstarts, and tutorials for your language and platform.
Resource Center
The latest ebooks, industry reports, and webinars
Learn from customer engagement experts to improve your own communication.
Ahoy
Twilio's developer community hub
Best practices, code samples, and inspiration to build communications and digital engagement experiences.