How to Pass Call Context When Forwarding Across the PSTN
Time to read:
April 26, 2021
Written by
Reviewed by

Many of us have encountered call forwarding use-cases, but have you faced issues in passing call context from the original call to the forwarded call across the PSTN (Public Switched Telephone Network)? In this tutorial, you will learn how to pass call context in a PSTN call forwarding use-case by building a serverless Voice IVR using Twilio Studio and Twilio Functions.
Why do you need to pass a call context?
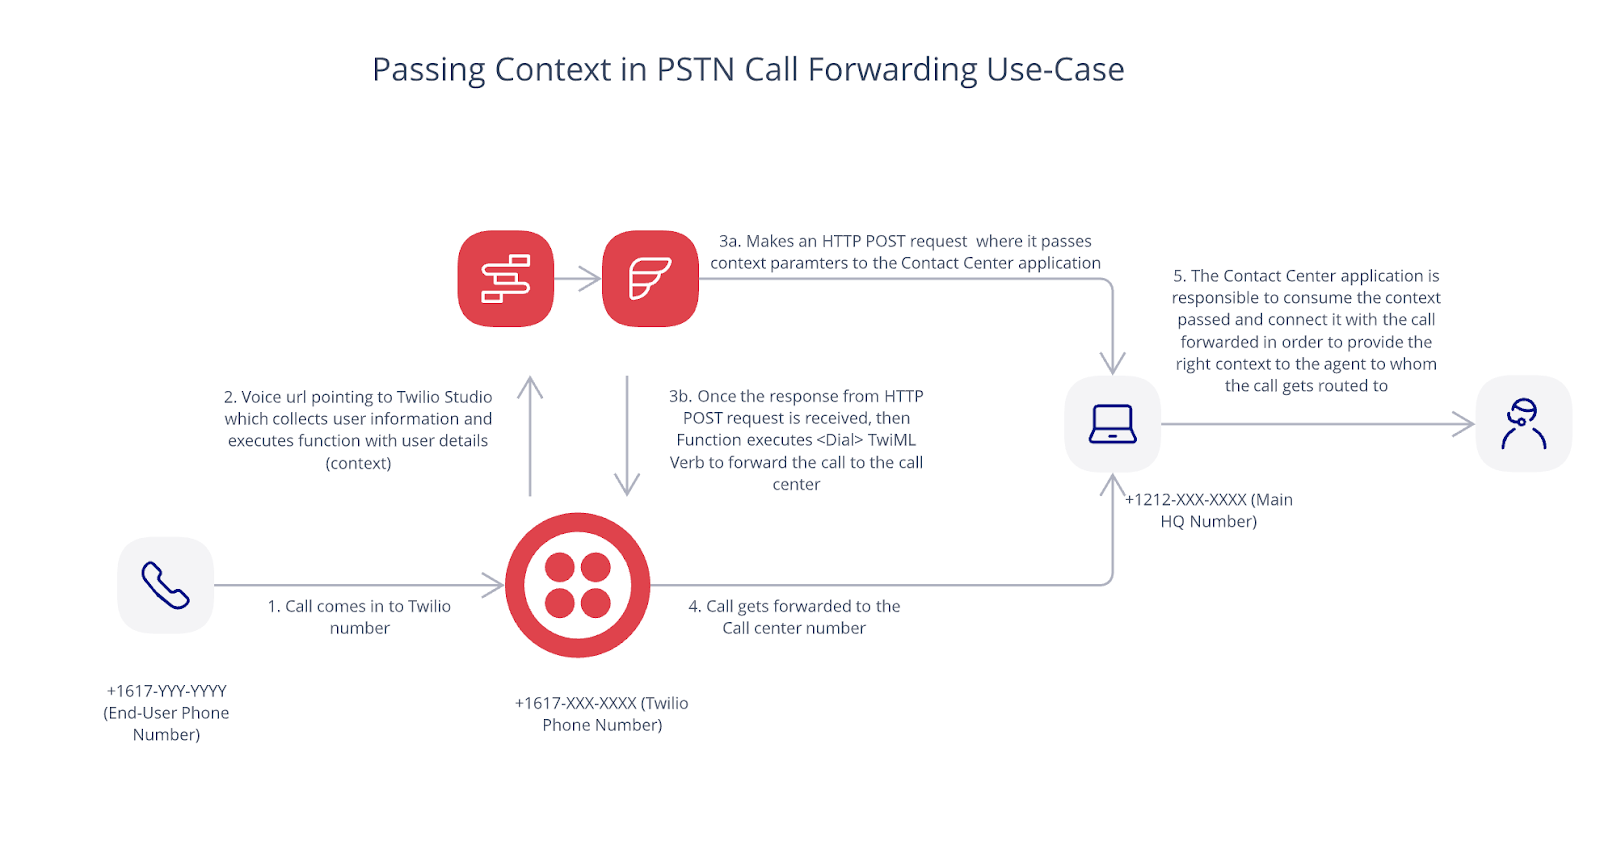
Consider business cases where customers call in to an external business partner and provide some context (for example: name, reason for calling, etc.) and that call is then forwarded across the PSTN to the main contact center where business agents provide more in-depth responses to customer-focused queries.
Alternatively, cases where a customer services many different entities (e.g., schools, hospitals) and the end-user calls into those entities which directly forward the call to a shared contact center where a pool of agents answer these queries. In such cases, the customer might need to track the end-users phone number as well as the entity it is coming from, to properly identify themselves to the customer.
In either case, forwarding a call without context can lead to a poor customer experience (customers being asked the same questions again). It’s also an agent time-sink – having to ask for context again decreases call-handling speed, lowers bandwidth, and lowers resolution speed. In cases where the current platform supports Session Initiation Protocol (SIP), you can share the context using special headers; however, we know from experience that not every voice platform supports SIP. Instead of providing a poor experience to your customers, what if you could build a solution on Twilio to do this?
Previously, we showed you how to pass call context using Twilio Sync, Functions, and TaskRouter. Today, I’ll show you how to do it by building an IVR in Studio in conjunction with Functions. Let’s get started!
Prerequisites
- A free or paid Twilio account. If you are new to Twilio get your free account now! (If you sign up through this link, Twilio will give you $10 credit when you upgrade.)
- A Twilio phone number with SMS capabilities - configure one here
The Solution
Here’s how we’re going to proceed today:
- A Twilio Studio Flow is triggered with an incoming call to your Twilio number.
- The Studio Flow gathers inbound caller details and then calls a Twilio Function which first passes the context through an HTTP request to the contact center application and then forwards the call to the customer’s contact center.
- The customer’s contact center application should consume the context passed (for example, by populating details for screen pop, or by looking up customer data in a CRM) and connect it with the call forwarded to provide the right context to the agent to whom the call gets routed to.
See the below diagram for reference:
How do we build this? The Building Blocks
Studio Flow Configuration
First, you will build an IVR workflow to collect end-user details to successfully identify the inbound caller using Twilio Studio, a stateful visual workflow builder using a simple drag & drop interface. Twilio Studio is hosted by Twilio, so you don’t need to set up your own server or deploy anything separately.
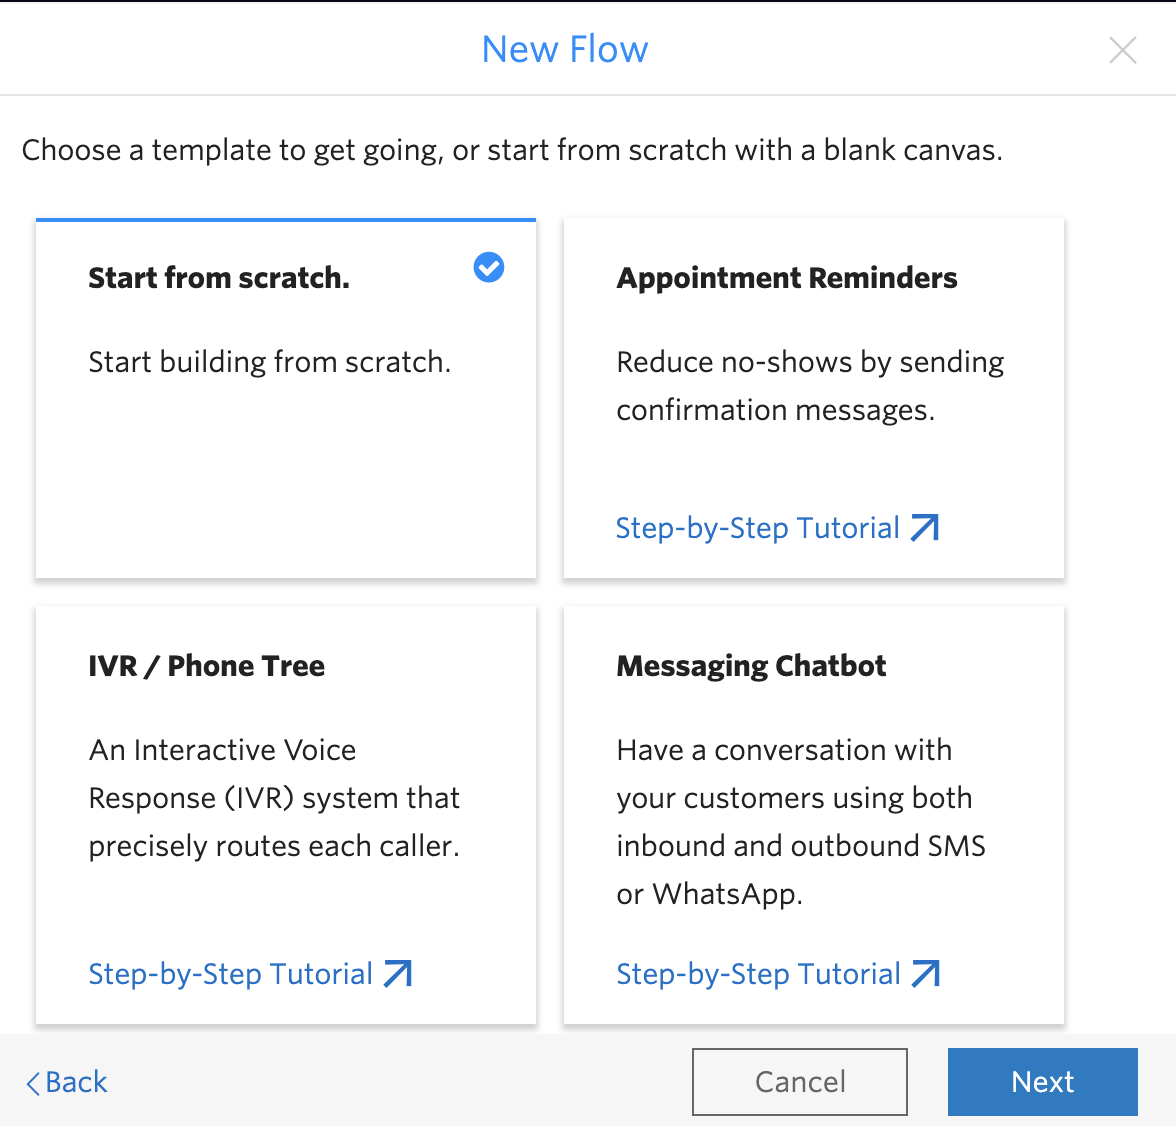
To make a new Twilio Studio flow, log in to your Twilio account and go to the Studio Dashboard. Then, click the blue plus sign and give your flow the name “Call Forwarding.”
In the next part of the setup, you choose “Start from scratch” and click “Next.
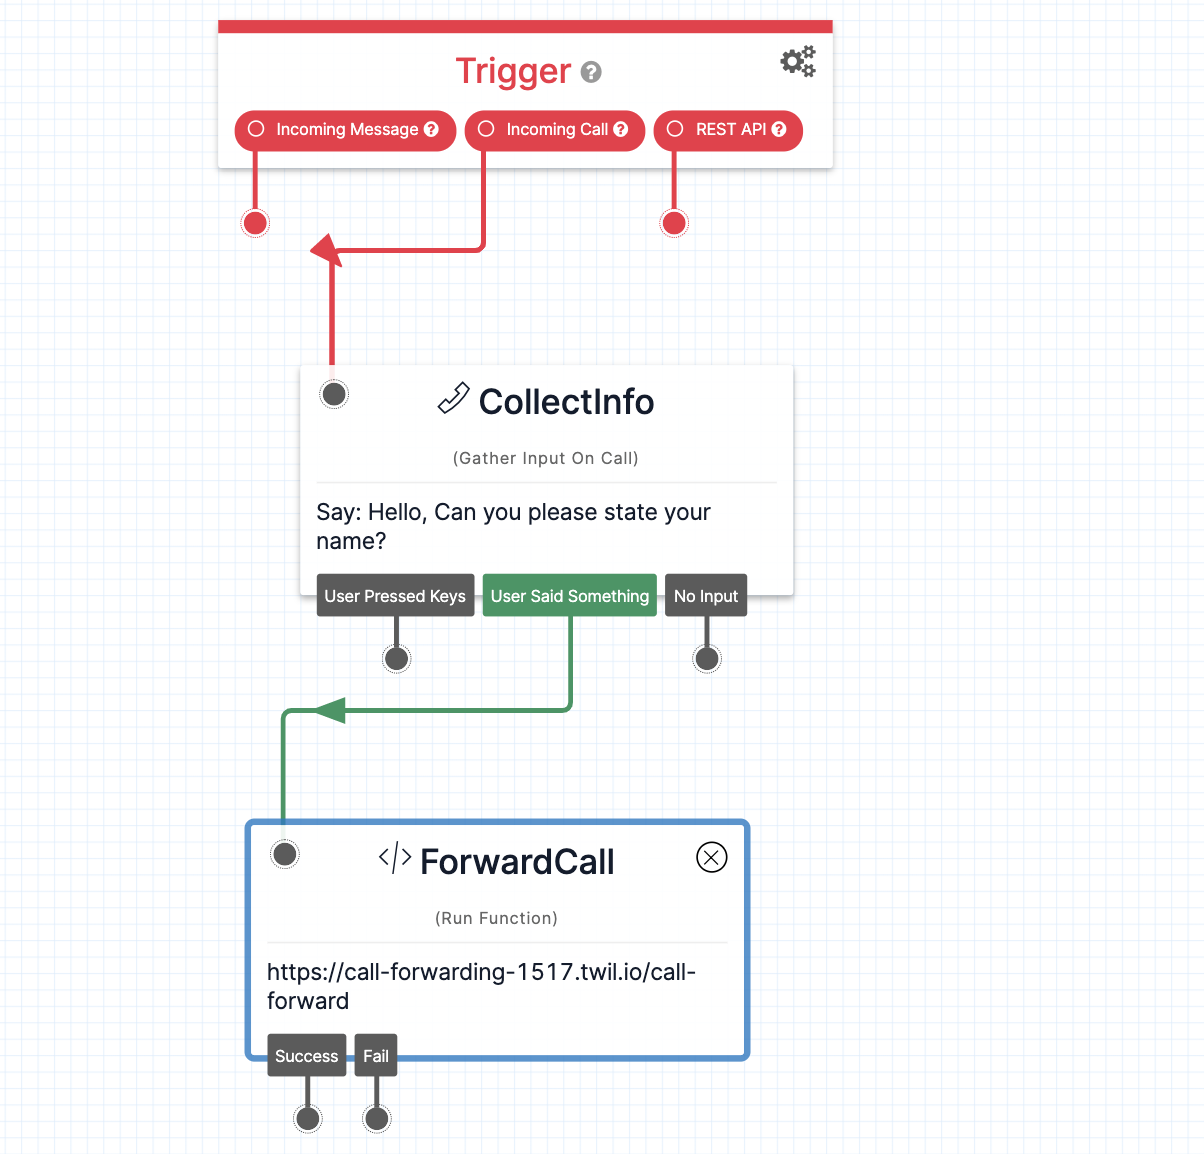
Since the interactions are Voice only and are triggered by a user’s inbound call, we start by dragging a “Gather Input on Call” widget on the canvas, naming it “CollectInfo”, and connecting it to the Incoming Call trigger by dragging the red dot to the grey dot in the corner of the new widget.
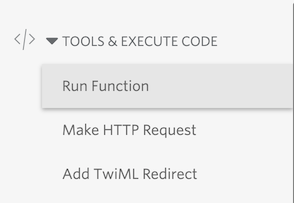
We can customize this widget to specify what we want to say when the caller picks up. In this example, we’re going with “Hello, Can you please state your name?” to collect the user’s details. This widget expects the user to say something after they hear the message – click the widget, and enter the message in the “Text to Say” box that appears on the canvas.Once the user provides their name, we need to forward the call to the customer’s contact center. Here will use a “Run Function” widget; drag one of these widgets onto the canvas and connect it to the “User Says Something” transition on the previous widget.
Twilio Functions Configuration
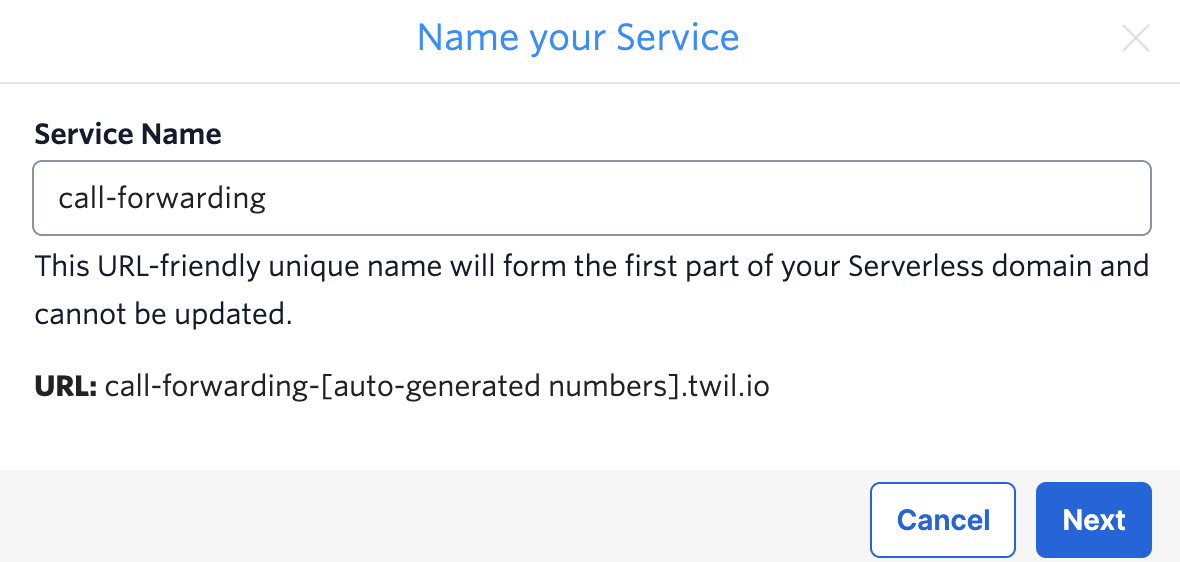
Before we can configure our widget, we need to create a Twilio Function. Go to the Manage Twilio Functions section of the Twilio Console. Create a new Service by clicking the “Create Service” button. Give it a name like “call-forwarding”, and click “Next” to proceed.
Once the Service is created, you can add a new Function by clicking on the Add + button. Name the path something like “call-forward” and keep the visibility “Protected”.
In your Function, replace the code with the following JavaScript:
As mentioned in the code, you’ll also need to add the axios package. In the lower left hand corner click the grey gear with “Dependencies” and add axios. I tested with version 0.21.1.
Finally, drag an arrow from the “User Said Something” transition to your new “Run Function” widget.
Explanation of the Functions code
This code captures the parameters passed in the Run Function widget and generates the TwiML to tell Twilio how to forward this call. We used <Dial> TwiML Verb to forward the call to the provided phone number, and set the CallerId to the end-user phone number.
Before the <Dial> Verb is called, we make a write request to an external API of your application using JSON (application/json) and leveraging the “Axios” HTTP client library.
Axios is a popular JavaScript library you can use to perform HTTP requests, that works in both browser and Node.js platforms. You may choose a different approach to make an HTTP request.
Now we create an HTTP POST request with the relevant parameters to be passed in the HTTP request body – that’s what you see in the const instance block. Once we get a response (i.e., the API at the customer contact center’s application has received the contextual parameters passed) then Twilio executes <Dial> TwiML Verb, which forwards the call.
The Contact Center application is responsible to connect the context passed with the call forwarded to provide the right context to the agent who receives the call. The caller ID is one of the ways shown here through which you can connect the context with the call. If the customer wants to use caller ID, then Toll-Free numbers are recommended – they always pass the caller ID, even if the user blocks it.
Connect the Function to your flow
Now that you have a function, we’re ready to turn our attention back to the Studio canvas.
First: make sure to save and deploy your Function (look for the blue “Deploy All” button on the bottom of your screen). Then, go back to the “Run Function” widget inside your Twilio Studio flow.
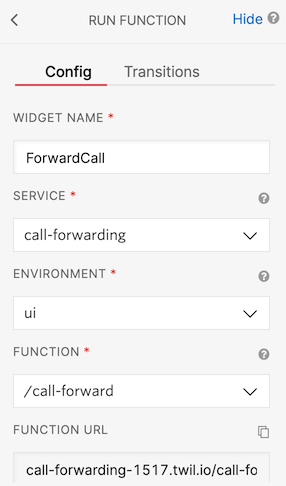
Name the Function widget ‘ForwardCall’, select ‘call-forwarding’ for the Service, select the ui environment, and pick your Twilio Function in the Function URL (/call-forward) dropdown menu in the right sidebar.
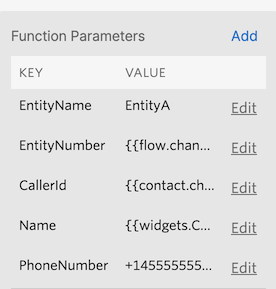
Next, add the parameters to the request as shown below.
- Create a field called
EntityNameand set the value as the name of the Entity which forwards the call to the contact center. - Next, create a field called
EntityNumberand set the value as{{flow.channel.address}}which is written using the liquid templating language. - Create a field called
CallerIdand set the value as{{contact.channel.address}}. - Create a
Namefield, and set the value as{{widgets.CollectInfo.SpeechResult}}to capture the name provided by the inbound caller in theCollectInfowidget (note the name of the widget). - Next, create the last field called
PhoneNumberand set the value to the phone number (in E.164 format) where you want the call to be forwarded.
The Finished Product
The final state of the canvas is: we have our “Trigger” widget take an incoming call, connect the caller to the “Gather Input on a Call” widget, and then transition to a Twilio Function to forward the call (with context) to the customer contact center.
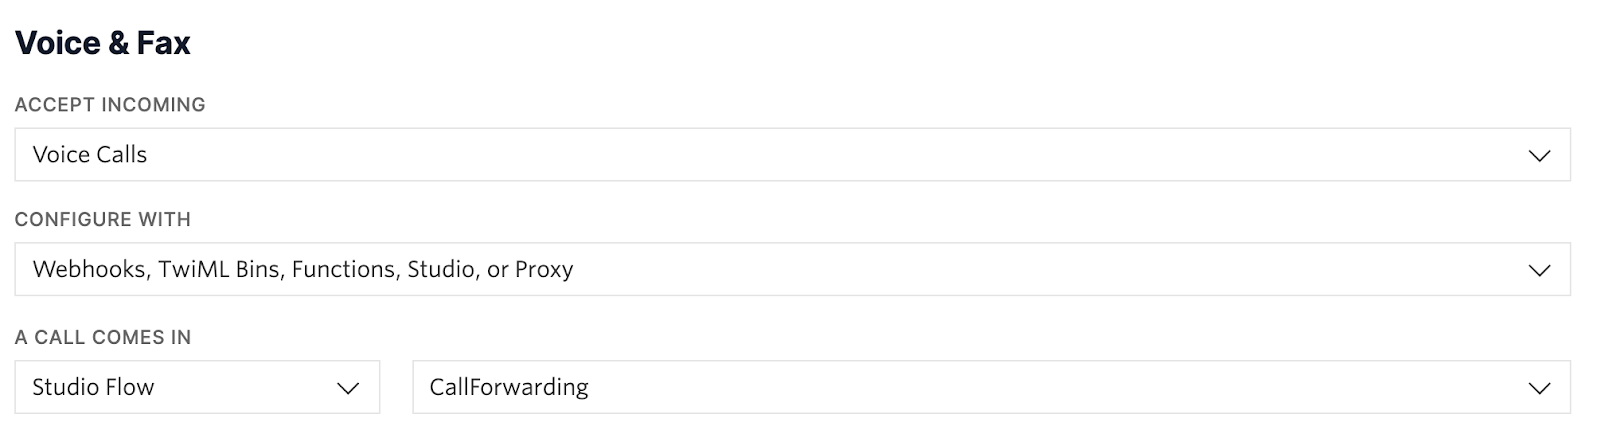
After we’ve saved and published the flow, the last thing to do is hook up our flow to a phone number! In the Twilio console, select Manage Numbers and choose the Twilio phone number that you would like to connect to your Studio Flow.
Go to the section for Voice & Fax, then select Studio Flow from the first dropdown and CallForwarding (or whatever you’ve named your flow) from the second dropdown. Click save, and you’re all set!
Test out the project
Now that you’re set-up, give your Twilio number a call and see if the call gets forwarded to the number and all the context parameters appear in your webhook / external API.
Did everything work? Congratulations! You’re able to forward any call and pass along context across PSTN with Twilio. If it didn’t, don’t worry. I’ve listed some of the troubleshooting tips you can go through.
Troubleshooting Tips
- If you try to call in and do not hear the IVR menu, double-check that you have chosen the correct Studio Flow from the dropdown options in your phone number console and published your latest Studio flow.
- If you see the call is not forwarded to the intended phone number, then check if you have set the correct value in
PhoneNumberfield in your Function widget parameters. - If you don’t see the value of the parameters passed in the Function widget, then check if all the parameters are correctly stated as well as the values are rightly set in the Function widget parameters.
Final thoughts and next steps
We demonstrated how you can pass context in call forwarding across the PSTN network leveraging Twilio Studio and Twilio Functions.
This example is meant to be a starting point and illustrates a basic Interactive Voice Response (IVR) system in the event that an end-user makes an inbound call to a Twilio phone number, but there are many opportunities for you to customize it for your needs and extend this capability.
Expanding on the current use-case
One of the use cases could be that instead of getting contextual parameters during the PSTN call, you may want to collect those parameters when the call has ended. So, in this case, instead of making a write request to your external API, you can simply leverage the action attribute of <Dial> Verb. This attribute accepts a URL as its argument and tells Twilio where to make a POST or GET request after the dialed call ends. You can provide the relevant parameters as the query parameters in the URL and your application will receive these contextual parameters as well as the other parameters that Twilio includes.
If you do not wish to provide an action URL, <Dial> will finish and Twilio will move on to the next TwiML verb in the document. You can also use <Redirect> TwiML Verb. <Redirect> makes a request to a URL along with query parameters and transfers the call flow to the TwiML received in response to that request. Either it could be an empty response or a valid TwiML. This URL can behave like a webhook to your application server where you can access these additional parameters once the call ends.
I would be happy to hear how you would make this better or any challenges you have with the code.
Additional Resources
The following links will help you expand your knowledge of Twilio Serverless Functions and Studio:
- Make a write request to an external API: This will walk you through to make an HTTP request from serverless Twilio Function to an external API using JSON (application/json)
- Build an IVR using Studio: This will walk you through building an IVR using Twilio Studio, where you can create a phone menu that’s easy to navigate by voice or keypress, and can add much more capabilities
Ishita is a Solutions Engineer at Twilio, focusing on helping our Growth customers build scalable solutions on Twilio. You can reach her at iaggarwal [at] twilio.com
Related Resources
Twilio Docs
From APIs to SDKs to sample apps
API reference documentation, SDKs, helper libraries, quickstarts, and tutorials for your language and platform.
Resource Center
The latest ebooks, industry reports, and webinars
Learn from customer engagement experts to improve your own communication.
Ahoy
Twilio's developer community hub
Best practices, code samples, and inspiration to build communications and digital engagement experiences.