Play Chess with a Friend on WhatsApp using Python and Twilio
Time to read:
June 03, 2020
Written by
Reviewed by

While most of the world is under some form of stay-at-home orders to prevent the spread of COVID-19, we are constantly looking for new ways to entertain ourselves and remain connected with family and friends.
When I was little I used to play chess a lot, so now that I have additional time on my hands I decided to start playing again. The thing is, nobody in my immediate family plays chess, so I had this idea of using WhatsApp to play a game of chess against a remote friend.
By the end of this tutorial you will know how to use the Twilio API for WhatsApp to implement a turn-based game that requires sending messages and images between multiple participants. You will also learn about how to manage a game of chess in Python, but even if chess isn’t your thing, you will be able to replace the chess portions with your favorite turn-based game!
Tutorial requirements
To build this project you need the following items:
- Python 3.6 or newer. If your operating system does not provide a Python interpreter, you can go to python.org to download an installer.
- A free or paid Twilio account. If you are new to Twilio get your free account now! This link will give you $10 credit when you upgrade.
- Two WhatsApp or SMS enabled smartphones.
- ngrok. We will use this handy utility to connect the development version of our Python application running on your system to a public URL that Twilio can connect to. This is necessary for the development version of the application because your computer is likely behind a router or firewall, so it isn’t directly reachable on the Internet. If you don’t have ngrok installed, you can download a copy for Windows, MacOS or Linux.
Ready to play? Let’s go!
Configuration
Let’s start by creating a directory where our project will live:
Following best practices, we are now going to create a virtual environment where we will install our Python dependencies.
If you are using a Unix or MacOS system, open a terminal and enter the following commands to do the tasks described above:
For those of you following the tutorial on Windows, enter the following commands in a command prompt window:
The Python packages that we have installed are:
- The Flask framework, to create the web application that will receive message notifications from Twilio
- The python-dotenv package, to manage our environment variables
- The python-chess package, to maintain the state of the chess board
- The cairosvg package, to render chess board images that we can send through WhatsApp and SMS
- The python-twilio package, to send messages through the Twilio service
Installing the Cairo Graphics Library
The cairosvg package installed above requires the Cairo Graphics Library installed in your system. Use the appropriate instructions for your operating system to install this library:
- For Windows 64-bit: download libcairo-x64.zip and extract its contents in the project directory or any other directory that is in the system path.
- For Windows 32-bit: download libcairo-x86.zip and extract its contents in the project directory or any other directory that is in the system path.
- For Mac OS: run
brew install cairo(this requires the homebrew package manager). - For Ubuntu Linux: run
sudo apt-get install libcairo2. - For other Linux distributions: consult the documentation for your package manager to find out what is the package you need to install for
libcairo.
Configure the Twilio WhatsApp Sandbox
Twilio provides a WhatsApp sandbox where you can easily develop and test your application. Once your application is complete you can request production access for your Twilio phone number, which requires approval by WhatsApp.
Let’s connect your smartphone to the sandbox. From your Twilio Console, select Programmable SMS and then click on WhatsApp. The WhatsApp sandbox page will show you the sandbox number assigned to your account, and a code to join.
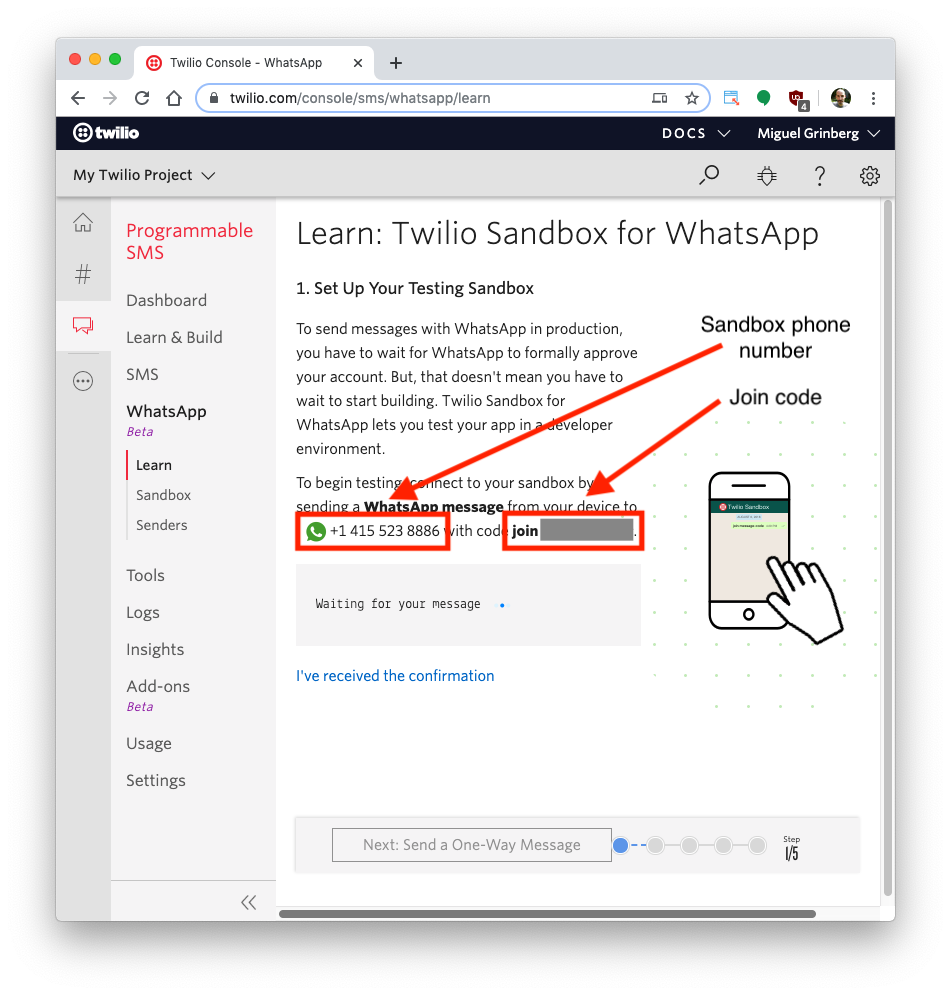
To enable the WhatsApp sandbox for your smartphone send a WhatsApp message with the given code to the number assigned to your account. The code is going to begin with the word join, followed by a randomly generated two-word phrase. Shortly after you send the message you should receive a reply from Twilio indicating that your mobile number is connected to the sandbox and can start sending and receiving messages.
This step needs to be repeated for any additional phones you’d like to have connected to your sandbox, so you will need to ask your chess playing friend to do this as well.
Receiving and sending messages with Twilio
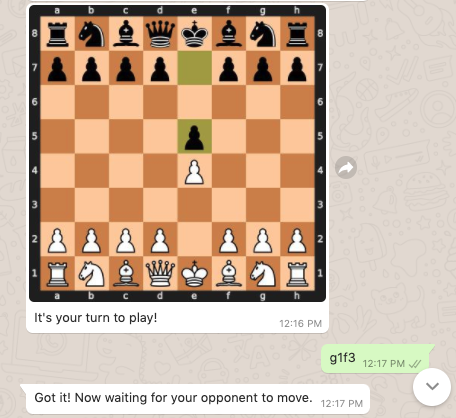
The two participants will enter their moves as text messages. When the application receives a message from the first player, it will confirm the receipt by replying to the player. Then it will also send a separate message to the second player, including the updated image of the board. Once the second player sends their move the cycle repeats with the players reversed.
Receiving a message
The Twilio API for WhatsApp uses a webhook to notify an application when there is an incoming message. Our chess application is going to use the Flask framework to define an endpoint that Twilio can invoke when a player sends in their move.
To write your first webhook, enter the following code in a app.py file:
The @app.route decorator from Flask associates the webhook() function with the /webhook URL. Later we will tell Twilio to notify us of incoming messages by sending a request to this URL.
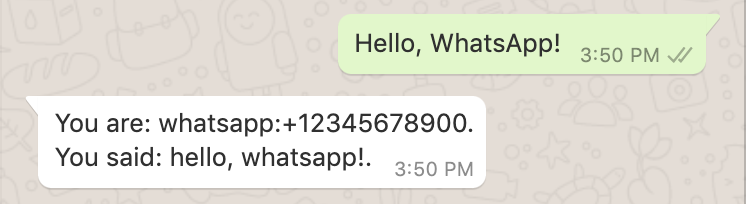
This example also shows how to obtain the sender of the message and the message text. Both of these values come as form variables, which Flask makes accessible to us in the request.form dictionary. The From form variable is the phone number of the sender, which in the case of a WhatsApp message is given in the format whatsapp:<phone number>. For example, if we received a WhatsApp message from the United States number 234-567-8900, we would receive it as whatsapp:+12345678900. The text of the message comes in the Body variable, and since we’ll need to parse chess moves from this text we normalize it to lowercase.
Replying to a message
Once we receive a move from a player we would like to acknowledge it by responding to the player. The webhook can issue a response to the sender of a message by providing a TwiML payload in the response of the webhook. TwiML is short for Twilio Markup Language, an XML-based syntax that the webhook can use to provide instructions to Twilio regarding how to handle the message.
The Twilio Helper Library for Python allows us to generate TwiML responses using classes and objects. The respond() function shown below generates a response that sends a text message back to the sender:
Add the new import at the top of the app.py file. The new respond() function can be above or below webhook(), it doesn't really matter.
If you want to see how TwiML looks, start a Python shell and enter the following code to generate an example response:
Let’s incorporate the use of our new respond() function into the webhook function:
Setting up a webhook with Twilio
We now have a complete webhook function that receives a message and responds to it, so let’s run it to make sure it is working properly.
Add a .flaskenv file (note the leading dot) to your project with the following contents:
This tells the Flask framework the location of our application, and also configures Flask to run in debug mode, which adds convenient features such as the automatic reloading of the server when changes are made to the code. This is useful because you can start the server and let it run while you code your application, knowing that every time you save a source file the server will reload and incorporate the changes.
Start your Flask application by running the following command:
The service is now running as a private service on port 5000 inside your computer and will sit there waiting for incoming connections. To make this service reachable to Twilio over the Internet we need to use ngrok.
Leave the Flask terminal running and open a second terminal. Start ngrok with the following command:
This command allocates a temporary public domain that redirects HTTP requests to our local port 5000. On a Unix or Mac OS computer you may need to use ./ngrok http 5000 if you have the ngrok executable in your current directory. The output of ngrok should be something like this:
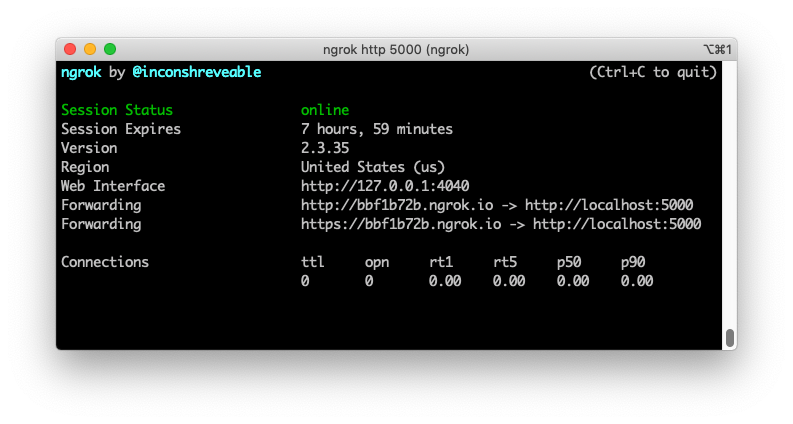
Note the lines beginning with “Forwarding”. These show the public URL that ngrok uses to redirect requests into our service. What we need to do now is tell Twilio to use this URL to send incoming message notifications.
Go back to the Twilio Console, click on Programmable SMS, then on WhatsApp, and finally on Sandbox. Copy the https:// URL from the ngrok output and then paste it on the “When a message comes in” field. Since our endpoint was defined under a /webhook URL, append that at the end of the root ngrok URL. In my case, the complete webhook URL is https://bbf1b72b.ngrok.io/webhook.
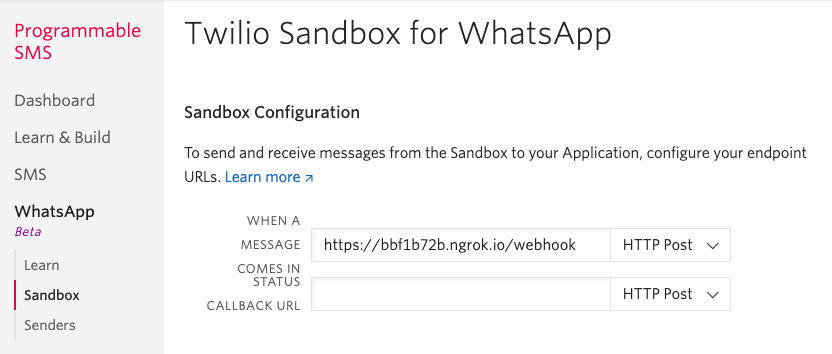
Make sure the request method is set to HTTP Post. Don’t forget to click the “Save” button at the bottom of the page to record these changes.
Now go to your smartphone and send a WhatsApp message to the WhatsApp sandbox number that you connected to earlier.
Sending a message
We now have seen how to receive messages and reply to them. The last remaining messaging feature we will need to use in our chess game is the ability to initiate a conversation with a player, as opposed to responding to a message initiated by them. We will use this to let a player know it is their turn to move after the other player sent their move.
Initiating a message to a user is done by contacting the Twilio APIs. The Twilio Helper Library provides a Client() object that provides Python wrappers for API calls.
The client object needs to authenticate against the Twilio service. The authentication credentials are imported directly from environment variables, so we are going to set those variables in the .env file of our project. Create a file named .env (note the leading dot) and enter the following contents in it:
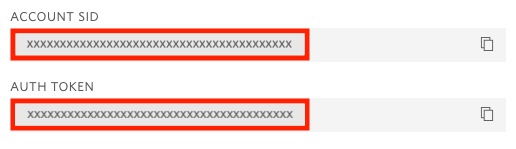
For the TWILIO_ACCOUNT_SID and TWILIO_AUTH_TOKEN variables, you can obtain the values that apply to your Twilio account from the Twilio Console:
For the TWILIO_NUMBER variable, use the number that was assigned to your WhatsApp sandbox. The format for this number is a whatsapp: prefix, followed by the E.164 representation of the phone number. In my case, the number is whatsapp:+14155238886. Yours might be different, so make sure you use the right number for your account.
The MY_NUMBER and FRIEND_NUMBER are the WhatsApp numbers for yourself and your chess-playing friend. These numbers are given in the same format as the previous one.
Now that we have the configuration in place, let’s send a message to ourselves from the Python shell:
With this short Python snippet we import the os package to read environment variables, the load_dotenv() function to import the variables we entered in the .env file, and the Client() class from Twilio to send a request to the Twilio API. The client.messages.create() function takes the sender’s number (our WhatsApp sandbox number), the recipient (your own WhatsApp number), and a message.
Check your WhatsApp to confirm that you have received the message. To avoid unsolicited messages, remember that the recipient phone number must have connected to the WhatsApp sandbox before messages are delivered. A WhatsApp session lasts 24 hours, so after that period has passed you will need to reconnect by sending the join message again.
As part of our chess game we will need to send an image of the chess board. To send an image along with your message, you can add the media_url argument to the client.messages.create() call, passing a publicly-accessible URL for the image. We will see later how to generate chess board images to use in our game.
Running a chess game with python-chess
In this section we’ll learn how to work with the python-chess package to manage a game of chess.
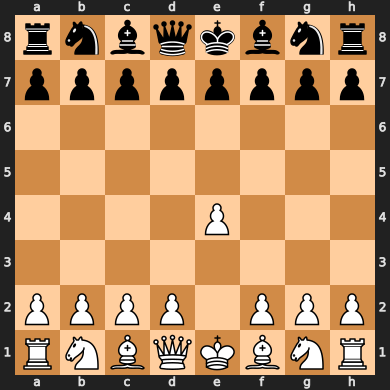
To create a new game with all the pieces set to the initial positions, we just create a chess.Board() object:
If you want to see the state of the game, we can generate the standard FEN (Forsyth-Edwards Notation) notation for the starting position of the board. The FEN notation encodes the position of all the pieces in the board, which player is to move next, and other aspects of the game such as castling and en-passant states.
To make a move, we create a chess.Move object, and then push it into the board object:
In this example I have entered the move e2e4 using a variant of the long algebraic notation, used by the Universal Chess Interface (UCI). This format is simple to learn, as it uses the coordinates of the start and end squares for the moved piece, with the square coordinates using a letter from a to h for the column, and a number from 1 to 8 for the row.
Almost all moves can be represented with these four characters. For castling moves, only the king’s movement is indicated. For a promotion, a fifth character is added with the promoted piece (q for a queen, r for a rook, and so on).
The most interesting aspect of our game is the nice chess board images that we are going to send to the players when it is their turn to move. The chess package comes with support for rendering a board object in the SVG (Scalable Vector Graphics) format, but this isn’t a format supported by Twilio, so we are going to use the cairosvg package to convert the SVG data to PNG.
Let’s make an image for our board` object from the example above:
You should now have a board.png file in your current directory with the image of the board.
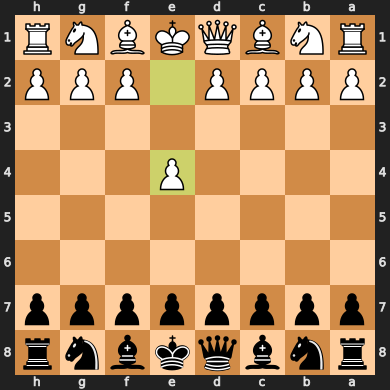
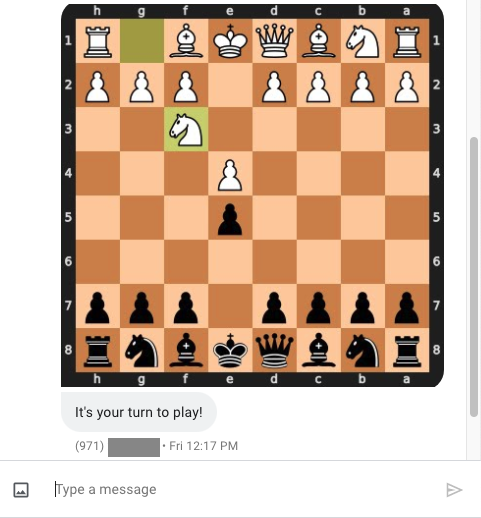
The chess.svg.board() function that renders the board to SVG has additional options. The lastmove option can be used to provide a move object. This highlights the start and end square. The flipped boolean can be set to True to render the board from the black player’s perspective.
Below is another call to render the board with the pawn move from e2 to e4 highlighted and in the correct orientation for the black player:
Later you will learn how to make these PNG image files available as URLs that we can use in the media_url argument of the message sending function.
Implementing a chess-playing webhook
Let’s go back to our webhook and start incorporating the messaging and chess functionality we have learned in the last two sections.
We are going to design our application as a “bot”. The players will send messages to the application that will be interpreted as commands that change the application state. This is going to include three possible commands:
playwill start a game. Any of the two players (configured with theMY_NUMBERandFRIEND_NUMBER) can send this command to initiate a game.resignwill end a game. Once again any of the players can send this when it is their turn to move.- A valid UCI move, such as
e2e4,e7e5, etc. When the application receives a move it applies it to the board, and then notifies the other player that it is their turn to move.
Let’s start a new version of app.py file. The imports and global definitions are shown below:
You should recognize most of the imports. The only ones we haven’t covered before are BytesIO, which we will use to render the PNG board images to memory instead of a file, and random, which we will use to randomly select who are the white and black players. We also have a new import from the Flask framework, the url_for() function, which we will use to generate the URLs for the board images, as you will see later.
We call load_dotenv() before we do anything else to import all the variables we have defined in the .env file. The app variable is our Flask application as before. We define a few more variables: client is our Twilio client instance, twilio_number is the number from which we will be sending messages, imported from the environment variable. The players list contains the two players, also imported from the environment variables. Finally, we’ll store the state of the game in the board variable.
We will use the respond() function that we tested above, so let’s add it to our app.py file:
Our /webhook endpoint is defined below:
This is longer than our previous version, so let’s go over the logic in detail.
We begin by getting the sender of the message in the player local variable. If the player is not any of the known players stored in the players list, then we send an error response and exit. We are only going to accept messages from the two players.
Then the opponent local variable is set to the other player for convenience, as we can now refer to player and opponent. The message is loaded with the body of the message as before.
Next we look at the message to see if we recognize the play or the resign commands. If the former, we call the new_game() function. For the latter we call resign_game(). If the message is neither, we assume it is a move.
Before we can apply the move we have to validate that we are in the correct state. If board is None that means that a game has not started yet, so we send an error message and exit. If the sender is not the player that moves next, we also send an error message. If our validation checks passed, then we try to create the move object and validate it against the board, catching errors in case the move is invalid or illegal. If we find the move is bad, then we return an error message and exit once again.
We finally apply the move to the board and invoke the send_move() function to notify the players that the game has advanced.
As you can see, we have pushed all the game logic into auxiliary functions. Let’s look at these functions one by one.
Creating a new game
Below is the definition of the new_game() function.
The function first validates that a game does not currently exist, and if one does then it exists with an error message. To create a new game we create a new chess.Board() instance, and then randomize the players list. We will assign players[0] to the white pieces and players[1] to the black.
At the end we call the send_move() function, which we have yet to define. This is to notify the white player that it is their turn to move. The response that goes out to the sender of the play message is an empty MessagingResponse object, since in this case there is nothing to say.
Ending the game
To keep this project simple the application does not detect end of game conditions such as checkmate or stalemate (though this could be an interesting addition that you can implement using the python-chess package to detect these states). The only way to end the game is when a player resigns. At this point we have to tell the other player that they won, and then reset the board variable back to None, leaving it ready to start another game if desired.
Notifying players when a move was made
Here is the most important function in this application, which tells the player who made a move that the move was accepted, and also tells their opponent that it is their turn to move.
This is a surprisingly short function, given the amount of complexity it packs. In this function we have to send two messages. The response to the player that made the move is in the last line, and is simple because we can use the respond() helper function.
The message that goes to the opponent uses the client.messages.create() function that we’ve seen before. This message includes the media_url argument, on which we invoke the url_for() function from the Flask framework to generate a URL for our board.
How do these URLs work? What we are going to do is add a second endpoint to our application, with the /board URL that returns board images. The url_for() call generates a URL for this endpoint, which Flask will know as render_board because that is the name of the function we are going to write for it.
The board-rendering endpoint will accept a few arguments. We will pass the FEN notation of the board we want to render in the fen argument, the move we want to highlight in last_move and the flip argument will be set to 1 if we want to render the board for the black player. These arguments are going to be given in the query string of the URL.
The URLs that render boards are going to be long due to the length of the FEN strings. An example URL can be https://bbf1b72b.ngrok.io/board?fen=rnbqkbnr/pppppppp/8/8/4P3/8/PPPP1PPP/RNBQKBNR+b KQkq+-+0+1&last_move=e2e4&flipped=1.
Generating board images
Here is the final piece of our application: the board-rendering endpoint we referenced in the send_move() function above.
The request.args dictionary from Flask is used to access the fen, flip and last_move query string arguments. With this information we can create a board object that matches the state of the game that is being requested, and then render it to PNG as we did before. For this function, however, we used a BytesIO memory string in the write_to argument, so that the PNG data is written to memory instead of a file.
The endpoint returns the PNG data directly, also setting the image/png content type in the response, so that Twilio knows we are sending an image.
Running the game
If you need to make sure you have all the code, see the complete and tested code in this gist.
If you aren’t running the Flask server anymore, start it again now:
If ngrok isn’t running, then start it in a second terminal:
Make sure that the WhatsApp endpoint is configured with the forwarding URL reported by ngrok. Each time ngrok restarts the URL changes, so you will need to go back to the Sandbox settings and update the notification webhook. Remember to add /webhook at the end of the ngrok forward URL.
Make sure that both you and your friend have connected to the WhatsApp sandbox in the last 24 hours. Then start WhatsApp on your phone and send play to the sandbox number. The application will select one of the players to play white and send them a board.
Start making moves in the UCI format and have fun playing chess with your friend!
Using SMS instead of WhatsApp
The last topic we are going to cover is how to use SMS instead of WhatsApp. The SMS and WhatsApp APIs are identical, so this application can easily be adapted to run on SMS and MMS.
First, you have to acquire a Twilio phone number with SMS capabilities. This is going to take the place of the WhatsApp sandbox. Use the Buy a Number page to find a number in your country and region that you like.
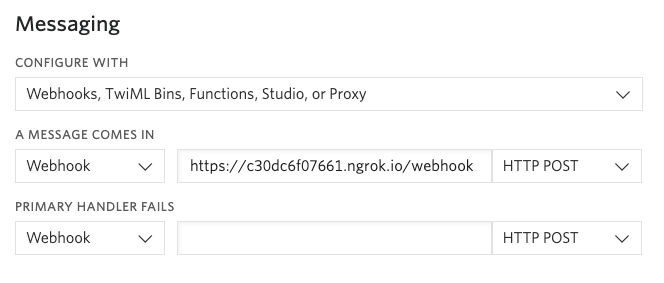
The webhook for incoming message notifications is configured separately for WhatsApp and SMS. To do it with your new Twilio phone number, select the number in the Phone Numbers page, scroll down to the “Messaging” section and enter the ngrok endpoint URL in the “When a message comes in” field.
Finally, open your .env file and replace all the WhatsApp numbers with regular numbers, still in E.164 format, but without the whatsapp: prefix.
Now restart the Flask application to have it use the updated environment variables and send messages to the Twilio number to play chess with your friend!
Conclusion
I hope this was a fun and interesting tutorial, and that you continue developing the game on your own. In particular, I see a few nice improvements that can be added:
- Detect when the game ends. The python-chess package can do this.
- Implement other turn-based games that you like. Random chess instead of standard chess should be very easy!
I’d love to see in which ways you extend this little project!
Miguel Grinberg is a Python Developer for Technical Content at Twilio. Reach out to him at mgrinberg [at] twilio [dot] com if you have a cool Python project you’d like to share on this blog!

Related Resources
Twilio Docs
From APIs to SDKs to sample apps
API reference documentation, SDKs, helper libraries, quickstarts, and tutorials for your language and platform.
Resource Center
The latest ebooks, industry reports, and webinars
Learn from customer engagement experts to improve your own communication.
Ahoy
Twilio's developer community hub
Best practices, code samples, and inspiration to build communications and digital engagement experiences.