Send WhatsApp Notifications with Python and Twilio
Time to read:
June 08, 2020
Written by
Reviewed by

Twilio makes it easy to send WhatsApp notifications to users directly from your Python application. In this tutorial we are going to build a simple product delivery form that sends WhatsApp notifications to customers regarding the delivery of their orders.
Tutorial requirements
To follow this tutorial you need the following components:
- Python 3.6 or newer. If your operating system does not provide a Python interpreter, you can go to python.org to download an installer.
- A smartphone with an active phone number and WhatsApp installed.
- A Twilio account. If you are new to Twilio create a free account now. If you use this link you’ll receive $10 in credit when you upgrade to a paid account (you can review the features and limitations of a free Twilio account).
- ngrok. We will use this handy utility to connect the Flask application running on your system to a public URL that is accessible on the Internet. This is necessary for the development version of the application because your computer is likely behind a router or firewall. If you don’t have ngrok installed, you can download a copy for Windows, MacOS or Linux.
Configure the Twilio WhatsApp Sandbox
Twilio provides a WhatsApp sandbox where you can easily develop and test your application. Once your application is complete you can request production access for your Twilio phone number, which requires approval by WhatsApp.
Let’s connect your smartphone to the sandbox. From your Twilio Console, select Programmable SMS and then click on WhatsApp. The WhatsApp sandbox page will show you the sandbox number assigned to your account, and a join code.
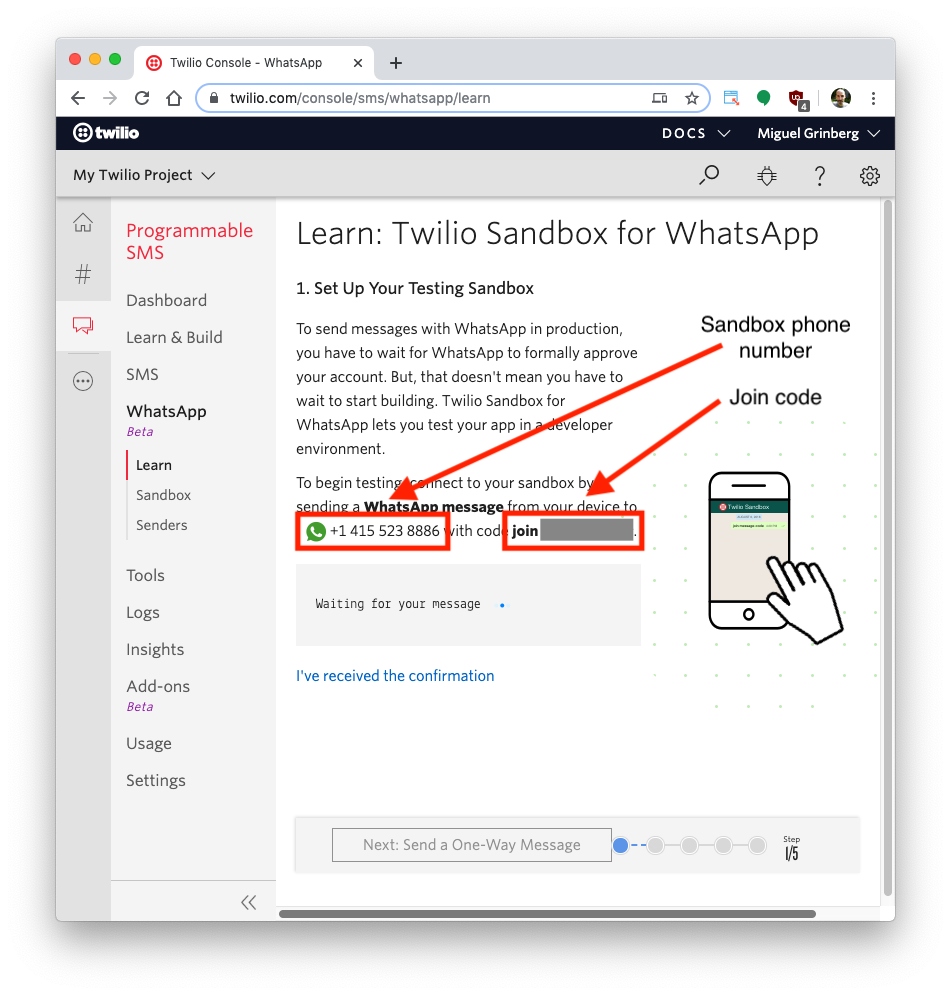
To enable the WhatsApp sandbox for your smartphone send a WhatsApp message with the given code to the number assigned to your account. The code is going to begin with the word join, followed by a randomly generated two-word phrase. Shortly after you send the message you should receive a reply from Twilio indicating that your mobile number is connected to the sandbox and can start sending and receiving messages.
Note that this step needs to be repeated for any additional phones you’d like to have connected to your sandbox.
Project creation
Following Python best practices, we are going to make a separate directory for our project, and inside of it, we are going to create a directory for our HTML templates and a Python virtual environment. Then we are going to install the Python packages that our application will use.
If you are using a Unix or Mac OS system, open a terminal and enter the following commands to do the tasks described above:
For those of you following the tutorial on Windows, enter the following commands in a command prompt window:
The last command uses pip, the Python package installer, to install the packages that we are going to use in this project, which are:
- The Flask framework, to create the web application
- The Twilio Python Helper library, to work with the Twilio APIs
- The Flask-WTF extension, to handle web forms
- The Bootstrap-Flask extension, to create a Bootstrap web page layout
- The phonenumbers package, to validate phone numbers
- The python-dotenv package, to read environment variables from a .env file
Configuration
For the project configuration we are going to use environment variables, which we can easily import into the project using the python-dotenv package. Create a file named .env (note the leading dot) and enter the following contents in it:
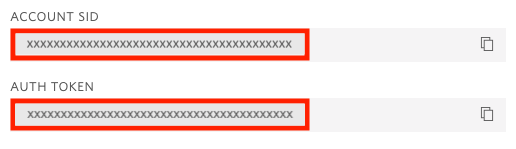
The TWILIO_ACCOUNT_SID and TWILIO_AUTH_TOKEN variables are going to provide authentication when we send requests to Twilio. You can obtain the values of these variables that apply to your Twilio account from the Twilio Console:
The TWILIO_NUMBER variable is the number that was assigned to your WhatsApp sandbox. The format for this number is a whatsapp: prefix, followed by the E.164 representation of the phone number. In my case, the number is whatsapp:+14155238886. Yours might be different, so make sure you use the right number for your account. Note that for an application that was granted production access by WhatsApp you will use the Twilio phone number associated with the application instead of the sandbox number.
Project initialization
We will code our application in a file named app.py so open this file in your code editor. Below you can see the initialization portion of our project, which includes the imports and the global variables:
Below the imports the first thing that we do is call the load_dotenv() function from the python-dotenv package. This function will read the variables defined in our .env file and incorporate them into the environment.
The COMPANY global variable has the name of the fictitious company that will be sending delivery notifications to customers. You can set this to any company name you like. The TWILIO_NUMBER variable has the phone number that will be sending these notifications, which we import directly from the environment variable of the same name.
The app variable is our Flask application instance. Since we will be using web forms in this project, we have to define a SECRET_KEY value in the Flask configuration that can be used by the Flask-WTF extension to provide CSRF protection. In a real application, this needs to be a unique and difficult to guess string, as it ensures forms and other parts of the application are protected against malicious attacks. The Bootstrap class initializes the Bootstrap-Flask extension, which gives us convenient access to the Bootstrap framework for the browser.
The twilio variable holds an instance of the Twilio client object, which we will use to make requests into the Twilio service to send our notifications. This Client() instance automatically looks up the TWILIO_ACCOUNT_SID and TWILIO_AUTH_TOKEN environment variables and uses them to authenticate all requests going out to Twilio.
Creating a base Bootstrap template
The HTML code that goes into a page has a large amount of boilerplate code that is the same regardless of the page that is being displayed. In Flask, we use template inheritance to avoid repeating these elements in every page. Below you can see the base template that we will use in this application. Write it as base.html in the templates directory:
This page layout is mostly copied from the Bootstrap-Flask documentation. In addition to the basic page layout I have included the intlTelInput JavaScript library, which provides a nice phone number field.Lastly, I added code to render flashed messages as Bootstrap alerts.
Note the {% block content %}{% endblock %} line. This block named content is where derived templates will insert their content.
Creating an order delivery form
To begin we are going to code a web form that accepts fictitious orders. To give you an idea of what we will be doing, here is how the completed form will look:

When using the Flask-WTF extension, web forms are coded as Python classes. Here is the OrderForm class that corresponds to the form you see above, which you can add at the bottom of our app.py file:
Each class attribute represents one of the fields of the form. In general we try to create each field using the appropriate field class, but for the phone number we are using a generic StringField because the intTelInput JavaScript library does the work of transforming it into a nice phone field. If you are interested in learning more about how to use this phone field in Flask applications, I have written a tutorial specifically for it.
The validate_phone() method provides custom validation logic for the phone number, which comes validated from the client-side, but as a good practice needs to be revalidated in the server. For this we use the phonenumbers package.
Let’s write a template for this form. Put the following template in the index.html file in the templates directory:
This template uses the inheritance feature of Jinja2 templates to inherit from the base.html template we created earlier. In a derived template we just need to define the blocks that the base template exports. The content block uses the render_form() macro from the Bootstrap-Flask package to render our form object, which we will pass as a template argument.
The scripts block is a place in the base template where we can insert custom JavaScript code. In this case we add the code necessary to initialize the phone number field with the intTelInput library. As mentioned above, if you are interested in learning how this field works in detail consult this tutorial.
Now that we have the form class and the template, we can create a route that renders the form. Add the following after the OrderForm class definition in app.py:
The index() function is associated with the root URL of our application through the app.route decorator. Because this endpoint will process form input, we make it accept the GET and POST request methods.
The function creates an instance of the form and then attempts to validate it. The validate_on_submit() method only returns True if form data is present and valid. In any other case it returns False. When the user opens the application the browser will issue a GET request, so form data is not going to be available. In that case we skip the conditional statement and go directly to the render_template() call, which returns the index.html web page with the rendered form.
When the user presses the submit button in the form, the browser will send a POST request and include all the form data. If the form validation on all these fields passes, then we can send a notification to the customer, and for this we call a send_delivery_notification() function, including the data received with the form. If the form data is invalid, we once again skip the conditional and re-render the form, to give the user a chance to fix the form and submit it again.
Sending WhatsApp notifications
The Twilio API for WhatsApp has two modes in which to communicate with users:
- To initiate a conversation with a user, only a pre-approved templated message can be sent. This is a measure to prevent spam in the WhatsApp platform.
- Once a user sends a message to your WhatsApp number, a session that lasts 24 hours is created during which non-templated messages can be sent.
Because the nature of our application requires us to initiate an interaction with users, we have to use a message template. By default, Twilio provides three pre-approved templates that we can use:
- Your {{1}} code is {{2}}
- Your {{1}} appointment is coming up on {{2}}
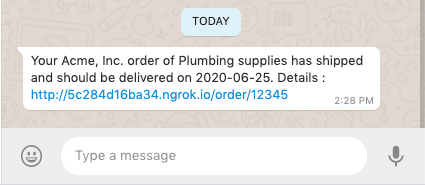
- Your {{1}} order of {{2}} has shipped and should be delivered on {{3}}. Details: {{4}}
If none of these templates work for you, you can request approval for your own custom template. For our order delivery application we are going to use the last of the three pre-approved templates.
The delivery message has four placeholders. We are going to use {{1}} for the company name, which we have in the COMPANY_NAME global variable. For {{2}} we are going to write the product name entered in the form. For {{3}} we’ll use the delivery date, also from the form. Finally for {{4}} we’ll generate an order link that the user can click to access more details about their order.
Let’s begin by creating an endpoint for these order links:
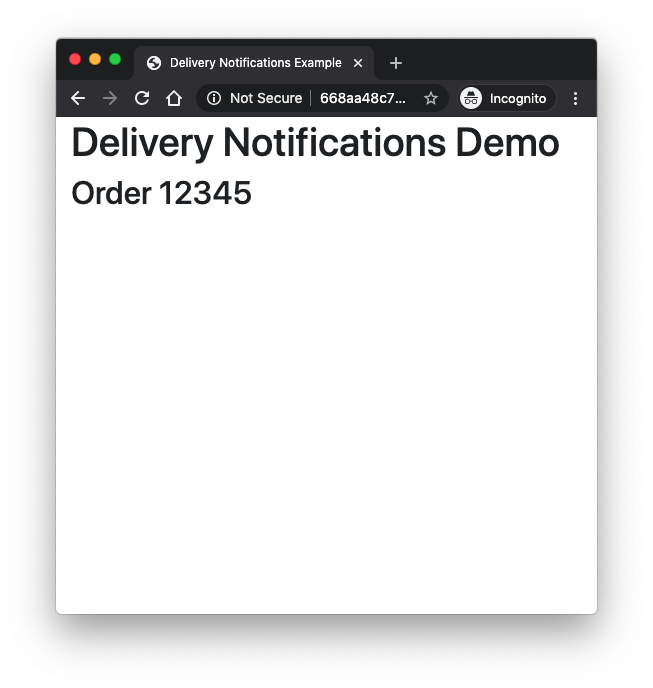
Since this is a made-up order system we’ll just render a simple page with the order number. In a real system you will retrieve order information from your database and populate the web page with it.
Place the order.html template referenced above in the templates directory:
As mentioned above, we are leaving this page as a placeholder for order information that would be retrieved from a database.
Below you can see the implementation of the send_delivery_notification() function. Replace the placeholder of this function added above with this implementation:
The order_url variable uses the url_for() function from Flask to generate an external URL for the order number entered in the form. The ’order’ argument to url_for() is the endpoint name, which Flask takes from the name of the view function.
The twilio.messages.create() function invokes the Twilio API to send a notification. The from_ argument indicates the number of the sender, which should be the WhatsApp sandbox number assigned to your account until you are approved to use your own Twilio phone number. The to argument is the number of the recipient. To send a message on WhatsApp the number must be prefixed with whatsapp: as well. The body argument includes the text of the message, which must follow the pattern of one of the pre-approved message templates so that we can send it as an initial message to the customer.
Testing the application
Ready to do some testing? Start the Flask application with the flask run command:
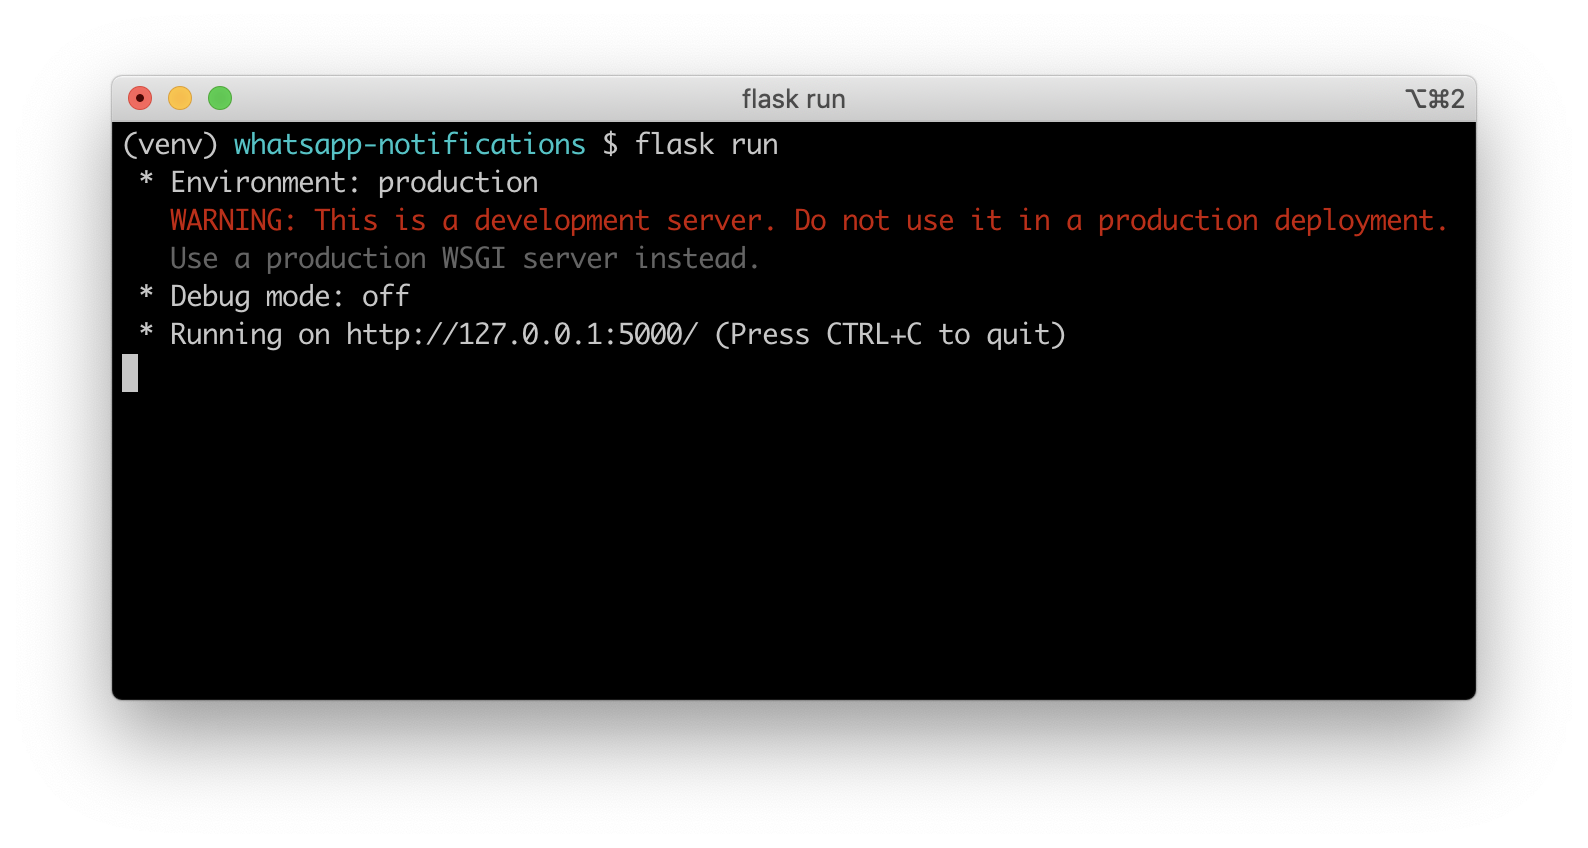
Now you have a web application running locally on your computer. Because we are going to be sending links that we want users to click, we need the application to be accessible from the Internet. During development, we can use the ngrok utility to create a temporary public URL for our application.
Leave the Flask application running and open a second terminal window. After you install ngrok, run ngrok http 5000 on this terminal. On a Unix or Mac OS computer you may need to use ./ngrok http 5000 if you have the ngrok executable in your current directory. The output of ngrok should be something like this:
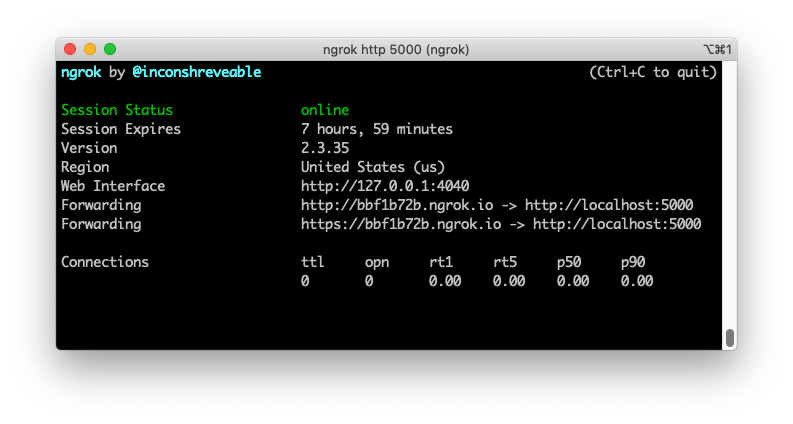
Note the lines beginning with “Forwarding”. These show the public URL that ngrok uses to redirect requests into our local application. Take either one of these URLs and enter it on your browser. In my case, I would enter http://bbf1b72b.ngrok.io, but in your case the URL is going to be different. Ngrok will randomly generate the first part of the URL every time it starts.
You should now have the order form in your browser:
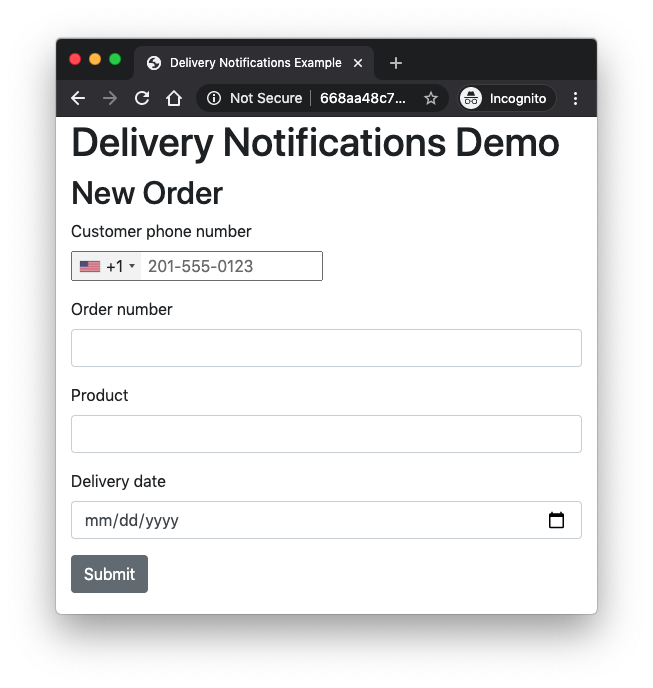
Fill out the details using your own mobile phone number and submit it. A few seconds later, you will receive a WhatsApp notification with the information you entered on the form. Keep in mind that while you use the WhatsApp sandbox, only phone numbers that joined the sandbox can be contacted.

You can click the link to open the placeholder order page we built into our application.
Conclusion
In this tutorial we have learned how to send notifications to WhatsApp users using pre-approved templated notifications. While this isn’t the topic of this tutorial, if the user responds to the message, then your application will be free from the template requirements for 24 hours and can interact freely with the user during that period. Consult the Twilio API for WhatsApp documentation for details on how to receive and respond to messages.
Are you interested in creating more cool projects with WhatsApp? We have many more WhatsApp tutorials!
Miguel Grinberg is a Python Developer for Technical Content at Twilio. Reach out to him at mgrinberg [at] twilio [dot] com if you have a cool Python project you’d like to share on this blog!


Related Resources
Twilio Docs
From APIs to SDKs to sample apps
API reference documentation, SDKs, helper libraries, quickstarts, and tutorials for your language and platform.
Resource Center
The latest ebooks, industry reports, and webinars
Learn from customer engagement experts to improve your own communication.
Ahoy
Twilio's developer community hub
Best practices, code samples, and inspiration to build communications and digital engagement experiences.