Setting up React for ES6 with Webpack and Babel
Time to read:
August 17, 2015
Written by
This post is part of Twilio’s archive and may contain outdated information. We’re always building something new, so be sure to check out our latest posts for the most up-to-date insights.

ReactJS has been taking the world of front end development by storm. Described by its own homepage as the V in MVC, React allows you to build reusable UI components and makes maintaining changes in your data’s state effortless by abstracting the DOM. Combined with a bundler utility like Webpack, React greatly simplifies building and maintaining Single Page Applications.
Take the Twilio Javascript library for a spin here
Facebook has done a great job of keeping React up to date, and even made it compatible with new features from ECMAScript 6 (ES6), the significant update to the JavaScript language that is finally available for use. Unfortunately, browser support for ES6 is not as widespread as many would hope which is where handy utilities like Babel come into play. Babel lets us write code that uses new ES6 features, and then transpiles that code into standard ES5 code that can run in older JavaScript environments.
In this post, we’ll go through the steps of setting up two basic React components that use ES6 features, use Babel to transpile them to ES5 and bundle them using Webpack. This is going to be fun because React, ES6, Babel and Webpack play together particularly well.
Visiting the toolshed
Before we get started writing code we have to install the right tools. First make sure you have NodeJS and npm installed as we’ll use those to install the packages we need.
With Node and npm installed fire up your terminal, head over to the directory where you want your project to live and run:
Go through all of the prompts filling out whatever information you feel is appropriate and a package.json file should be generated. This will allow us to keep track of what node modules we need for future reference.
Now let’s install React and the React DOM:
We will also need to install Webpack and the Webpack development server for serving our bundled JavaScript application. You may need to use “sudo” to install the dev server package globally.
Now that our bundling tool is taken care of, we need a transpiler for interpreting our ES6 code. This is where Babel comes in. Let’s install the babel-loader and babel-core packages that we’ll use to work with Webpack, as well as the ES2015 and React presets for loading the code that we’ll write.
Creating your first React components
In React, components are the individual building blocks of how your data is viewed. You write components to handle how your data should look and to automatically render state changes. When you create a component, you define all of this by overriding React.Component’s render function.
Let’s dig into this by writing our first component whose job is to render the word “Hello” into the browser.
Open up a new file called “hello.jsx” in your text editor and enter this code:
There are a couple of things to note about the syntax. First off, we have ES6 import statements and class definitions, which makes our code more concise by not having to call React.createClass. But there is also some funky looking inline HTML type stuff in the component class definition’s render function. This XML-like syntax being returned from the function is called JSX. It was designed to make building React components easier because it is concise and familiar for defining tree structures with attributes.
All of this new syntax might look a bit strange, but don’t worry because in just a bit well use Babel to transpile both the ES6 syntax and the JSX syntax into ES5 JavaScript that can be run in a browser.
Here is what our Hello React component looks like without using ES6 and JSX:
When we use JSX, we are able to define our virtual DOM element more concisely without having to call React.createElement and passing which attributes the element should have. Our simple Hello component may have the same number of lines of code but JSX makes things much easier as you continue building components and combine them together.
Now that we have our component class, we need to add some code to “mount” this component to a DOM element. This will take our React component and render it to display within an element of an HTML page. To do this we import the React DOM and call its render function, passing in a component object as well as an actual DOM element to attach to.
Open up “hello.jsx” once again and add these lines:
Now let’s create our second component whose job is to render the word “world”. Create a new file called “world.jsx” and add the following code. Notice that it’s eerily similar to the code we wrote for our first component:
So we have two React components, but nowhere to use them. Let’s fix this by writing a simple HTML page that contains a
for each component we want to mount. Create an “index.html” file and write this bare bones web page:
We’ve now created all of the code we need to display “Hello World” in a browser using React components. The final step in getting this code ready to run is to pass it through Webpack.
Bundling everything with Webpack
Webpack is a module bundler that takes assets such as CSS, images or JavaScript files with lots of dependencies and turns them into something that you can provide to a client web page. It uses loaders that you specify in your configuration file to know how to transpile these assets. In our case, we want to transpile the JSX to JavaScript and ES6 code to browser-compliant ES5 code. We can do this by providing a JavaScript file as an entry point for Webpacks loader pipeline. Webpack will analyze this file and all of the subsequent dependencies used in your code to generate a bundle for you to include in your HTML. To tell Webpack about our React components, all we need to do is import those JavaScript files.
Create a “main.js” file in your text editor and add code to import both of the React components we made:
Next we need to tell Webpack that this will be our entry point and which loaders to use when creating the bundle. We are only using the Babel loader, but we could use other loaders for things like CoffeeScript and SASS if we had other dependencies.
Fire up your text editor one more time and create a new file called “webpack.config.js” and add the following configuration:
Finally, we need to make one more small modification to our HTML to include the “bundle.js” file that will be generated when we run the Webpack dev server:
Let’s fire up the Webpack dev server to see our components on the page live in action:
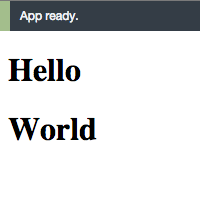
Watch as your terminal comes alive while Webpack builds your code to run in-browser. Now that the dev server is running, you can navigate to “http://localhost:8080/webpack-dev-server/” in your browser to see your Hello World React app displayed beautifully on the page.
What comes next?
We’ve just built two React components using Babel for JSX and ES6 syntax and bundled them together using Webpack. This may not seem like much, but it is a solid start on the path to building bigger single page applications. You’ve now overcome the hurdle of getting a bunch of new technologies to work together and can finally start making awesome stuff with React.
If you want to dive into building an actual React application, you can check out this other hands on blog post I wrote recently about building a dashboard with React for monitoring phone calls using the Twilio REST API.
I’m looking forward to seeing what you all build. Feel free to reach out and share your experiences or ask any questions.
- Email: sagnew@twilio.com
- Twitter: @Sagnewshreds
- Github: Sagnew
- Twitch (streaming live code): Sagnewshreds


Related Resources
Twilio Docs
From APIs to SDKs to sample apps
API reference documentation, SDKs, helper libraries, quickstarts, and tutorials for your language and platform.
Resource Center
The latest ebooks, industry reports, and webinars
Learn from customer engagement experts to improve your own communication.
Ahoy
Twilio's developer community hub
Best practices, code samples, and inspiration to build communications and digital engagement experiences.